You’ve probably seen the distinctive blue glow of an argon welding arc and wondered exactly how this precise welding technique creates such clean, high-quality joints. Gas Tungsten Arc Welding (GTAW), commonly called TIG welding, relies on a clever combination of physics and engineering to fuse metals without atmospheric contamination. At its core, argon welding works by using a non-consumable tungsten electrode to create an electric arc while surrounding the weld zone with inert argon gas that blocks oxygen and nitrogen from weakening your joint. This process gives you unparalleled control over thin materials like aluminum, stainless steel, and copper alloys—making it the go-to method for aerospace components, bicycle frames, and critical piping systems where weld integrity matters most. Understanding how argon welding works reveals why professional fabricators tolerate its steep learning curve to achieve welds that other processes simply can’t match.
Why Argon Gas Creates Superior Weld Protection
The magic of argon welding begins with the shielding gas itself, which performs three critical functions beyond simply blocking atmospheric contamination. When you strike the arc, argon transfers heat efficiently from the tungsten electrode to your workpiece while simultaneously stabilizing the arc column against fluctuations in torch distance. Unlike carbon dioxide used in MIG welding, argon won’t react with molten metal even at extreme temperatures—preventing the porosity and oxidation that ruin weld strength. For aluminum and magnesium projects, pure argon works best with alternating current to provide that essential oxide-removing cleaning action during the electrode-positive portion of each cycle.
Critical gas flow factors you must control:
– Too little flow (under 15 CFH) allows atmospheric contamination
– Too much flow creates turbulence that sucks in ambient air
– Windy conditions require 25-30 CFH versus 15-20 CFH indoors
– Nozzle-to-work distance should stay under 3/8 inch for effective coverage
The argon shield’s effectiveness depends entirely on your technique—hold the torch too far from the workpiece and you’ll see telltale pinholes appear in your weld bead as oxygen infiltrates the cooling metal. This is why experienced welders keep the nozzle within comfortable reach while maintaining that perfect 10-15 degree torch angle.
Step-by-Step Argon Welding Mechanics

How the Non-Consumable Tungsten Electrode Works
Unlike MIG welding where the wire melts into the joint, argon welding uses a tungsten electrode that stays intact thanks to tungsten’s incredibly high melting point (3,422°C). When you press the foot pedal, a high-frequency generator creates a spark through the argon cloud—ionizing the gas and establishing an electrical pathway without touching the workpiece. This is why you can maintain that critical 1.5-3mm arc length while feeding filler rod with your other hand.
The real physics magic happens in the plasma column between electrode and workpiece, where electrical resistance generates temperatures up to 20,000°F—hot enough to melt any commercial metal. Crucially, most heat transfers through Joule heating from current flow rather than radiation, giving you precise control over penetration depth. As you move along the joint, the circular torch motion you develop creates a stable molten pool while your filler rod feeds rhythmically—dipping in and out while staying within the protective argon cloud.
Perfecting the Filler Metal Technique
Your filler rod handling makes or breaks argon weld quality. For aluminum projects, keep the rod slightly farther from the arc since it melts at lower temperatures, but never let it exit the argon shield where oxidation would contaminate your weld. Watch for these visual cues:
– A shiny, fluid weld pool indicates proper heat and gas coverage
– Dull, sluggish metal suggests contamination or insufficient heat
– Excessive spatter means your travel speed is too slow
As you approach the end of a weld, gradually reduce current to prevent crater cracks—those stress concentration points that become failure initiators under load. This controlled cooldown is why argon welding produces joints that pass rigorous non-destructive testing where other methods fail.
Critical Equipment Setup for Successful Argon Welding
Choosing the Right Torch Configuration
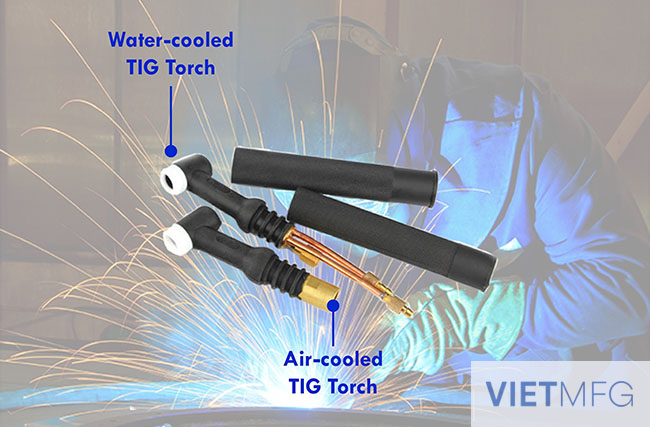
Your torch selection directly impacts weld quality based on current requirements:
– Air-cooled torches work for jobs under 200 amps (ideal for hobbyists)
– Water-cooled systems handle 200-600 amps for production welding
– Nozzle diameter should be 3x your electrode size (e.g., 3/8″ nozzle for 1/8″ electrode)
The gas lens inside your torch matters more than most beginners realize—it creates a laminar gas flow that prevents turbulence and extends your effective shielding zone. Install one if you’re welding outdoors or in drafty shops where standard nozzles struggle to maintain protection.
Polarity Settings That Make or Break Your Weld
DCEN (Direct Current Electrode Negative) delivers 70% of heat to your workpiece—perfect for steel and stainless steel jobs with thoriated tungsten electrodes ground to a sharp point. AC mode alternates polarity to provide cleaning action on aluminum’s oxide layer while preventing tungsten overheating. Modern inverters let you adjust the “balance control” to fine-tune how much time spent in electrode-positive (cleaning) versus electrode-negative (penetration) mode.
For thin aluminum under 1/8 inch, use higher frequency AC (150-250 Hz) for a tighter, more stable arc. Thicker sections benefit from lower frequencies (60-120 Hz) that increase cleaning action. Always match your tungsten type to the polarity—zirconiated electrodes handle AC better than thoriated types that can “spit” particles into your weld.
Avoiding Costly Argon Welding Mistakes

Diagnosing Common Weld Defects
When porosity appears in your argon welds, check these three culprits first:
1. Insufficient gas flow or excessive torch height
2. Contaminated base metal (oil, oxide, moisture)
3. Wind disrupting the shielding gas envelope
Tungsten inclusions—visible as dark spots on X-rays—mean you’ve either touched the electrode to the weld pool or exceeded its current capacity. Never dip your tungsten into the molten metal; if contamination occurs, shut down and grind the tip with a diamond wheel before resuming.
Material-Specific Preparation Requirements
Aluminum demands special attention since its oxide layer reforms within minutes of cleaning. After wire brushing with stainless steel:
– Wipe with acetone to remove oils
– Weld within 30 minutes before oxide redevelops
– Preheat thick sections to 175-200°C for better penetration
For stainless steel, remove all sulfides and chlorides that cause corrosion later. Use a dedicated stainless steel brush that never touches carbon steel—cross-contamination creates galvanic corrosion sites that compromise your entire assembly.
Advanced Argon Welding Techniques for Professionals
Pulsed-Current Welding for Thin Materials
When welding sheet metal under 1/16 inch, switch to pulsed mode where current rapidly cycles between high (pulse) and low (background) settings. This technique:
– Reduces heat input by 30-40% compared to constant current
– Minimizes distortion on thin panels
– Allows higher travel speeds without burn-through
Set your pulse frequency between 0.5-25 Hz depending on material thickness—lower frequencies work better for thicker metals while higher pulses control thin materials. The background current should maintain just enough heat to keep the pool liquid between pulses.
Mastering the Aluminum Welding Process
For flawless aluminum welds:
– Use pure argon with 2% zirconiated tungsten
– Set AC frequency to 120 Hz for most applications
– Hold a consistent 1/8″ arc length (critical for stability)
– Add filler rod only to the leading edge of the pool
Watch for the “wet” appearance of properly shielded aluminum—dull or sandy textures mean oxygen intrusion. If your weld bead develops black soot, increase cleaning action by adjusting balance toward electrode-positive mode.
Final Argon Welding Takeaways
Understanding how argon welding works reveals why this method produces the highest-quality welds across critical industries despite its complexity. The inert gas shield prevents oxidation that weakens joints, while the separate filler rod gives you precise control over weld composition. By mastering torch angle, arc length, and gas flow for your specific material, you’ll create joints that pass X-ray inspection where other methods fail.
Key maintenance tips to extend your GTAW success:
– Replace contaminated tungsten electrodes immediately
– Clean nozzles after each use to prevent gas flow restrictions
– Store filler rods in airtight containers to prevent oxidation
– Check gas hose connections regularly for leaks
When executed properly, argon welding delivers the cleanest, strongest welds possible—making it worth the investment for any serious fabricator. Start with simple steel joints to build your coordination before tackling aluminum, and remember that perfecting this skill takes deliberate practice. Your patience will pay off with welds that showcase both structural integrity and aesthetic precision.
Leave a Reply