A dead welding helmet battery can transform what should be a safe, efficient welding session into a hazardous situation with compromised visibility and protection. Auto-darkening welding helmets rely on properly charged batteries to function correctly, yet many welders struggle with inconsistent performance due to improper charging techniques or maintenance oversights. Whether you’re working on precision automotive repairs or large-scale construction projects, understanding the exact charging requirements for your specific helmet model ensures you maintain optimal eye protection and workflow efficiency. This guide cuts through the confusion to deliver precise, actionable instructions for charging any auto-darkening welding helmet correctly the first time.
Locating and Identifying Your Helmet’s Battery System
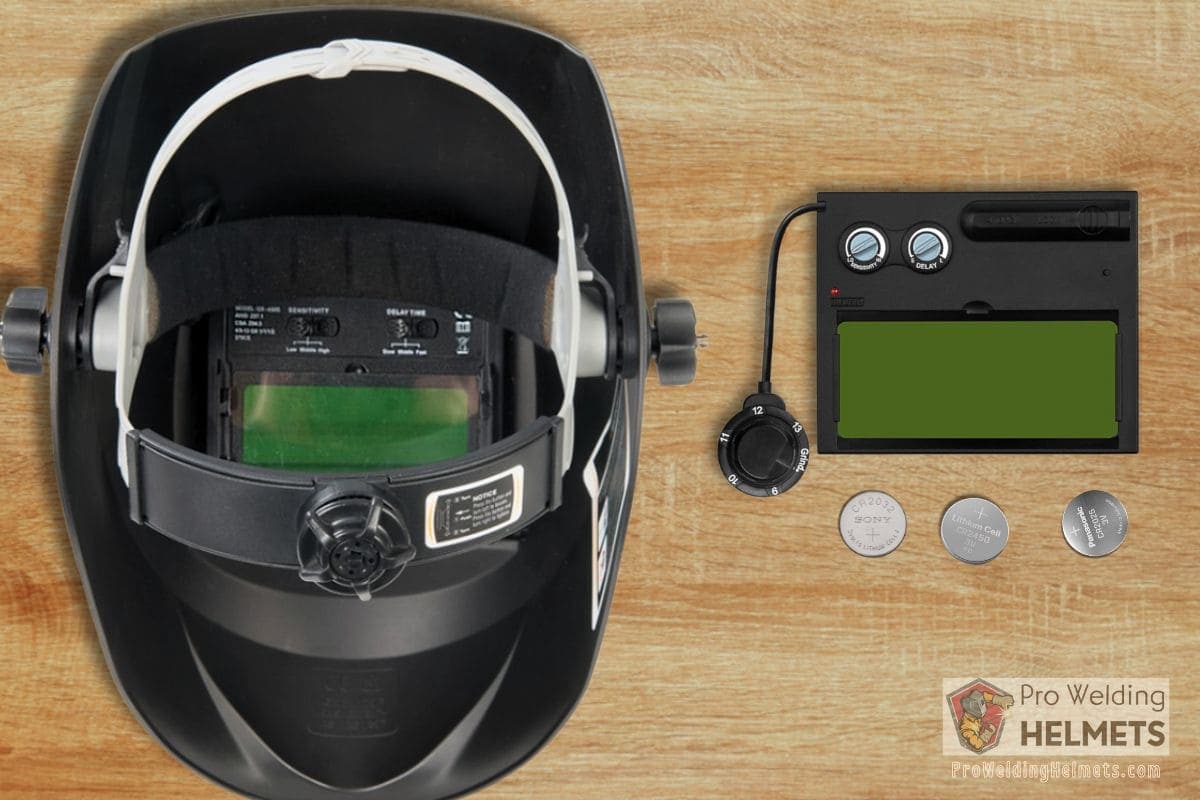
Before connecting any charger, you must determine your welding helmet’s specific power configuration, as charging methods vary significantly between battery types. Modern auto-darkening helmets primarily use lithium-ion batteries, nickel-metal hydride (NiMH) units, or solar-assisted hybrid systems—each requiring distinct charging approaches. Lithium-ion batteries dominate premium models with their 8-20 hour runtime and lightweight design, while NiMH options remain common in budget-friendly helmets. Solar-assisted systems incorporate photovoltaic cells that supplement battery power but cannot fully recharge depleted units through sunlight exposure alone.
Finding your helmet’s battery compartment typically involves checking behind the headgear adjustment mechanism or within the helmet shell itself. High-end models like the Lincoln Electric Viking 3350 feature externally accessible battery packs connected via coiled cords, while budget options such as the Jackson Safety Warrior often conceal batteries beneath protective covers on the helmet’s rear. Always consult your manufacturer’s manual for exact battery location and type before proceeding—attempting to charge an incompatible battery system can trigger safety cutoffs or permanently damage internal circuitry.
What to Do When You Can’t Find the Battery Compartment
If your helmet lacks visible battery access points, it likely uses a solar-assisted system with permanently installed cells. Helmets like the Miller Digital Elite rely primarily on solar power with battery backup, requiring no manual charging under normal conditions. However, if the auto-darkening function fails in low-light environments, check for a small charging port typically positioned near the helmet’s temple area. These models often include a micro-USB or proprietary connector for emergency battery top-ups when working in poorly lit conditions where solar charging proves insufficient.
Step-by-Step Lithium-Ion Battery Charging Procedure
Lithium-ion batteries power most premium welding helmets and require precise charging protocols to maximize lifespan and performance. Begin by powering off your helmet completely—many models like the Hobart Ranger continue drawing minimal power even when seemingly inactive, which interferes with proper charging. Locate the charging port, usually a 2.5mm or 3.5mm DC jack positioned on the helmet’s side or integrated into the battery compartment cover. Remove any rubber protective caps, then firmly insert the manufacturer-provided charger until you feel slight resistance indicating secure connection.
How to Verify Proper Charging Connection
A solid red indicator light confirms active charging on most helmets, but some models like the ESAB Sentinel A50 display intermittent blinking patterns during initial connection. If no indicator activates within 30 seconds, disconnect and inspect both the charger plug and port for debris—welding spatter accumulation commonly blocks proper contact. Clean ports gently with compressed air followed by a cotton swab dipped in isopropyl alcohol, allowing complete drying before reattempting connection. Never force the charger plug, as misalignment can bend delicate internal contacts requiring professional repair.
Charging Duration and Completion Indicators
Lithium-ion batteries typically require 2-4 hours for full recharge from complete depletion, though larger capacity units in helmets like the Lincoln Electric Viking 1350 may need up to 6 hours. The charging indicator will change from red to green or blue when complete—never rely solely on elapsed time as environmental factors affect charging speed. Disconnect the charger immediately upon full charge indication; while modern lithium systems prevent dangerous overcharging, prolonged connection accelerates battery degradation. Always unplug from the wall outlet first to prevent electrical surges through the cable during disconnection.
NiMH Battery Charging: Special Considerations

Nickel-metal hydride batteries found in helmets like the Jackson Safety Warrior require fundamentally different charging approaches than lithium-ion units. These older technology batteries benefit from occasional full discharge cycles to prevent memory effect, though modern low-self-discharge variants have minimized this concern. NiMH units typically need 6-12 hours for complete recharge and generate noticeable warmth during the process—excessive heat indicates potential problems requiring immediate disconnection.
Temperature Management During NiMH Charging
NiMH batteries perform best when charged in ambient temperatures between 50-85°F (10-30°C). Charging below 40°F (4°C) significantly reduces efficiency, while temperatures above 95°F (35°C) accelerate internal degradation. If the battery becomes uncomfortably hot to touch during charging, disconnect immediately and allow it to cool for 30 minutes before resuming. Never charge NiMH batteries overnight without automatic shutoff capability—set a physical timer as backup since these units suffer permanent capacity loss from overcharging.
Solar-Assisted Charging Realities
Many welders mistakenly believe solar-powered helmets recharge fully through sunlight exposure alone, but helmet-mounted photovoltaic cells primarily provide operational power rather than meaningful battery recovery. The small surface area limits solar charging to approximately 1-2% capacity per hour of direct sunlight—enough to maintain charge during outdoor welding but insufficient for reviving depleted batteries. Models like the Miller Digital Elite require at least 4 hours of direct sun to gain only 20% charge from complete depletion.
Maximizing Solar Charging Efficiency
Position your helmet with the lens facing directly toward the sun during breaks for optimal solar absorption. Outdoor welders should store helmets on reflective surfaces like aluminum sheets to increase light exposure from multiple angles. For substantial solar recharging, consider aftermarket solar panels designed specifically for welding helmets, which offer 3-5 times the charging speed of integrated cells when properly positioned. Remember that solar charging works best as a maintenance strategy during extended outdoor projects rather than a primary charging method.
Troubleshooting Common Charging Failures

When your welding helmet refuses to charge despite following proper procedures, systematic troubleshooting prevents unnecessary battery replacements. First, test the wall outlet with another device to rule out power issues—many shop outlets have GFCI protection that trips unexpectedly. Next, inspect the charger cable for internal breaks near the plug or connector, which often cause intermittent charging. If the charger works with another helmet, the problem likely lies with your helmet’s charging port or internal circuitry.
When to Replace Batteries vs. Chargers
Battery lifespan typically ranges from 2-3 years or 300-500 charge cycles before significant capacity degradation occurs. If your helmet operates for less than 2 hours after full charging despite proper maintenance, battery replacement becomes cost-effective compared to continued charging frustrations. Always purchase manufacturer-approved replacements—aftermarket batteries frequently lack proper voltage regulation, causing erratic auto-darkening performance or complete helmet failure during critical welding operations.
Critical Safety Practices During Charging
Charging welding helmets requires specific safety protocols often overlooked in workshop environments. Always charge on non-flammable surfaces away from welding gases, solvents, or flammable materials—battery failures, while rare, can trigger thermal runaway events generating intense heat. Never charge helmets inside enclosed spaces like toolboxes where heat buildup could occur, and avoid charging near water sources that might cause electrical hazards.
Recognizing Dangerous Battery Conditions
Immediately discontinue use and replace any battery showing physical swelling, unusual odors, or electrolyte leakage. Swollen batteries indicate internal gas buildup from chemical breakdown and pose serious fire risks if subjected to further charging cycles. Store replacement batteries in original protective cases away from metal objects that could cause short circuits—loose batteries in toolboxes frequently contact wrenches or screwdrivers, creating dangerous arc flash situations.
Proper welding helmet charging extends beyond simply connecting a cable—it’s a critical safety practice affecting your eye protection during every welding session. By implementing these precise charging techniques tailored to your specific helmet model, you ensure reliable auto-darkening performance while maximizing battery lifespan. Establish a regular charging schedule that prevents deep discharges, store batteries at partial charge during extended downtime, and always use manufacturer-approved equipment to maintain optimal performance. When charging issues arise, systematic troubleshooting helps distinguish between simple connection problems and genuine component failures requiring replacement. Remember that consistent battery care represents a small investment of time that pays significant dividends in workplace safety and welding precision. Your eyes deserve nothing less than perfectly functioning protection—make proper helmet charging an indispensable part of your welding routine today.
Leave a Reply