When your plumbing system develops a leak, your custom exhaust needs modification, or you’re building a structural frame, knowing how to cut and weld pipe properly becomes critical. Many DIYers make the mistake of rushing these processes, resulting in weak joints that fail prematurely. This guide delivers actionable techniques that produce professional-quality results regardless of your experience level. By following these specific methods for cutting and welding various pipe materials, you’ll create joints that withstand pressure, vibration, and environmental stresses for years to come.
Selecting the Right Pipe Cutting Tool for Your Material

Choosing inappropriate cutting equipment causes jagged edges, oval-shaped pipes, and wasted materials. Match your cutting method precisely to the pipe type and diameter for optimal results.
Hacksaw Techniques for Clean Manual Cuts
For pipes under 2 inches in diameter, a quality hacksaw delivers surprisingly professional results when used correctly. Start by securing the pipe in a vise with the marked cut line positioned just above the jaws to prevent vibration. Use a fine-tooth blade (32 teeth per inch) for copper and PVC, switching to a bi-metal blade for steel pipes. Begin with light pressure to establish a groove at a 90-degree angle to the pipe, then increase pressure slightly while maintaining 40-60 steady strokes per minute. When cutting through the final section, support the cutoff piece to prevent blade binding. After cutting, use a deburring tool to remove sharp edges inside and outside the pipe—this step prevents fitting damage and ensures smooth flow in plumbing applications.
Precision Cutting with Pipe Cutters for Plumbing Projects
Standard pipe cutters create perfect 90-degree cuts on copper and steel pipes up to 2 inches without deforming the pipe. Position the cutter so the cutting wheel contacts your marked line, then tighten the adjustment knob until firm resistance is felt. Rotate the cutter around the pipe while applying steady pressure, tightening the knob a quarter-turn after each full rotation. This gradual approach prevents crushing thin-walled tubing. When the pipe separates, rotate the cutter backward to release it cleanly. Immediately deburr both ends using the built-in reamer—skip this step and you’ll struggle with fitting installation and create turbulence points in fluid systems.
Power Tool Methods for Large-Diameter and Structural Pipes
For pipes over 2 inches or structural steel applications, reciprocating saws and angle grinders dramatically reduce cutting time. When using a recip saw, select a bi-metal blade with 18-24 teeth per inch and clamp the pipe securely on both sides of your cut line. Guide the saw shoe against the pipe for stability while maintaining smooth, controlled strokes. Angle grinders require 1/8-inch cut-off wheels and careful technique—hold the grinder perpendicular to the pipe and apply light, consistent pressure while moving continuously around the circumference. Both methods generate intense sparks, so clear all flammable materials from your work area and wear full-face protection. After cutting, grind the edges smooth to eliminate sharp burrs that could compromise weld integrity.
Proper Pipe Preparation Before Welding

Skipping preparation causes 90% of pipe welding failures through contamination, poor fit-up, and inadequate penetration. These steps transform ordinary welds into leak-proof, structurally sound joints.
Creating the Perfect Bevel for Maximum Penetration
The bevel angle directly impacts weld strength and appearance. For pipes under 1/4 inch thick, a square butt joint works with minimal gap (1/16 inch). Thicker materials require a 30-37.5 degree bevel on each side, leaving a 1/16 to 1/8 inch root gap. Use an angle grinder with a beveling attachment or specialized pipe beveler to create consistent angles—hand grinding often produces uneven bevels that cause incomplete fusion. Check your bevel angle with a welder’s gauge to ensure consistency around the entire circumference. The bevel should expose shiny, clean metal without heat discoloration that indicates excessive grinding heat.
Achieving Perfect Alignment for Leak-Proof Joints
Misaligned pipes create stress points that cause premature failure under pressure. Clamp pipes in a vise or alignment fixture, then check concentricity by placing a straight edge against both pipes at multiple points around the circumference. For critical applications, use an internal pipe alignment clamp that centers both pipes from the inside. Tack weld at 12, 3, 6, and 9 o’clock positions with 1/2-inch welds—these tacks must be strong enough to maintain alignment during welding but small enough to incorporate into the final weld. Before proceeding, check alignment again by rotating the pipes to ensure consistent gap spacing throughout.
Eliminating Contaminants That Cause Weld Failure
Oil, rust, and mill scale create porosity that weakens welds and causes leaks. Clean at least 1 inch of material on both sides of the joint using a stainless steel wire brush dedicated to your specific material type—using the same brush on different metals causes cross-contamination. For stubborn rust or mill scale, follow brushing with a solvent wipe using acetone or denatured alcohol. Never use compressed air alone—this merely spreads contaminants. When working with galvanized pipe, completely remove the zinc coating from both sides of the joint using a grinder—the zinc fumes produced during welding are extremely toxic.
Master Pipe Welding Techniques for Different Positions
Welding pipe in various positions requires specific techniques to overcome gravity’s effect on the molten weld pool. These methods ensure complete penetration regardless of orientation.
Root Pass Techniques for Complete Joint Penetration
The root pass determines overall weld strength, so perfect execution is critical. For 1G (rotated pipe) positions, maintain a 10-15 degree travel angle away from your direction of travel with a consistent 1/8-inch arc length. Use a slight weaving motion that pauses briefly at each edge to ensure fusion without undercut. In 5G (fixed horizontal) positions, weld at the 4 and 8 o’clock positions where gravity assists bead control—avoid welding at the 6 o’clock position where gravity pulls the weld pool downward causing sagging. Maintain a travel speed that produces a slightly convex bead with distinct overlapping ripples—too fast creates a narrow, high bead with potential lack of fusion.
Fill and Cap Passes for Smooth, Strong Top Layers
After completing the root pass, clean thoroughly with a stainless steel brush before adding fill passes. For fill passes, increase your travel speed slightly while maintaining consistent weave width—typically 2-3 times your electrode diameter. Use a crescent or zigzag weave pattern that provides adequate side-to-side coverage without excessive width. For the cap pass, reduce your amperage by 10-15% to prevent burn-through and use a tight weave pattern that slightly overlaps the base metal on both sides. Maintain a slight drag angle (5-10 degrees) to achieve proper bead wetting and avoid undercut. Practice on scrap pipe to develop the muscle memory for consistent travel speed and weave pattern.
Avoiding Costly Mistakes That Compromise Weld Integrity
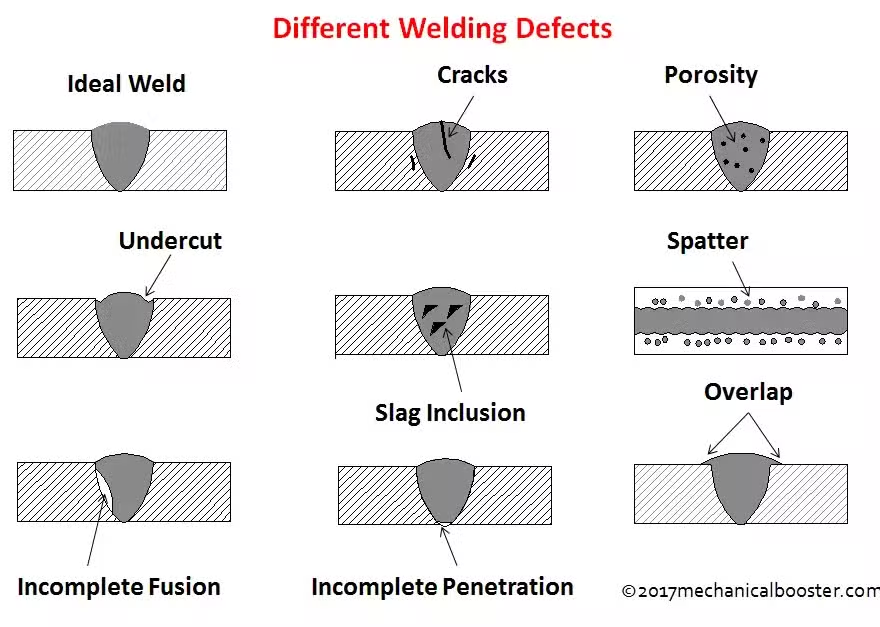
Even experienced welders fall victim to these common errors that create hidden weaknesses in pipe joints.
The Critical Importance of Proper Cleaning Between Passes
Skipping interpass cleaning causes trapped slag inclusions that weaken multi-pass welds. After each pass, use a dedicated stainless steel brush to remove all slag and oxidation before proceeding. For critical applications like pressure vessels, clean between every pass—even those that appear clean to the naked eye may contain microscopic contaminants. Never use the same brush on different materials—carbon steel contamination in stainless steel welds causes corrosion failures. When in doubt, spend extra time cleaning—it takes minutes to prevent hours of rework when the weld fails inspection.
Parameter Settings That Guarantee Strong Penetration
Incorrect voltage and wire feed speed cause most welding defects. For MIG welding 1/4-inch steel pipe, start with 19-21 volts and 250-280 inches per minute wire feed speed using ER70S-6 wire. Adjust based on bead appearance: a convex bead with minimal ripples indicates too slow travel speed or high voltage, while a narrow, high bead suggests too fast travel or low voltage. Listen to the arc sound—consistent “sizzling bacon” indicates proper settings, while loud cracking suggests excessive voltage. Always test on scrap material of identical thickness before welding your actual joint.
Professional Finishing Techniques for Long-Lasting Results
Surface treatment after welding dramatically extends joint life by reducing stress concentrations and corrosion points.
Strategic Grinding Methods That Strengthen Joints
Grinding techniques directly impact fatigue life—improper grinding creates stress risers that initiate cracks. Always grind parallel to the weld axis, never across it. Start with a coarse 36-60 grit flap disc to remove excess reinforcement, then progress to finer 80-120 grit for final blending. Maintain a consistent angle that creates a smooth transition from base metal to weld—avoid creating a sharp groove at the weld toe. For critical applications, leave a slight crown (1/32 inch) rather than grinding completely flush—this small reinforcement significantly improves fatigue resistance.
Post-Weld Treatment for Maximum Durability
For structural applications, controlled cooling prevents cracking in high-carbon materials. Wrap welded sections in insulating blankets to slow cooling rates for thick-walled pipes over 1/2 inch. For stainless steel applications, remove heat tint discoloration using a pickling paste to restore corrosion resistance—the rainbow-colored oxidation left by welding creates galvanic corrosion points. In high-vibration environments like exhaust systems, peen the weld while still warm (500-700°F) using light, overlapping hammer strikes to relieve residual stresses that cause fatigue cracking.
Mastering pipe cutting and welding requires attention to detail at every stage—from selecting the right cutting tool to perfecting your welding technique. The difference between a joint that fails in months versus one that lasts decades comes down to proper preparation, correct parameters, and strategic finishing. Start with simple projects on scrap materials to develop your technique before tackling critical applications. Remember that safety isn’t optional when working with high heat, sharp edges, and toxic fumes—always wear appropriate protective gear and work in well-ventilated areas. With practice and attention to these specific techniques, you’ll create pipe joints that perform reliably under pressure, vibration, and environmental stress. The most successful welders continually refine their skills through practice and learning from each project—treat every weld as an opportunity to improve your craft.
Leave a Reply