Cutting welded wire fence properly is essential for anyone repairing sections, creating custom sizes, or installing new fencing configurations around their property. Unlike woven wire that separates at knot points, welded wire features metal wires fused together at every intersection, making clean cuts crucial for maintaining structural integrity while preventing injuries from sharp edges. Whether you’re modifying a garden enclosure, repairing agricultural fencing, or adjusting property boundaries, knowing the right techniques ensures professional results that protect both you and your fence investment.
The process of how to cut welded wire fence varies significantly based on your tools, wire gauge, and specific project requirements. What works for light-gauge garden fencing may prove inadequate for heavy-duty livestock containment, and different approaches suit occasional repairs versus large-scale installations. This guide walks you through every aspect of the cutting process, from selecting the right tools and safety equipment to executing precise cuts and finishing edges properly. By understanding these fundamentals, you can tackle any welded wire fencing project with confidence and achieve clean, safe results that maintain your fence’s functionality and appearance.
Essential Tools for Cutting Welded Wire Fence

Bolt Cutters for Manual Cutting
Bolt cutters are your most versatile option for cutting welded wire fence up to 9-gauge thickness. Choose cutters with handles at least 24 inches long to maximize leverage, and always verify blade sharpness before starting your project. When using them properly, position the fence material deep within the blade throat near the pivot point where cutting force is strongest. Keep blades perpendicular to the wire direction and apply pressure gradually to avoid blade damage or dangerous kickback.
For larger projects, invest in bolt cutters with replaceable blades since cutting welded wire gradually wears even high-quality steel. Inspect your cutters before each use, and replace or sharpen blades when they show signs of dulling. Proper technique significantly impacts cutting efficiency—remember to position each intersection near the pivot point and work methodically along your cut line for clean results.
Power Tools for Faster Results
Angle grinders equipped with thin metal-cutting discs (1mm or thinner) offer substantial advantages when cutting thicker gauge wire or making numerous cuts. A 4.5-inch grinder provides the best balance of maneuverability and cutting power for fence work. The high-speed rotation helps soften welded intersections while severing the wire, though the resulting edges become extremely sharp and require careful handling afterward.
Reciprocating saws (Sawzalls) provide excellent maneuverability for cutting welded wire fence in confined spaces. Select a coarse metal-cutting blade with 10-14 teeth per inch for optimal cutting speed. Always secure the material firmly before cutting, as the reciprocating motion can cause unstable material to shift dangerously. Battery-powered models offer portability for locations without electrical access.
Critical Safety Equipment Before You Start

Personal Protective Gear Requirements
Safety glasses with side shields form your first line of defense against flying metal fragments and sparks. For power tool work, add a face shield over your safety glasses for comprehensive facial protection. Cut-resistant gloves balance dexterity with protection—Kevlar-lined or leather palm gloves prevent injuries from sharp wire ends created during cutting.
Wear heavy work boots with steel or composite toe caps for protection against dropped fence sections and stable footing on uneven terrain. Choose boots with aggressive tread patterns for traction on loose soil or muddy conditions. Complete your safety ensemble with long pants made from durable canvas or denim and long-sleeved shirts to protect against scratches and abrasions.
Safe Work Practices to Follow
Before cutting, inspect the fence section for tension, as improperly released tension can cause sections to spring apart dangerously. Welded wire fence installed under tension requires gradual, controlled cutting with temporary bracing until tension fully releases. For fence sections attached to tension cables, release the tension gradually before cutting individual mesh sections.
Maintain clear communication with anyone else present at your work site, especially when using noisy power tools. Establish a safe perimeter around the cutting area—keep spectators well outside the cutting zone, and never operate power tools while others stand in the line of potential projectile travel.
Cut Welded Wire Fence with Bolt Cutters
Mark Your Cut Lines First
Measure and mark your fence section using a tape measure and visible marking tool like chalk or spray paint. For straight cuts, mark both top and bottom edges to guide your cutting path and ensure alignment. If cutting individual openings, mark all four sides of the desired opening. Taking time with measurements prevents costly mistakes that waste material and require additional repairs.
Execute Clean Cuts Through Each Intersection
Position the bolt cutter blades around the first wire intersection at one end of your marked cut line. Slide the fence material as deep into the blade throat as possible, positioning the intersection near the pivot point. Align the cutting blades perpendicular to the wire direction before applying pressure.
Apply steady, gradual pressure to the handles, allowing the mechanical advantage to work through the cut without jerky movements. Once the initial intersection severs, move along the cut line to the next intersection, repeating the process. For larger openings, cut along three sides of the marked rectangle, leaving one edge attached as a hinge to control the removed section.
Match Your Approach to Wire Gauge
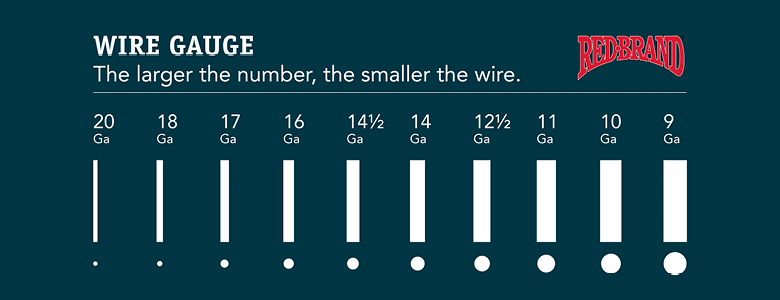
Light-Gauge Fencing (14-16 Gauge)
Light-gauge welded wire fence, commonly used for garden fencing, can be cut with most standard wire-cutting tools. Choose sharp tools and make clean, decisive cuts through each intersection. Avoid twisting motions that can deform the wire rather than cutting it cleanly. For creating multiple uniform openings, tin snips or aviation snips provide increased precision and cleaner cuts than bolt cutters.
When using power tools on light-gauge fence, use light pressure and allow the tool to do the work without forcing it through the material. Excessive force creates rough edges and causes heat buildup that discolors the protective coating.
Medium-Gauge Fencing (10-12 Gauge)
Bolt cutters with 24-30 inch handles provide optimal leverage for medium-gauge wire, allowing most users to cut through individual intersections with reasonable effort. For extended projects, consider bolt cutters with gear-assisted mechanisms that reduce hand fatigue. Keep blades properly aligned and sharpened, as dull blades require significantly more force and produce inferior cuts.
Power tools become increasingly efficient for medium-gauge fence, with angle grinders cutting through this wire effectively while producing cleaner results with less material deformation.
Cut Along Fence Length and Create Openings
Cutting Along the Fence Length
Longitudinal cuts along the fence length require different approaches based on wire direction. Cutting parallel to horizontal wires means severing only vertical wires at regular intervals, which bolt cutters handle efficiently. Cutting perpendicular to wire directions requires severing all wires at each intersection along the cut line—a more demanding scenario where angle grinders or circular saws typically work best.
For very long cuts, create a cutting guide using a straight board clamped to the fence as a reference. A chalk line snapped onto the fence surface provides visual guidance for your cutting path.
Creating Individual Openings
Creating openings requires cutting along three sides of your marked rectangle, leaving one edge intact as a hinge. Mark the opening dimensions clearly on both sides of the fence using a tape measure for accuracy. For openings larger than 3 feet, add support braces along the uncut edge to maintain fence structure until permanent framing is installed.
Cut along the three marked lines starting with top and bottom cuts before completing the side cuts. Leave the final cut until last, using the opening section’s weight to control its movement. Immediately secure the opening edges to prevent injury from sharp wire ends.
Finish Edges and Clean Up Properly
Smooth Sharp Cut Edges
Freshly cut edges require attention to prevent injuries. Inspect all cut edges carefully after completing your work. For temporary safety, file or grind down prominent sharp points using a coarse file or portable grinder. Work along the entire cut length, paying special attention to intersection points where multiple wires meet.
For permanent installations where appearance matters, consider using plastic cap rail or similar edge protection products designed for welded wire fence. Alternatively, fold and crimp cut edges back on themselves using pliers to create a rolled edge that eliminates sharp points.
Remove Debris and Clean the Site
Remove all cut fence pieces, metal shavings, and debris immediately after cutting. Use a magnet or magnetic sweeper to collect small metal fragments that may be difficult to see in grass. Collect larger sections for appropriate disposal—many areas have metal recycling programs that accept clean steel fencing material.
Inspect the cutting area for any damage to surrounding surfaces or vegetation that may have occurred during cutting, repairing any inadvertent damage before completing your project.
Troubleshoot Common Cutting Problems
Fix Difficult Cutting Situations
When standard cutting efforts fail, several factors may be causing difficulty. Dull or damaged cutting edges reduce efficiency dramatically—inspect and sharpen or replace blades before continuing. Improper tool alignment limits cutting effectiveness—ensure bolt cutter blades are properly adjusted and positioned perpendicular to the wire direction.
If your wire gauge exceeds your tool’s capacity, upgrade to more capable equipment. Bolt cutters have gauge limits based on size and design—attempting to cut wire beyond these limits risks tool damage and injury.
Achieve Cleaner Cut Results
Jagged cuts typically result from dull tools, improper alignment, or incorrect technique. Stop cutting and inspect tool condition when cuts become ragged—sharpening or replacing blades often resolves these issues. Deformed cuts, where wire is crushed rather than severed, indicate insufficient cutting force or improperly closing blades.
Power tool cuts become rough when excessive force is applied. Reduce pressure on the tool and allow the cutting edge to do the work, maintaining a steady pace along the cut line.
Final Tips for Successful Fence Cutting
Cutting welded wire fence successfully requires matching your tools and techniques to your specific project. For occasional light-duty projects, quality bolt cutters and basic safety equipment provide everything needed. Larger projects may justify investing in power tools that speed the process while maintaining quality results.
Always prioritize safety over speed—rushing leads to injuries, damaged materials, and inferior results. Maintain your tools in good condition, replacing blades and adjusting equipment as needed. With these techniques, you can confidently tackle any welded wire fence cutting project, from simple garden modifications to complex agricultural installations. The key lies in understanding your materials, selecting appropriate tools, working safely, and finishing each job with proper edge treatment and cleanup.
Leave a Reply