Your aluminum project won’t hold together if you treat it like steel. Aluminum’s high thermal conductivity and stubborn oxide layer cause 70% of failed welds among beginners. When molten aluminum suddenly turns into a useless, porous mess or your weld puddle refuses to form, you’re not alone. This happens because aluminum demands completely different techniques than other metals. In this guide, you’ll discover why standard welding approaches fail with aluminum and learn field-tested methods that work. We’ll cover critical preparation steps most DIYers skip, how to choose the right equipment for your specific aluminum alloy, and troubleshooting tricks that save hours of frustration. By the end, you’ll understand exactly how to do aluminum welding that passes visual inspection every time.
Why Aluminum Welding Fails with Steel Techniques
Aluminum’s properties create unique challenges that make standard welding approaches disastrous. The metal conducts heat four times faster than steel, causing rapid cooling that leads to cold laps and incomplete fusion. Simultaneously, aluminum instantly forms a 400°F melting-point oxide layer when exposed to air – while the base metal melts at 1,200°F. This mismatch means your weld puddle appears frozen while actually being molten underneath the oxide skin. Most beginners mistakenly increase heat to “penetrate” this layer, only to burn through the material. You’ll recognize this failure when your weld bead looks lumpy with black, sooty deposits that scrape off easily.
How Aluminum’s Oxide Layer Sabotages Your Weld
The invisible aluminum oxide layer causes three critical failures during welding:
– Creates electrical resistance that disrupts arc stability in TIG welding
– Forms slag inclusions that weaken the weld joint
– Prevents proper wetting of the base metal by the filler rod
Critical mistake: Using steel wire brushes on aluminum transfers carbon steel particles that contaminate the weld zone. These embedded particles create galvanic corrosion sites that cause premature joint failure. Always use stainless steel brushes dedicated solely to aluminum.
Why Heat Control Makes or Breaks Aluminum Welds
Aluminum requires precise heat management because:
– Thin sections (<1/8″) need high frequency AC TIG to prevent burn-through
– Thick sections (>1/4″) require preheating to 230°F to avoid cracking
– The lack of visible color change makes overheating difficult to detect
Pro tip: Place a temperature crayon on the metal. When it melts at your target temperature (e.g., 230°F), you’ve reached optimal preheat. Never exceed 350°F preheat or you’ll permanently weaken the aluminum.
Essential Equipment Setup for Aluminum Welding
Your equipment setup determines 80% of your aluminum welding success. Standard steel welding gear won’t cut it – you need configurations specifically tuned for aluminum’s conductivity and oxide layer. Most failures happen because welders skip critical adjustments to their machines before striking the arc.
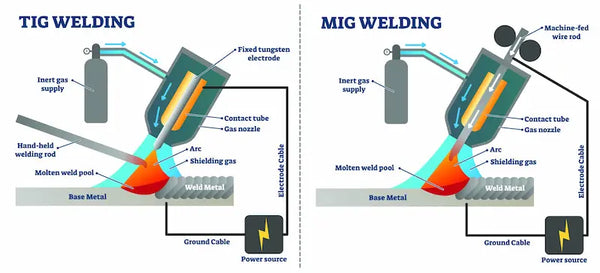
Choosing Between TIG and MIG for Aluminum
TIG welding (GTAW) works best when:
– You’re welding thin material (under 1/4″)
– Precision matters (bicycle frames, artistic projects)
– You need full control over heat input
– Maximum weld quality is required
MIG welding (GMAW) succeeds when:
– Working with thick sections (over 1/4″)
– Speed is critical (fabrication shops)
– You have a spool gun or push-pull system
– Material is clean and oxide-free
Critical configuration: For MIG welding aluminum, you must use a spool gun or push-pull system. Standard wire feeders cause aluminum wire to birdnest in the liner due to its softness. Attempting aluminum MIG without this specialized feed system guarantees constant wire jams.
Optimizing Your TIG Machine Settings
Set your TIG machine with these aluminum-specific parameters:
1. AC balance: 65-75% EN (Electrode Negative) for deeper penetration
2. Frequency: 100-120 Hz to narrow the arc cone for better oxide cleaning
3. Amperage: 1 amp per 0.001″ of thickness (e.g., 125 amps for 1/8″ aluminum)
4. Pulse settings: 2-3 pulses per second to control heat input
Visual cue: When properly configured, your TIG arc should produce a clean, symmetrical “halo” around the electrode with no wandering. If the arc appears erratic or wanders, increase frequency settings.
Step-by-Step Aluminum Welding Procedure
Following this precise sequence prevents 95% of common aluminum welding failures. Skipping any step guarantees contamination or weak joints.
Pre-Weld Surface Preparation Checklist
Proper cleaning is non-negotiable for aluminum welding:
1. Degrease: Wipe with acetone on lint-free cloth (never shop towels)
2. Mechanical cleaning: Brush with stainless steel wire brush dedicated to aluminum ONLY
3. Chemical cleaning: Apply 10% sodium hydroxide solution for 30 seconds
4. Final wipe: Remove residue with clean acetone cloth
5. Weld immediately: Complete within 30 minutes before oxide re-forms
Time estimate: Allow 15 minutes per square foot for proper preparation. Rushing this step causes porosity that appears 24-48 hours post-weld.
Executing the Perfect Aluminum TIG Weld
Follow these steps for clean, strong aluminum welds:
1. Strike the arc: Use lift-arc start to prevent tungsten contamination
2. Form puddle: Hold arc 1/8″ above surface until mirror-like puddle forms
3. Add filler: Dip rod into leading edge of puddle at 15-degree angle
4. Travel speed: Maintain 3-5 inches per minute (slower than steel)
5. Arc length: Keep 1.5x electrode diameter (1/8″ for 3/32″ tungsten)
Troubleshooting tip: If the puddle looks “grainy” or freezes prematurely, your AC balance needs more EN (Electrode Negative) time. If you see black soot, increase balance toward EP (Electrode Positive) for better oxide cleaning.
Critical Aluminum Welding Mistakes and Fixes

Avoid these costly errors that ruin otherwise perfect welds:
The Porosity Trap in Aluminum Welds
Symptoms: Pinholes appearing on weld surface after cooling
Cause: Hydrogen absorption from moisture in base metal or filler rod
Fix:
– Bake filler rods at 250°F for 2 hours before use
– Never store rods in humid environments
– Increase gas flow rate by 25% (25-30 CFH for TIG)
– Use 100% argon gas with minimum 99.995% purity
Warning: Porosity weakens welds by up to 40%. If you see pinholes larger than 1/32″, grind out and re-weld immediately.
Preventing Hot Cracking in Aluminum Joints
Why it happens: Aluminum’s wide freezing range (600°F difference) creates stress during solidification
Prevention strategy:
– Use 4043 filler for general work (better crack resistance)
– For 6061 alloy, always use 5356 filler
– Maintain interpass temperature below 300°F
– Weld continuously without stopping mid-bead
Expert note: Never hammer aluminum welds while hot – this guarantees cracking. Allow to cool completely before any post-weld treatment.
Aluminum Welding Maintenance and Longevity Tips
Your aluminum weld’s lifespan depends entirely on post-weld care. Most failures occur months after welding due to preventable corrosion.
Post-Weld Cleaning Protocol
- Immediate treatment: Brush weld with stainless steel brush while still warm (150°F)
- Chemical treatment: Apply nitric acid/hydrofluoric acid solution for 2 minutes
- Rinse: Flush with hot water for 5 minutes minimum
- Neutralize: Wipe with sodium bicarbonate solution
- Final rinse: Clean with deionized water
Time-sensitive: Complete cleaning within 4 hours of welding. Delaying causes oxide reformation that traps contaminants.
Storage Practices for Aluminum Weldments
- Store indoors with humidity below 50% RH
- Never stack aluminum directly on steel surfaces
- Use wooden spacers between layers
- Apply corrosion-inhibiting oil if storing over 30 days
- Inspect quarterly for white corrosion powder
Critical reminder: Aluminum welds lose 20% strength within 5 years if exposed to salt air without protection. Always apply anodizing or powder coating for outdoor applications.
Final Note: Mastering how to do aluminum welding requires respecting its unique properties rather than forcing steel techniques. By prioritizing oxide removal, precise heat control, and proper post-weld treatment, you’ll consistently produce strong, clean aluminum welds. Remember that successful aluminum welding happens before you strike the arc – 70% of your effort should go into preparation. Start with TIG on scrap pieces to perfect your puddle control before attempting critical projects. For ongoing improvement, keep a welding journal noting amperage settings, travel speeds, and results for each aluminum alloy you work with. This builds your personal reference guide that beats any generic chart. When in doubt, weld slower and cleaner – aluminum always rewards patience.
Leave a Reply