Vertical welding separates skilled welders from beginners. When gravity pulls molten metal downward, your technique must counteract this constant force to produce quality welds. Whether you’re working on structural steel, pipelines, or custom fabrication, mastering vertical welding opens doors to higher-paying jobs and more complex projects. This guide delivers practical, actionable techniques you can implement immediately—no fluff, just proven methods that work in real-world conditions.
Essential Equipment Setup for Vertical Welding Success

Your equipment configuration makes or breaks vertical welding attempts before you even strike an arc. Unlike flat position welding where gravity assists your work, vertical welding demands precise equipment settings that maintain control over the molten pool.
Selecting the Right Electrodes and Amperage
For vertical up welding, choose electrodes specifically designed for this position. E6013 electrodes offer beginners the easiest learning curve with their forgiving arc characteristics and light slag coverage. Set your machine between 85-105 amps for 1/8-inch diameter electrodes on 1/4-inch steel. E7018 electrodes provide superior strength for structural work but require 15-20 amps higher settings and stricter technique control.
Vertical down welding demands different electrode choices—E6010 or E6011 electrodes work best due to their deep penetration and fast-freezing slag. Increase amperage by 10-15% compared to vertical up settings to maintain proper penetration while traveling faster. Never use the same settings for vertical up and down welding on identical materials—this common mistake causes excessive penetration or lack of fusion.
Base Material Preparation Checklist
Skip proper cleaning and vertical welding becomes nearly impossible. Remove all rust, mill scale, paint, and oil from both sides of the joint using a stainless steel wire brush or angle grinder. Pay special attention to the root area where contamination hides and causes porosity that’s magnified by vertical positioning. Check your work by running a clean rag over the surface—any discoloration means more cleaning is needed.
Ensure proper joint fit-up with a consistent 1/8-inch gap for groove welds. Vertical welding with improper fit-up leads to burn-through on the root pass or lack of penetration. Use clamps or tack welds every 2-3 inches to maintain alignment, but keep tacks small enough to incorporate into your final weld.
Vertical Up Welding: The Professional’s Technique
Vertical up welding produces stronger, higher-quality welds than downhill methods but demands greater skill. This technique is required for most structural certifications and critical applications where maximum strength matters.
Perfecting Your Electrode Angle for Upward Travel
Hold your electrode at a 5-15 degree drag angle pointing upward along your travel direction. This subtle angle pushes molten metal upward while maintaining arc force penetration. For fillet welds, maintain a 45-degree work angle to both plates. For groove welds, angle slightly toward the thicker material side if plates differ in thickness.
Critical mistake to avoid: Letting your electrode angle flatten as you move upward. This causes excessive convexity and poor root penetration. Check your angle every few inches by pausing and observing your position.
Mastering Travel Speed and Oscillation
Start at 6-9 inches per minute for your root pass on 1/4-inch steel. Watch the weld pool—if it builds too high, increase speed slightly; if undercut appears on the leading edge, slow down. The ideal pool should be slightly higher on the bottom edge than the top, maintaining consistent width.
For wider joints, use a controlled “U” weave pattern with 1-second pauses at each edge. This brief pause allows the edge to solidify before moving upward, preventing undercut. The weave width should never exceed 3 electrode diameters—wider weaves lose heat control in vertical position.
Vertical Down Welding: When Speed Trumps Strength
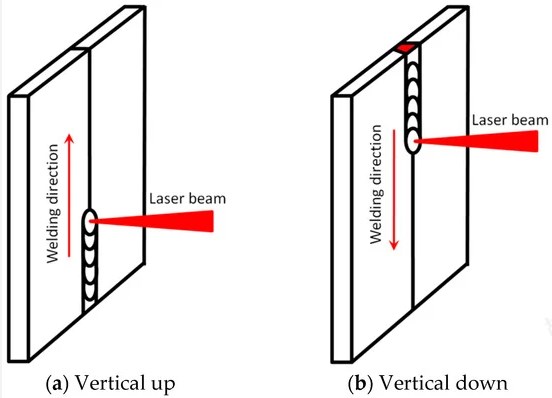
Vertical down welding works for non-critical applications where production speed matters more than maximum strength. This technique requires different handling but can significantly increase your productivity on appropriate jobs.
Optimizing Downhill Travel Technique
Position your electrode at a 15-30 degree drag angle pointing downward along your travel path. This leading position helps control the faster-moving pool. Maintain a travel speed 25-40% faster than vertical up welding—typically 9-12 inches per minute for similar materials.
Keep your arc length slightly shorter than in vertical up welding to prevent excessive spatter. The downhill technique produces shallower penetration, so reduce your joint gap to 1/16-inch for groove welds to avoid burn-through. Only use this method on materials thinner than 3/8-inch where code requirements permit.
Recognizing When Not to Use Downhill Welding
Never use vertical down welding for structural applications requiring certification. AWS D1.1 structural code prohibits downhill welding for most critical connections. Avoid downhill technique on high-carbon steels or thick materials where hydrogen cracking risk increases with faster cooling rates.
Fixing Common Vertical Welding Defects Immediately
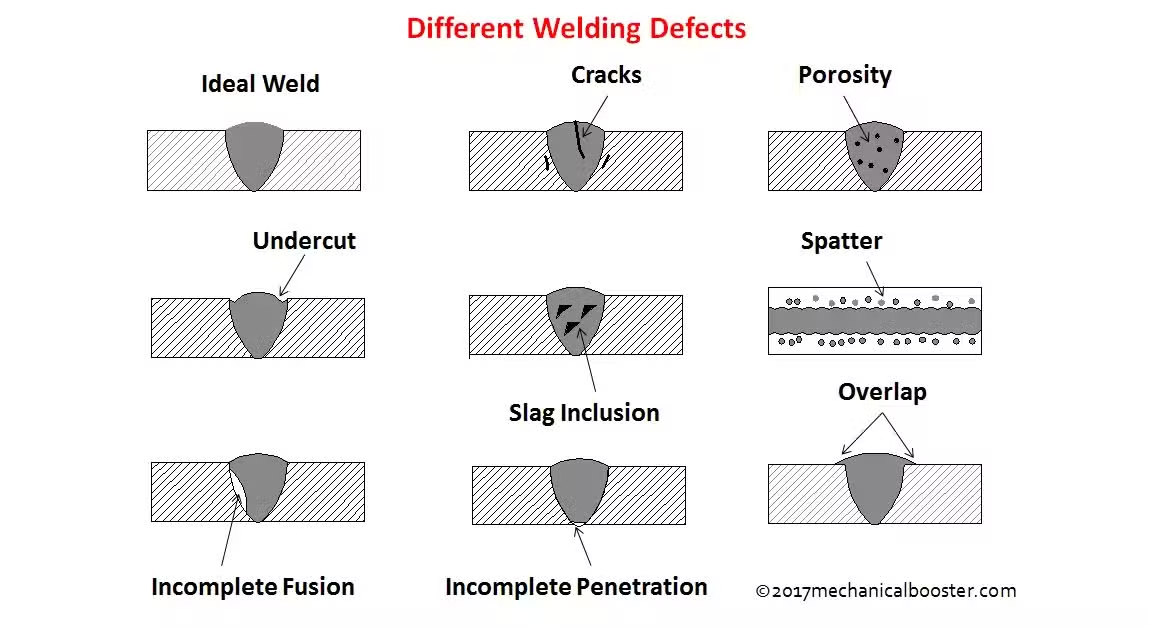
Recognizing and correcting defects while welding saves costly rework. Vertical position magnifies common welding problems, so early detection proves essential.
Eliminating Vertical Undercut in Real-Time
Undercut appears as a groove along the weld toe and commonly forms on the leading edge during vertical up welding. When you see undercut developing:
– Reduce travel speed by 10-15%
– Decrease your drag angle by 5 degrees
– Apply slight weaving with longer pauses on the undercut side
– Increase amperage by 5-10 amps if the pool remains too fluid
For severe undercut, stop immediately and grind the affected area before continuing. Never try to cover undercut with additional passes—that compounds the problem.
Preventing Lack of Fusion in Multi-Pass Welds
Lack of fusion between passes ranks among the most dangerous vertical welding defects. To ensure proper fusion between layers:
– Clean each previous pass thoroughly with a wire brush
– Maintain consistent work angle directed toward the joint edge
– Reduce travel speed by 20% on fill passes compared to root pass
– Keep arc length consistent—never stretch the arc to reach difficult areas
Check fusion by examining the overlap between passes—if the previous layer remains shiny rather than melted into the new pass, you have lack of fusion.
Critical Safety Adjustments for Vertical Welding
Vertical welding introduces unique safety hazards that flat position work doesn’t present. Protect yourself from falling molten metal and working at heights with these essential precautions.
Positioning Your Body for Maximum Protection
Always position yourself so falling slag and spatter cannot enter your clothing. Wear a full welding jacket with sleeves pulled over your gloves. Add leather spatter sleeves for extended vertical work. Never wear pants outside your boots—molten metal will find its way inside.
When welding above waist height, use a welding curtain or shield between you and the work area. This simple barrier catches falling metal that would otherwise hit your body. For overhead vertical work, position yourself to the side rather than directly beneath the weld.
Fall Protection for Elevated Work
OSHA requires fall protection for work 6 feet or higher, but vertical welding often happens at lower heights where falls still cause serious injury. Use a harness and lanyard whenever working on scaffolding, ladders, or elevated platforms—even at 4-5 feet. Secure your welding cable overhead to prevent tripping hazards that become dangerous at height.
Practice Drills That Build Vertical Welding Confidence
Effective practice focuses on specific skills rather than just welding random joints. These targeted exercises develop the muscle memory needed for professional vertical welding.
Fillet Weld Mastery Exercise
Weld 12-inch long fillet joints on 3/8-inch plate in the 3F position. Focus exclusively on maintaining consistent travel speed and angle. After welding, break the sample and examine penetration—aim for equal leg size with complete root fusion. Repeat until 9 out of 10 welds pass visual inspection.
Pro tip: Place a straight edge along the weld face after cooling. Any significant deviation from straight indicates inconsistent travel speed that needs correction.
Root Pass Control Drill
Create a groove weld with 30-degree bevels and 1/8-inch gap on 1/4-inch plate. Practice root passes focusing on observing the back side for consistent penetration without burn-through. The ideal root pass shows slight reinforcement on the back side—completely flat or convex indicates insufficient penetration.
Certification Test Strategies for Vertical Welding
Vertical welding positions dominate structural certification tests. Prepare specifically for these requirements to pass on your first attempt.
Pre-Test Procedure Verification
Before your certification test, verify all variables match the procedure specification:
– Confirm electrode classification and batch numbers
– Check amperage with a meter, not just machine dial
– Measure preheat temperature with a crayon, not estimation
– Practice with identical joint configuration and fit-up
Many welders fail certification by using slightly different materials or settings than qualified in the welding procedure specification.
During the Test: Consistency Over Perfection
Certification evaluators look for consistent technique throughout the weld, not perfect appearance. Maintain the same travel speed, angle, and arc length from start to finish. If a small defect appears, continue with your planned technique rather than trying to fix it mid-bead—that often creates larger problems.
Vertical welding demands respect for physics and precision in execution. By implementing these specific techniques—proper electrode angles, controlled travel speeds, and immediate defect correction—you’ll transform vertical welding from a frustrating challenge into a routine skill. The key lies not in brute force but in understanding how to work with gravity rather than against it. Master vertical welding, and you’ve cleared one of the most significant hurdles in professional welding. Start with short practice sessions focusing on single variables, track your progress with destructive testing, and within weeks you’ll notice dramatic improvements in both quality and confidence. Remember: every expert welder once struggled with vertical position—your persistence today builds the expertise that commands higher wages tomorrow.
Leave a Reply