The rhythmic clang of hammer on anvil, the intense glow of heated metal, and the satisfying moment when two pieces become one—forge welding connects modern makers to an ancient craft that shaped human civilization. When you learn how to forge weld, you’re not just acquiring a metalworking skill; you’re joining a lineage of blacksmiths stretching back to the Middle Ages who used this technique to create everything from agricultural tools to architectural ironwork. Unlike modern welding methods that melt metal, forge welding joins pieces through solid-state diffusion at high temperatures, creating bonds often stronger than the original metal. This guide delivers exactly what you need to know to successfully forge weld your first joint, with practical steps, safety protocols, and insider techniques that transform intimidating theory into actionable practice. By the end, you’ll understand not just how to forge weld properly but why each step matters in creating metallurgical bonds that stand the test of time.
Essential Safety Gear for Forge Welding Success
Before you even consider how to forge weld, you must protect yourself from the unique hazards of the smithy environment. Forge welding involves extreme temperatures that can exceed 2000°F, flying scale, harmful fumes, and intense light—all demanding specific safety measures. Investing in proper protective equipment isn’t optional; it’s what separates serious practitioners from those who quickly abandon the craft due to preventable injuries. Developing consistent safety habits from your first attempt ensures you’ll be able to practice this craft for decades rather than days.
Shield Your Eyes from Forge Intensity
Specialized forge goggles with appropriate tinting are non-negotiable when you learn how to forge weld. The bright yellow glow of steel at welding temperature emits intense light that can cause photokeratitis (welder’s flash) with even brief unprotected exposure. Many smiths prefer amber or green-tinted lenses that reduce glare while still allowing you to accurately read metal color temperatures. Never attempt to forge weld without proper eye protection—the momentary distraction of eye strain could ruin your weld or cause serious injury.
Protect Your Lungs from Harmful Flux Fumes
When borax flux meets red-hot metal, it releases fumes that can irritate respiratory passages with repeated exposure. A N95 respirator provides basic protection, but for frequent forge welding, invest in a P100 cartridge respirator specifically designed for metal fumes. Position your forge in a well-ventilated area, preferably with cross-ventilation that carries fumes away from your breathing zone. Remember that proper respiratory protection becomes even more critical when welding alloy steels that contain chromium, nickel, or other elements that produce hazardous oxides when heated.
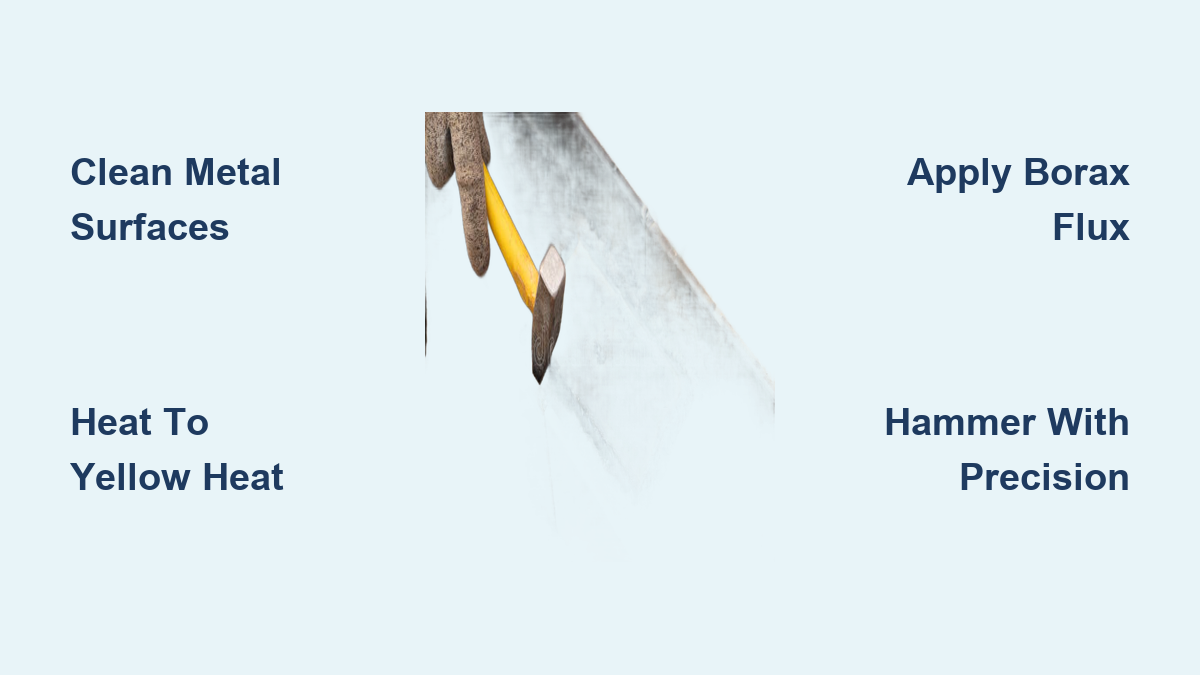
Prepare Metal Surfaces for Strong Forge Welds

The success of your forge weld depends more on preparation than technique—rushed surface preparation accounts for more failed welds than any other factor. Learning how to forge weld effectively requires understanding that clean metal creates strong bonds, while contaminated surfaces guarantee weak joints that fail under stress. This preparation phase separates beginners from skilled smiths, as professionals know that 80% of welding success happens before metal ever touches the anvil.
Clean Metal Surfaces Thoroughly Before Heating
Use a stainless steel wire brush dedicated solely to metal preparation—never reuse brushes that have contacted oil or contaminants. For stubborn scale or rust, employ an angle grinder with a flap disc to expose bright, clean metal at the joint interface. Pay special attention to corners and edges where contaminants hide, as these become weak points in your weld. Pro Tip: After cleaning, handle metal only with clean gloves or tongs to prevent skin oils from transferring to the surface—a common mistake that sabotages otherwise perfect welds.
Heat Metal to Precise Welding Temperature
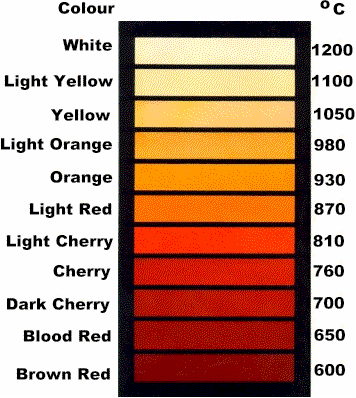
Understanding steel’s color progression is essential when you learn how to forge weld. Begin heating both pieces evenly in the forge, monitoring their color as they progress from dull red (1400°F) through bright orange (1800°F) to the critical bright yellow (2000°F) that indicates proper welding temperature. This yellow heat window is narrow—push past it to orange-white (2200°F+) and you’ll oxidize the steel’s carbon content, ruining it for welding. Warning: Different steel alloys reach welding temperature at different colors; 1095 steel welds slightly cooler than 80CrV2, for example.
Apply Flux Correctly for Oxygen-Free Welding
Flux isn’t just helpful when you learn how to forge weld—it’s absolutely essential. Borax creates a glassy barrier that prevents atmospheric oxygen from contaminating your weld interface during the critical joining phase. Without this protection, oxidation forms instantly on hot steel, creating a barrier that prevents proper atomic bonding between pieces. Mastering flux application transforms your success rate from frustratingly low to consistently reliable.
Apply Flux at the Critical Moment
Remove metal from the forge when it reaches bright yellow heat (approximately 2000°F for most carbon steels), then immediately apply dry borax powder using tongs or a dedicated flux applicator. The flux should melt and flow evenly across both surfaces, creating a continuous protective coating. Work quickly—within 5-10 seconds—before oxidation begins. Key Insight: If your flux doesn’t melt immediately upon contact, your metal isn’t hot enough for proper forge welding; return it to the forge for additional heating.
Reheat Metal to Optimal Welding Temperature
After flux application, your metal needs precise reheating to reach the exact temperature window where forge welding succeeds. This reheating phase requires careful attention to detail, as even slight temperature variations can make the difference between a perfect weld and complete failure. Learning how to forge weld properly means developing the patience to allow metal to heat evenly rather than rushing the process.
Monitor Color Changes During Final Heating
Return both fluxed pieces to the forge, positioning them to heat evenly. Watch closely as they progress through orange to bright yellow heat—this final heating should take 1-2 minutes for typical 1/4″ thick stock. Critical Warning: If sparks appear during reheating, contamination has occurred and you must stop immediately, clean the metal, and restart the process. Sparks indicate impurities burning off, which will ruin your weld.
Join and Hammer the Weld Seam Properly
The actual welding happens in a brief, intense window after removing metal from the forge—typically 15-30 seconds for most projects. This phase demands coordinated movement, proper positioning, and controlled hammering technique. Learning how to forge weld successfully means understanding that the quality of your hammer strikes directly determines weld integrity.
Position Pieces Before Hammering Begins
Before removing metal from the forge, position your anvil and tools for immediate access. Hold pieces together with metal binding wire if needed, ensuring perfect alignment. Strike your first hammer blows on the edges of the joint, working toward the center—this technique traps flux between the pieces rather than driving it out prematurely. Apply moderate, consistent force with each blow; excessive hammering can cause the weld to slip or create weak spots through over-deformation.
Verify Weld Quality Through Multiple Checks
A successful forge weld shows no visible seam and feels completely solid when flexed. Examine the joint from multiple angles under good lighting, looking for any gaps, discoloration, or inconsistent texture. Pro Tip: Heat the welded piece to non-welding temperatures (bright orange) and quench it in water—a properly executed weld won’t separate under this thermal stress test. Failed welds often reveal themselves during this check, giving you the opportunity to reheat and rework before proceeding.
Understand Metal-Specific Temperature Requirements
Learning how to forge weld different metals requires understanding their unique thermal properties. Steel and aluminum, for example, have vastly different welding temperatures despite both being commonly forge-welded metals. Attempting to weld aluminum using steel’s temperature guidelines guarantees failure, as aluminum reaches welding temperature at approximately 800°F—less than half what steel requires.
Forge Welding Carbon Steel Successfully
Most carbon steels weld optimally between 1950-2100°F, appearing as a bright yellow with no orange undertones. Higher carbon steels (like 1095) often weld at slightly lower temperatures than mild steel. Time Estimate: For 1/2″ thick steel, allow 8-12 minutes in a quality coal forge to reach welding temperature evenly. Thinner sections heat faster but require more precise temperature control to avoid overheating.
Why Proper Forge Welds Outperform Base Metal
The remarkable strength of well-executed forge welds stems from metallurgical principles that create bonds stronger than the original material. Unlike fusion welding where metal melts and recrystallizes, forge welding joins metals through solid-state diffusion—atoms migrate across the interface while remaining in solid form. This process preserves the base metal’s grain structure continuity through the weld zone, creating a seamless transition that distributes stress more evenly than fusion welds.
Common Forge Welding Questions Answered
Can You Skip Flux When Learning How to Forge Weld?
Absolutely not—flux is essential for successful forge welding. Without borax or another appropriate flux, atmospheric oxygen instantly oxidizes the heated metal surfaces, creating a barrier that prevents proper bonding. The flux’s glassy coating seals the metal from oxygen while actively bonding with any surface impurities, allowing them to be squeezed out during hammering. This visible slag ejection confirms your weld is progressing correctly.
What’s the Most Common Beginner Mistake in Forge Welding?
Rushing the heating process accounts for more failed welds than any other factor. Beginners often pull metal from the forge too soon, before it reaches proper welding temperature throughout the joint area. Solution: When learning how to forge weld, err on the side of slightly overheating (within safe limits) rather than underheating—properly heated metal flows together almost magically under hammer pressure.
Develop Your Forge Welding Skills Systematically
Mastering how to forge weld requires patience and structured practice. Start with simple butt joints on mild steel before progressing to more complex configurations like scarf joints or pattern welding. Recommended Practice Sequence:
1. Weld two flat pieces together (butt joint)
2. Create a simple lap joint
3. Attempt a scarf joint with 45-degree angles
4. Progress to more complex pattern-welded billets
Each successful weld builds confidence and refines your ability to read metal temperature, apply proper flux, and deliver effective hammer blows. Join a local blacksmithing guild or take a workshop with an experienced smith—nothing accelerates learning like real-time feedback from someone who’s mastered how to forge weld through years of practice.
Final Note: Forge welding connects you to an ancient craft tradition while providing practical skills for creating strong, beautiful metalwork. By following these precise steps for preparation, heating, fluxing, and hammering, you’ll transform from a frustrated beginner to a confident practitioner capable of creating metallurgical bonds that outperform modern welding techniques. The journey of mastering how to forge weld begins with your first successful joint—so prepare your safety gear, clean your metal thoroughly, and make that first decisive hammer blow toward becoming a true blacksmith.
Leave a Reply