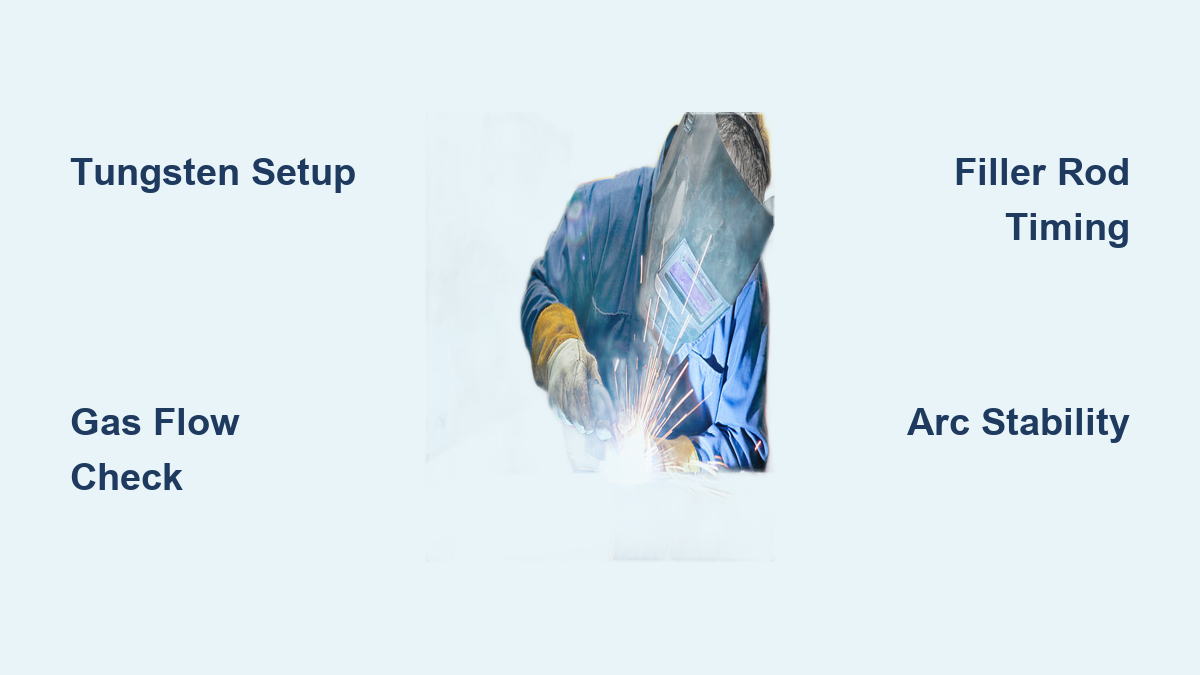
Heliarc welding—more formally known as Gas Tungsten Arc Welding (GTAW)—delivers unmatched precision for joining thin materials and exotic metals that other processes struggle with. Unlike MIG or stick welding that use consumable electrodes, heliarc welding employs a non-consumable tungsten electrode to create the arc while separate filler metal is manually added to the weld pool. This critical distinction allows for exceptional control over heat input and weld bead formation, making it the preferred method for aerospace components, pharmaceutical tubing, custom automotive fabrication, and artistic metalwork. Whether you’re repairing a cracked aluminum intake manifold or crafting delicate stainless steel sculptures, mastering how to heliarc weld opens possibilities other techniques simply can’t match. This guide cuts through the complexity to give you actionable steps for successful heliarc welding from your very first arc.
Essential Heliarc Welding Equipment Setup
Before striking an arc, proper equipment configuration makes the difference between frustration and success. Unlike simpler welding processes, heliarc demands precision in every component’s selection and adjustment. Your investment in correct setup pays immediate dividends in arc stability and weld quality.
Power Source Configuration for Optimal Performance
Selecting and configuring your power source correctly determines your success with different materials. For steel and stainless steel projects, DC (direct current) power with electrode negative polarity delivers concentrated heat for deep penetration on thinner materials. When working with aluminum or magnesium, you’ll need AC (alternating current) capability—the polarity reversal breaks up aluminum’s stubborn oxide layer during welding. Modern inverter-based machines like the Miller Syncrowave or Lincoln TIG welders offer both AC/DC functionality with advanced features like frequency control that tighten the arc cone for better precision on thin materials. Set your amperage to 15-20 amps per millimeter of material thickness as a starting point, then adjust based on weld pool behavior.
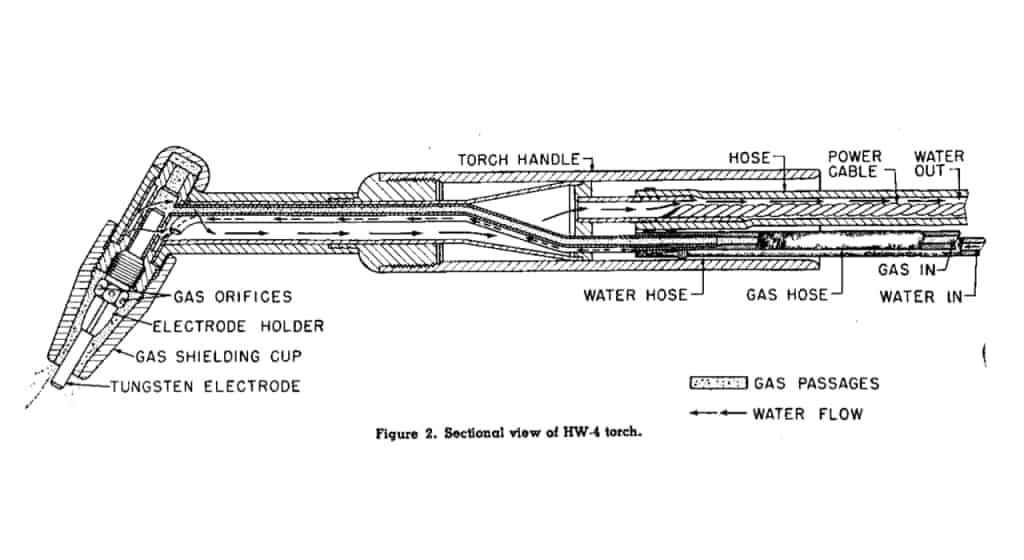
Torch Assembly Precision for Clean Welds
Your torch assembly requires meticulous attention to detail that beginners often overlook. Match collet sizes exactly to your tungsten diameter—using a 3/32″ collet with 1/8″ tungsten creates electrical arcing that contaminates your weld. Install the gas lens properly with its fine mesh screen to distribute argon evenly around the tungsten; this becomes critical when welding in drafty conditions or on complex joints. For most general applications, a #7 or #8 ceramic gas cup provides optimal gas coverage without obstructing your view of the weld pool. Before welding, perform a gas flow check by placing your gloved hand near the cup—you should feel consistent airflow without turbulence that would draw in atmospheric contaminants.
Perfecting Heliarc Welding Technique
The multi-tasking nature of heliarc welding separates it from simpler processes. While MIG welding lets you focus primarily on torch movement, heliarc demands simultaneous control of four critical elements: arc length, torch angle, travel speed, and filler rod manipulation. Mastering these elements transforms frustrating attempts into beautiful, consistent welds.
Hand Position and Torch Control
Position yourself so your welding hand rests firmly on the workpiece or a stable surface—never weld “from the shoulder” with a floating arm. Hold the torch at a precise 10-15 degree angle from vertical, with the gas cup positioned directly over the weld joint. Your non-dominant hand should cradle the torch body while your dominant hand makes micro-adjustments to maintain consistent arc length. Practice the “triangle technique” where your welding elbow, wrist, and torch form a stable triangle that moves as a single unit. This positioning prevents hand tremors and maintains the critical 1-2mm arc gap that ensures proper heat concentration.
Filler Rod Addition Timing and Technique
The rhythm of filler rod addition separates novice from skilled heliarc welders. Dip the rod into the leading edge of the molten pool every 1-2 seconds, withdrawing it completely between additions. For aluminum welding, use a “whipping” motion where you quickly dip and withdraw the rod to prevent excessive heat buildup. On steel, a more consistent dipping pattern works better. Hold the filler rod at a 15-degree angle to the workpiece so it preheats in the arc before entering the pool—this prevents cold laps and ensures proper fusion. Practice on scrap metal until you develop the muscle memory to add filler without breaking your concentration on arc length and travel speed.
Material-Specific Heliarc Welding Procedures
Each metal responds uniquely to heliarc welding parameters, requiring specific adjustments to your technique. Understanding these differences prevents common mistakes that lead to failed welds and wasted materials.
Aluminum Welding Without Porosity

Aluminum’s high thermal conductivity and oxide layer demand specific techniques. Set your machine to AC with 60-70% electrode negative balance for optimal cleaning action and penetration. Preheat thicker aluminum sections to 200-300°F using an infrared thermometer to verify temperature—this compensates for aluminum’s heat-sinking properties. Use pure argon shielding gas at 20-25 CFH and a 3/32″ 2% ceriated tungsten with a rounded tip. Start your weld with a brief dwell to establish the weld pool, then add 4043 or 5356 filler rod in a steady rhythm. Watch for the “cauliflower” appearance in the weld pool—that’s the oxide layer breaking up, indicating proper cleaning action. If you see black soot forming, increase your cleaning balance percentage.
Stainless Steel Welding Without Warpage
Stainless steel’s sensitivity to heat distortion requires precise thermal management. Use DCEN polarity with 2% lanthanated tungsten ground to a sharp point. Set argon flow to 15-18 CFH and add 10-15% helium for better penetration on thicker sections. Maintain interpass temperatures below 300°F using stainless steel heat sink bars or copper backing to draw heat away from the joint. For thin materials under 1/8″, use pulse welding with a 2:1 pulse ratio (peak to background current) to control heat input. Add filler rod continuously rather than dipping to maintain a stable, fluid weld pool that resists cracking. Immediately after welding, use a stainless steel wire brush dedicated only to stainless to remove any discoloration before it becomes chromium-depleted.
Troubleshooting Critical Heliarc Welding Failures
Even experienced welders encounter problems, but knowing how to diagnose and correct issues quickly saves time and materials. Most heliarc welding defects stem from just three root causes: improper gas coverage, incorrect heat management, or technique inconsistencies.
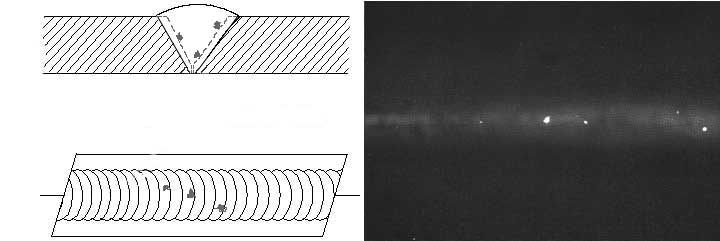
Fixing Tungsten Contamination Immediately
Tungsten inclusions appear as hard, dark spots in your weld and cause arc instability. If your tungsten touches the weld pool or filler rod, stop immediately and grind the tip back to a clean point. Use a dedicated tungsten grinder with proper filtration—never grind tungsten on a shop grinder where other metals can contaminate it. When grinding, rotate the tungsten slowly while applying light pressure to create a smooth, concentric point 2-3 times the electrode diameter in length. For aluminum AC welding, allow the tip to ball slightly by welding briefly at higher amperage before reducing to your working range.
Eliminating Porosity in Critical Welds
Porosity appears as tiny holes throughout the weld bead and severely compromises strength. Check for these common causes: wind drafts disrupting gas coverage (use wind shields), contaminated base metal (clean with acetone and stainless brush), or moisture in the gas line (replace dew-laden regulators). For aluminum, ensure your gas flow starts 1-2 seconds before the arc (pre-flow) and continues 5-10 seconds after (post-flow). If porosity concentrates at weld starts, increase pre-flow time; if at weld ends, extend post-flow. Verify your gas cup size matches the application—a cup too small won’t provide adequate coverage on wide beads.
Safety Practices That Prevent Serious Injury
Heliarc welding’s intense UV radiation and electrical hazards demand specific safety protocols that many beginners underestimate. The risks extend beyond immediate burns to long-term health consequences from improper protection.
Essential UV Protection Beyond Standard Gear
Heliarc welding produces intense ultraviolet radiation that can cause arc eye (photokeratitis) in as little as 15 seconds of unprotected exposure. Use an auto-darkening helmet with a minimum DIN 10-13 shade range and ensure it activates within 1/20,000th of a second. Standard welding jackets aren’t sufficient—wear leather sleeves and a collar that button up to your chin to prevent “welder’s flash” on your neck. Remember that UV radiation reflects off nearby surfaces, so position welding curtains to protect others in the workspace. For prolonged welding, consider a forced-air respirator system that provides both fume protection and cooled air to reduce heat stress.
Equipment Maintenance That Ensures Consistent Results
Regular maintenance prevents the subtle equipment failures that cause inconsistent welds and wasted materials. Many heliarc welding problems actually stem from neglected equipment rather than technique issues.
Daily Torch Inspection Protocol
Before each welding session, perform this 60-second inspection: check for gas leaks by listening for hissing and applying soapy water to connections; verify the tungsten is securely seated with no play in the collet; ensure the gas lens is properly seated without gaps; inspect the gas cup for cracks or tungsten spatter buildup; and confirm the electrode extends 1/4-3/8″ beyond the cup for proper gas coverage. Replace any component showing wear—using a slightly cracked gas cup might seem acceptable but causes inconsistent gas flow that leads to porosity on critical welds.
Mastering how to heliarc weld requires patience and deliberate practice, but following these precise techniques delivers results no other process can match. Start with simple lap joints on clean aluminum or steel scrap, focusing on maintaining consistent arc length before worrying about perfect bead appearance. Record your settings for each successful weld to build a reference library for future projects. After each session, clean your torch thoroughly and store tungsten in a dedicated container to prevent contamination. Within weeks of consistent practice, you’ll develop the hand-eye coordination that makes heliarc welding feel natural, opening doors to projects that demand the highest quality metal joining. Remember that even expert welders continually refine their technique—embrace the learning process and celebrate each small improvement as you master this precision craft.
Leave a Reply