Weld failures can lead to catastrophic structural collapses, safety hazards, and costly repairs—but most problems can be prevented with proper inspection techniques. Knowing how to inspect welds effectively is essential for anyone working with welded structures across construction, manufacturing, or maintenance operations. This guide provides practical, actionable methods you can implement immediately to identify defects before they compromise structural integrity. Whether you’re a fabricator, inspector, or maintenance technician, mastering these inspection techniques will help you catch problems early, reduce rework costs, and ensure your welds meet industry standards. You’ll learn which methods to use at each inspection stage, how to recognize critical defects, and what documentation you need to maintain compliance.
Preparing for Effective Visual Weld Inspection
Visual inspection remains the most cost-effective first step in how to inspect welds properly, capable of identifying up to 80% of common defects when performed correctly. Before you begin, ensure your inspection environment has adequate lighting—minimum 500 lux (50 foot-candles)—to reveal surface irregularities. Natural daylight works well, but for indoor or confined spaces, use a focused LED inspection light that creates shadows to highlight subtle defects. Clean the weld surface thoroughly using a wire brush or appropriate solvent to remove slag, spatter, oil, and rust that could mask critical flaws.
Essential Visual Inspection Checklist
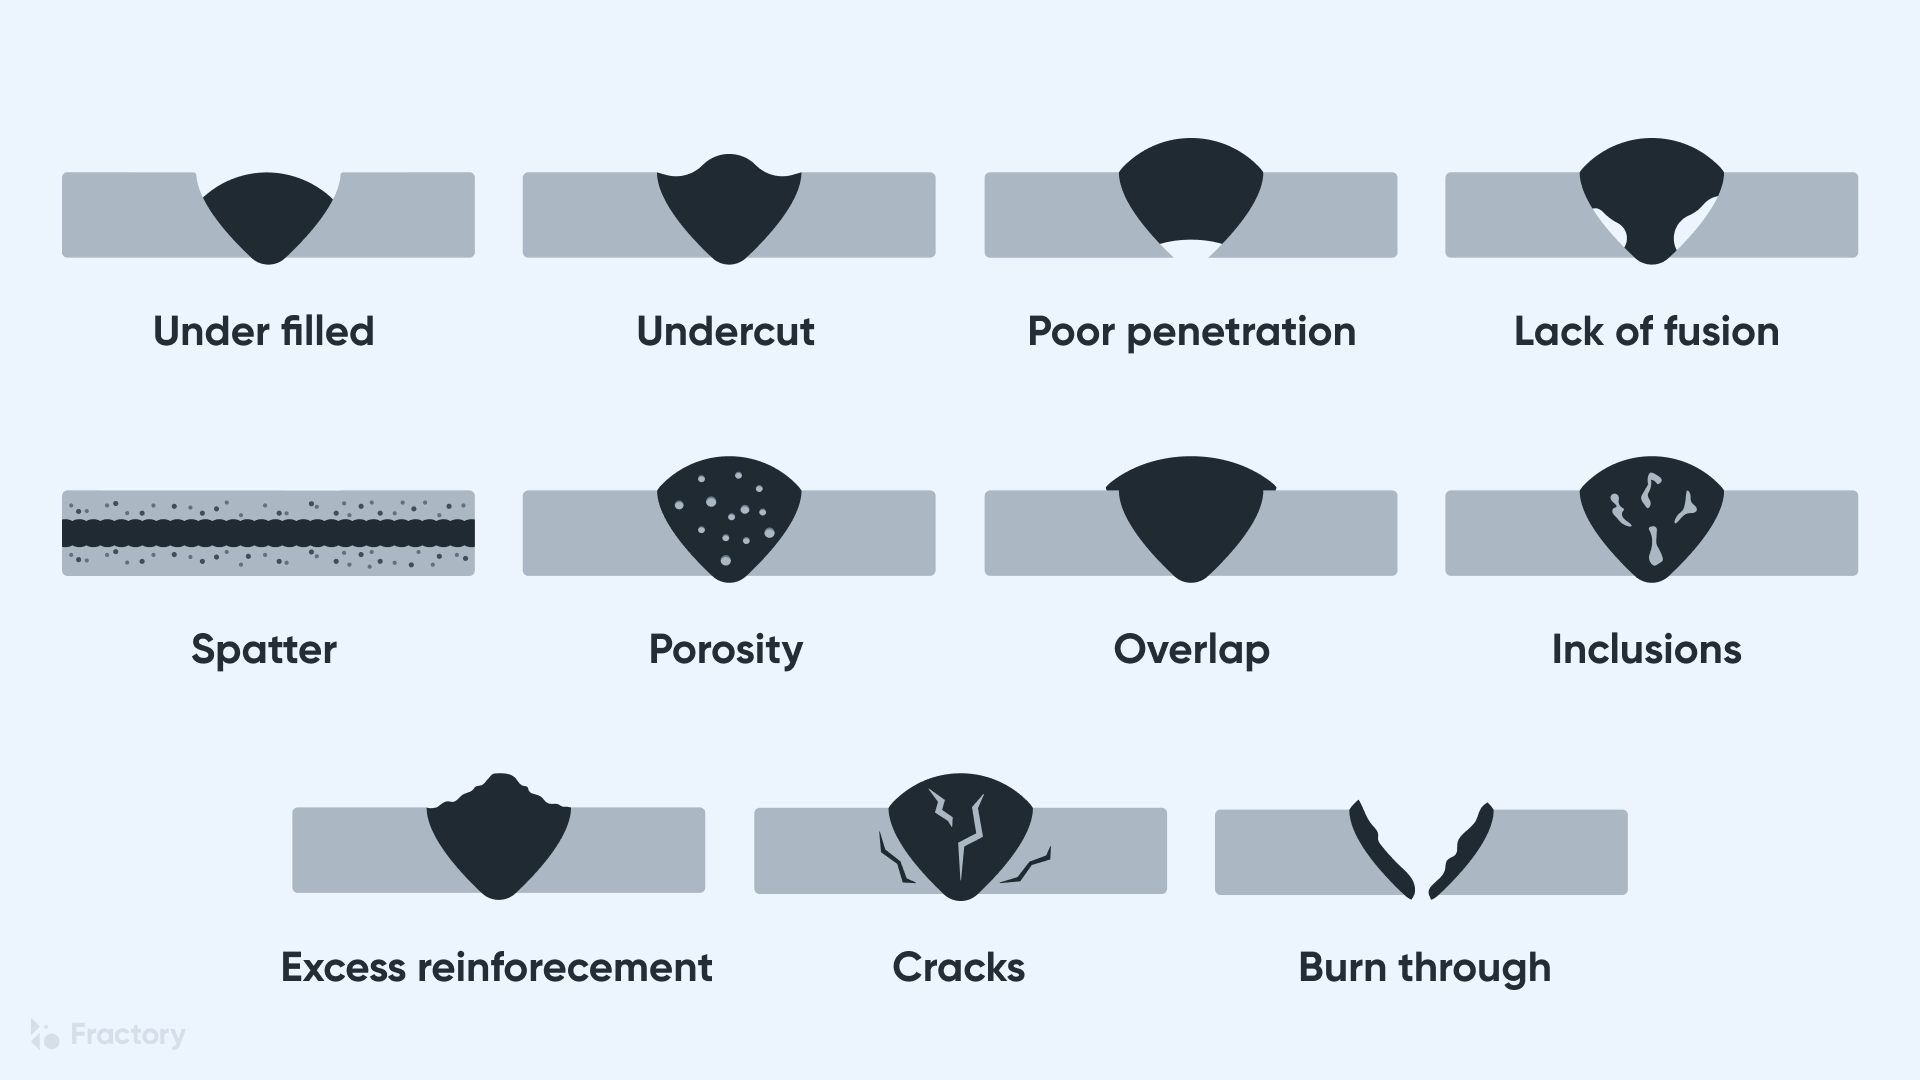
When learning how to inspect welds visually, focus on these critical elements that indicate quality or potential failure points. Check for consistent weld bead appearance along the entire length with no sudden changes in width or height. Examine both weld toes (where weld metal meets base material) for smooth transitions without undercutting—a groove that reduces cross-sectional thickness and creates dangerous stress concentrations. Inspect the weld face for porosity (small round cavities from trapped gas) or slag inclusions (irregular non-metallic particles). Verify proper reinforcement—not too convex (creating stress points) nor too concave (reducing strength). For groove welds, confirm adequate penetration at the root with no visible gaps between weld metal and base material.
Pro Tip: Use a 2x-10x magnifying glass for closer examination of suspicious areas, and position yourself at a 30-45 degree angle to the weld surface to maximize shadow effects that highlight surface irregularities.
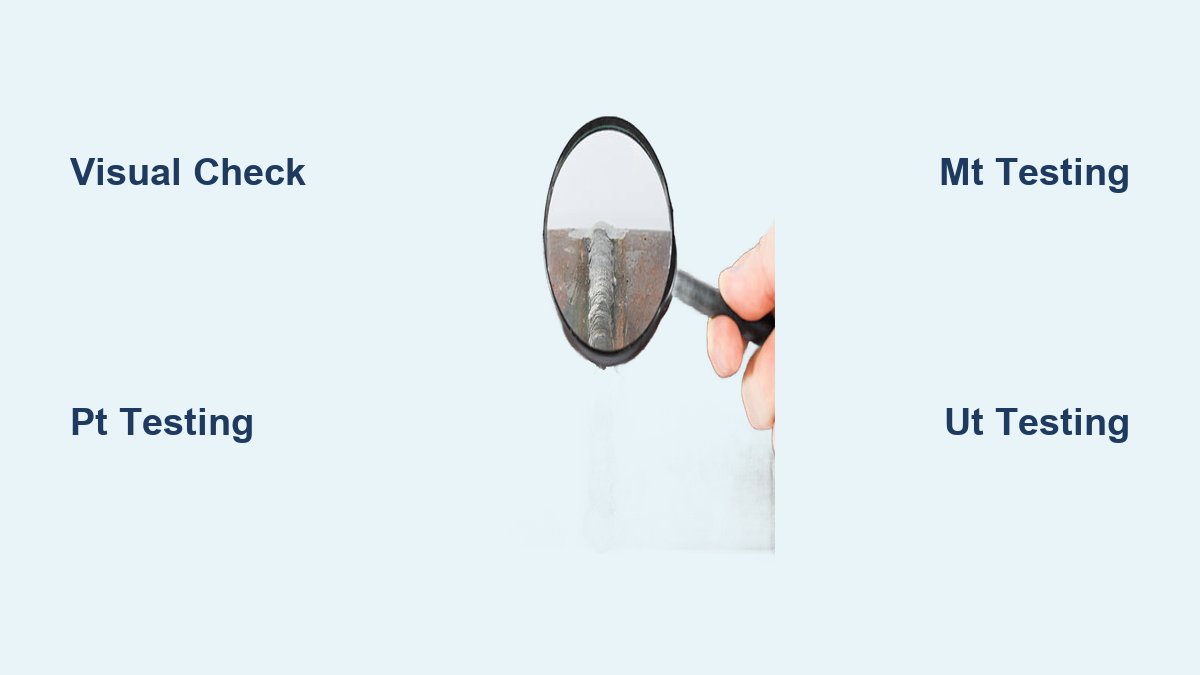
Non-Destructive Testing Methods for Hidden Defects
While visual inspection catches surface flaws, many serious defects lurk beneath the surface. Understanding when and how to apply non-destructive testing (NDT) methods is crucial for comprehensive weld evaluation. The right method depends on your material type, accessibility, and the specific defects you’re targeting.
Liquid Penetrant Testing for Surface Cracks
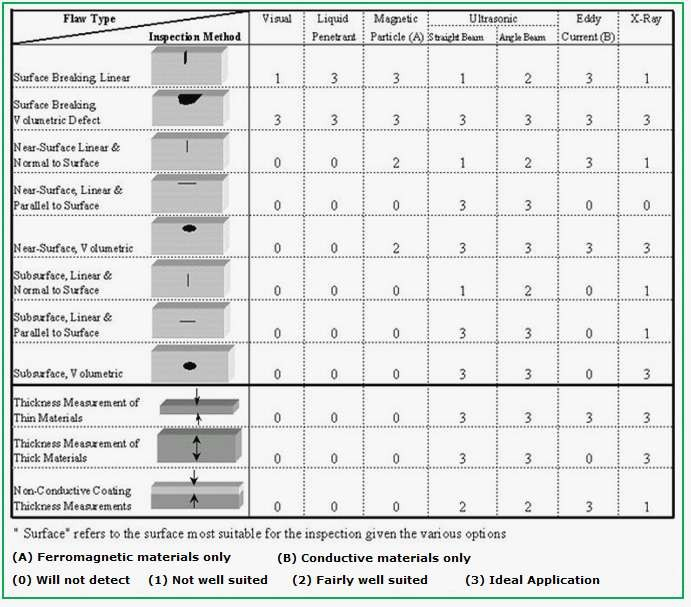
Liquid penetrant testing (PT) detects surface-breaking defects in non-porous materials like steel, aluminum, and titanium. After thorough cleaning to remove all contaminants, apply visible or fluorescent penetrant and allow 10-30 minutes dwell time for capillary action to draw liquid into defects. Carefully remove excess penetrant without disturbing what’s inside flaws, then apply developer powder. Allow 7-60 minutes for indications to form—visible dye shows as red marks against white developer, while fluorescent dye requires UV light. This method reveals cracks, porosity, and laps but won’t detect subsurface defects.
Magnetic Particle Testing for Steel Welds
Magnetic particle testing (MT) works exclusively on ferromagnetic materials like carbon steel and detects both surface and near-surface defects. Create a magnetic field using either prods (electrodes placed across the weld) or a yoke (magnet straddling the weld). Apply magnetic particles while the field is active—they’ll cluster at flux leakage points caused by cracks, lack of fusion, or inclusions. Inspect immediately as indications fade when the magnetic field dissipates. Perform testing in two perpendicular directions to catch defects of any orientation. MT provides immediate results but requires proper magnetization direction and works only on magnetic materials.
Ultrasonic Testing for Internal Evaluation
Ultrasonic testing (UT) uses high-frequency sound waves to detect internal discontinuities in all materials. A transducer sends pulses into the weld; when sound waves hit defects like porosity, slag, or lack of fusion, echoes return to the transducer. The instrument calculates defect depth based on sound travel time. For accurate results, calibrate your equipment using reference standards matching your material thickness. Move the transducer systematically across the weld in a raster pattern, angling the beam to intersect the entire weld volume. UT requires significant operator skill to distinguish real defects from geometric reflections but provides precise depth measurements impossible with other methods.
Recognizing Critical Weld Defects That Demand Action
Not all weld discontinuities require repair—your job is to identify which defects actually threaten structural integrity. Understanding how to inspect welds means knowing which flaws are deal-breakers versus acceptable variations based on your application’s requirements.
Planar Defects: The Most Dangerous Flaws
Planar defects like cracks, lack of fusion, and lack of penetration pose the greatest risk because their sharp edges concentrate stress and can propagate under load. Cracks appear as jagged linear discontinuities visible on the surface or detected internally through NDT. Transverse cracks (perpendicular to weld axis) are especially dangerous as they directly oppose applied loads. Lack of fusion occurs when weld metal fails to bond with base material or previous passes, creating a smooth, planar discontinuity that radiographic testing may miss but ultrasonic testing detects readily. These defects typically require complete removal and rewelding—never simply cover with additional weld passes.
Warning: Hydrogen-induced cracks may not appear until hours or days after welding, especially in high-strength steels. Monitor critical welds during the first 48 hours after completion.
Volumetric Defects: When Size Matters
Volumetric defects like porosity and slag inclusions are generally less critical than planar defects but become problematic when clustered or exceeding size limits. Porosity appears as round cavities from trapped gas and is acceptable in small quantities for many applications. Slag inclusions (irregular non-metallic particles) are more concerning, especially when linear or clustered. Acceptance depends on your applicable standard—AWS D1.1 allows limited porosity in structural welds, while ASME Boiler Code has stricter limits for pressure vessels. Measure defect size against code requirements: typically, isolated porosity under 3/32″ diameter is acceptable in many applications, but clusters exceeding 1/4″ in any direction usually require repair.
Creating Actionable Weld Inspection Documentation
Proper documentation transforms how to inspect welds from subjective opinion to objective quality control. Your inspection report must include specific elements to be legally defensible and practically useful for future reference.
Essential Inspection Report Components
Document these critical elements for each weld inspected: component identification (with unique numbering), weld location and joint type, inspection method used, inspector credentials (including certification level), equipment calibration status, environmental conditions during inspection, specific defects found (with measurements and locations), and final disposition (accept/reject with reference to applicable standard). For rejected welds, include precise repair instructions and verification requirements for the rework. Sketch defect locations when possible—simple diagrams communicate issues more effectively than written descriptions alone.
Time-Saving Shortcut: Use standardized digital inspection forms on tablets in the field rather than paper, allowing immediate photo documentation, automatic timestamping, and direct integration with your quality management system.
Maintaining Weld Quality Through Prevention
The most efficient approach to how to inspect welds involves preventing defects before they occur rather than just finding them after welding. Integrate inspection principles throughout your welding process rather than treating it as a final step.
Pre-Weld Verification Checklist
Before striking an arc, verify these critical elements that prevent 70% of common weld defects: base material meets specifications and is properly cleaned, joint preparation matches procedure requirements, fit-up tolerances are within acceptable limits (typically ±1/16″ for most applications), preheat temperature is achieved and documented, welding procedure specification (WPS) is approved and available, filler metals are correct and properly stored, and welder qualifications match the required process and position. This pre-weld verification catches problems that would otherwise create defects requiring costly rework.
Expert Note: Track weld parameters during production—amperage, voltage, and travel speed deviations beyond 10% of procedure values often lead to defects that visual inspection might miss until it’s too late.
Final Verification Before Sign-Off
Before accepting any weld, perform these final checks that many inspectors overlook. Verify all required non-destructive testing has been completed with acceptable results—not just the minimum percentage but all critical areas specified in your procedure. Confirm any repairs have been properly documented, re-inspected, and meet acceptance criteria. Check for post-weld heat treatment requirements if applicable. Finally, ensure all documentation is complete, signed, and stored according to retention requirements (typically 5-20 years depending on application).
Mastering how to inspect welds requires both technical knowledge and practical judgment—understanding not just what defects look like but why they form and when they truly matter. Start with thorough visual examination, apply appropriate NDT methods when needed, document everything meticulously, and integrate inspection principles throughout your welding process rather than treating it as an afterthought. This systematic approach ensures your welds provide the structural integrity they’re designed for, keeping structures safe and reducing costly rework. Remember that consistent, methodical inspection today prevents catastrophic failures tomorrow.
Leave a Reply