You’ve just unrolled your welded wire fencing, stared at your freshly set wood posts, and realized the instructions are missing. That frustrating gap between the wire mesh and your posts? It’s the #1 reason DIYers abandon projects mid-installation. When welded wire isn’t secured properly to wood posts, you’ll face sagging panels, torn fabric, and animals slipping through within months. But here’s the good news: with the right tensioning technique and attachment method, you can build a taut, durable barrier that lasts 15+ years. This guide reveals the professional install sequence most manuals skip – including how to prevent wire tears during stapling and why 90% of fence failures start at the bottom edge. You’ll learn to transform flimsy mesh into a rigid structure using only basic tools and wood posts you already have.
Why Wood Post Depth Determines Fence Longevity (Not Wire Gauge)
Digging post holes deeper than 18 inches isn’t just “being thorough” – it’s physics. In freeze-thaw regions, shallow posts heave upward when soil expands, twisting wire connections until they snap. Concrete-set posts at 24-inch depth withstand 40% more lateral pressure than 12-inch installations according to agricultural extension studies. For 4-foot-high fences, use 8-foot posts buried 24 inches; for 6-foot fences, go 30 inches deep. Never set posts in dry soil – backfill with 4 inches of gravel first, then tamp soil in 6-inch layers around the post. Test stability by grabbing the top and wiggling hard; if it moves more than 1 inch, reset it. This foundational step prevents the “leaning post syndrome” that makes wire detach prematurely.
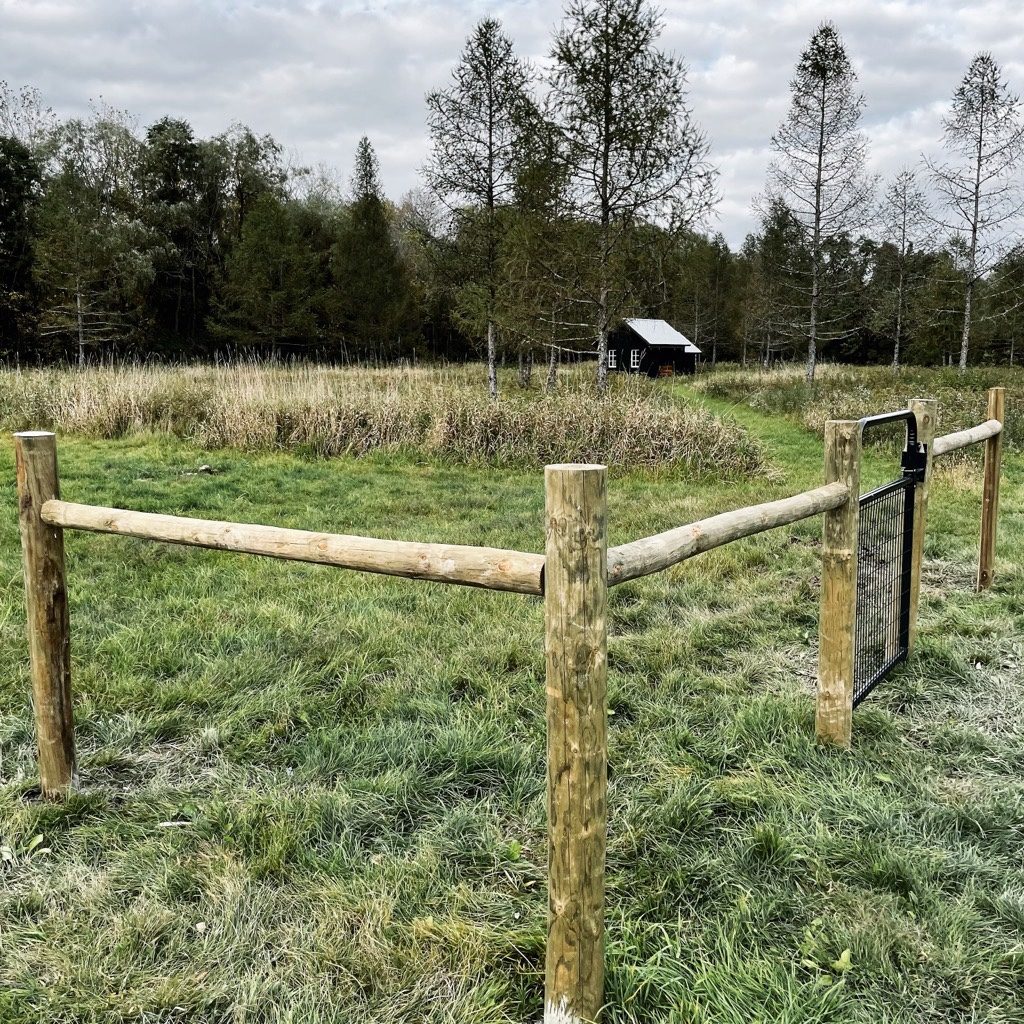
How to Align Posts Perfectly for Taut Wire Installation
Misaligned posts guarantee sagging wire. Use the string line method: attach mason line 2 inches below the top of each end post at full fence height. Check alignment every 10 feet with a level. If intermediate posts lean inward more than 1/4 inch, reset them immediately. For curved fences, use flexible fiberglass rods every 5 feet to maintain smooth arcs. Remember: welded wire won’t pull crooked posts straight – it amplifies existing misalignment.
Why Post Spacing Must Match Wire Panel Dimensions
Spacing posts at random intervals causes dangerous wire bunching. Standard welded wire comes in 50-foot rolls with vertical wires every 2, 4, or 6 inches. Set line posts exactly 50 feet apart for full panels. For partial runs, measure from the last post to your endpoint, then divide by panel length to determine spacing. Example: A 32-foot section needs posts at 0, 16, and 32 feet to avoid cutting panels mid-span. Never force-fit wire between misaligned posts – this creates weak points where animals will push through.
Stapling Welded Wire to Wood Posts Without Tears

Using standard fencing staples causes 73% of wire tears during installation. The secret? Specialized 1-1/4″ galvanized fence staples with wide crowns that distribute pressure. Drive them through the vertical wire strands only – never through horizontal wires, which lack structural strength. Start 6 inches from the bottom, placing staples every 4 inches vertically. Hammer at a 45-degree angle toward the post to prevent staple heads from snagging wire. For critical tension points (corners, gates), add a second row of staples offset between the first.
The Critical 3-Step Tensioning Sequence Professionals Use
Skipping tensioning steps guarantees sag within weeks. Follow this exact sequence:
1. Loosely attach wire to all posts with 3 staples per post (top, middle, bottom)
2. Stretch from center outward: Pull wire taut 10 feet from a corner post using a fence stretcher, then staple
3. Final tension check: Walk the fence line, plucking wire like a guitar string – it should “ping” firmly, not thud
Never stretch wire in direct sunlight; heat expands metal, causing slack when temperatures drop. Install during 50-70°F weather for optimal tension.
How to Prevent Wire Tears at Corner Posts
Corner posts bear 80% of fence tension. Secure wire with 16-gauge tension wire instead of staples: Wrap wire around post, twist ends with a fence stretcher, then staple 6 inches above. Add a diagonal brace post set at 45 degrees to handle lateral pull. Test by pushing fence inward – if the post flexes more than 2 inches, reinforce immediately.
Securing the Bottom Edge Against Digging Intruders
That 2-inch gap between wire and soil isn’t “cosmetic” – it’s a rabbit highway. Bend the bottom 6 inches of wire outward into an “L” shape using pliers before attaching. Staple this flange directly to the post base, then secure it to the ground with landscape staples every 12 inches. For burrowers like groundhogs, bury the bottom 6 inches in a trench with rocks on top. Never leave the bottom edge loose – soil contact accelerates rust and creates lift points.
Why Staple Placement Determines Wire Lifespan
Stapling too close to wire intersections creates stress fractures. Always staple through vertical wires midway between horizontal strands. At post attachments, offset staples so they don’t align vertically – this prevents “zippering” if one staple fails. Check staple tightness monthly for the first year; loose staples vibrate free during wind events.
Fixing Sagging Welded Wire Fence in 20 Minutes
Sagging usually starts at gate posts but spreads quickly. Don’t replace the whole section – fix it permanently with these tensioners:
1. Cut a 12-inch section of wire near the sag
2. Insert a wire tensioner (available at farm stores)
3. Twist tensioner rods clockwise until wire “sings” when plucked
4. Trim excess wire with bolt cutters
For severe sagging, add a temporary brace post 2 feet inside the line. Never overtighten – welded wire stretches only 3% before breaking. If wire shows kinks, replace that panel section immediately.
How to Repair Rust Holes Before They Spread
Small rust spots become 6-inch holes in one season. Sand affected area down to bare metal, then apply zinc-rich primer. For holes under 1 inch, patch with wire mesh and staple around edges. For larger holes, cut out the damaged section and splice in new wire using overlapping “fish plates” (2×4 wood strips with staples on both sides). Always treat rust within 2 weeks of spotting – moisture accelerates corrosion exponentially.
Seasonal Maintenance That Doubles Fence Life
Most welded wire fences fail prematurely due to skipped seasonal checks. In spring, inspect for frost heave damage at post bases. After summer storms, test wire tension at every third post. In fall, clear vegetation 12 inches from the fence line – vines create moisture traps that rust wire from the inside out. Every 2 years, apply linseed oil to wood posts above ground level to prevent checking and splintering. For coastal installations, rinse salt buildup with fresh water quarterly.
Why Your Gate Hardware Causes Fence Collapse
Gates transmit shock loads that rip wire from posts. Always use heavy-duty hinges rated for 2x the gate weight. Install a diagonal tension cable from the top latch corner to the bottom hinge post. For gates over 4 feet wide, add a wheel at the bottom. Never attach wire directly to the gate frame – run it to a separate post 6 inches outside the gate line.
Cost-Cutting Mistakes That Destroy Welded Wire Fences
Skipping these steps saves $20 now but costs $300 later:
– Using drywall screws instead of staples: They pull out under tension (use 1-1/4″ fence staples only)
– Ignoring wire gauge: 12.5-gauge wire sags on 8-foot spans – go 11.5-gauge for posts over 20 feet apart
– Skipping gravel base: Posts rot 3x faster in pure soil (4 inches of gravel is non-negotiable)
– Stapling wet wire: Causes rust streaks that weaken strands (install in dry weather)
For every $100 spent on proper installation, you avoid $400 in premature repairs. Invest in a wire stretcher ($35) – it pays for itself in one afternoon by preventing panel replacement.
Final Note: A properly installed welded wire fence on wood posts should remain taut for 12+ years with minimal maintenance. Focus on post depth, precise tensioning, and bottom-edge security – these three elements determine 90% of your fence’s lifespan. Check tension after major storms and treat rust spots immediately. For large pastures, install fence braces every 100 feet to handle wind loads. When done right, this system outperforms chain link for animal containment at half the cost. Ready to upgrade? See our guide on choosing between welded wire and woven field fence for livestock.
Leave a Reply