Your welding helmet suddenly goes dark mid-bead, or worse—you notice cracks spiderwebbing across your lens during a critical job. Without immediate replacement, you’re risking permanent arc eye damage or retinal burns. Installing a welding lens correctly isn’t just about convenience; it’s your primary defense against UV radiation 10,000 times brighter than sunlight. This guide gives you the exact steps to install any welding lens safely—whether you’re using a Lincoln Electric Viking, Miller Digital Elite, or budget auto-darkening model. You’ll learn how to avoid dangerous gaps, prevent fogging issues, and verify proper function before striking your next arc.
Why Incorrect Lens Installation Causes Serious Eye Injuries
How Gaps and Misalignment Expose You to Radiation Burns
Even a 1mm gap around your lens allows concentrated UV rays to penetrate. These microscopic openings cause “welder’s flash”—a painful corneal sunburn that feels like sand in your eyes hours after welding. More dangerously, unfiltered infrared radiation can silently damage your retina, leading to permanent vision spots. Proper installation creates a seamless seal where the lens meets the helmet shell, blocking all stray radiation.
The Hidden Danger of Overtightened Retaining Screws
Forcing screws to “secure” a lens often warps the housing. This creates pressure points that crack lenses during temperature changes or impact. Always hand-tighten screws in a star pattern—never use power tools. If you hear plastic creaking, you’ve exceeded safe torque limits.
Identifying Your Helmet’s Lens System Before Starting
Fixed vs. Auto-Darkening Helmets: Critical Differences
Fixed-shade helmets (like basic grinding shields) use simple snap-in lenses with no electronics. Auto-darkening models contain fragile LCD cells requiring precise alignment with light sensors. Never force a fixed-shade lens into an auto-darkening helmet—the electrical contacts will short-circuit. Check your helmet’s manual for the exact lens code (e.g., “ADF-200” for Jackson Safety models).
Measuring Lens Dimensions With Household Tools
No manual? Place your old lens on graph paper and trace its outer shape. Note:
– Outer dimensions (typically 3.5″ x 4.5″ for standard helmets)
– Sensor window position (auto-darkening only)
– Retaining clip locations (count the tabs)
Mismatched lenses cause dangerous light leaks—your replacement must match within 1/16″.
Essential Safety Prep: Non-Negotiable Steps Before Handling Lenses
Required Gear to Prevent Contamination and Injury
- Nitrile gloves (cotton fibers scratch anti-fog coatings)
- Grounded ESD wrist strap (for auto-darkening units—static kills LCDs)
- Work light (minimum 500 lumens to spot micro-cracks)
- Non-ammonia lens cleaner (Windex ruins anti-reflective coatings)
Critical: Power down auto-darkening helmets by removing batteries first. Never install lenses while connected to welding leads—stray voltage can fry the circuitry.
Removing Your Old Welding Lens Without Damaging the Helmet
Unlocking Retaining Mechanisms Safely
Most helmets use one of three systems:
1. Slide locks (Miller Digital Elite): Press both side tabs inward while lifting the lens cover
2. Twist rings (Lincoln Viking 3350): Rotate counterclockwise until tabs clear grooves
3. Screw retainers (Jackson Safety Genesis): Remove all 4 perimeter screws before lifting
Pro Tip: Place masking tape on loose parts before disassembly. A dropped screw into the helmet’s electronics voids warranties.
Handling Cracked Lenses Without Injury Risk
If your lens is shattered:
1. Spray with light oil (3-in-1 oil works) to bind glass fragments
2. Scoop pieces with stiff cardboard—never fingers
3. Immediately bag debris in puncture-proof container
Never blow on broken lenses—microscopic shards become airborne hazards.
Pre-Installation Checks for New Lenses
Inspecting for Shipping Damage in Critical Areas
Hold the lens under bright light at 45-degree angles to check:
– Edge integrity: Chips >0.5mm compromise structural safety
– Sensor windows: Haze here causes delayed darkening (auto-darkening only)
– Coating uniformity: Rainbow swirls indicate scratched anti-reflective layers
Red Flag: If the lens feels warm when unpacked, it was exposed to direct sunlight during shipping—return it immediately. UV damage isn’t always visible.
Cleaning Your Workspace Like a Pro
Wipe the helmet shell’s lens channel with 99% isopropyl alcohol on microfiber cloth. Dust particles here create pressure points that crack new lenses. For auto-darkening models, clean sensor ports with compressed air—never cotton swabs (fibers block light detection).
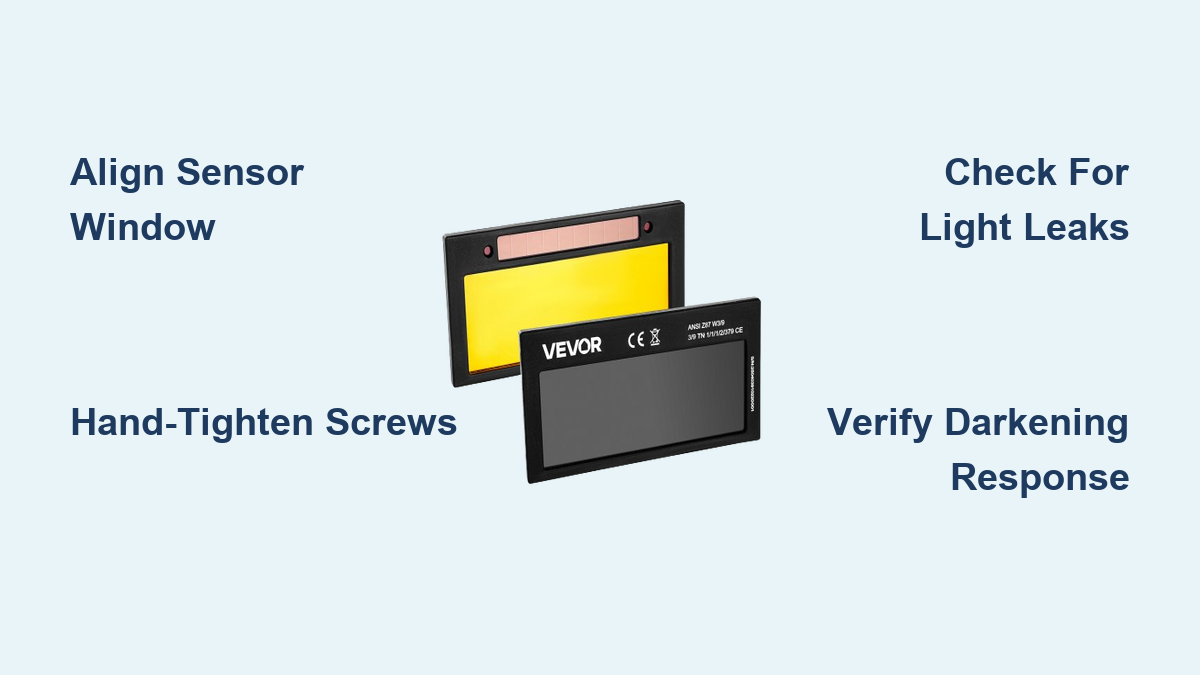
Installing the New Lens: Precision Alignment Steps
Positioning Auto-Darkening Lenses for Optimal Performance
- Align the light sensor window with the helmet’s front aperture (usually top-center)
- Match battery contacts to internal terminals (note positive/negative orientation)
- Ensure impact cover sits flush—gaps here cause “ghosting” during darkening
Time-Saver: Place thin painter’s tape on the helmet shell to mark screw positions before inserting the lens. Prevents fumbling during alignment.
Securing Retainers Without Warping the Housing
For screw-based systems:
1. Insert all screws finger-tight first
2. Tighten in star pattern (top-bottom-left-right)
3. Stop when resistance increases—never force past this point
4. Verify even pressure by sliding credit card around perimeter (no snags)
Warning: Overtightening by just 1/8 turn can misalign LCD layers in auto-darkening lenses, causing permanent blind spots.
Critical Post-Installation Safety Tests
Checking for Radiation Leaks in 60 Seconds
- Darken room completely
- Shine bright flashlight around lens edges
- Look for any light penetration through seals
- Pay special attention to corners and sensor ports
Pass/Fail: If you see light, disassemble and reposition the lens. Never weld with detectable leaks.
Verifying Auto-Darkening Response Time
For auto-darkening helmets:
1. Set welder to 90A on DCEN
2. Strike arc at 1/2″ distance from helmet
3. Darkening should occur in ≤1/20,000 second
4. Return to light state within 0.25 seconds after arc stops
Failure Sign: Delayed darkening = misaligned sensors. Recheck lens positioning before welding.
Fixing Common Installation Problems Immediately
Solving Fogging Caused by Improper Sealing
Moisture inside the lens housing means:
– Fault: Outer impact cover isn’t sealed
– Fix: Apply silicone sealant (Permatex Ultra Blue) to channel grooves
– Never use tape—it melts during welding
Stopping Lens Vibration During Use
Loose lenses rattle during grinding:
1. Add 0.5mm rubber gasket tape to shell channel
2. Reinstall lens—should require firm pressure to seat
3. Test by tapping helmet lightly (no movement)
Extending Lens Life With Smart Maintenance
Cleaning Without Damaging Coatings
- Blow loose debris with air canister
- Spray lens-specific cleaner on microfiber cloth (never directly on lens)
- Wipe in straight lines from center outward—no circles
- Dry with clean side of cloth using light pressure
Never Use: Paper towels, shirt sleeves, or ammonia-based cleaners—they destroy anti-fog layers in 3 uses.
Storage Habits That Prevent Premature Failure
Store helmets:
– In cool, dark place (dashboards ruin lenses in 2 hours)
– With impact cover closed (dust scratches viewing area)
– Vertical position (prevents warping from weight)
Replace lenses showing any cloudiness—even if scratches aren’t visible.
When to Replace Entire Helmet Systems
Lenses fail safely when:
– Cracks penetrate beyond the outer protective layer
– Auto-darkening shows permanent dark spots
– Response time exceeds 1/10,000 second
Critical Threshold: If you experience eye discomfort after welding, replace immediately—your lens is compromised even if undamaged. Never risk vision for equipment costs.
Final Note: Proper welding lens installation takes 8-12 minutes but prevents lifelong vision damage. Always verify radiation seals before every use—your eyes can’t regenerate from UV burns. For auto-darkening helmets, carry a spare fixed-shade lens as backup when working in high-interference environments. Check ANSI Z87.1-2020 compliance stickers before purchasing replacements; non-certified lenses may darken too slowly during critical arc starts. When in doubt, consult your helmet manufacturer’s installation video—most provide free step-by-step guides for every model. Your vision is worth the extra 5 minutes of careful setup.
Leave a Reply