You’ve positioned your electrode perfectly, struck the arc, and started your weld pass—only to end up with a convex bead that bulges outward instead of the smooth concave profile you wanted. This frustrating outcome happens to even experienced welders who haven’t mastered the precise balance of heat, speed, and technique required for consistent concave welds. Whether you’re fabricating structural steel components or repairing sheet metal, knowing how to make a concave weld gives you a significant advantage with better fatigue resistance and reduced material consumption. This guide reveals the exact settings, angles, and movements you need to achieve professional-quality concave welds every time you strike an arc.
Why Concave Welds Outperform Convex Profiles
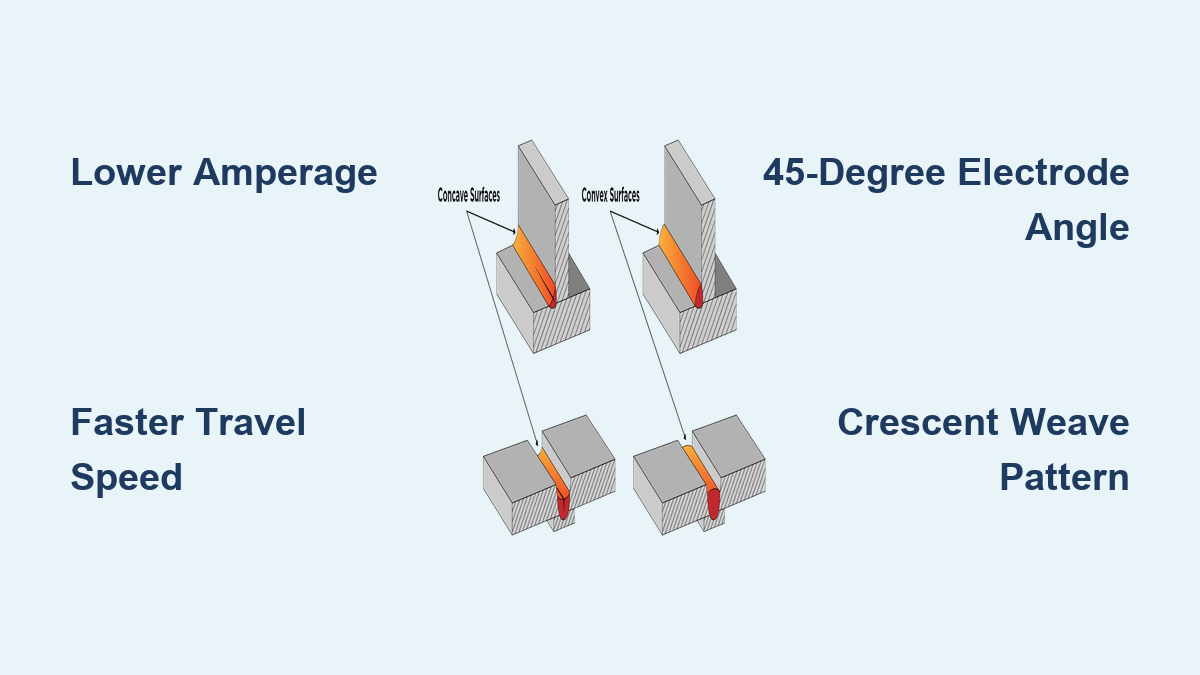
Concave welds curve inward below the base metal surface, creating what professionals call “negative reinforcement.” This subtle but critical difference from convex welds delivers two major benefits: reduced stress concentrations at the weld toe and significantly less filler metal usage. When a load cycles through a welded joint, the gradual transition of a concave weld distributes stress more evenly, preventing cracks from initiating at the toe where convex welds create sharp angles.
The physics behind this superior performance lies in surface tension dynamics. As your weld pool cools, surface tension pulls the molten metal toward the cooler base metal edges. When you balance travel speed, amperage, and electrode angle correctly, this surface tension creates the characteristic inward curve. Higher travel speeds and cooler settings allow surface tension to dominate over gravitational forces on the pool, resulting in that smooth concave profile you’re after.
Optimal Machine Settings for Concave Welding

Your machine settings make or break your ability to produce concave welds consistently. Forget the maximum amperage recommendations on your electrode packaging—those settings produce convex beads. For true concavity, you need to operate at the lower end of the acceptable range.
Shielded Metal Arc Welding (SMAW) Configuration
When using 6013 electrodes on 1/4-inch steel, reduce your amperage to 80-100 amps instead of the typical 130 amps. For 7018 electrodes in fillet welds, stay at 90-110 amps rather than pushing to 120+. This cooler setting creates a smaller, more controllable pool that solidifies with the desired inward curve. Maintain a short arc length—no more than the electrode diameter—to maximize surface tension effects on the pool shape.
MIG and Flux-Cored Welding Adjustments
For MIG welding, reduce your voltage by 1-2 volts below standard settings and increase travel speed by 10-15%. With ER70S-6 wire on mild steel, a voltage setting of 18-19 volts (instead of 20-21) combined with faster movement creates perfect concavity. Flux-cored welding requires similar adjustments—lower voltage by 1-3 volts and maintain a brisk travel pace while keeping the gun angle consistent.
Essential Joint Preparation for Clean Concave Welds

Contaminated metal sabotages your concave weld attempts before you even strike an arc. Rust, oil, or mill scale disrupts surface tension, causing the weld pool to behave unpredictably and preventing that smooth inward curve.
- Remove all contaminants within two inches of the joint using a stainless steel wire brush
- For heavy rust or mill scale, grind the area first before final cleaning with acetone
- Ensure tight fit-up with gaps no larger than 1/16 inch to prevent weld pool irregularities
- Clamp workpieces securely to eliminate movement that disrupts bead profile consistency
Perfect Electrode Angle for Concave Profiles
Your electrode angle determines whether you get concave or convex results. The magic happens with a drag technique at 45-60 degrees from the workpiece surface. Point the electrode back toward where you’ve already welded (10-20 degrees off perpendicular), allowing the arc force to shape the pool while the trailing electrode angle encourages inward cooling.
For vertical fillet welds, adjust to approximately 45 degrees from each surface while pointing toward your direction of travel. This backhand technique counters gravity’s effect on the pool and maintains consistent concavity throughout the vertical run. Right-handed welders achieve best results moving from right to left with the electrode leading the pool, while left-handed welders work opposite.
Precise Travel Speed Control Techniques
Travel speed is your most powerful tool for controlling concavity. Too slow creates convex beads; too fast causes undercut and irregular profiles. The sweet spot occurs when your weld pool forms a teardrop shape extending about one electrode diameter behind the arc.
Practice on scrap material first:
– Mark straight lines on practice metal to develop consistent speed
– Focus on the pool’s behavior rather than watching your progress
– Maintain fluid motion without hesitation or acceleration
– Use a magnetic guide for long seams to prevent speed variations
When welding production pieces, aim for a speed that allows the pool edges to cool slightly faster than the center. This differential cooling rate creates the inward curve characteristic of proper concave welds.
Effective Weave Patterns for Concave Fillet Welds
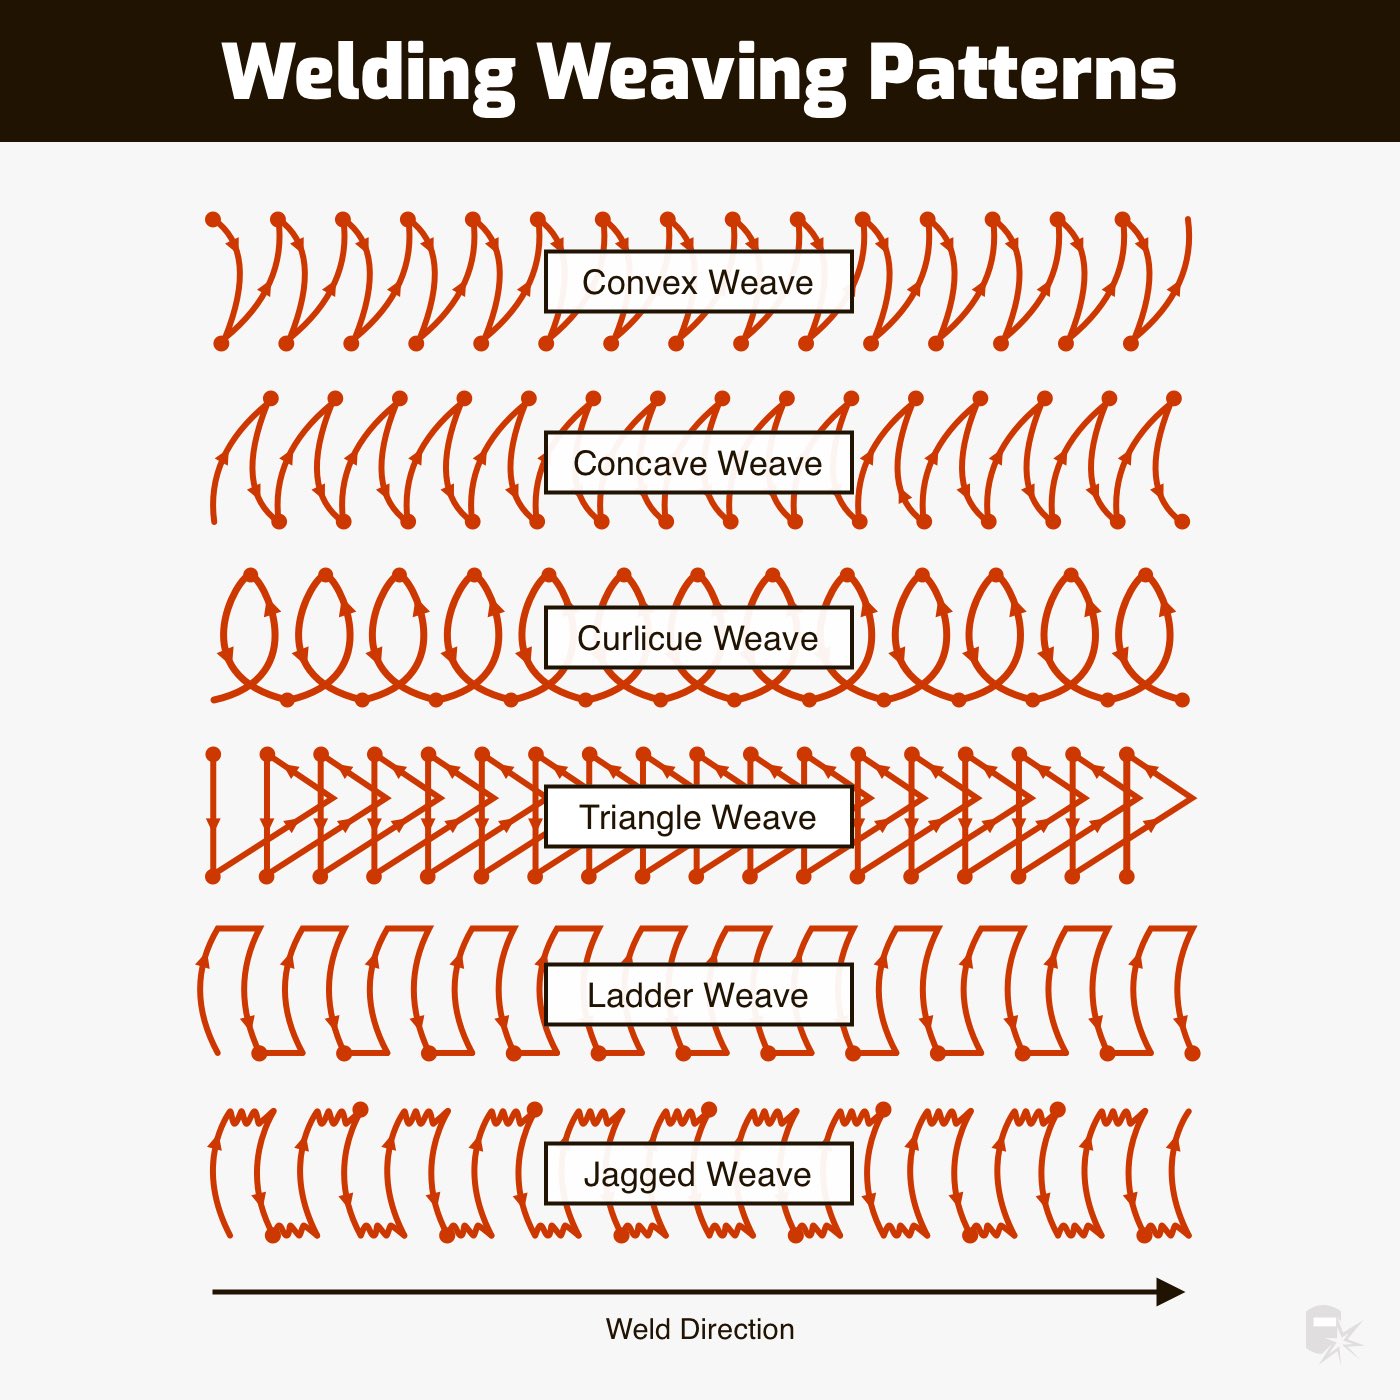
Certain weaving motions enhance concavity by controlling cooling rates across the weld face. The crescent or C-weave works exceptionally well for fillet welds.
Crescent Weave Technique
Move your electrode in a sideways “C” pattern—down the vertical leg, across the root, and up the horizontal leg—while advancing along the joint. Keep the weave narrow (no wider than three times the electrode diameter) and pause momentarily at each edge. These micro-pauses allow the toe areas to cool slightly faster than the center, promoting the desired inward curve without creating convexity.
Whip-and-Pause Alternative
For thinner materials, try a controlled whip-and-pause motion:
– Move the electrode rapidly forward a short distance
– Pause briefly (just long enough for the leading edge to stabilize)
– Repeat consistently along the joint
– Maintain consistent arc length throughout
Avoid wide weaving patterns—they disrupt thermal equilibrium and typically produce convex or irregular profiles. Narrow, controlled movements maintain the conditions that favor concavity.
Position-Specific Concave Welding Strategies
Each welding position requires technique adjustments to maintain concavity while fighting gravity’s effects on the weld pool.
Horizontal Position Success
Hold your electrode at 45 degrees to both surfaces, tilted slightly upward (5-10 degrees). Use a travel speed 10-15% faster than flat position welding and maintain a shorter arc length to maximize pool control. Watch for sagging at the bottom of the weld—if you see it, increase speed slightly or reduce amperage by 5 amps.
Vertical Position Mastery
For upward vertical welding:
– Use smaller electrodes (3/32 inch) at lower amperage
– Maintain 45-degree angle to each surface while pointing upward
– Use short segments with micro-pauses at each edge
– Build each segment from bottom to top to prevent sagging
Downhill vertical welding naturally produces concave profiles but sacrifices penetration. Only use this method when specifications permit, and maintain moderate amperage with a slightly longer arc.
Overhead Position Techniques
Overhead welding often produces natural concavity but risks sagging and undercut. Combat this by:
– Using the lowest practical amperage
– Maintaining a shorter-than-normal arc length
– Keeping the electrode angle that presses the pool against the joint
– Balancing travel speed to prevent both sagging and lack of fusion
Troubleshooting Common Concave Weld Problems
Even with perfect technique, issues arise. Learn to recognize and correct them immediately.
Fixing Undercutting
Undercut along the weld toe frequently accompanies concave attempts. Correct it by:
– Reducing amperage by 5-10 amps
– Slowing travel speed just enough to fill the edge transition
– Tilting the electrode slightly more toward your direction of travel
– Maintaining consistent weave width and pause durations
Correcting Lack of Fusion
Concave welds sometimes sacrifice fusion at the edges when pushed too aggressively. If your weld looks concave but lacks proper blending:
– Reduce travel speed by 10-15% while maintaining angle
– Increase amperage slightly if speed reduction isn’t sufficient
– Switch to a stringer bead instead of weaving for better edge penetration
– Ensure proper joint preparation with adequate bevel angles
Adjusting Excessive Concavity
When your weld becomes too concave—nearly flat or dipping below acceptable standards:
– Increase travel speed gradually until profile improves
– Bump amperage up by 5-10 amps to increase pool fluidity
– Reduce weave width to concentrate heat in the joint
– For production work, document settings that produce optimal results
Quality Verification for Professional Results
Don’t assume your concave weld meets specifications—verify it. Under good lighting, examine the completed weld for these characteristics:
– Smooth, continuous curve dipping below base metal without undercut
– Gradual transition from weld to base metal (no sharp angles)
– Consistent leg length meeting specifications (concave welds may require slightly longer legs)
For critical applications, supplement visual inspection with appropriate non-destructive testing. Dye penetrant testing reveals surface-breaking discontinuities, while radiographic or ultrasonic testing evaluates internal quality. Measure throat dimensions to ensure they meet minimum requirements—concave welds distribute stress differently than convex profiles.
Practice Strategies for Consistent Results
Mastering concave welds requires deliberate practice with specific goals. Start with simple fillet welds on scrap material, focusing on one variable at a time—first perfecting travel speed, then electrode angle, then weave pattern. Document successful settings for different materials and thicknesses to create your personal reference guide.
Challenge yourself progressively:
– Begin with flat position fillet welds on 1/4-inch steel
– Move to horizontal position once consistent in flat
– Progress to vertical and overhead positions
– Experiment with different electrode types and sizes
– Practice on various joint configurations
Keep a welding journal noting:
– Material type and thickness
– Electrode type and diameter
– Machine settings (amps/voltage)
– Travel speed and technique
– Results and adjustments made
This systematic approach transforms concave welding from a frustrating challenge into a reliable technique you can deploy whenever specifications demand it.
Creating quality concave welds consistently separates skilled welders from beginners. By mastering the precise balance of lower heat input, faster travel speed, and proper electrode angle, you’ll produce welds with superior fatigue resistance and material efficiency. Start with scrap material, focus on one technique variable at a time, and document your progress. Within weeks of deliberate practice, achieving perfect concave profiles will become second nature rather than a struggle. The professional results you’ll produce make this advanced technique well worth the effort.
Leave a Reply