Your garden perimeter looks bare, livestock keeps escaping, or you need affordable property security. A welded wire fence solves these problems with its strength, affordability, and quick installation. Unlike chain-link or wood options, this mesh system creates a rigid barrier that withstands animal pressure and weather extremes. Knowing how to make a welded wire fence properly transforms your property line from vulnerable to secure in just one weekend. This guide delivers actionable steps for DIYers to build a professional-grade welded wire fence that lasts decades—no prior construction experience needed.
Why Welded Wire Outperforms Other Fence Types
Welded wire mesh delivers unmatched value for boundary security. Its grid pattern distributes pressure evenly when animals push against it, preventing the “bowing” common in woven wire fences. The rigid structure resists climbing better than chain-link, while costing 30-50% less than wood alternatives. For livestock containment, the uniform openings prevent hooves or heads from getting trapped—a critical safety advantage over traditional field fencing. Homeowners gain instant property definition without breaking the bank, while farmers secure pastures against predators. This durability comes from factory-welded intersections that won’t unravel like twisted wire options when impacted.
How Mesh Size Affects Your Project Success
Choosing the wrong opening size creates immediate problems. Small 2×2 inch grids work for poultry but get clogged with vegetation in pastures. Oversized 6×6 inch openings let rabbits and small dogs through. Match mesh dimensions to your primary threat:
– Chickens/rabbits: 1×1 or 1×2 inch
– Sheep/goats: 2×4 inch
– Cattle/horses: 4×4 or 2×6 inch
– Deer deterrence: 2×4 inch with 8+ foot height
Pro Tip: Always add 6 inches of buried mesh depth to stop diggers—rodents and coyotes exploit unsecured bottom edges.
Essential Tools and Materials Checklist
Skip this preparation and you’ll waste hours mid-project. Every welded wire fence installation requires these non-negotiable items:
– Mesh roll (galvanized for rust resistance)
– Line posts (4×4 pressure-treated lumber or metal T-posts)
– Corner posts (6×6 lumber or 2.5″ metal posts)
– Post-hole digger (manual or power auger)
– Staple gun with 1.5″ galvanized staples
– Fence tensioner (critical for taut installation)
– Sledgehammer (for driving T-posts)
Avoid this mistake: Using untreated wood posts. Ground contact rots untreated lumber in 2 years—always specify “ground contact” rated lumber or metal posts.
Step 1: Precise Layout and Property Line Verification
Start by confirming your legal property boundaries with survey markers—installing on a neighbor’s land triggers costly disputes. Drive temporary stakes every 10 feet along the intended fence line using string guides. Measure diagonally between corners; equal diagonal lengths confirm perfect 90-degree angles. For sloped terrain, follow the contour rather than terracing—welded wire stretches better over gradual slopes than sharp ledges. Mark post locations with spray paint, spacing line posts 8-12 feet apart (closer spacing for cattle, wider for deer fencing).
What to Do When Encountering Obstacles
Rocks, roots, or utilities derail unprepared installers. If your post-hole digger hits immovable objects:
1. Shift post position 6-12 inches laterally—don’t force holes
2. Call 811 before digging near utility markers (free service locates buried lines)
3. Use shorter posts in rocky soil (bury 1/3 total length minimum)
Time Saver: Pre-mark all post locations with biodegradable paint—no guessing mid-installation.
Step 2: Installing Corner and End Posts for Maximum Strength
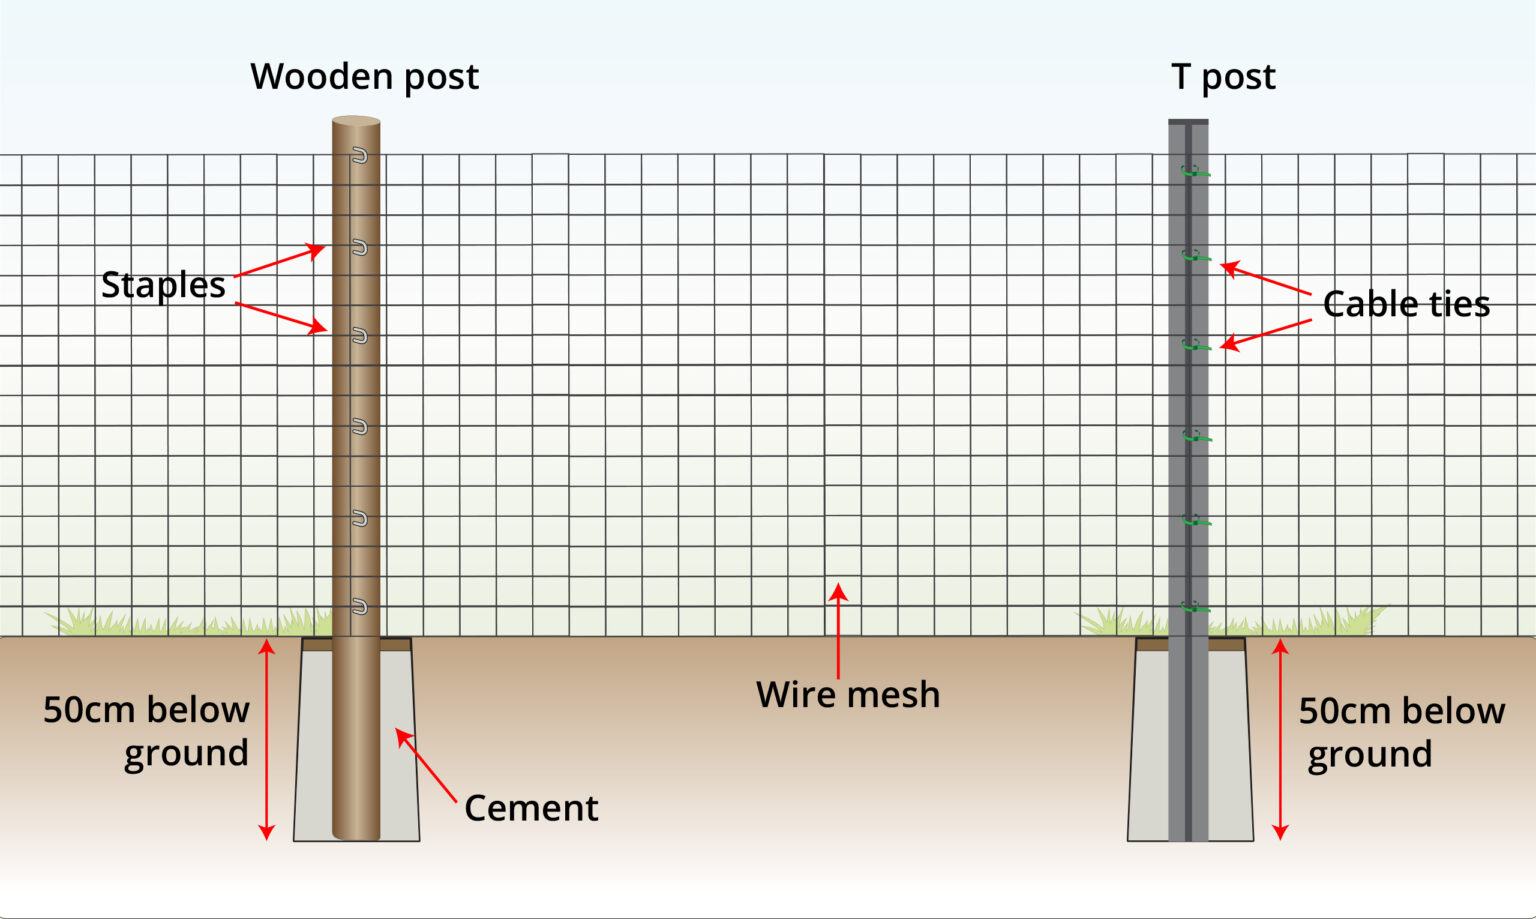
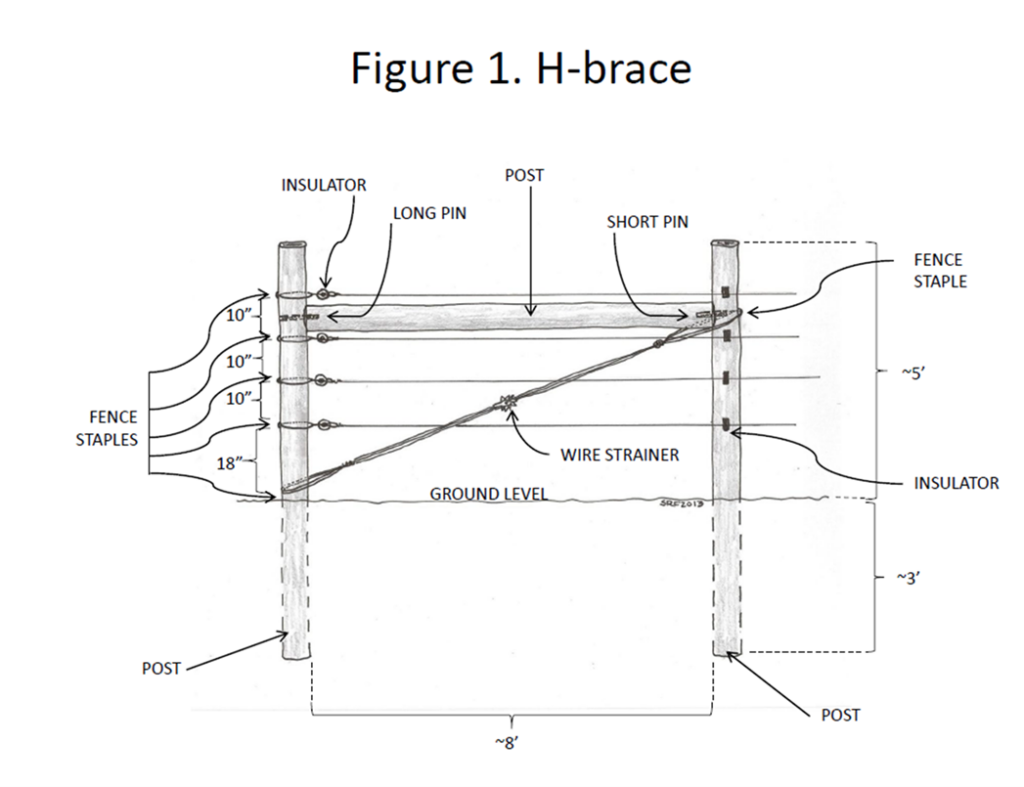
Corner posts bear 90% of tension forces—skimp here and your fence collapses. Dig 24-inch deep holes (36 inches in frost-prone zones). Set 8-foot corner posts with 24 inches underground, bracing them vertically with 2x4s. Fill holes with 6 inches of gravel for drainage, then concrete up to soil level. Allow 24 hours for curing before attaching mesh. For end posts (gate locations), use the same heavy-duty installation. Critical check: Use a level on two sides of each post before concrete sets—leaning corners warp the entire fence.
How to Reinforce Posts in Loose Soil
Sandy or clay soils require extra stabilization:
– Add concrete depth by 25% (30″ holes → 38″ concrete)
– Insert rebar vertically through post base into concrete
– Create “collars” with 6″ PVC pipe around post base
Warning: Never rely on tamped soil alone for corners—concrete failure causes catastrophic sagging.
Step 3: Stretching Welded Wire Mesh Without Sagging
This step separates professional results from DIY disasters. Unroll mesh 10 feet from the fence line to avoid premature tension. Attach one end to a corner post with heavy-duty staples every 12 inches. Insert a fence tensioner between the mesh and opposite corner post. Crank slowly while walking the fence line—stop immediately if mesh distorts. Ideal tension leaves mesh taut but not drum-tight; it should deflect 1-2 inches when pressed firmly. For long runs (>100 feet), use intermediate tensioners every 50 feet to prevent cumulative sag.
Fixing Mesh That Won’t Stay Taut
If sections slacken after tensioning:
1. Recheck post plumb—leaning posts lose grip
2. Add intermediate posts where soil settled
3. Re-tension at dawn when metal contracts in cool temperatures
Pro Tip: Staple mesh 6 inches below post tops—this creates downward tension that counters snow load.
Step 4: Securing Mesh to Line Posts for Longevity
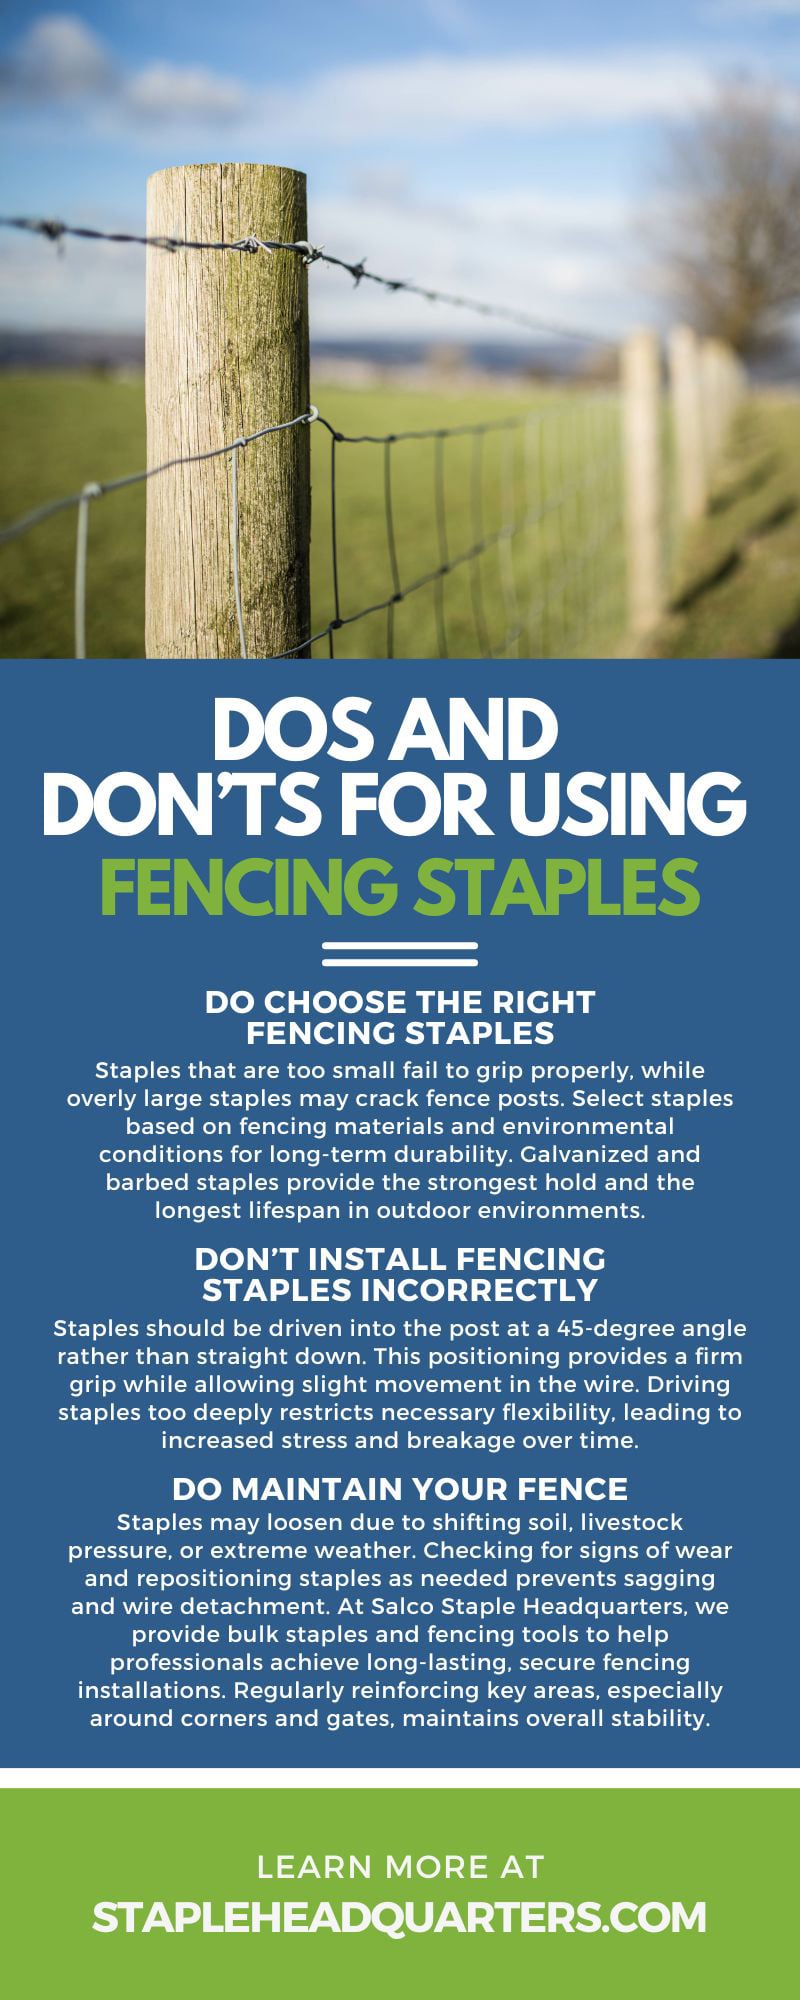
Staple placement determines how long your fence stays rigid. Drive 1.5″ galvanized staples through every horizontal wire intersection where it meets posts. Start 6 inches below the post top and work downward, spacing staples 8 inches apart vertically. Never staple only at top/bottom—this causes mid-span bulging. For T-post installations, use specialized wire clips that slide onto post ribs. Hammer clips flush to prevent snagging clothing or animal hides. Always leave 2-3 inches of mesh overlap at corners for future re-tensioning.
Common Attachment Mistakes to Avoid
DIYers compromise security with these errors:
– Using nails instead of staples: Nails pull out under tension
– Skipping horizontal wires: Only vertical wires tear under pressure
– Over-stapling: Creates rust points where staples penetrate mesh coating
Visual Cue: Properly secured mesh shows zero “wave” between posts when viewed horizontally.
Step 5: Adding Gates Without Compromising Strength
Gates are the weakest point—reinforce them like a fortress. Build frames from 2×4 lumber with diagonal bracing to prevent sagging. Position gate posts 1 inch wider than the gate itself for smooth swing clearance. Install heavy-duty hinge straps (not standard door hinges) with 3-inch lag bolts. Anchor the latch post with extra concrete—latch-side posts take 3x more force than hinges. For livestock gates, add a spring-loaded catch to prevent accidental openings.
How to Prevent Gate Sag Within Months
Gate failure happens without these steps:
1. Angle the frame with top hinge 1/4 inch farther from post than bottom hinge
2. Install a turnbuckle cable from top corner to opposite bottom corner
3. Use wheel guides for gates over 4 feet wide
Time Saver: Pre-assemble gates on sawhorses—no awkward balancing mid-installation.
Maintaining Your Welded Wire Fence for 20+ Years
Annual upkeep prevents costly repairs. Inspect for these trouble signs every spring:
– Rust spots at staple points (touch up with galvanized paint)
– Loose posts (add concrete collars before movement worsens)
– Vegetation growth against mesh (causes moisture-trapping corrosion)
– Sagging sections (re-tension before winter snow load)
Trim overhanging branches—falling limbs tear mesh during storms. After heavy snow, gently lift sagging sections with a broom handle; never pull downward. Re-tension mesh annually as metal fatigues over time.
Critical Tip: Replace damaged sections immediately—small tears propagate into large gaps under pressure.
Welded wire fences deliver unmatched security when installed correctly: corner posts set in concrete, mesh stretched taut with professional tensioners, and every wire intersection secured to posts. Avoid the top mistakes—skimping on post depth, improper tensioning, and inadequate gate reinforcement—to ensure your fence withstands decades of weather and wildlife pressure. Remember to verify property lines before digging, choose mesh size for your specific threat, and perform annual maintenance checks. For complex terrain or large acreage, consult a fencing contractor for the initial layout—they’ll spot soil and slope issues that derail DIYers. Once built, enjoy the peace of mind that comes with a fence that clearly defines your property while keeping what’s yours securely contained. Ready to start? Measure twice, dig once, and staple every intersection—your future self will thank you when the fence stands strong through blizzards and bull charges.
Leave a Reply