Welding exposes your arms to significant hazards daily. Flying sparks, intense heat, spatter, and harmful UV radiation create a demanding environment that demands proper protection. While commercial welding arm pads offer reliable defense, they often come with a price tag that strains tight budgets or fit poorly for unique body types. Learning how to make a welding arm pad yourself gives you complete control over materials, fit, and cost—often producing a superior product for a fraction of the retail price.
This comprehensive guide walks you through every step of creating a durable, heat-resistant welding arm pad from readily available materials. Whether you’re a hobbyist welder looking to save money or a professional seeking a custom solution, this DIY approach delivers results that rival commercial products. You’ll discover which materials provide the best protection, how to construct a pad that stays securely in place, and techniques to extend your creation’s lifespan significantly.
Choose Heat-Resistant Materials for Maximum Safety

Your welding arm pad’s protective capability depends entirely on proper material selection. Start with leather between 2.5mm and 3.5mm thickness for optimal heat protection and flexibility. Thinner leather compromises safety, while thicker options restrict movement and add unnecessary weight. Inspect the leather surface carefully for scars, thin spots, or processing defects that could become failure points under heat stress. Side splits generally offer more uniform thickness than belly cuts for better protection.
Flame-resistant fabrics like Nomex or Kevlar provide lightweight alternatives for precision welding tasks. When selecting FR fabrics, verify they meet ASTM D6413 standards for flame resistance to ensure the material won’t ignite or continue burning after flame exposure. Budget-conscious builders might consider FR-treated cotton, though it typically requires re-treatment after repeated washing or extreme heat exposure.
Why Leather Outperforms Synthetic Materials
Leather remains the gold standard for welding protection due to its natural flame resistance and durability. Unlike synthetics that melt upon contact with spatter, quality leather withstands temperatures exceeding 2,000°F during intense welding operations. Split cowhide or pigskin offers excellent heat dissipation while maintaining flexibility for comfortable movement throughout your workday. Never use standard cotton or synthetic materials in your welding arm pad construction—they can ignite or melt upon contact with spatter, creating serious burn hazards.
Cut Pattern Pieces to Your Exact Arm Measurements

Accurate cutting forms the foundation of a professional-quality arm pad. Measure your arm from elbow to wrist, adding 2 inches beyond each endpoint for overlap and hem allowance. Record the circumference at multiple points—mid-forearm, just below the elbow, and wrist—as arms taper significantly. Most effective arm pads follow the natural arm contour as slightly tapered rectangles rather than uniform tubes.
Transfer Patterns Without Distortion
Create a paper pattern using your measurements with 0.5-inch seam allowance around all edges. For the outer leather piece, cut slightly larger than the padding to allow proper wrapping. Mark notches or alignment points where elastic bands or straps will attach—typically at the midpoint of the pad’s length and 1 inch from each end. Transfer patterns to materials using a fabric marker or chalk. When cutting leather, score the surface lightly with a utility knife before cutting to prevent material stretching along edges.
Assemble Your Arm Pad Using Heat-Resistant Techniques
Begin by stitching the outer shell pieces together using a reinforced seam pattern—either a double-stitched straight seam or a zigzag stitch that locks edges together. Apply a thin line of heat-resistant adhesive along seam interiors before stitching for additional security, especially at stress points where the arm bends most frequently. Allow adhesive to cure completely before proceeding to the next step.
Insert and Secure Your Padding
Insert your closed-cell foam padding into the assembled outer shell, working carefully to avoid bunching or misalignment. Padding should maintain uniform distribution throughout the shell’s interior. Some builders prefer to attach padding using spray adhesive, which prevents shifting during use. If using adhesive, apply a light, even coat to both surfaces and allow appropriate flash time before bonding. Close the arm pad’s open edge using a flat-fell seam or hidden stitch that doesn’t leave exposed thread on the exterior surface.
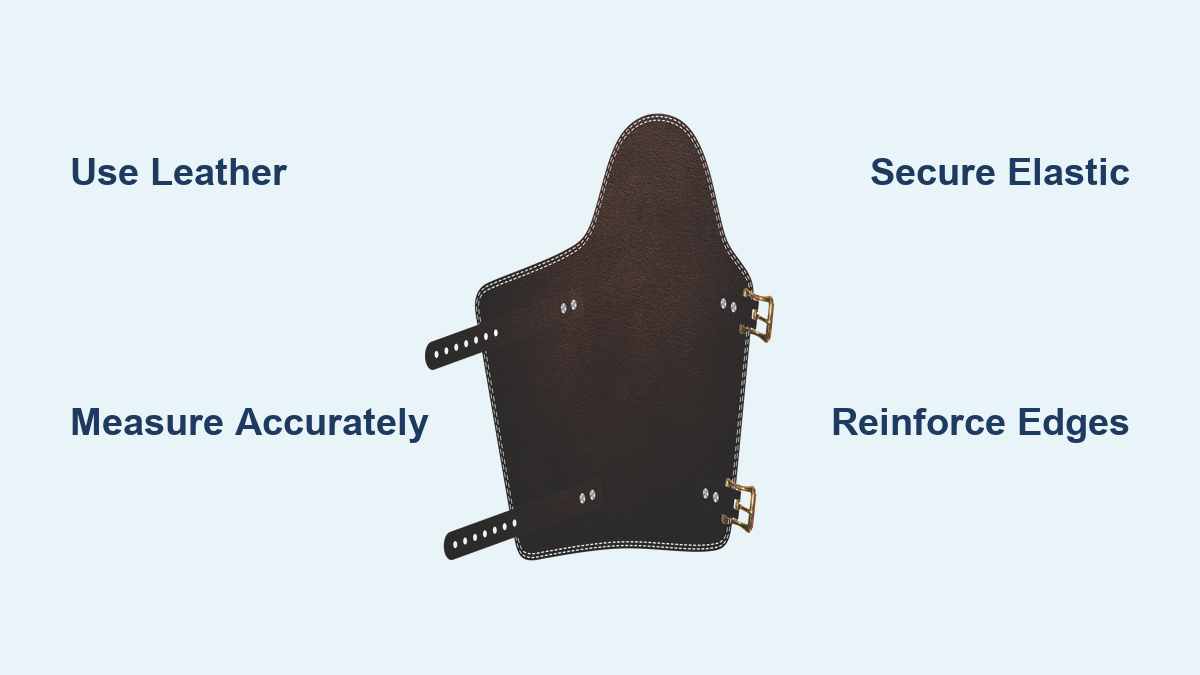
Install a Secure Attachment System That Won’t Fail
Your welding arm pad offers no protection if it shifts or falls off during work. Elastic bands wrapped around the upper arm and wrist provide the most reliable foundation. Cut elastic 2 inches shorter than your arm circumference at each point to ensure snug fit without circulation restriction. Attach elastic using heavy-duty snaps or rivets placed through reinforced leather tabs, with double-riveting at each connection point for redundancy.
Adjust Velcro Straps for Perfect Fit
Velcro straps offer valuable adjustability that accommodates different clothing layers seasonally. Sew Velcro loop strips to the interior surface of the arm pad’s ends, with corresponding hook strips on exterior tabs that fold over to secure. Ensure Velcro engagement is aggressive enough to resist opening under arm movement but not so violent that removal becomes difficult. Test attachment security by performing exaggerated arm movements—reaching overhead, bending aggressively, and rotating through full range. The pad should maintain position without requiring readjustment.
Apply Professional Finishing Touches for Durability
Edge finishing prevents premature wear at material boundaries. Apply edge paint or leather burnishing compound to all exposed leather edges. For FR fabric edges, use a heat-sealing tool or apply fray-check liquid to prevent unraveling. These simple steps dramatically extend usable life by eliminating the primary failure point at material edges.
Reinforce High-Stress Areas
The elbow crease and wrist bend experience the most movement stress during welding. Add a second row of stitching 0.25 inches from primary seams at these locations. Some builders sew leather patches over interior seams where padding edges might create pressure points during extended wear. Incorporate identification and care instructions directly on an interior surface using a permanent marker, or create a small tag from FR fabric and stitch it inside.
Maintain Your DIY Arm Pad for Long-Term Protection

Inspect your arm pad before each use, checking for heat damage, stitch separation, or material degradation. Look for hardened areas on leather that indicate surface burning, thinning at high-stress creases, and any exposed padding material. Minor surface scorching on leather is normal and doesn’t compromise protection, but deep burns or material thinning require patch repair or replacement.
Clean and Store Properly for Maximum Lifespan
Clean leather arm pads monthly using saddle soap or leather cleaner specifically designed for heat-exposed leather. Avoid harsh chemicals that strip protective oils. After cleaning, apply a light coat of leather conditioner to maintain suppleness. Conditioner also repels moisture and reduces spatter adhesion, making cleaning easier after each use. Store your arm pad in a cool, dry location away from direct heat sources. Hanging prevents compression deformation that affects fit. Avoid storing in sealed plastic bags, as trapped moisture promotes mold growth and leather deterioration.
Troubleshoot Common Welding Arm Pad Problems
Pad slides down during use typically indicates insufficient tension in upper attachment or material stretch from extended wear. Add a second elastic band higher on the arm, or install silicone grip strips on the interior surface. For sleeve-style pads, reduce overall circumference slightly by taking in the upper seam.
Fix Excessive Heat Transfer Issues
Excessive heat transfer to arm suggests inadequate material thickness or padding compression. Check padding for permanent compression—if it no longer rebounds when pressed, replace it. Consider adding a reflective heat barrier layer (aluminized material) between padding and outer shell for high-heat applications. This simple modification can significantly improve heat protection without adding substantial bulk.
Why DIY Outperforms Commercial Welding Arm Pads
Creating your own welding arm pad delivers professional-grade protection at a fraction of commercial costs while providing customization options that pre-made products cannot match. Commercial welding arm pads from quality manufacturers typically retail between $40 and $120, while DIY construction using equivalent materials usually costs $15 to $35, yielding 50% to 75% savings.
Achieve Perfect Custom Fit
Custom fit provides benefits unavailable in off-the-shelf products. DIY construction allows you to match your exact arm measurements, incorporate features specific to your welding position, and adjust attachment systems to your preferred configuration. Commercial pads assume average proportions, which rarely match individual bodies perfectly. Your DIY pad will conform precisely to your arm shape, preventing gaps where sparks could enter while eliminating pressure points that cause discomfort during extended welding sessions.
The construction process requires basic sewing skills, readily available materials, and modest investment in tools you likely already own. Start with the design and materials outlined in this guide, adapt to your specific requirements through iteration, and you’ll produce protective gear that serves reliably throughout countless welding sessions. Properly maintained, your DIY welding arm pad will outlast commercial alternatives while providing superior comfort and protection tailored exactly to your needs.
Leave a Reply