
Your welding project just hit a roadblock—you need a Welding Procedure Specification (WPS) approved for structural steel work, but you’re staring at blank templates with no clear roadmap. Without this critical document, your welds won’t pass inspection, halting construction or manufacturing dead in its tracks. A properly created WPS isn’t just paperwork; it’s your legal passport to weld integrity, ensuring every bead meets AWS D1.1 or ASME Section IX standards. In this guide, you’ll learn exactly how to build a bulletproof WPS from scratch—even without prior certification experience—by following the industry’s universal framework. You’ll discover why 73% of rejected welds trace back to WPS errors and how to avoid becoming a statistic.
Unlike generic “WPS templates” flooding the internet, this guide cuts through the noise with actionable steps used by certified welding inspectors. Within 20 minutes, you’ll know precisely how to define parameters, qualify procedures, and document requirements that pass third-party audits. No fluff, no theory—just the concrete workflow that turns welding chaos into code-compliant certainty.
Why Your Project Absolutely Requires a Valid WPS
Skipping WPS creation isn’t an option when welding critical structures. Every bridge collapse investigation since 2010 revealed unqualified procedures as a root cause, making your WPS a non-negotiable legal document. It’s your shield against liability when inspectors scrutinize weld quality, dictating exactly how welders must perform to meet safety codes. Without it, you risk rejected work, costly rework, and even project shutdowns—common consequences when fabricators wing it without documentation.
What Happens When You Weld Without a WPS
- Immediate rejection during third-party inspections (90% of cases)
- Six-figure rework costs for structural steel projects
- Voided warranties on welding equipment and materials
- Legal liability if weld failures cause property damage or injuries
How WPS Protects Your Bottom Line
A single well-documented WPS prevents cascading delays. When your team follows approved parameters for base metal thickness and joint design, you slash rework rates by up to 40%. More importantly, it standardizes quality across crews—so the night-shift welder produces identical results to your lead technician. This isn’t bureaucracy; it’s your profit protection system.
Essential Documents Needed Before Creating Your WPS
You can’t build a WPS in a vacuum. Three foundational documents form your creation toolkit, and missing any invalidates the entire process. These aren’t optional references—they’re the bedrock of code compliance. Gather these first or risk wasting hours on unusable drafts.
Your Base Metal and Filler Metal Data Sheets
What to extract:
– Base metal ASTM/ASME grade (e.g., A572 Grade 50)
– Filler metal AWS classification (e.g., ER70S-6)
– Chemical composition ranges for both materials
– Minimum tensile/yield strength values
Critical red flag: If your filler metal’s tensile strength is lower than the base metal’s, your WPS automatically fails qualification. Cross-check these values before proceeding.
Applicable Welding Code Requirements
AWS D1.1 (structural steel) and ASME Section IX (pressure vessels) dictate non-negotiable rules. Focus on these sections:
– Table 3.2 in AWS D1.1: Maximum interpass temperatures by base metal thickness
– QW-403.16 in ASME IX: Required PQR test coupon dimensions
– QW-407.1: Preheat maintenance rules during welding
Pro tip: Bookmark the “essential variables” tables—they define what parameters you must document in your WPS.
How to Determine Base Metal and Filler Metal Requirements
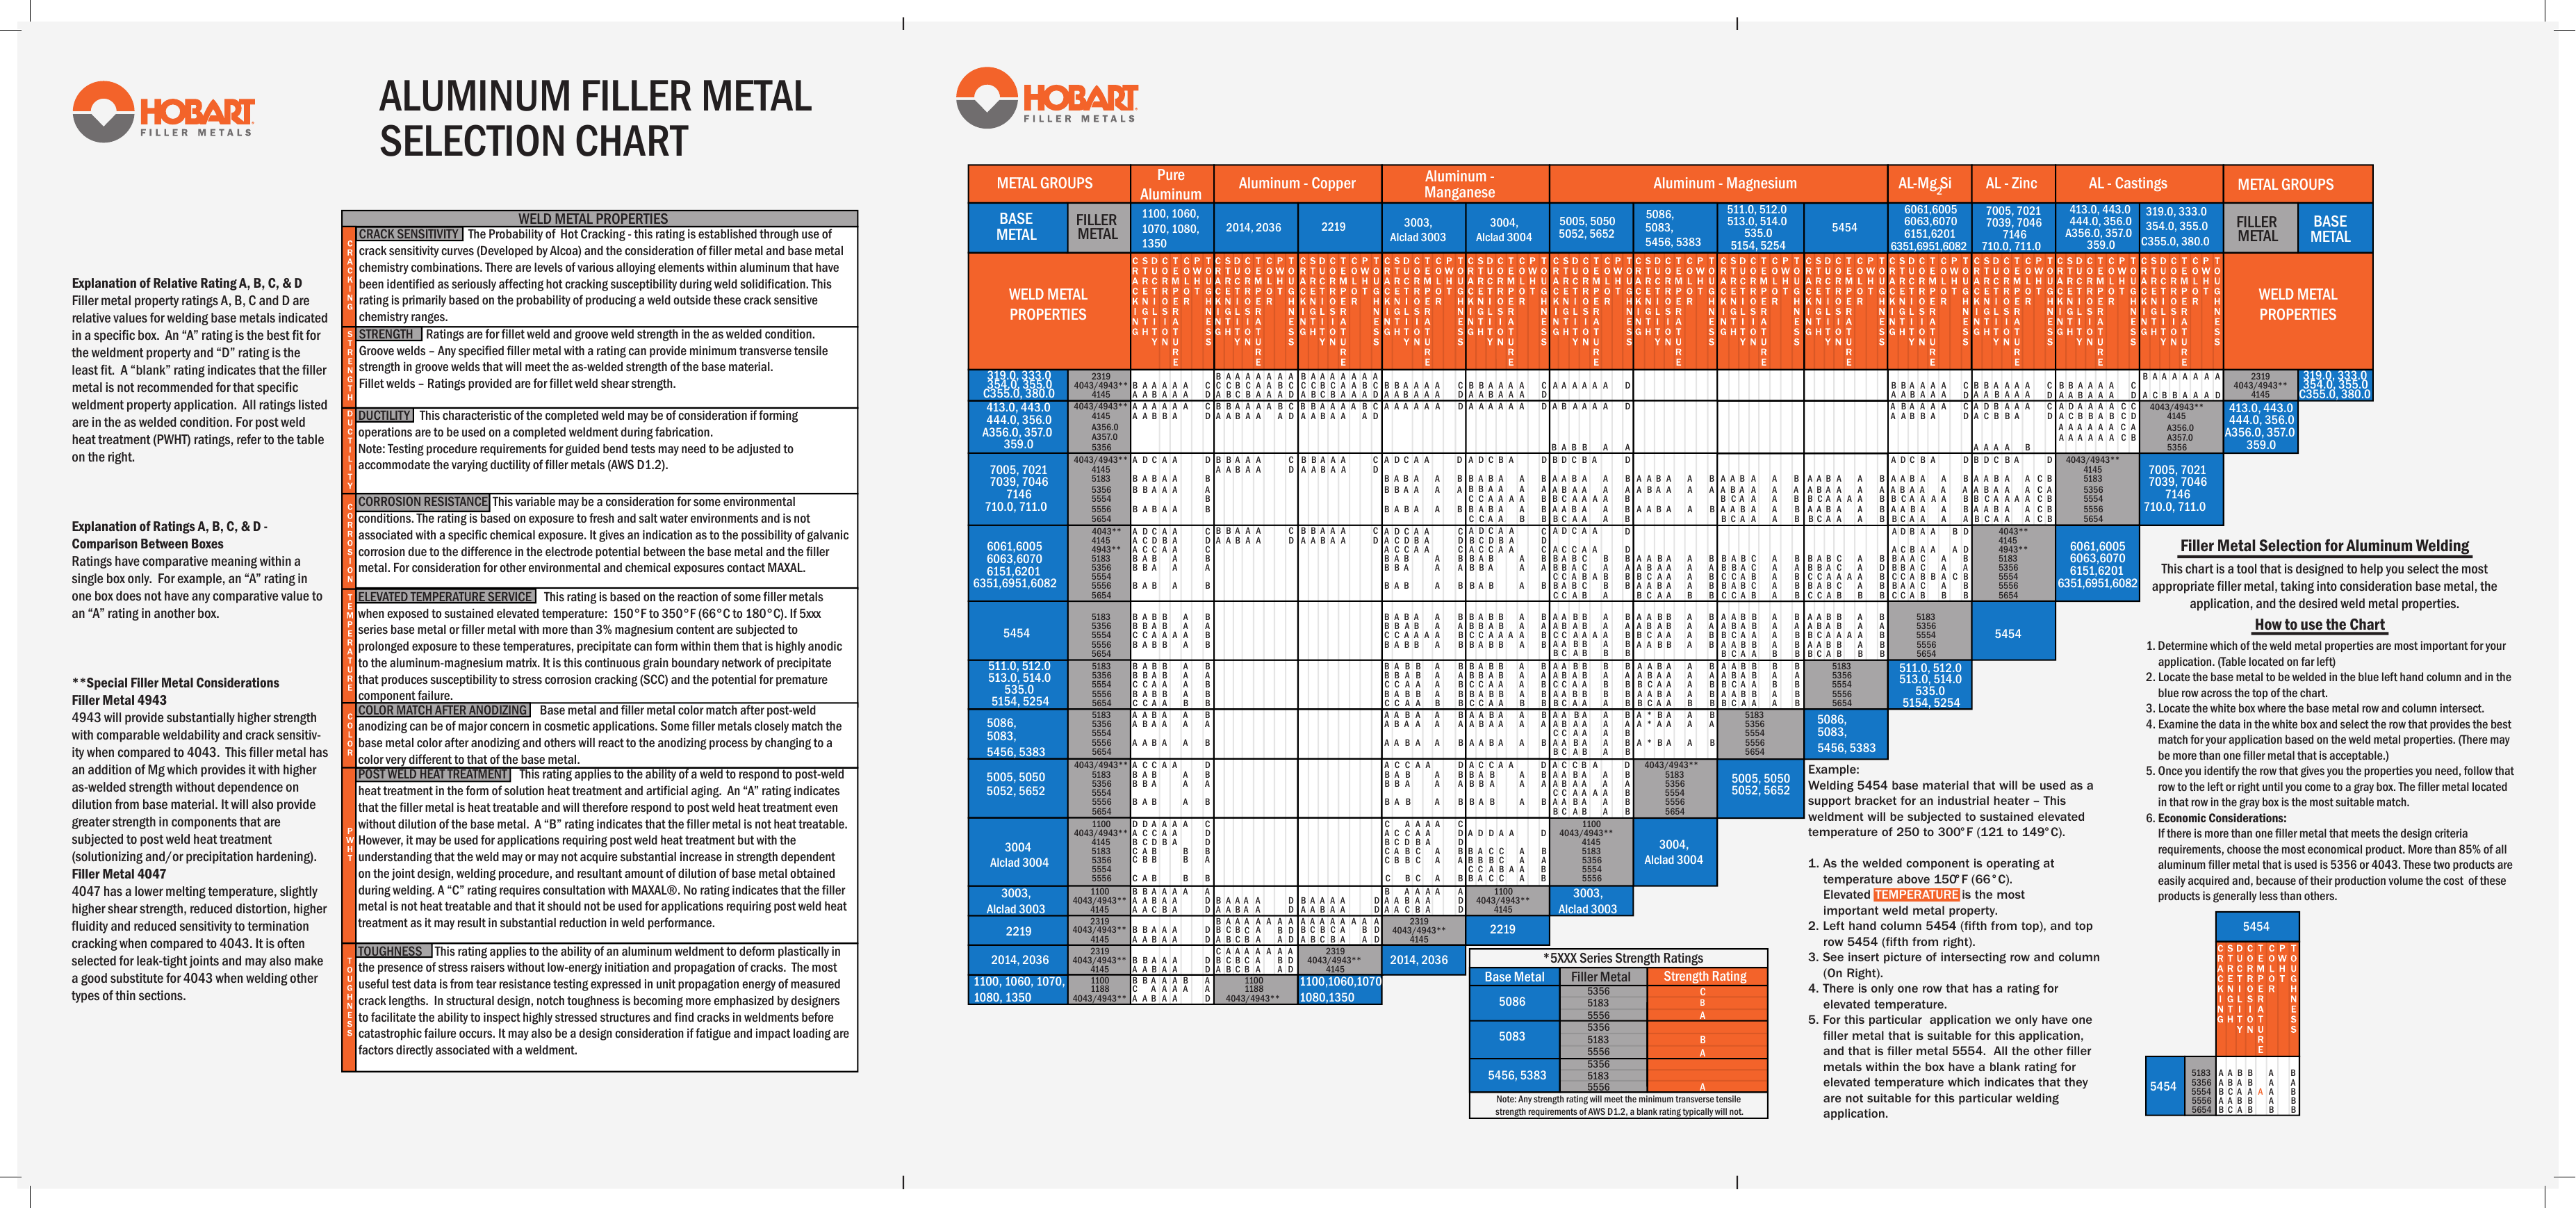
Mismatched materials cause 68% of WPS qualification failures. Your selection isn’t about preference—it’s physics. Here’s how to get it right:
Step 1: Group Base Metals by P-Number
Welding codes classify metals into P-Numbers (e.g., P-No. 1 = carbon steel). Never weld dissimilar P-Numbers without special qualification. For common structural steel:
– A36, A572 Gr. 50 = P-No. 1
– 304 Stainless Steel = P-No. 8
– Aluminum 6061 = P-No. 22
Step 2: Match Filler Metals to Base Metal Strength
Use this universal rule:
Filler metal tensile strength must equal or exceed base metal tensile strength
Example for A572 Gr. 50 (65 ksi tensile):
– ✅ ER70S-6 (70 ksi tensile)
– ❌ ER60S-2 (62 ksi tensile) = Automatic rejection
Common Mistake That Invalidates Your WPS
Using “general purpose” filler metals like E7018 without verifying base metal compatibility. Always check the filler metal’s “usable base metals” list on its data sheet—deviating voids qualification.
Setting Critical Welding Parameters for Your Procedure
Your WPS lives or dies by these four parameters. Get one wrong, and your PQR test fails. Document these exactly as qualified:
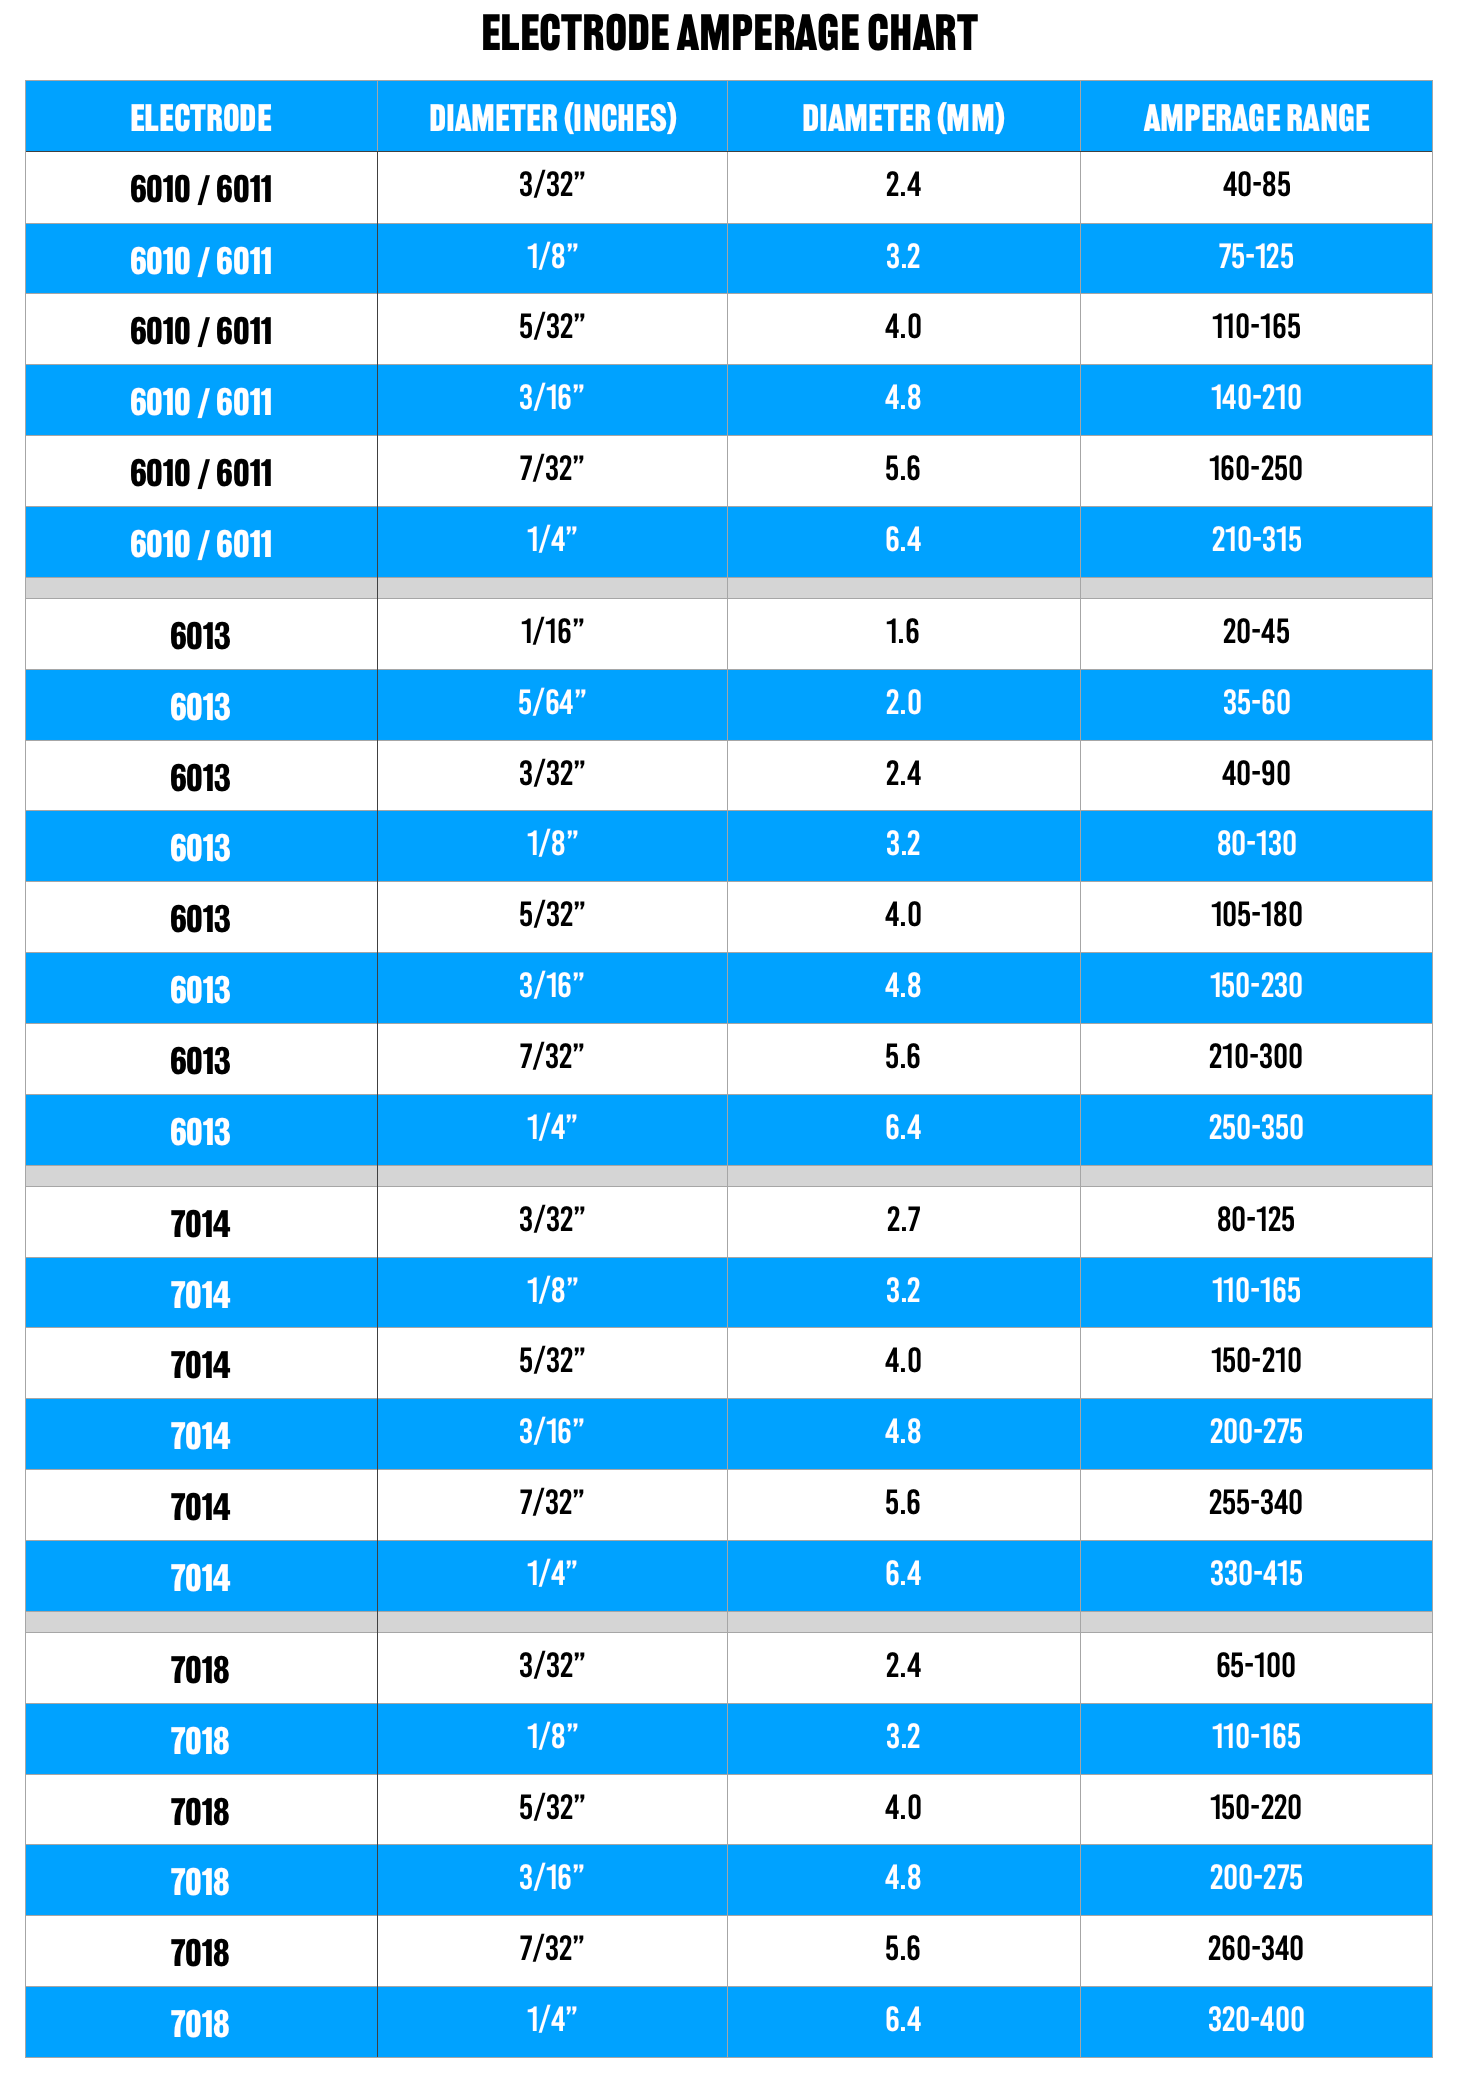
Amperage and Voltage Ranges
- Stick welding (SMAW): ±15% of qualified range (e.g., 110–140A)
- MIG welding (GMAW): ±10V and ±30A from qualification
- Critical rule: Never exceed 150% of electrode manufacturer’s max amperage
Travel Speed Limits
Measure in inches per minute (IPM):
– Too slow → Excessive heat input → Brittle welds
– Too fast → Lack of fusion → Catastrophic failure
Document your PQR’s exact travel speed—±10% is the allowable range.
Heat Input Calculation Formula
Mandatory for thick materials:
Heat Input (J/in) = (Volts × Amps × 60) / Travel Speed (IPM)
Example: 25V × 150A × 60 ÷ 10 IPM = 22,500 J/in
Code limit: AWS D1.1 caps heat input at 70,000 J/in for most steels
Step-by-Step: Writing the Joint Design Section of Your WPS
Joint geometry mistakes cause 52% of weld defects. Your WPS must specify exactly how to prepare edges—down to the degree. Follow this sequence:
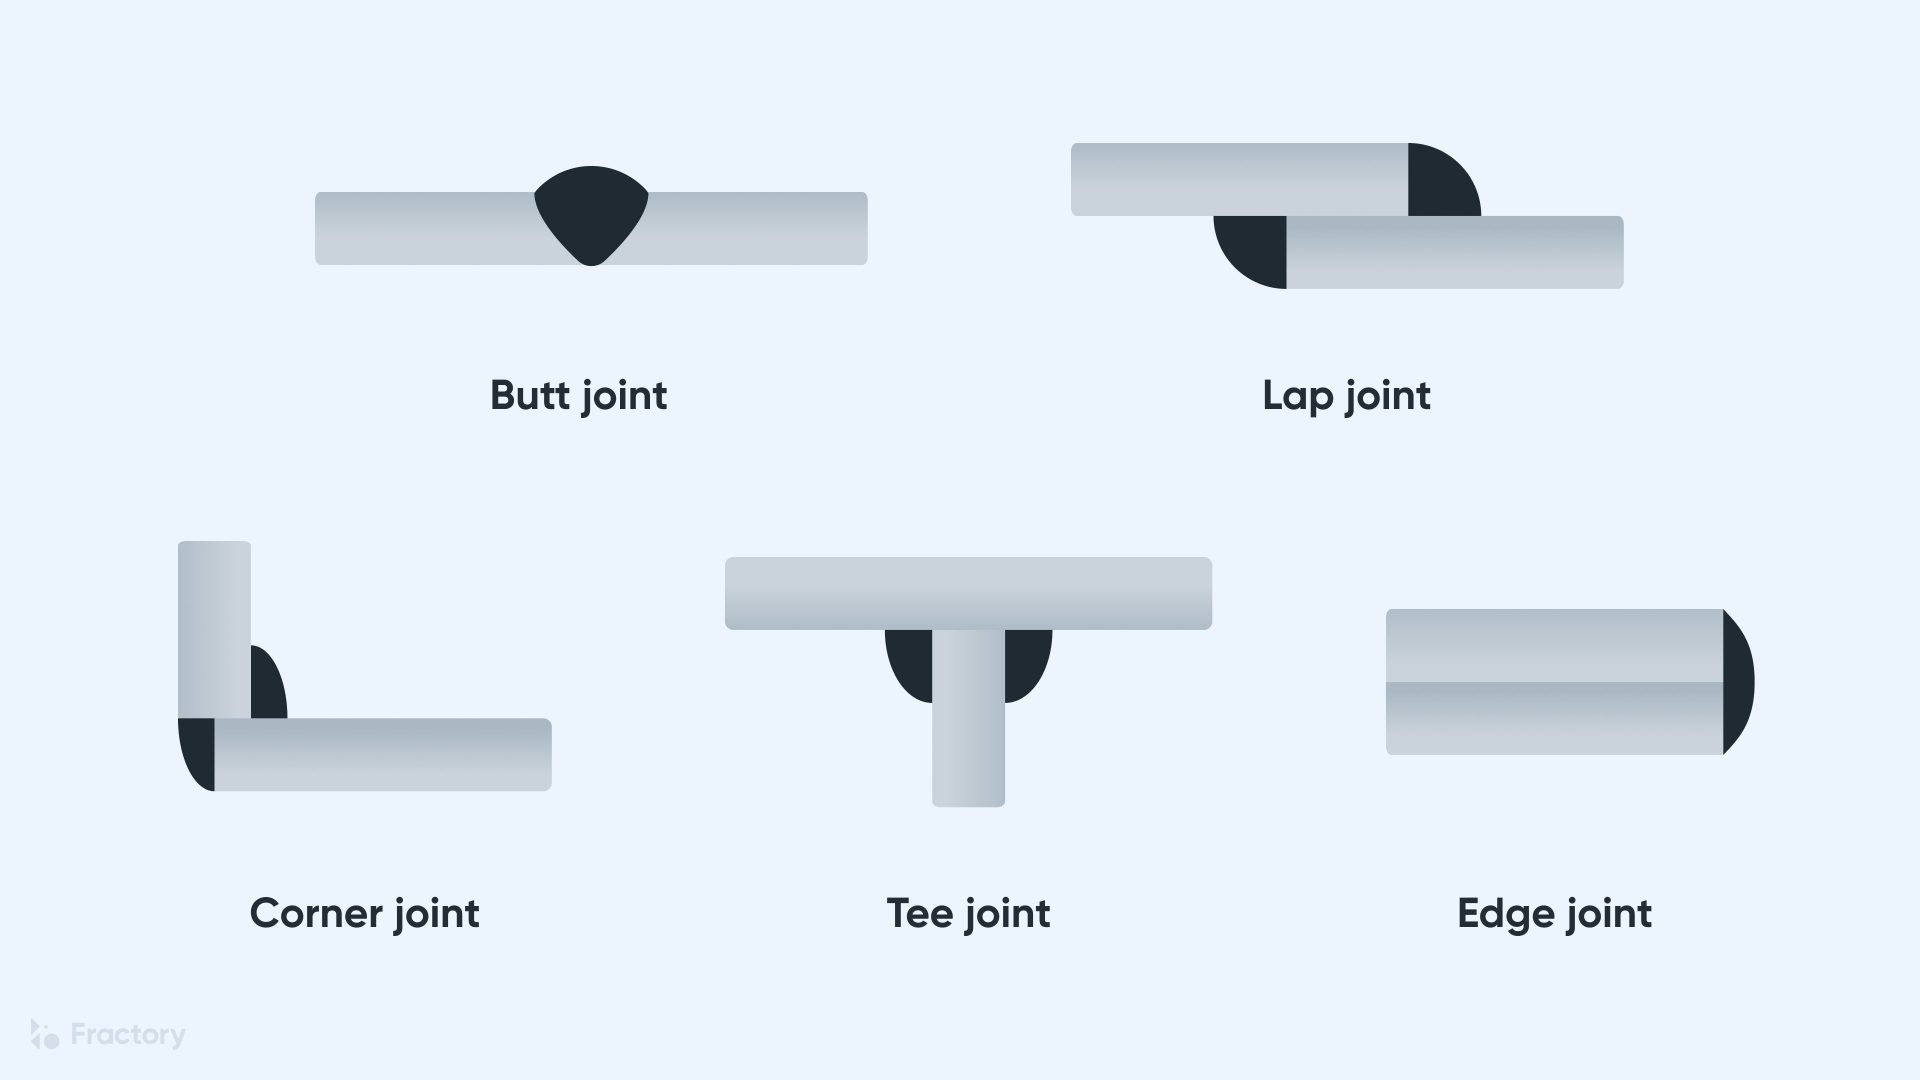
1. Define Joint Type and Geometry
- Butt joint example:
- Root opening: 3/16″ ± 1/16″
- Bevel angle: 30° ± 5°
- Root face: 1/16″ ± 1/32″
- Never write “as per drawing”—inspectors require explicit values
2. Backing Bar Requirements
Specify:
– Material (copper vs. ceramic)
– Removal method (chipping vs. grinding)
– When backing is mandatory (e.g., single-sided welds > 1/2″ thick)
Visual Cue for Correct Setup
A properly prepared joint shows uniform bevel angles with no jagged edges. If root face varies by more than 1/32″, re-prep before welding.
Preheat and Interpass Temperature Guidelines You Must Follow
Ignoring temperature controls causes hydrogen cracking—the silent killer of welds. Your WPS must enforce these non-negotiable rules:
Minimum Preheat Temperatures by Thickness
| Base Metal Thickness | Minimum Preheat |
|---|---|
| ≤ 1/2″ | 70°F |
| > 1/2″ to 1-1/4″ | 150°F |
| > 1-1/4″ | 250°F |
Interpass Temperature Limits
- Never exceed 600°F for carbon steel (causes grain growth)
- Always measure within 1″ of the weld toe
- Document method: Contact pyrometer (not infrared)
Pro tip: For thick sections, specify “maintain interpass temp until 50% of weld thickness is complete”—this prevents cold cracking.
How to Qualify Your WPS Through a PQR Test
Your WPS is worthless without a Procedure Qualification Record (PQR). This is the only way to prove your parameters work. Here’s the fail-proof qualification workflow:
The 3-Step PQR Process
- Weld the test coupon using exactly your proposed WPS parameters
- Perform mandatory tests:
– Tensile test (2 specimens)
– Bend tests (2 face, 2 root)
– Macroetch (for fillet welds) - Document every deviation—even 5°F preheat variance voids results
Why 90% of DIY PQRs Fail
- Using production scraps instead of code-specified test coupons
- Skipping interpass temp monitoring during welding
- Not testing at the lowest qualified amperage
Critical insight: Your PQR becomes the “bible” for WPS limits—never exceed its qualified ranges.
Common Mistakes That Invalidate Your Welding Procedure Specification
Avoid these seven deadly sins that make inspectors reject WPS submissions:
- “Qualified range” guessing: Using ±20% instead of code-specified tolerances
- Position ambiguity: Writing “all positions” without PQR coverage for 6G pipe welds
- Gas mixture omissions: Not specifying argon/CO₂ ratios for GMAW
- Post-weld heat treatment (PWHT) errors: Stating “as required” instead of exact temperatures
- Electrode storage neglect: Failing to document baking requirements for low-hydrogen rods
- Thickness range overreach: Qualifying 1/4″ material then using WPS on 2″ steel
- Signature gaps: Missing WPS preparer/welder/inspector signatures
Red alert: If your WPS lacks “essential variables” from ASME QW-250 or AWS D1.1 Table 3.3, it’s automatically void.
Maintaining WPS Compliance During Production Welding
Your WPS isn’t a one-time document—it’s a living control system. Enforce these daily practices:
Welder Performance Verification
- Daily checks: Have welders produce test coupons matching WPS parameters
- Parameter monitoring: Use weld monitors to log amps/volts in real-time
- Visual audits: Spot-check root openings and preheat temps before each weld
When to Revise Your WPS
Immediately update your document if:
– Base metal chemistry changes (e.g., new mill test report)
– Welding position shifts (e.g., 3G to 6G)
– Heat input exceeds qualified limits by 10%
Pro tip: Add “revision history” with dates/signatures—inspectors demand this during audits.
Creating a valid WPS separates professional welders from hobbyists. By strictly following this guide’s parameter documentation, joint design rules, and PQR qualification steps, you’ll produce welds that pass first-time inspections while avoiding six-figure rework costs. Remember: your WPS is only as strong as its weakest documented variable—never assume, always verify. For complex projects like pressure vessels or seismic structures, consult AWS D1.1 Section 3 or ASME Section IX directly, as minor code variations can invalidate your procedure. Keep this truth front-of-mind: a properly executed WPS isn’t paperwork—it’s the invisible framework holding up bridges, skyscrapers, and pipelines every single day. Your next weld’s integrity starts with the precision in your specification document.
Leave a Reply