Aluminum MIG welding separates skilled fabricators from beginners. Unlike steel, aluminum’s high thermal conductivity, stubborn oxide layer, and low melting point create unique challenges that can lead to porous, weak welds if handled incorrectly. When you’re trying to join aluminum components for automotive, marine, or structural projects, understanding these material-specific hurdles makes the difference between a strong, reliable joint and a failed weld that requires costly rework. This guide reveals the exact techniques professional welders use to consistently produce clean, penetration-rich aluminum welds—even if you’ve struggled with this material before.
Choosing the Right Aluminum MIG Welding Equipment

Your standard steel MIG setup needs significant modifications to handle aluminum successfully. Aluminum wire’s softness causes feeding issues that lead to bird’s nesting and inconsistent arcs if you don’t have the proper equipment configuration.
Spool Gun vs. Push-Pull System: Which Works Better
For occasional aluminum welding, a spool gun attached to your existing MIG machine offers the most cost-effective solution. The spool gun houses a small aluminum wire spool directly on the gun handle, eliminating the long feed path that causes aluminum wire to bend and jam. However, if you weld aluminum regularly, invest in a dedicated push-pull system. These systems feature a motor in the gun handle that pulls wire while a second motor in the machine pushes, ensuring consistent feed speed and reducing wire deformation. Push-pull systems provide better ergonomics and reliability for production work, while spool guns work acceptably for hobbyists and infrequent users.
Selecting the Correct Aluminum Wire and Shielding Gas
ER4043 and ER5356 represent the two most common aluminum welding wires. ER4043 contains silicon and produces welds with excellent fluidity and crack resistance, making it ideal for automotive heat exchangers and general fabrication. ER5356, with its magnesium content, creates stronger welds closer to 6061-T6 aluminum’s strength—perfect for marine applications and structural components. Always match your wire alloy to your base metal when possible. For shielding gas, 100% argon at 35-50 CFH provides adequate protection for most aluminum applications. Avoid CO2 or mixed gases containing CO2, as they cause excessive spatter and porous welds.
Proper Aluminum Surface Preparation Techniques
Skipping proper preparation guarantees welding failures with aluminum. The oxide layer and contaminants create the two primary obstacles to sound welds, and addressing both before striking an arc determines your final weld quality.
Effective Cleaning Methods for Aluminum Surfaces
Start by removing oil and grease with acetone or a dedicated aluminum cleaner—these contaminants create hydrogen porosity in the weld metal. For oxidized aluminum, use a stainless steel wire brush designated specifically for aluminum to remove the oxide layer. Critical warning: never use the same wire brush on aluminum and steel, as steel particles embedded in the brush will contaminate your aluminum welds. For heavily oxidized material, begin with a chemical etchant, then finish with the stainless brush. Always work the brush in one direction rather than scrubbing back and forth to lift oxide particles from the surface.
Immediate Welding After Cleaning
Aluminum’s oxide layer reforms rapidly after cleaning, so weld within 2-4 hours of surface preparation for best results. For thicker materials over 1/4 inch, light preheating to 200-300°F reduces the temperature gradient between the oxide layer and base metal. Use a contact thermometer to verify preheat temperature—this prevents burning through thinner sections while ensuring proper fusion in thicker materials.
Mastering Aluminum-Specific MIG Welding Techniques
Aluminum demands modified technique compared to steel MIG welding. The goal remains consistent—deposit metal with proper fusion and penetration—but the methods differ substantially due to aluminum’s unique properties.
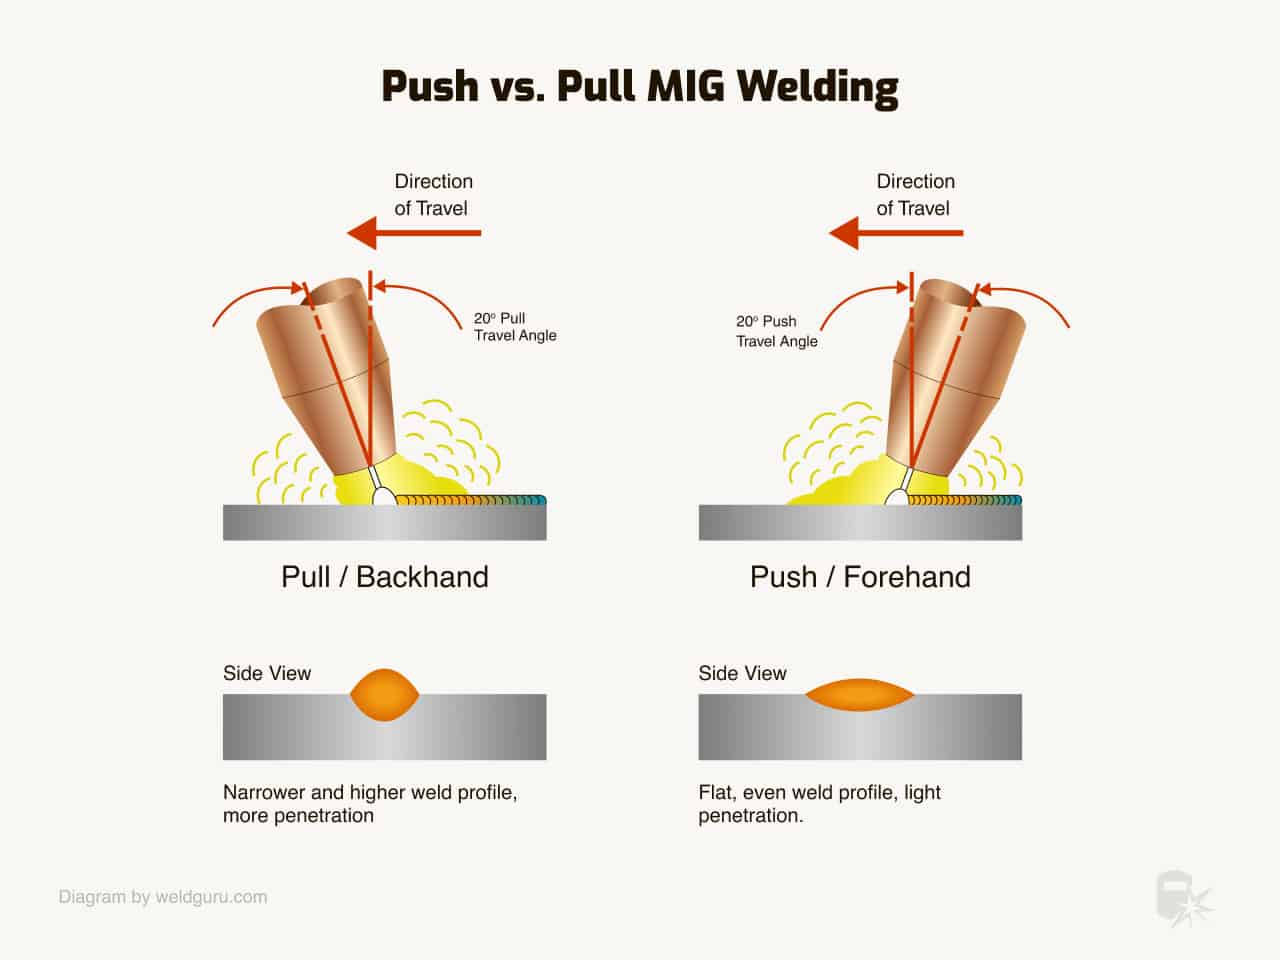
Why Push Technique Works Best for Aluminum
Push welding (forehand welding) produces superior aluminum welds compared to the drag technique used for steel. With push technique, you direct the gun so the wire points ahead of the arc pool as you travel. This pushes the molten weld pool away from the arc center, allowing the shielding gas to protect the pool as you move forward. Maintain the contact tip at 10-15 degrees from perpendicular to the work surface, with the gun handle angled backward 5-15 degrees. Practice this position on scrap material until it feels natural—this subtle difference creates flatter, wider beads with less spatter.
Optimal Travel Speed and Wire Stick-Out
Aluminum’s high thermal conductivity demands faster travel speeds than steel to concentrate heat where needed. Move steadily enough that the weld pool remains small—roughly the width of your pinky finger for 1/8-inch material. Maintain a consistent wire stick-out of 3/8 to 1/2 inch (contact tip to work distance), longer than steel applications. This extended stick-out allows the wire to preheat as it approaches the arc, reducing thermal shock on the contact tip. Monitor your contact tip condition closely; aluminum wire tends to deposit metal inside the tip bore, causing erratic arcs. Replace tips at the first sign of spatter or arc instability.
Dialing In Perfect Aluminum MIG Parameters
Voltage, wire feed speed, and amperage work together in aluminum MIG welding, with wire feed speed typically serving as the primary control since it determines amperage for a given wire diameter.
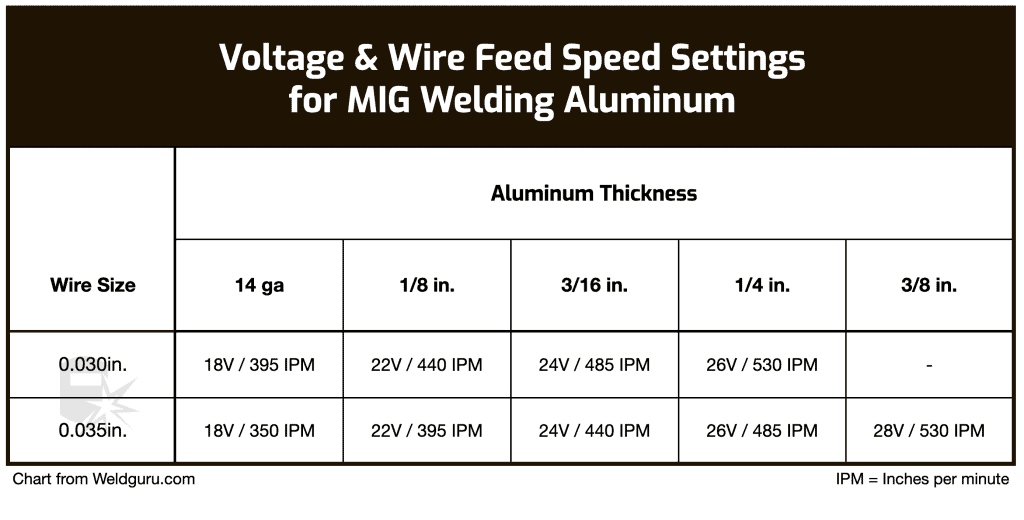
Parameter Guidelines by Material Thickness
For thin sheet metal (1/16 inch), use 0.030-inch wire at 300-400 IPM (inches per minute) with 14-16 volts. Material at 1/8 inch thickness responds well to 0.035-inch wire at 350-500 IPM with 17-19 volts. At 1/4 inch thickness, increase to 0.040-inch wire at 400-600 IPM with 19-22 volts. Always run test welds on scrap material matching your production piece before starting actual projects. Adjust one parameter at a time until you achieve a flat bead with good edge wetting and minimal spatter.
Fine-Tuning Based on Weld Appearance
The ideal aluminum weld shows slight convexity with toes that blend smoothly into the base metal. If the bead is excessively convex or shows poor edge fusion, increase voltage slightly or decrease travel speed. If you see undercut, burn-through, or excessive spatter, decrease voltage or increase travel speed. Aluminum’s high fluidity means small parameter changes create significant visual differences in your weld bead—this responsiveness helps you dial in perfect settings quickly once you understand what to look for.
Troubleshooting Common Aluminum Welding Defects
Even experienced welders encounter defects when working with aluminum. Recognizing the root cause enables quick correction rather than repeated failed attempts.
Why Porosity Occurs and How to Fix It
Porosity—small holes in the weld—stems primarily from contamination or shielding gas issues. Oil, grease, or cutting fluids on the base metal introduce hydrogen that forms bubbles as the weld cools. Verify your cleaning process by welding on a freshly cleaned area; if porosity disappears, contamination was the issue. Check for wind or drafts disturbing gas coverage, and confirm your gas supply isn’t contaminated. A slight increase in gas flow rate sometimes helps in drafty conditions, though excessive flow creates turbulence that draws air into the shield.
Preventing Burn-Through on Thin Aluminum
Aluminum’s low melting point makes burn-through a common problem on thinner materials. Reduce heat input by lowering wire feed speed or voltage slightly, and increase travel speed. For thin materials, use a copper backing bar to conduct heat away from the weld zone—this dramatically reduces burn-through risk while improving backside bead appearance. Stringer beads rather than wide weave patterns concentrate heat less and work better for thin materials. If burn-through persists despite parameter adjustments, consider increasing wire diameter slightly to allow lower feed speeds with the same deposition rate.
Essential Safety Practices for Aluminum Welding
Aluminum welding produces fumes and UV radiation requiring proper protection beyond standard steel welding precautions.
Critical Respiratory Protection Requirements
Aluminum welding fumes contain metal oxides that irritate respiratory passages. Always weld in a well-ventilated area with active fume extraction. For occasional welding, a half-mask respirator with P100 filters provides adequate protection. Never weld on painted or coated materials without proper respiratory protection, as the coatings produce toxic fumes far more dangerous than base metal fumes.
Enhanced Eye and Skin Protection
Aluminum’s reflective properties make UV radiation more intense at the welding arc, requiring shade 10-12 lens settings. Use an auto-darkening helmet with appropriate shade settings. Wear welding gloves with good dexterity—aluminum’s high thermal conductivity means you feel heat through thin gloves faster than with steel welding. Flame-resistant clothing covers all exposed skin, and avoid synthetic materials that can melt onto skin if exposed to spatter.
Mastering aluminum MIG welding opens possibilities that steel-only welding cannot match. The material demands respect—proper preparation, appropriate equipment, and modified techniques—but the results justify the investment. Start with scrap material, practice the push technique until it feels natural, and gradually tackle more challenging projects. With consistent practice and attention to these critical details, you’ll join the ranks of fabricators who reliably produce strong, clean aluminum welds that hold up under real-world stress.
Leave a Reply