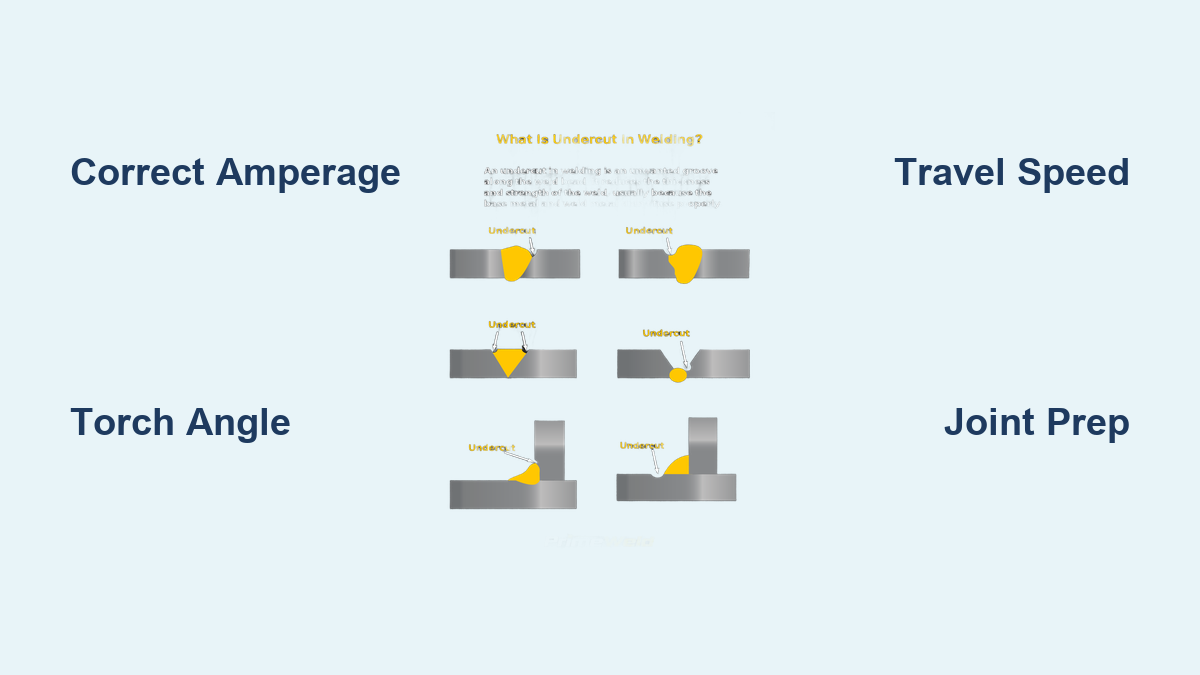
Undercut remains one of the most persistent challenges for welders at every skill level, appearing as a groove along the weld toe that compromises structural integrity without obvious surface indication. This defect occurs when the base metal melts away at the weld edge faster than filler material can fill the space, creating a weak point that significantly reduces the joint’s load-bearing capacity. For professional welders and hobbyists alike, mastering how to prevent undercut in welding isn’t just about aesthetics—it’s critical for ensuring safety, durability, and compliance with industry standards. Whether you’re working on automotive repairs, structural steel, or pipeline projects, this guide delivers actionable strategies to eliminate undercut from your welding practice and produce consistently strong, clean welds that pass inspection every time.
Optimal Amperage Settings to Stop Undercut Formation

Selecting the right amperage represents your first line of defense against undercut. Excessive current remains the single most common cause of this defect across all welding processes, as it creates a molten pool that erodes base metal faster than filler material can fill the gap.
For stick welding (SMAW), follow the fundamental rule of one amp per thousandth of electrode diameter. When using a 1/8-inch electrode, maintain amperage between 110-140 amps rather than pushing toward the higher end of the range. If undercut appears despite proper technique, reduce amperage by 10-15% before adjusting other variables—this simple change resolves most undercut issues while still achieving adequate penetration.
MIG welders should balance voltage and wire feed speed carefully. Start with 18-24 volts and 150-300 inches per minute wire feed for mild steel with ER70S-6 wire, then adjust downward if undercut appears. The goal is finding the lowest stable combination that maintains consistent spray transfer without excessive heat buildup at the weld edges.
TIG welding demands even more precise current control due to the concentrated heat of the tungsten electrode. Lower amperage settings combined with proper filler rod timing prevent the edge erosion that plagues many TIG welds. Remember that undercut often appears first on the vertical member of fillet joints where heat naturally rises and concentrates.
Perfect Your Torch Angle and Travel Speed
Your physical manipulation of the welding torch directly determines whether molten metal flows into edges or erodes them. Many welders unknowingly create undercut through improper positioning and inconsistent movement.
Maintain a 10-15 degree drag angle (tilting the torch slightly backward in the direction of travel) for most welding positions. This angle concentrates heat on the base metal ahead of the puddle while allowing filler material to flow into the edges properly. Pushing the torch too far forward (beyond 30 degrees) overheats the leading edge and causes undercut, while pulling straight back leaves the edges unfused.
Travel speed requires Goldilocks precision—neither too fast nor too slow. Moving too quickly creates a narrow, convex bead that leaves edges unfused, while moving too slowly allows heat to build up excessively at the weld edges. Target a bead width approximately three times your electrode diameter as your visual guide for proper speed.
How to Detect and Correct Speed Issues in Real Time
Watch your weld pool behavior for immediate feedback on travel speed effectiveness. A healthy pool flows smoothly with clearly defined edges that flatten slightly against the base metal. When undercut begins forming, the edges of the pool appear to recede or “dig in” to the base metal, creating a visible groove alongside the advancing puddle.
Listen for changes in arc sound too—a smooth, consistent sound indicates proper heat distribution, while undercut often produces a more hollow or erratic sound accompanied by increased spatter as molten metal spatters from the developing undercut groove. When you notice these warning signs, immediately slow your travel speed slightly or adjust your torch angle.
Joint Preparation Essentials That Prevent Undercut

Proper joint preparation creates conditions where undercut prevention becomes natural rather than requiring constant technique adjustment. Many welders overlook this critical step while focusing solely on their welding technique.
Achieve optimal fit-up with a root opening of 1/16 to 1/8 inch for groove joints. Tighter fits trap gases and prevent proper penetration, causing welders to increase heat in ways that cause undercut. Wider gaps allow heat to escape rapidly, potentially causing lack of fusion if travel speed increases to compensate.
Clean base metal edges to bright metal before welding—rough, oxidized, or contaminated edges melt inconsistently, creating hot spots that erode unevenly and produce undercut. Rust, mill scale, oil, and paint all affect how base metal heats and melts, resulting in unpredictable undercut formation.
For fillet welds, consider slightly obtuse angles (greater than 90 degrees) when possible. This design provides more metal at the edge to resist erosion and more surface area for filler metal to bond with, though structural requirements may limit this option in some applications.
Common Undercut Mistakes and Instant Fixes
Even experienced welders develop habits that consistently produce undercut without realizing the connection between their technique and the defect. Recognizing these frequent errors helps you identify and correct problems in your own practice.
Mistake: Excessive Heat Input Belief
Many welders mistakenly believe more heat produces stronger welds. In reality, excessive heat weakens joints by causing undercut, excessive spatter, and a wide, brittle heat-affected zone. If fusion is occurring at the root, slight lack of sidewall penetration is preferable to undercut.
Fix: Reduce amperage by 5-10% and observe the results before making further adjustments.
Mistake: Perpendicular Torch Position
Holding the torch too perpendicular to the work surface concentrates heat directly under the electrode rather than directing it forward into the joint. This superheats the puddle center while leaving edges cooler.
Fix: Adjust to a consistent 10-15 degree drag angle and maintain it throughout the weld.
Mistake: Rushed Filler Rod Addition
In TIG welding, adding filler rod behind the leading edge of the puddle or too infrequently leaves edges unfilled as the base metal erodes.
Fix: Add filler rod to the leading edge of the puddle at regular intervals with enough material to maintain proper bead width.
Process-Specific Undercut Prevention Strategies

Each welding process has unique characteristics that influence undercut formation. Understanding these differences helps you apply the right techniques for your specific application.
Stick Welding (SMAW) Solutions
Maintain consistent electrode angle throughout the weld—avoid the natural tendency to rotate your wrist as fatigue sets in. For electrodes with difficult-to-control arcs (such as cellulose rods), keep arc length short to prevent voltage fluctuations that cause heat variations and subsequent undercut.
MIG Welding (GMAW) Adjustments
Use the push technique (angling the gun in the direction of travel) for better bead appearance and less undercut. Start with lower voltage settings that maintain stable spray transfer, as MIG’s continuous wire feed produces high heat input that readily causes undercut if not carefully controlled.
TIG Welding (GTAW) Precision
Combine low amperage settings with proper filler rod timing. Add filler rod to the leading edge of the puddle rather than behind it, ensuring material reaches the edges before base metal erodes. Maintain consistent torch angle throughout the weld, making any changes gradually rather than abruptly.
Long-Term Prevention Through Equipment Maintenance
Preventing undercut requires consistent attention to equipment condition over time. Parameter drift from worn components creates subtle changes that gradually reintroduce undercut.
Replace MIG contact tips regularly—worn tips change wire feeding characteristics and arc behavior, leading to inconsistent heat input. Stick electrode holders that make poor electrical contact cause voltage drops and arc instability that produces variable results. Regular inspection and replacement of worn consumables maintains parameter consistency.
Use quality consumables from reputable suppliers and store them properly. Electrodes with flux coverings that don’t properly shield the arc, wire electrodes with inconsistent diameter, and contaminated filler materials all produce unpredictable arc behavior that leads to undercut.
Document successful parameter settings for future reference. Recording amperage, voltage, travel speed, and technique notes for successful welds allows replication of those settings on similar work, preventing the parameter experimentation that often reintroduces undercut.
Final Quality Check Before Finishing Your Weld
Before considering your weld complete, perform these quick checks to ensure undercut hasn’t formed:
- Run your fingernail along the weld toe—if you feel any groove, undercut is present
- Examine the weld from multiple angles under good lighting—shallow undercut often appears only from certain perspectives
- Check for consistent bead width along the entire joint—narrowing indicates potential undercut development
- Verify proper fusion at both edges of the weld—not just the center
Mastering how to prevent undercut in welding requires attention to multiple interrelated factors rather than a single magic solution. By optimizing your parameters, perfecting your technique, preparing joints properly, and maintaining your equipment, you’ll consistently produce undercut-free welds that meet even the strictest industry standards. Start implementing these strategies today, and within a few practice sessions, you’ll develop the muscle memory and visual recognition that make undercut prevention second nature in your welding practice.
Leave a Reply