Your stick welder sits in the corner of your garage, still in its box, while that broken trailer hitch waits patiently for repair. You’ve watched countless YouTube videos but feel overwhelmed by electrode types, amperage settings, and safety concerns. Getting your stick welder properly configured shouldn’t require an engineering degree—just clear, actionable steps that transform you from confused beginner to confident welder in under an hour. This guide delivers exactly what you need to know to safely and correctly set up your stick welder for your first successful weld, with no fluff or confusing jargon. By the time you finish reading, you’ll understand electrode selection, proper machine configuration, and critical safety measures that prevent common beginner mistakes.
Essential Safety Gear Before Powering On Your Stick Welder
Before touching any controls, gather these non-negotiable safety items that protect against arc flash, sparks, and fumes. Your eyes need a welding helmet with auto-darkening lens set to shade #10-12 for most stick welding—manual helmets work but require perfect timing. Wear flame-resistant clothing covering all skin; cotton work shirts and jeans beat synthetic fabrics that melt on contact with sparks. Leather welding gloves specifically designed for stick welding provide grip and protection where regular work gloves fail. Position a welding curtain or screen if others might enter your workspace, creating a 10-foot safety perimeter around your welding area.
Why Proper Grounding Prevents Dangerous Electrical Shocks
Connect your work clamp directly to clean, bare metal on your workpiece—not the welding table or fixture. Scrape away paint, rust, or grease at the clamp location to ensure metal-to-metal contact. A poor ground connection causes erratic arcs, splattering metal, and potentially dangerous voltage buildup on your workpiece. Test your connection by attempting a practice weld on scrap metal; if the electrode sticks constantly or the arc won’t stabilize, reposition your ground clamp closer to your welding area for better electrical flow.
Selecting the Right Electrode for Your First Stick Welding Project
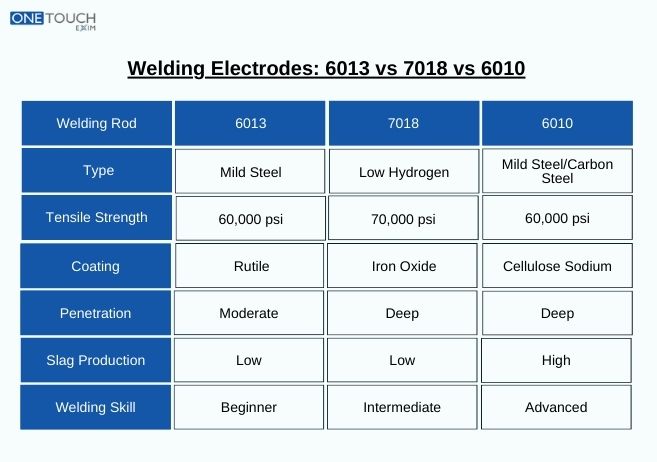
6010 vs. 7018: Which Rod Should Beginners Start With?
Choose 6010 electrodes for deep penetration on dirty or rusty metal, especially outdoors where wind affects the arc. These rods work with DC+ polarity and create aggressive, forceful arcs that cut through contaminants. Opt for 7018 rods when welding clean steel indoors for smoother, stronger welds with less spatter. Their flux coating produces a protective gas shield that requires stable conditions but delivers professional results. For your first attempt, 1/8-inch diameter 6010 or 7018 rods offer the best balance of control and forgiveness for beginners.
Proper Electrode Storage Prevents Weak, Cracking Welds
Store opened electrode containers with tight-sealing lids in a climate-controlled space below 60% humidity. Moisture-damaged rods create porous, brittle welds that fail under stress. If you suspect moisture exposure, bake electrodes in a rod oven at 250-300°F for one hour before use—never skip this step for critical projects. Discard rods with cracked or flaking flux coatings, as they cause inconsistent arcs and poor weld formation.
Configuring Your Stick Welder Controls for Perfect Arc Performance

Setting Amperage Based on Electrode Size and Material Thickness
Match amperage to electrode diameter using this quick reference:
– 1/16″ rods: 25-45 amps
– 1/8″ rods: 70-130 amps
– 5/32″ rods: 130-180 amps
Start at the manufacturer’s recommended setting, then adjust based on arc behavior. If the electrode sticks constantly, increase amperage slightly. When excessive spatter flies or the rod overheats rapidly, reduce the amperage. For thin materials under 1/8 inch, use the lowest possible amperage to prevent burn-through while maintaining a stable arc.
Polarity Settings: When to Use DC+ vs DC- for Stick Welding
Connect your electrode holder to the positive terminal (DC+) for most electrodes including 6010 and 7018, providing deeper penetration. Use DC- (reverse polarity) only when specifically required by your electrode type—typically for specialized rods like 6011 on AC machines. Check your welder’s polarity indicator lights before striking an arc; incorrect polarity causes poor arc stability and weak welds regardless of your amperage settings.
Striking and Maintaining Your First Successful Stick Welding Arc
The “Tapping” vs “Scratching” Technique for Reliable Arc Starts
Hold your electrode at a 15-20 degree angle to the workpiece and use quick, confident motions. For 6010 rods, strike like a match with a swift downward motion then pull back slightly to establish the arc. With 7018 electrodes, lightly tap the workpiece vertically then lift to 1/8 inch gap. If the rod sticks, immediately twist it sideways to break free—don’t yank the entire holder away. Practice starting arcs on scrap metal until you achieve consistent ignition within two attempts.
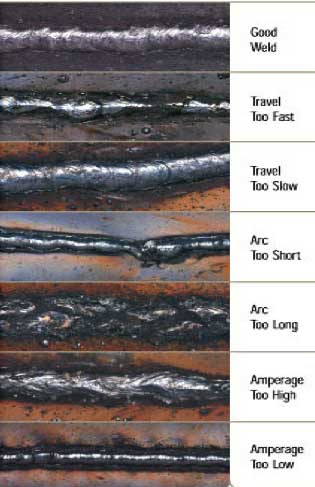
Optimal Travel Speed and Angle for Strong, Clean Weld Beads
Maintain a 10-15 degree push angle in your direction of travel for proper gas coverage and slag control. Move steadily enough that the molten weld pool stays slightly ahead of the arc but doesn’t cool too quickly. Watch the slag trail behind your weld; if it completely covers the bead immediately, you’re moving too slowly. When sparks fly excessively forward, increase your travel speed. For your first passes, aim for weld beads about twice the width of your electrode diameter with consistent ripples.
Troubleshooting Common Stick Welder Setup Problems
Why Your Electrode Keeps Sticking During Welding
Excessive sticking occurs when amperage runs too low for your electrode size or travel speed. Increase amperage by 5-10% increments while maintaining proper arc length. If the problem persists, check your ground clamp connection—reposition it closer to your welding area for better electrical flow. Never compensate for sticking by holding an excessively long arc, as this creates weak, porous welds with excessive spatter.
Fixing Excessive Spatter That Wastes Electrode Material
Reduce spatter by ensuring correct amperage settings—too high causes violent metal transfer. Clean your workpiece thoroughly to remove oil, paint, or rust that vaporizes during welding. Maintain proper travel speed; moving too slowly allows molten metal to accumulate and explode outward. For 7018 rods, keep your arc length consistently short (about rod diameter) to stabilize the transfer of molten metal across the gap.
Maintaining Your Stick Welder for Long-Term Reliability
Cleaning Electrode Holder and Work Clamp Connections Weekly
Disconnect power and inspect both holders for damaged insulation, loose parts, or excessive heat discoloration. Remove built-up spatter from the electrode holder tip using a dedicated cleaning tool—never hammer out stuck electrodes. Check work clamp jaws for secure grip and clean contact surfaces with a wire brush when corrosion appears. Replace any component showing cracks or excessive wear before your next welding session.
Proper Storage Practices When Not in Use
After welding, allow your machine to cool completely before covering it with a breathable fabric cover—not plastic that traps moisture. Store electrodes in sealed containers with desiccant packs to maintain dryness. Keep your welding area clean of metal shavings and flammable materials that could ignite from stray sparks during future sessions. Unplug the machine when storing for extended periods to prevent electrical issues.
Final Tips for Successful Stick Welding Projects
Master stick welding by practicing on scrap metal matching your project material thickness. Start with simple straight beads before attempting corners or joints. Keep your helmet clean and sensors unobstructed for proper auto-darkening function. Listen to the sound of your weld—consistent crackling indicates proper settings while loud popping signals problems. Most importantly, never rush your first attempts; quality welding develops through deliberate practice, not speed.
When you’ve completed this setup process correctly, your stick welder transforms from intimidating machinery to a reliable tool that solves real-world problems. You now have the knowledge to safely configure your welder for any project, recognize proper welding parameters, and troubleshoot common issues before they ruin your work. The trailer hitch repair that seemed impossible this morning becomes your first successful weld by afternoon—proof that proper setup makes all the difference. Keep this guide handy for your next project, and consider practicing different electrodes on various materials to expand your welding capabilities.
Leave a Reply