Your TIG welder’s performance on mild steel depends entirely on getting the setup right. Without proper configuration, you’ll struggle with inconsistent arcs, poor penetration, and weld defects that require costly rework. Whether you’re fabricating a custom exhaust system or repairing thin sheet metal, understanding how to set up a TIG welder for mild steel transforms frustrating sessions into smooth, professional results. This guide cuts through the confusion with precise settings and techniques that work—no more guessing about gas flow rates or amperage settings. Let’s get your machine dialed in for clean, strong mild steel welds.
Choose Correct Polarity for Steel
DCEN (Direct Current Electrode Negative) is the only polarity setting you should use when TIG welding mild steel. In this configuration, your tungsten electrode connects to the negative terminal while your workpiece connects to positive. This setup directs 70% of the heat into your base metal, creating deep penetration with a stable, focused arc that gives you complete control over the weld pool.
Using DCEN produces the cleanest welds with minimal spatter—meaning less time grinding and cleaning after welding. The electron flow efficiently transfers heat into the mild steel, allowing full penetration on thicker materials while maintaining precision on thinner sections. If your welder has AC capability, make sure it’s switched to DC—AC is exclusively for aluminum and magnesium where polarity reversal breaks through surface oxides. Never use DCEP (Direct Current Electrode Positive) for mild steel—it pushes heat toward your tungsten, causing rapid electrode consumption and wide, shallow welds.
Select Right Tungsten Electrode
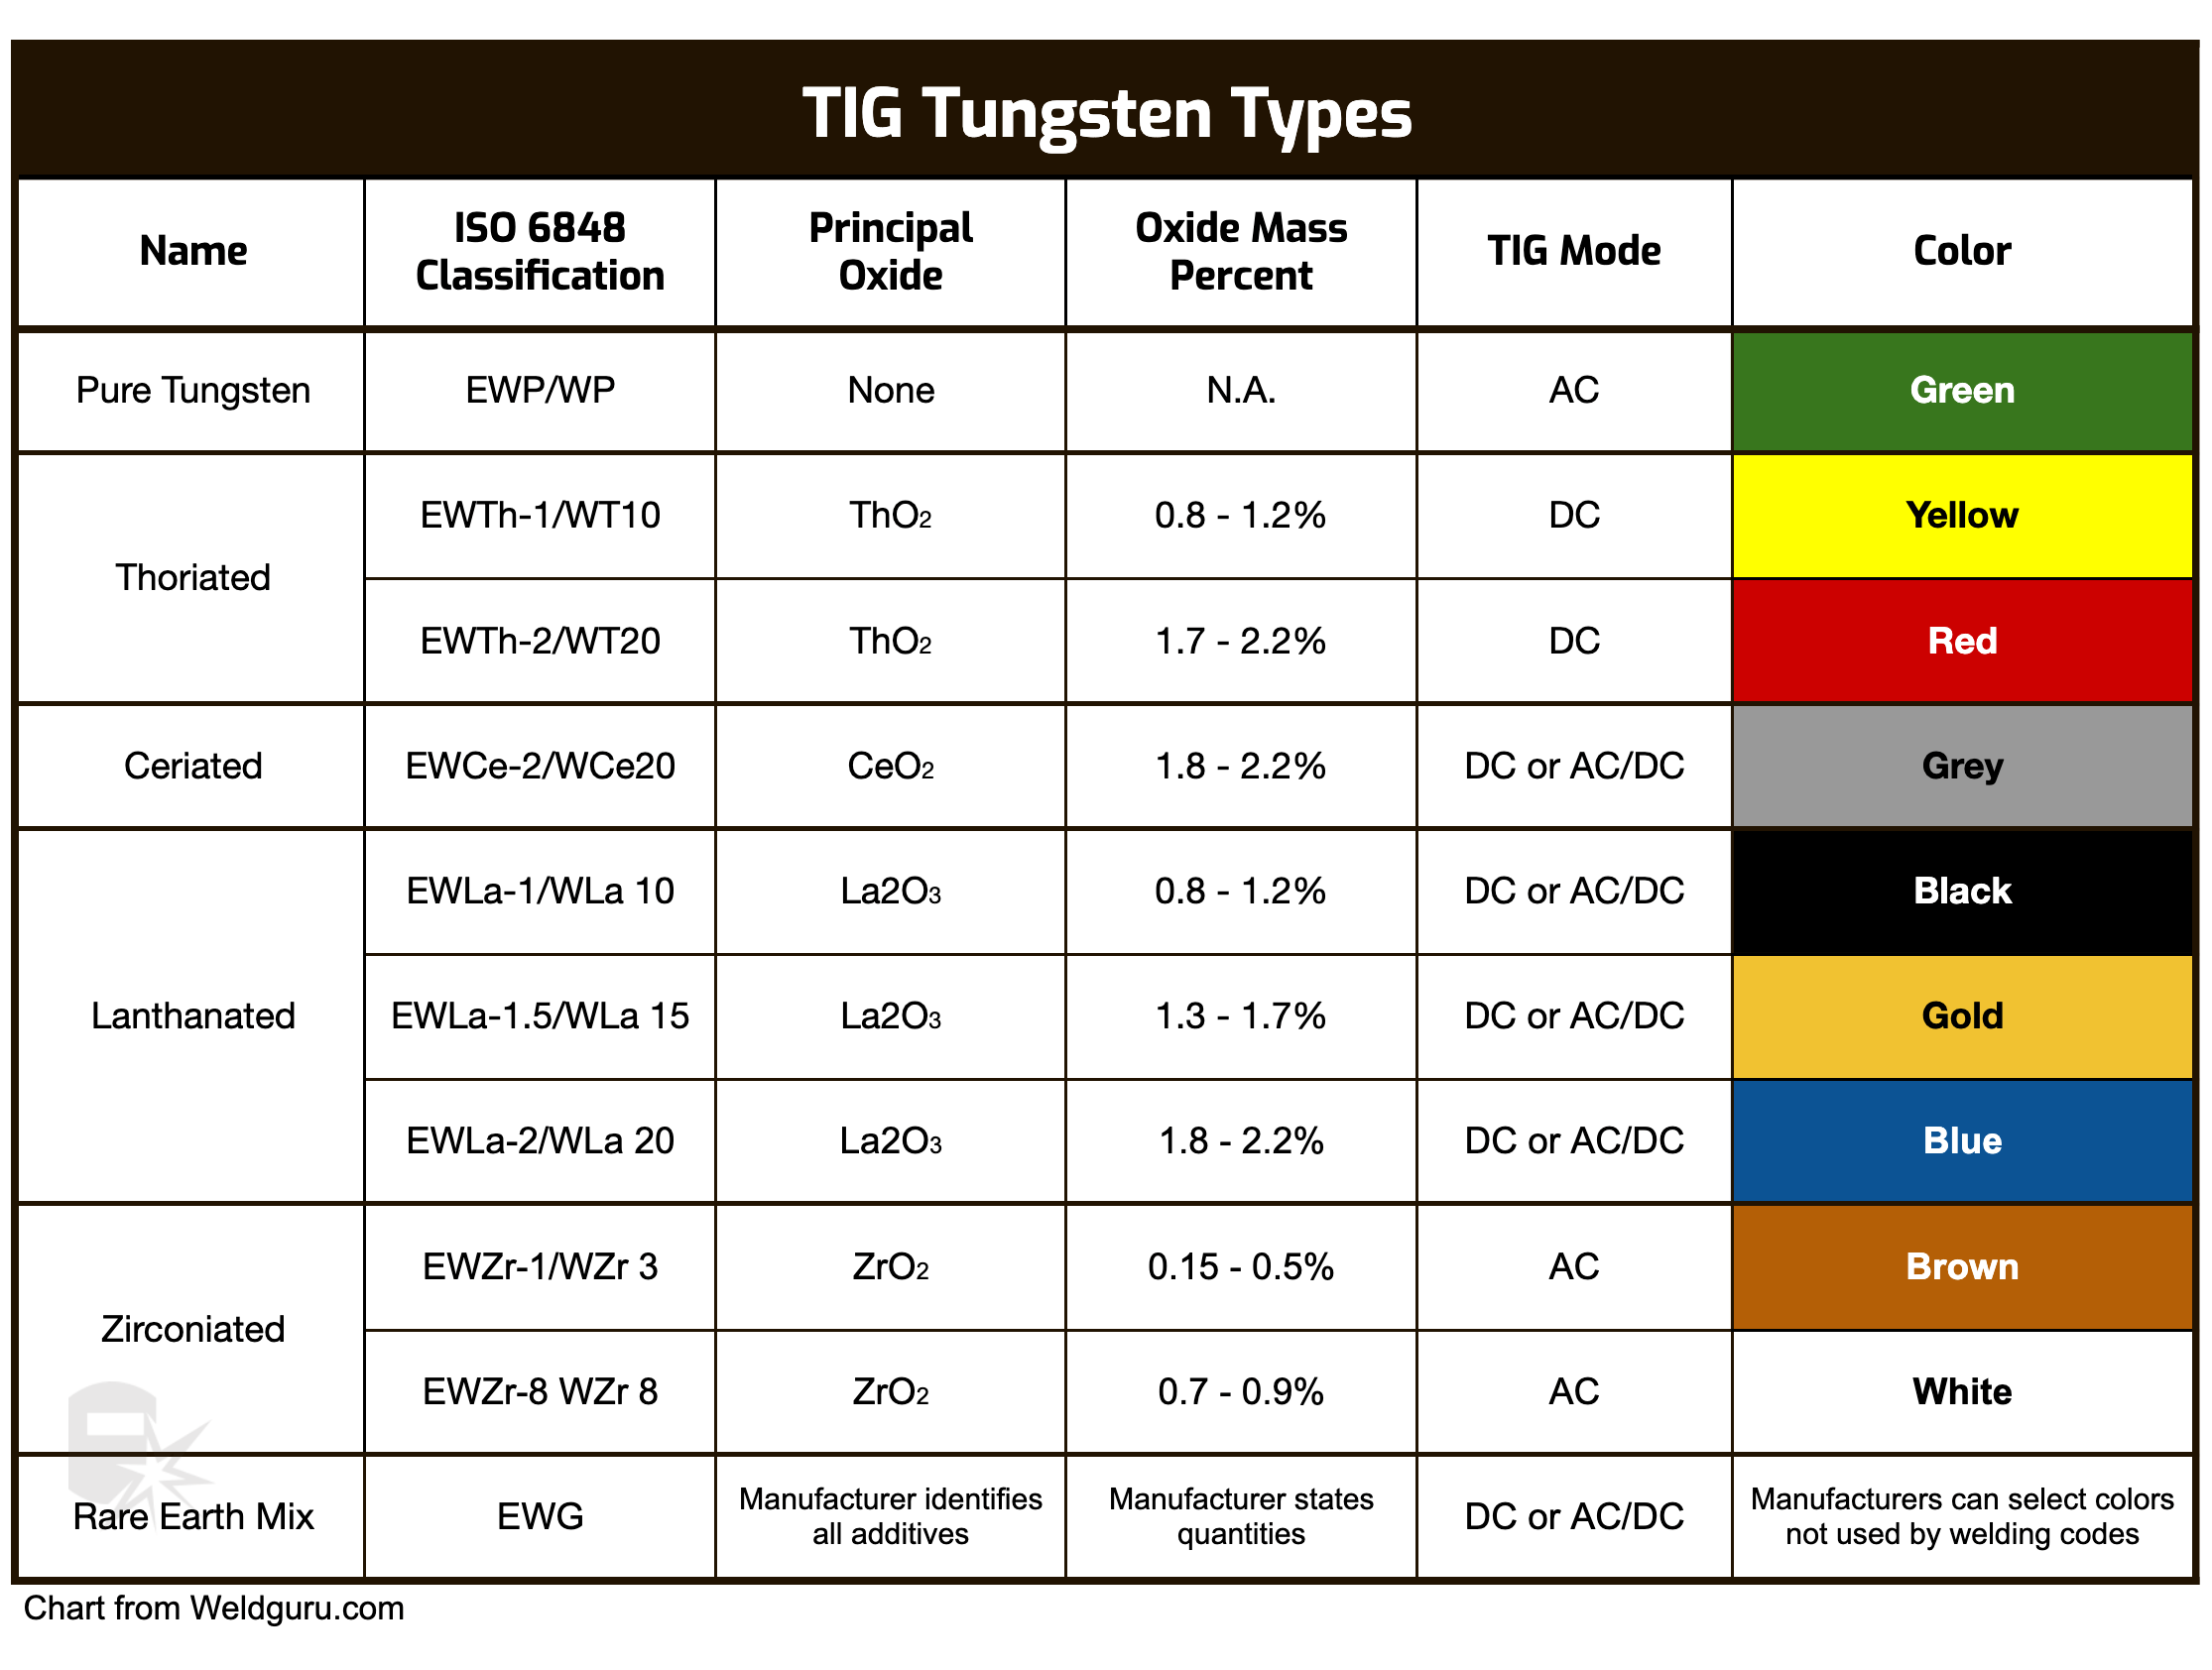
For mild steel TIG welding, choose between two electrode types: thoriated (red tip) for maximum arc stability during long welding sessions, or ceriated (gray tip) for easier arc starts at lower amperages. Both work well for steel, but ceriated performs better on thinner materials below 1/8 inch.
Match Electrode Diameter to Your Amperage
Using the wrong electrode size causes immediate problems. Too small, and your tungsten erodes quickly, contaminating your weld. Too large, and you lose control over the arc. Follow these guidelines:
- For 20-30 amps (24 gauge material): 1/16″ diameter
- For 60-80 amps (16 gauge material): 3/32″ diameter
- For 100-130 amps (1/8″ material): 1/8″ diameter
- For 150-200 amps (1/4″ material): 5/32″ diameter
Prepare and Sharpen the Tip Correctly
Grind your tungsten to a precise point with the length equal to the diameter—this creates the most stable arc for steel. Critical mistake: Always grind parallel to the electrode length, not across it. Cross-grinding creates perpendicular scratches that cause arc wandering. Before welding, clean the electrode with acetone and handle it with gloves—skin oils cause contamination. If you see discoloration or pitting, re-sharpen or replace it immediately.
Pick Proper Shielding Gas
Pure argon is your go-to shielding gas for 95% of mild steel TIG welding. It provides smooth arc characteristics and consistent bead appearance while protecting against atmospheric contamination. For thicker materials over 1/4 inch where deeper penetration is needed, try a 75% argon/25% helium mix—but avoid pure helium as it creates unstable arcs on steel.
Set the Correct Flow Rate
Your gas flow rate makes or breaks weld quality. Too low causes porosity; too high creates turbulence that pulls in contaminants. For most mild steel applications:
- Standard flow: 15-20 CFH (cubic feet per hour)
- Drafty environments: Increase to 20-25 CFH
- Larger cups (#9+): May require up to 25 CFH
Pro tip: Always set pre-flow to 0.5 seconds (minimum gas coverage before arc starts) and post-flow to 10-15 seconds (protects hot tungsten after welding stops). These settings prevent electrode oxidation and ensure complete weld protection.
Configure Torch and Cup Size
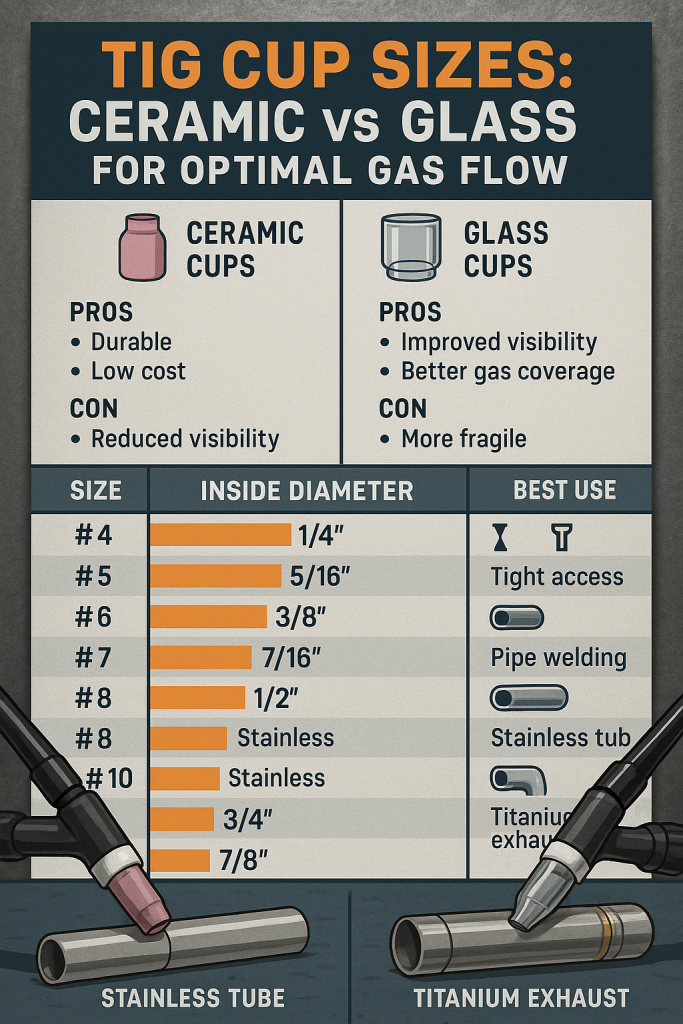
For mild steel under 250 amps, a standard ceramic cup works perfectly. Choose cup size based on your access requirements:
-
6 cup (5/16″ orifice): Tight spaces, thin materials
-
7 cup (7/16″ orifice): General purpose (best all-around)
-
8 cup (1/2″ orifice): Better coverage on thicker materials
Warning: Using a cup that’s too large creates gas turbulence, while too small restricts your view. For most shop work, the #7 cup gives optimal balance between gas coverage and visibility. If welding over 200 amps continuously, switch to a water-cooled torch to prevent overheating.
Match Filler Metal to Base Material
ER70S-2 is the universal filler rod for mild steel TIG welding. Its deoxidizers compensate for impurities in base metal, producing strong, crack-resistant welds. For higher-strength applications, use ER70S-6 which handles mill scale better.
Select Filler Diameter by Thickness
Your filler rod size must match base metal thickness:
- 24-18 gauge: 1/16″ diameter
- 16 gauge-1/8″: 3/32″ diameter
- 1/8″-1/4″: 1/8″ diameter
- Over 1/4″: 5/32″ diameter
Critical tip: Store filler rods in a dry container—moisture causes hydrogen cracking. Before welding, wipe rods with a clean cloth to remove oils that cause porosity.
Set Amperage by Thickness
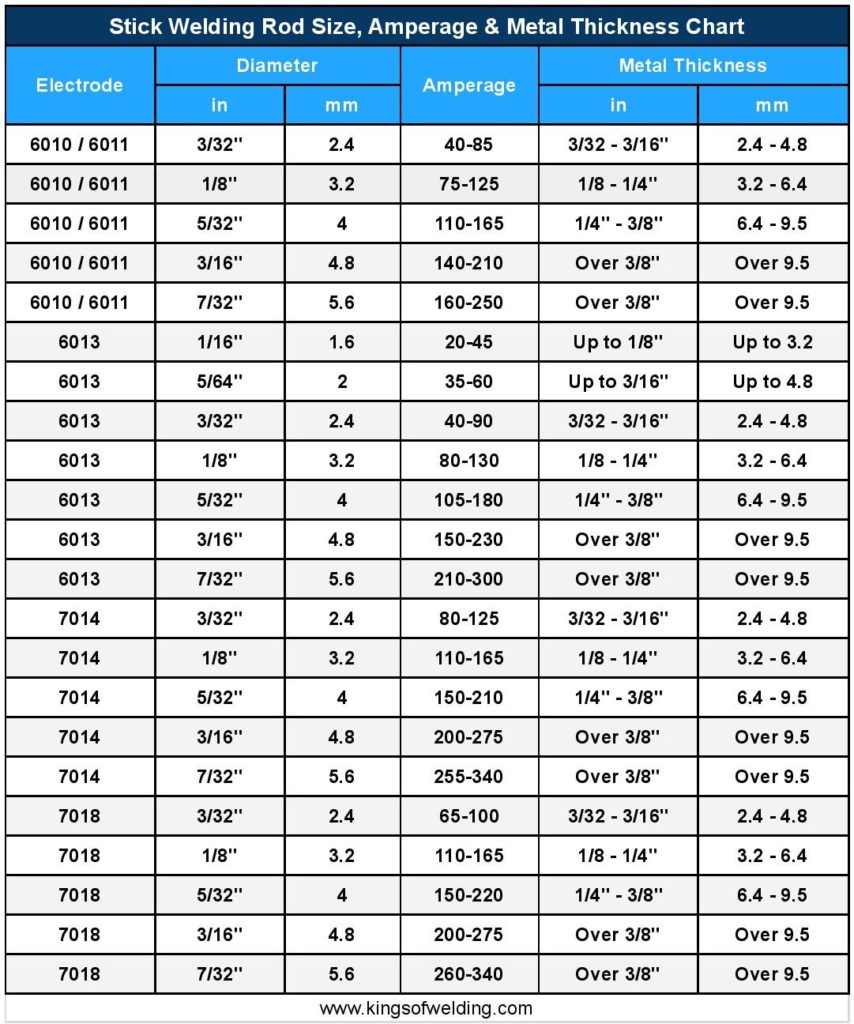
Use this foolproof formula: 1 amp per 0.001″ of material thickness. For example:
- 24 gauge (0.024″): 20-30 amps
- 16 gauge (0.060″): 60-80 amps
- 1/8″ (0.125″): 100-130 amps
- 1/4″ (0.250″): 150-200 amps
Adjustment factors:
– Vertical/overhead positions: Reduce amperage 10-15%
– Multiple passes: Reduce amperage 20% for root pass
– Inverter welders: Try 10-20% less amperage than traditional machines
Prepare Joint Configuration
For thin mild steel (<1/8″), square edges work fine with minimal gap. For 1/8″-1/4″ material, add a 1/16″ root gap. Thicker than 1/4″ requires a 60° V-groove with 3/16″ root face.
Fillet weld sizing rule: Leg length should equal the thinner material’s thickness. For example, welding 1/8″ to 1/4″ steel, make the fillet weld 1/8″ leg size. Deposit with slight convexity for maximum strength—avoid flat or concave profiles which create stress points.
Master Fundamental Technique
Hold your torch at 75° to the workpiece with 10-15° forward travel angle. Move steadily while maintaining arc length equal to your electrode diameter. Too short causes contamination; too long reduces penetration.
Add Filler Metal Properly
Dip the filler rod into the leading edge of the weld pool—not the arc itself. Hold it at 15-20° to the workpiece and add in a rhythmic motion: dip-pause-dip. Common mistake: Dipping too frequently creates cold laps; too infrequently causes convex beads.
Start with high-frequency arc initiation if available—it prevents tungsten contamination. When stopping, use your welder’s crater fill function (or manually ramp down amperage) to prevent crater cracks.
Verify Setup Before Welding
Before welding your actual piece:
1. Check all connections are tight and clean
2. Confirm work clamp attaches directly to bare metal
3. Verify 1/4″ tungsten extension beyond cup
4. Test gas flow with cup inverted (should feel strong, steady flow)
5. Run a test weld on scrap material of same thickness
Critical check: The test weld should have consistent width, slight convexity, and no discoloration beyond the immediate weld area. If you see blue tinting, your gas flow is too low or travel speed too slow.
Troubleshoot Common Issues
Porosity? Check for:
– Drafts in work area
– Contaminated base metal (clean with stainless steel brush)
– Low gas flow rate
– Leaking connections
Lack of penetration? Try:
– Increasing amperage 10-15%
– Slowing travel speed
– Reducing arc length
– Opening joint gap slightly
Tungsten contamination? This appears as black specks in weld—immediately stop and:
1. Replace contaminated tungsten
2. Grind out affected weld area
3. Verify proper arc length
4. Check filler rod angle isn’t blocking view
Final Setup Summary
To set up a TIG welder for mild steel successfully: Use DCEN polarity with pure argon at 15-20 CFH. Select thoriated or ceriated tungsten ground to a point, sized for your amperage. Choose ER70S-2 filler rod matching your material thickness. Set amperage at 1 amp per 0.001″ of thickness, adjusting for position and material. Always verify your setup with a test weld before starting your actual project.
With these precise settings, you’ll produce clean, strong mild steel welds with minimal cleanup. Remember: TIG welding rewards patience and precision—take time to set up correctly, and your welds will show the difference. Keep this guide handy for your next mild steel project, and you’ll consistently achieve professional results that stand the test of time.
Leave a Reply