
When stainless steel welds turn out discolored, porous, or weak, the problem almost always traces back to improper TIG welder setup. Getting your TIG welder correctly configured for stainless steel is the difference between professional-looking, corrosion-resistant welds and frustrating failures that compromise your project’s integrity. This guide reveals exactly how to set up a TIG welder for stainless steel to achieve clean, high-quality results from your very first weld.
Unlike MIG welding where you simply control gun angle and travel speed, TIG welding stainless steel demands precision setup across multiple variables. The wrong tungsten type, incorrect gas flow, or mismatched filler metal will sabotage your efforts before you even strike an arc. Following these setup procedures ensures you’re working with optimal conditions for stainless steel’s unique properties—high heat retention, sensitivity to contamination, and need for precise heat control.
Choose the Correct Tungsten Electrode Type and Preparation
Your tungsten electrode directly determines arc stability and weld quality when working with stainless steel. Selecting the right type and preparing it properly prevents common issues like tungsten contamination and inconsistent arcs.
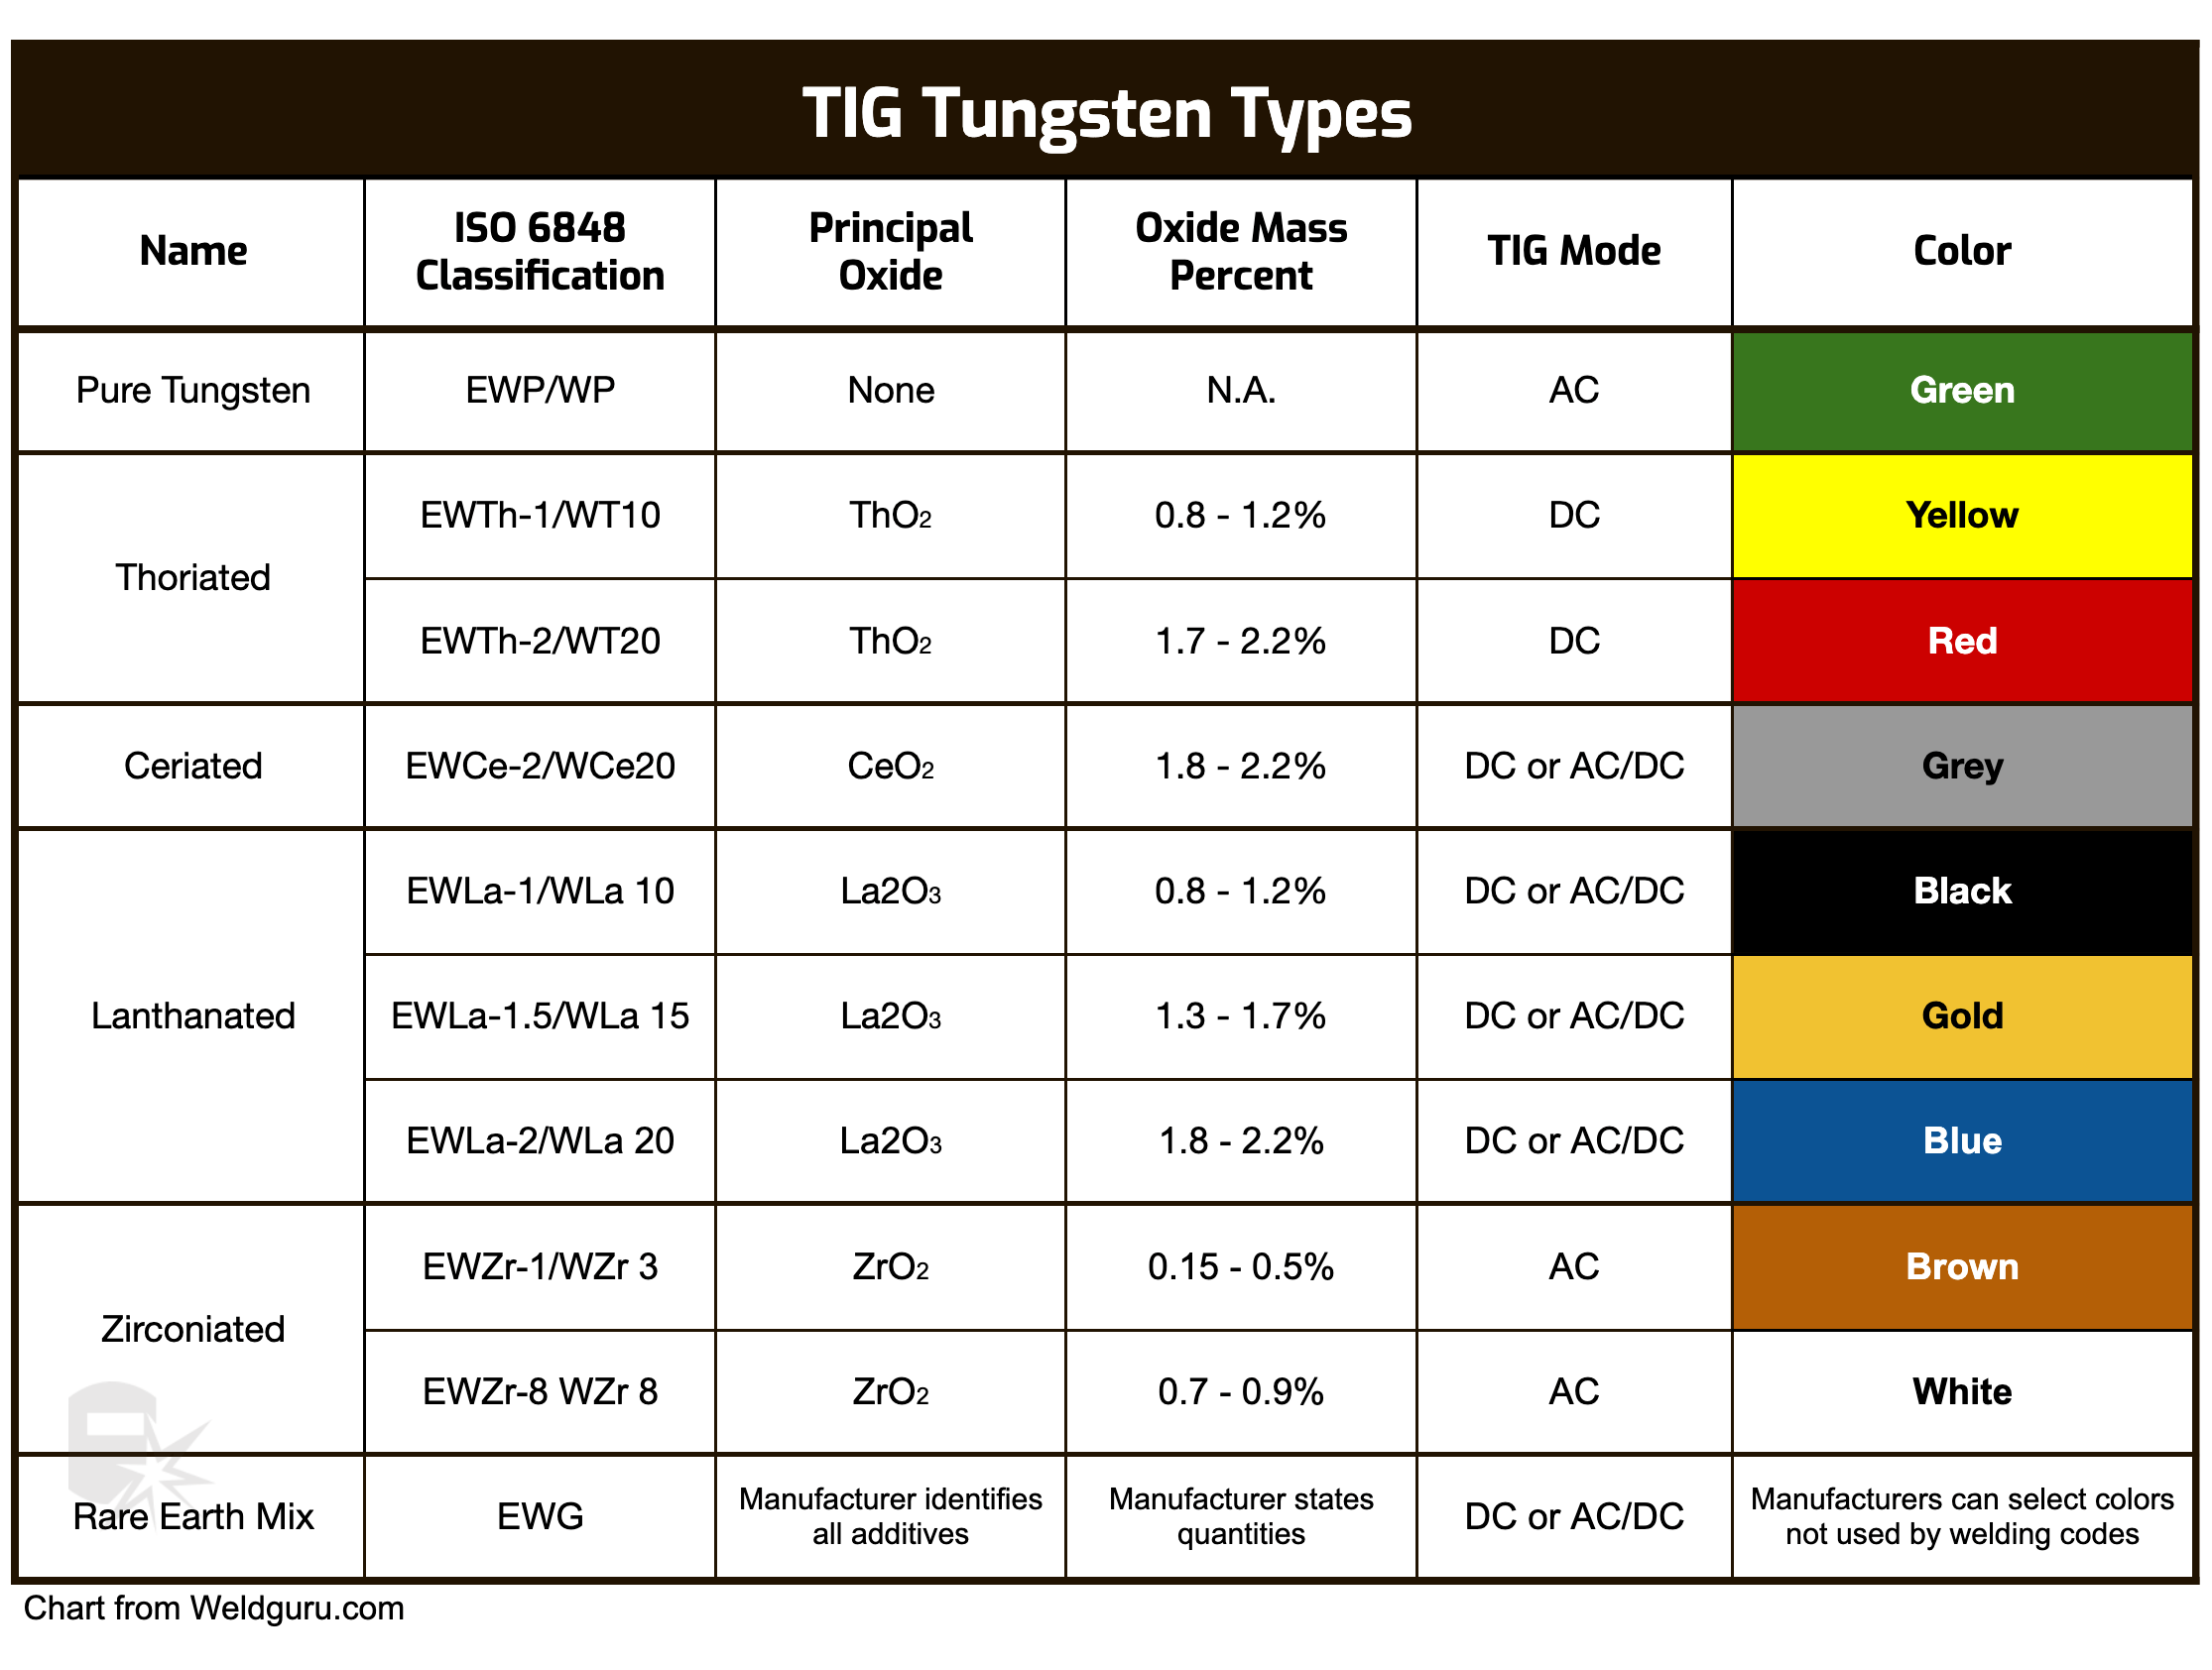
Thoriated vs. Ceriated vs. Lanthanated Electrodes
For stainless steel TIG welding, thoriated electrodes (red or yellow) remain popular despite their radioactive dust concerns during grinding. These electrodes handle higher temperatures and deliver exceptional arc stability—critical when welding stainless steel’s heat-sensitive surfaces. If safety is your priority, switch to ceriated electrodes (grey), which offer comparable performance without radioactive risks while maintaining excellent arc starting capabilities.
Lanthanated electrodes (black, gold, or blue) provide the best balance for most stainless steel projects. They deliver superior current-carrying capacity, easy arc starting, and reduced tungsten consumption compared to other options. For 304 or 316 stainless steel under 1/8 inch thick, 2% lanthanated tungsten in 3/32-inch diameter delivers optimal results with minimal fuss.
Proper Tungsten Grinding Technique
Never grind the painted end of your tungsten—this color coding identifies the electrode type. Use a dedicated tungsten sharpener with diamond grinding wheel to create a precise taper no greater than 2.5 times the electrode diameter. For 3/32-inch tungsten, this means a 1/4-inch taper maximum. After grinding, wipe the electrode clean with a lint-free cloth to remove any grinding residue that could contaminate your weld.
Pro Tip: Keep your tungsten sharpener isolated from other workshop tools. Cross-contamination from carbon steel particles will ruin your stainless steel welds.
Configure Optimal Shielding Gas Settings
Shielding gas protects your stainless steel weld from atmospheric contamination that causes oxidation, porosity, and weakened joints. The right gas mixture and flow rate make or break your weld quality.
Selecting the Ideal Gas Mixture
For 95% of stainless steel TIG welding projects, 100% argon provides sufficient protection. This standard mixture creates a stable arc and adequate coverage for materials up to 1/4 inch thick. When welding thicker stainless steel sections (over 1/4 inch), switch to an argon-helium mix (75% argon/25% helium) to increase heat input and penetration without compromising weld integrity.
For applications where appearance matters most—like food-grade equipment or architectural elements—consider argon with 2-5% hydrogen. This mixture enhances the “cleaning action” of the arc, producing mirror-like weld beads with minimal discoloration. Never exceed 5% hydrogen, as higher concentrations risk hydrogen embrittlement in stainless steel.
Precise Flow Rate Calibration
Set your gas flow between 15-25 CFH for most stainless steel applications. Thinner materials (under 1/8 inch) require the lower end of this range to prevent turbulent gas flow that pulls atmospheric contaminants into your weld zone. For thicker materials, increase to 25-35 CFH to ensure adequate coverage during longer welding passes.
Critical Mistake to Avoid: Excessive gas flow creates turbulence that draws oxygen into your weld puddle. If you hear a loud hissing sound from your torch, reduce the flow immediately.
Select Perfectly Matched Filler Metal

Mismatched filler metal creates weld joints that corrode faster than the base material—a critical failure in stainless steel applications where corrosion resistance matters most.
Filler Metal Selection Guide
For common 304 stainless steel, use 308L filler rod; for 316 stainless, choose 316L. The “L” designation indicates low carbon content, which prevents chromium carbide formation that weakens corrosion resistance at high temperatures. When uncertain about your base metal grade, 309L filler rod serves as a reliable universal option for most austenitic stainless steels.
Diameter Selection by Material Thickness
| Material Thickness | Recommended Filler Diameter |
|---|---|
| 1/16 inch | 0.045 inch |
| 1/8 inch | 1/16 inch |
| 3/16 inch | 3/32 inch |
| 1/4 inch | 1/8 inch |
Using filler rod too thick for your material creates an uncontrollable weld puddle, while too-thin rod requires excessive dipping that overheats the base metal. Always cut your filler rods to 18-inch lengths for better control during welding.
Calibrate Precise Power Settings for Stainless Steel

Stainless steel’s high thermal expansion coefficient demands careful heat management to prevent distortion and maintain corrosion resistance.
Amperage Settings by Material Thickness
Start with these baseline amperage settings for DCEN (electrode negative) polarity:
– 20-40 amps for 1/16 inch material
– 40-70 amps for 1/8 inch material
– 70-110 amps for 3/16 inch material
– 110-150 amps for 1/4 inch material
Always begin at the lower end of these ranges and increase only as needed. If your machine has a foot pedal, set the base amperage to 70% of your required setting, leaving room for real-time adjustments during welding.
Pulse Settings for Heat Control
For stainless steel under 1/8 inch thick, activate pulse welding with these parameters:
– Background current: 30% of peak current
– Pulse frequency: 1-2 pulses per second
– Pulse width: 50%
This configuration reduces overall heat input by 30-40% while maintaining adequate penetration—critical for preventing distortion in thin stainless steel sheets.
Prepare Stainless Steel Surfaces for Flawless Welds
Contamination causes more stainless steel TIG welding failures than any other factor. Proper surface preparation is non-negotiable.
Dedicated Cleaning Protocol
- Blow loose debris from the weld area with clean, oil-free compressed air
- Wipe the surface with acetone using lint-free cloths (never paper towels)
- For oxidized surfaces, use a stainless-steel-specific wire brush—never one that’s touched carbon steel
- Grind any heavy scale with dedicated stainless steel grinding discs
Critical Warning: Never use the same tools for stainless steel and carbon steel. Iron particles transferred from carbon steel tools will cause rust spots that compromise corrosion resistance.
Master Essential TIG Welding Techniques for Stainless Steel
Proper setup means nothing without correct technique. These methods ensure your setup efforts translate to perfect welds.
Optimal Torch Positioning and Movement
Hold your torch at 15 degrees off perpendicular to the workpiece, facing your direction of travel. Move at a consistent speed that maintains a weld puddle about 1.5 times your tungsten diameter. For 1/8 inch stainless steel, this typically means traveling at 3-4 inches per minute at 60-70 amps.
Post-Flow Timing for Oxidation Prevention
Set post-flow gas to one second per 10 amps of welding current, with a minimum of five seconds. For example, at 80 amps, set post-flow to 8 seconds. Keep the torch cup positioned over the weld termination point until the gas stops flowing—this prevents oxidation that causes weak, brittle welds.
Color Monitoring for Quality Control
Watch your weld color as you work:
– Gold/straw: Perfect heat control and gas coverage
– Blue/purple: Slightly excessive heat or insufficient post-flow
– Gray/black: Severe oxidation requiring weld removal and rework
Achieving consistent gold coloring requires maintaining steady travel speed, amperage, and torch height. Practice on scrap material until you can produce uniform color throughout your weld bead.
Setting up a TIG welder for stainless steel properly transforms frustrating welding experiences into consistent success. By selecting the right tungsten electrode, calibrating precise gas flow, matching filler metal perfectly, and preparing surfaces meticulously, you create the foundation for professional-quality welds. Remember that stainless steel demands more attention to setup details than other metals—each adjustment directly impacts corrosion resistance and structural integrity.
The most successful stainless steel TIG welders practice setup procedures until they become second nature. Start with scrap material to verify your settings before committing to critical welds. As you gain experience, you’ll develop an intuitive sense for how each parameter affects your weld quality. With consistent practice using these setup guidelines, you’ll produce stainless steel welds that not only look professional but also deliver the corrosion resistance and strength that makes stainless steel valuable in the first place.
Leave a Reply