You’ve just unboxed your new MIG welder and are ready to make your first weld, but the machine sits there silently while you wonder where to begin. Many beginners make critical mistakes during initial setup that lead to frustrating spatter, weak welds, or even safety hazards—without proper guidance, that expensive machine might as well be a paperweight. Starting a MIG welder correctly requires understanding five essential elements: safety preparation, proper wire installation, gas setup, electrical connections, and machine settings. This guide walks you through each step with exact procedures to follow, so you can go from confused beginner to confident welder in under 30 minutes—without the common pitfalls that ruin first attempts.
Essential Safety Preparations Before Powering On
Before touching any controls, you must create a safe welding environment. Your eyes and skin need protection from ultraviolet radiation that causes “welder’s flash”—a painful condition similar to sunburn on your cornea. Gather these non-negotiable safety items: an auto-darkening welding helmet set to shade 10 or higher, flame-resistant leather gloves that cover your wrists, and cotton or leather clothing without synthetic materials that can melt onto skin. Remove all flammable objects within a 10-foot radius of your workspace, as welding sparks can travel surprisingly far. Position your welding curtain to protect others in the area, and ensure your workspace has adequate ventilation—especially important when welding galvanized metals that release toxic zinc fumes.
Critical Electrical Safety Checks
Verify your power source matches your welder’s requirements before plugging in. Most entry-level MIG welders operate on standard 120V household current, but larger models require 240V circuits. Using an undersized extension cord causes voltage drop that prevents proper arc initiation—use 10-gauge wire for runs under 50 feet. Check that your circuit breaker matches the welder’s amperage rating (typically 30-50 amps for 240V models). Never operate a MIG welder on a GFCI-protected circuit, as the welding current can falsely trip the breaker. Confirm your work clamp makes direct metal-to-metal contact with clean, unpainted base metal—poor grounding causes erratic arcs and poor weld penetration.
Installing Welding Wire Correctly: Avoid Birdnesting

Birdnesting—when wire tangles inside the gun—causes 70% of beginner MIG welding failures. Prevent this by following the exact wire loading sequence. First, set your drive roll tension to minimum and open the drive roll housing. Cut the wire spool’s retaining wire with diagonal cutters and unwind the first 6 inches of wire, making sure it feeds in the direction indicated by the arrow on the spool. Thread the wire through the feed tube until it reaches the contact tip, then close the housing. Gradually increase drive roll tension until the wire feeds smoothly without crushing—over-tightening damages the wire and causes feeding issues. For steel welding, use .030″ ER70S-6 wire; for aluminum, choose .035″ spool gun wire with a U-groove drive roll.
How to Set Proper Wire Stick-Out Distance
Your wire’s stick-out distance (the length from contact tip to workpiece) dramatically affects weld quality. For most beginner applications, maintain 3/8 inch of stick-out—about the width of a dime. Too short (<1/4 inch) causes excessive spatter and contact tip burn-back; too long (>1/2 inch) creates weak, porous welds. Test your setting by taping a dime to your workpiece and adjusting until the wire extends just beyond the coin’s edge. This measurement ensures optimal shielding gas coverage while preventing the wire from dipping into the weld pool.
Connecting and Adjusting Shielding Gas
MIG welding requires shielding gas to protect the molten weld pool from atmospheric contamination. For most steel projects under 1/4 inch thick, use 75% argon/25% CO2 (C25) gas. Connect your regulator to the gas cylinder, ensuring the cylinder is secured upright. Crack the cylinder valve briefly before attaching to clear debris, then open the valve fully and adjust your regulator to 20-25 cubic feet per hour (CFH). Perform a gas flow test: with the trigger depressed, hold your gloved hand near the gun nozzle—you should feel steady gas flow without turbulence. Any hissing sound indicates leaks at fittings; apply soapy water to connections and look for bubbles.
Why Gas Flow Rate Matters for Beginners
Setting incorrect gas flow causes immediate welding problems. Too little gas (<15 CFH) allows oxygen into the weld pool, creating porous, weak welds that look like Swiss cheese. Too much gas (>30 CFH) creates turbulence that draws in atmospheric contaminants. For most indoor welding on clean steel, 20 CFH provides optimal coverage. When welding outdoors or in drafty areas, increase to 25 CFH but position windbreaks to prevent gas dispersion. Always purge your gun liner for 30 seconds before welding to clear air pockets that cause porosity in your first few inches of weld.
Machine Settings for First-Time Welding Success
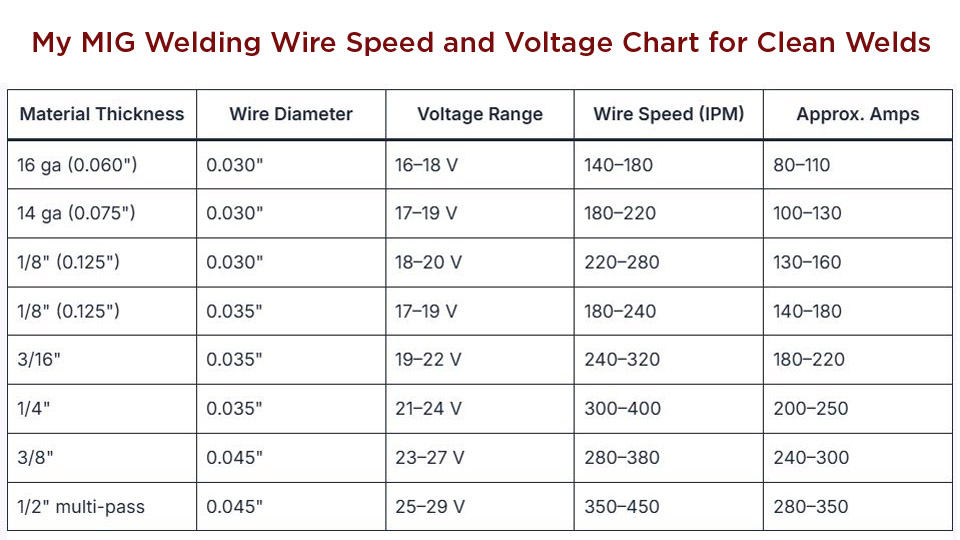
Your voltage and wire speed settings must match both material thickness and welding position. For 18-gauge steel in a flat position, start with 15-16 volts and 200-220 inches per minute (IPM) wire speed. Test on scrap metal and adjust: increase voltage if the arc sounds like bacon frying (too cold), decrease if it sounds like a buzzing bee (too hot). The ideal arc produces a steady “sizzle” like frying bacon. For vertical welding, reduce voltage by 1-2 volts to prevent weld pool sagging. Always set polarity to DC electrode positive (DCEP)—reversing this causes poor penetration and excessive spatter.
Troubleshooting Common First Weld Problems

When your first weld produces excessive spatter, check these three culprits: 1) Drive roll tension too high (wire feeding erratically), 2) Voltage too low for your wire speed (causing stubbing), or 3) Contaminated base metal (oil, rust, or paint). If the wire keeps burning back to the contact tip, your stick-out is too short or voltage too high. For weak, stringy welds that don’t penetrate, increase voltage by 1-2 increments while maintaining the sizzling sound. Remember: small adjustments make big differences—change only one setting at a time when troubleshooting.
Perfecting Your First Weld Technique
Hold your welding gun at a 10-15 degree push angle (wire pointing in direction of travel) for most applications. Move the gun steadily at 6-8 inches per minute—too fast creates cold, weak welds; too slow causes burn-through on thin material. Maintain a consistent travel speed that leaves a weld bead about twice the width of your contact tip. For your first practice runs, weld on overlapping circles (stacking dimes technique) to build muscle memory before attempting straight beads. Listen carefully to the arc sound—it should remain consistent; fluctuations indicate inconsistent travel speed or arc length.
How to Recognize a Good Weld vs. Bad Weld
A properly executed weld shows uniform ripples with no gaps between passes, minimal spatter, and complete fusion to both edges of the joint. The bead should have a slight crown—not flat or concave. Common beginner mistakes include: undercut (groove along weld edge indicating excessive heat), porosity (pinholes from gas contamination), and lack of fusion (weld sitting on top of base metal). If your weld looks like a string of disconnected beads, you’re moving too fast or holding the gun too far from the workpiece.
Routine Maintenance After Your First Session
After welding, perform these critical shutdown steps: 1) Cut power at the machine, 2) Close cylinder valve and bleed gas from regulator, 3) Back out drive roll tension to prevent wire deformation, 4) Clean spatter from nozzle with a wire brush, 5) Inspect contact tip for wear (replace if hole is oval-shaped). Store your welding gun coiled loosely with no sharp bends that kink the liner. For extended storage, cut the wire about 2 inches from the contact tip to prevent oxidation inside the liner. Wipe down the machine with a dry cloth to remove metal dust that can cause electrical issues.
When to Seek Professional Guidance
Certain welding situations require expert intervention immediately. If you’re welding on pressurized containers, high-carbon steels, or dissimilar metals, stop and consult a professional—these applications have hidden dangers that aren’t obvious to beginners. Similarly, if you experience frequent electrical shocks from your equipment, cease operation immediately and have the machine inspected by a qualified technician. Proper MIG welding technique develops through practice, but safety knowledge must come first—never sacrifice protection for convenience.
Starting your MIG welder correctly transforms a confusing array of dials and gauges into a reliable tool that creates strong, clean welds from day one. By following these precise setup procedures, you’ll avoid the frustration that causes many beginners to abandon welding prematurely. Remember that perfect welds come with practice—your first attempts should focus on consistent technique rather than appearance. Keep your workspace organized, maintain your equipment after each use, and always prioritize safety over speed. With these fundamentals mastered, you’re ready to tackle increasingly complex projects with confidence.
Leave a Reply