TIG welding delivers unmatched precision for clean, high-quality metal joints that outperform results from other welding methods. When you learn how to TIG weld properly, you gain the ability to create flawless seams on materials as thin as foil or as thick as structural steel—making it indispensable for automotive restoration, aerospace components, and artistic metalwork. Many beginners struggle with the learning curve compared to stick or MIG welding, but the superior control and aesthetic results make mastering this technique worthwhile for both hobbyists and professionals.
Unlike automated welding processes, TIG welding puts you in complete command of every aspect of the weld pool through coordinated hand and foot movements. This manual control allows you to adjust heat input in real-time as you progress along the joint, creating consistent, penetration-rich welds that require minimal cleanup. Whether you’re repairing a vintage motorcycle frame or fabricating custom metal art, understanding how to TIG weld opens doors to projects that demand both strength and visual appeal.
This guide breaks down the TIG welding process into actionable steps you can implement immediately, avoiding the common frustrations beginners face. You’ll learn equipment setup, fundamental techniques, material preparation, and troubleshooting—all based on proven methods used by professional welders.
Select Your TIG Welding Equipment Properly

Choosing the right TIG welding gear determines your success more than any other factor when learning how to TIG weld. Start with a power supply that matches your intended projects—most beginners benefit from a 200-amp AC/DC machine that handles everything from thin sheet metal to quarter-inch plate. Higher-end models offer advanced features like pulse control and AC balance adjustment that prove invaluable when welding aluminum.
Your TIG torch selection affects comfort and performance during extended welding sessions. For most hobbyist applications under 200 amps, an air-cooled torch provides sufficient duty cycle without the complexity of liquid cooling systems. Select a #17 or #20 series torch with a 3/32-inch collet for general-purpose work, and ensure it includes a gas lens assembly that delivers consistent shielding gas coverage even at lower flow rates.
Don’t overlook the importance of your amperage control method. Foot pedals offer intuitive, hands-free heat adjustment that many beginners find easier to master than finger-controlled units mounted on the torch. Look for a pedal with a smooth, responsive action that allows subtle heat adjustments as you move along complex joints—this precise control separates decent TIG welds from exceptional ones.
Configure Your TIG Welding Station Correctly
Setting up your TIG welding station properly prevents common beginner mistakes that lead to contaminated welds and equipment damage. Begin by connecting your ground clamp directly to the workpiece as close as possible to your welding area—this minimizes electrical resistance and ensures stable arc starting. For steel and stainless steel, select DCEN (direct current electrode negative) polarity on your machine; switch to AC when preparing to weld aluminum.
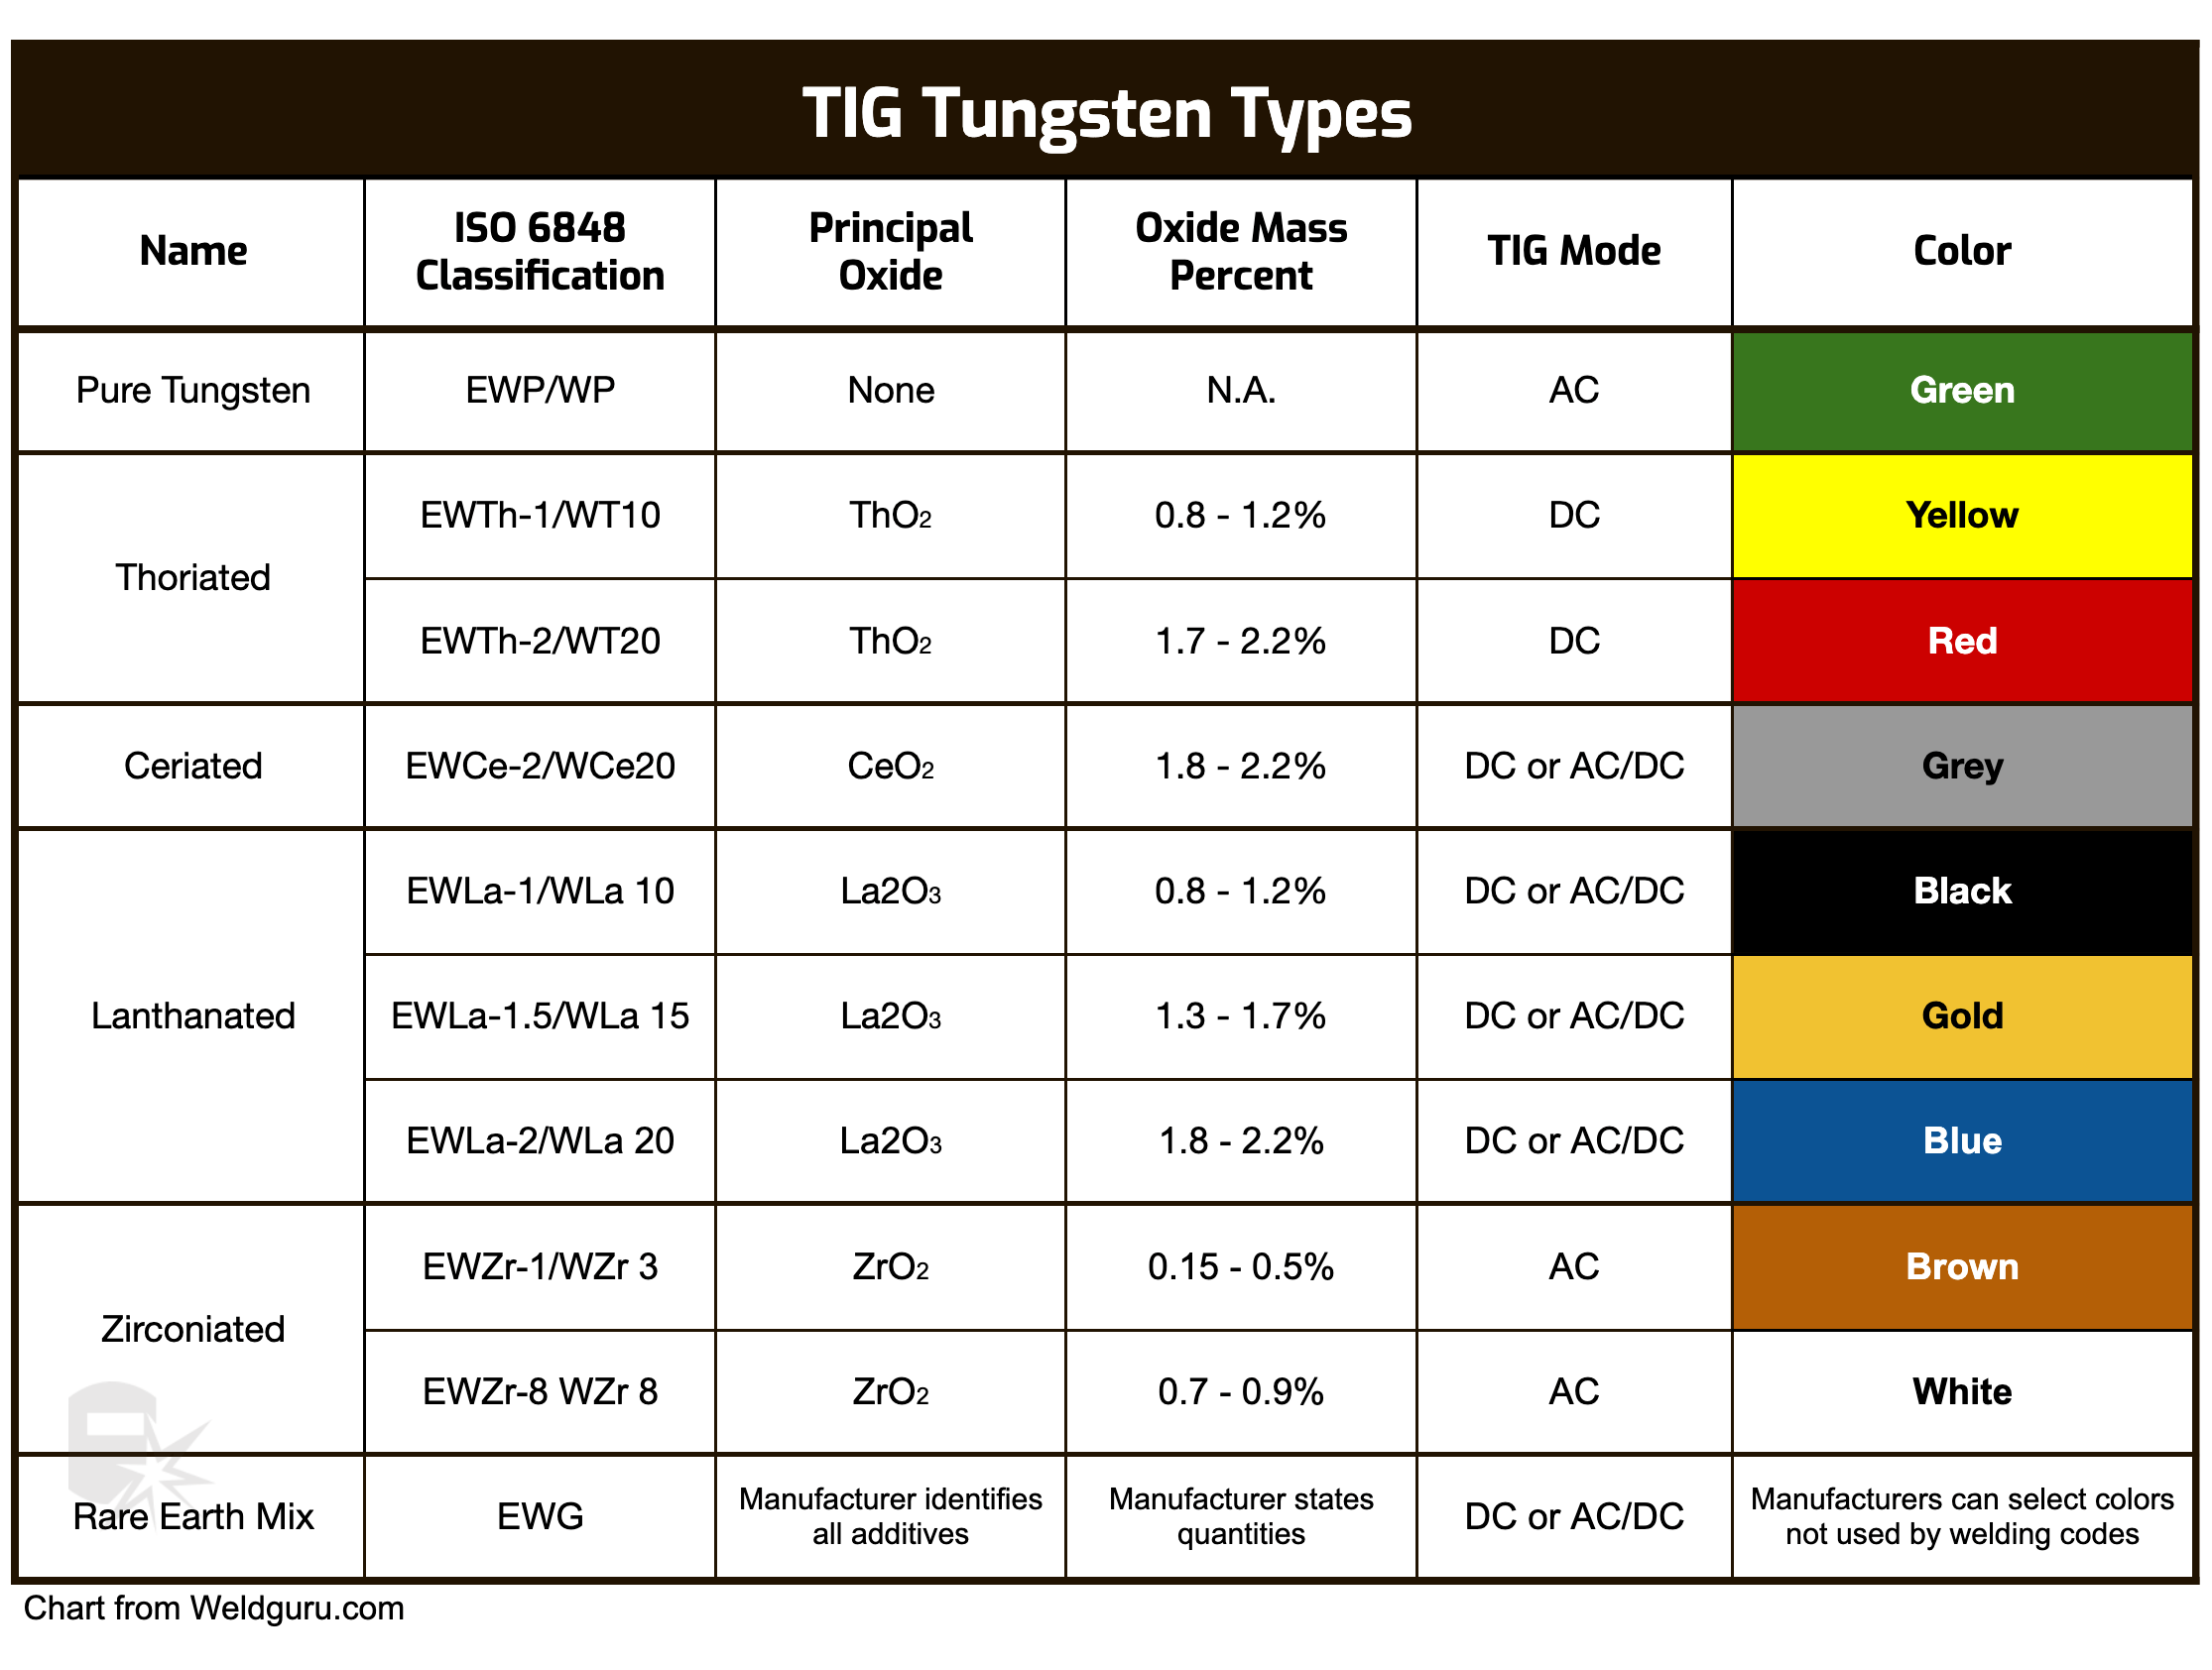
Choose the appropriate tungsten electrode based on your material: use 2% thoriated (red tip) for steel and stainless steel, or 2% ceriated (gray tip) for general-purpose work including aluminum. Grind your tungsten to a 15-20 degree point for DC welding using a dedicated tungsten grinder—never use the same grinder for other metals to avoid contamination. For AC aluminum welding, simply strike an arc and let the tip ball naturally for optimal performance.
Set your argon gas flow between 15-20 CFH using a high-purity regulator, and verify adequate coverage by watching the weld pool—proper shielding creates a clean, mirror-like appearance without discoloration. Higher flow rates become necessary when working outdoors or in drafty environments, but excessive flow wastes gas and can actually draw in atmospheric contamination through turbulence.
Execute Perfect TIG Welding Technique
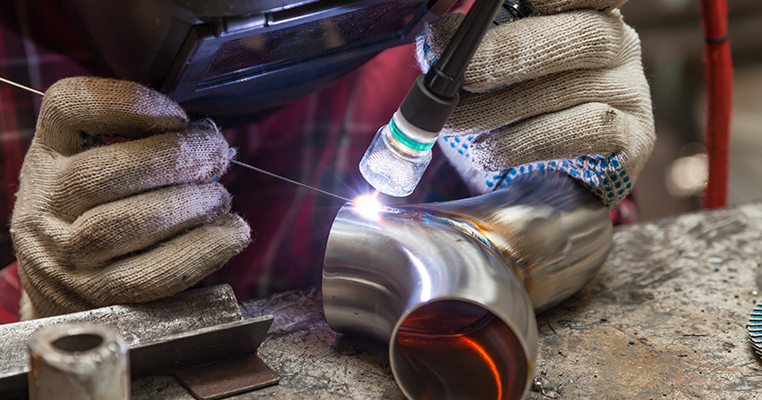
Mastering the fundamental TIG welding technique requires coordinating three simultaneous actions: maintaining consistent arc length, adding filler metal rhythmically, and moving at the correct travel speed. Hold your torch at a 70-80 degree angle to the workpiece, keeping the tungsten approximately 1/8 inch above the surface—this distance creates optimal arc stability and shielding gas coverage.
Add filler metal by dipping the rod into the leading edge of the weld pool without passing it through the arc itself. Hold the rod at a shallow 10-15 degree angle to the workpiece and develop a consistent “dip-pause” rhythm: melt a small amount of filler, pause briefly to let it incorporate into the pool, then repeat. This technique prevents tungsten contamination and creates uniform bead appearance.
Control heat input with your foot pedal as you weld, increasing amperage slightly when starting a weld to establish the pool, then reducing it as you progress to prevent burn-through. On thin materials under 1/8 inch, use short “stack of dimes” technique with rapid on-off pedal control to deposit small, controlled weld beads that minimize distortion.
Prepare Materials for Flawless TIG Welds
Proper material preparation prevents 90% of common TIG welding defects beginners encounter. Clean all surfaces thoroughly with a stainless steel brush dedicated to that specific metal type (never use the same brush for steel and aluminum), followed by acetone wiping to remove oils and residues. Aluminum requires special attention—clean immediately before welding since it re-oxidizes quickly.
Fit materials tightly with gaps no wider than the material thickness, using clamps or tack welds to maintain alignment. For steel under 1/8 inch, eliminate gaps entirely to prevent burn-through; thicker materials benefit from beveled edges with a 30-45 degree included angle to ensure complete penetration.
Preheat thick aluminum sections (over 1/4 inch) to 230°F using a temperature-indicating crayon to reduce the thermal gradient that causes cracking. For stainless steel, avoid excessive heat buildup by welding quickly and using lower amperage settings than you would for mild steel of similar thickness.
Troubleshoot Common TIG Welding Problems
Identify and correct common TIG welding issues before they ruin your project. Porosity (tiny holes in the weld) typically indicates contamination—check for inadequate shielding gas coverage, insufficient material cleaning, or tungsten contamination from touching the weld pool. Increase gas flow slightly and ensure no drafts interfere with your shielding gas envelope.
Lack of fusion appears as weak, poorly bonded joints and usually results from insufficient heat (too low amperage or too fast travel speed). Increase amperage by 10-15%, slow your travel speed, and adjust torch angle to direct more heat toward the joint edges. On thicker materials, make multiple passes with light brushing between layers to ensure proper bonding.
Tungsten inclusions create brittle spots in your weld and occur when the electrode contacts the molten pool. Immediately stop welding, grind 1/4 inch off the contaminated tungsten, and reshape the tip. Prevent future contamination by maintaining proper arc length and avoiding filler rod contact with the tungsten.
Practice Essential TIG Skill-Building Exercises
Develop muscle memory through deliberate practice before attempting actual projects. Start with stringer beads on clean steel scrap, focusing solely on maintaining consistent torch angle, arc length, and travel speed until you produce uniform beads with regular ripple patterns. This foundational exercise builds the coordination needed for all advanced techniques.
Progress to weave patterns using circular or zigzag motions to cover wider areas while maintaining even heat distribution. Practice each pattern until you can execute it smoothly without irregular bead edges—this skill proves essential for welding fillet joints and filling grooves in thicker materials.
Finally, practice welding various joint types: butt joints with backing bars, T-joints, and lap joints. Each configuration requires slight technique adjustments to ensure proper fusion while avoiding defects. These exercises build confidence for real-world applications and help you identify your specific weak points for targeted improvement.
Mastering how to TIG weld separates capable fabricators from true metal artisans. By following these essential steps—proper equipment selection, correct setup, fundamental technique mastery, thorough material preparation, and targeted practice—you’ll develop the skills to create clean, strong welds on virtually any metal. Start with simple exercises on scrap material, focus on developing consistent fundamentals rather than perfect aesthetics initially, and gradually expand your capabilities to more challenging projects. Remember that even professional welders were once beginners who made imperfect first attempts—persistence and proper technique yield remarkable progress in surprisingly short time. As your TIG welding skills grow, you’ll discover new creative and professional opportunities that demand this precise, versatile joining method.
Leave a Reply