When your bandsaw blade snaps mid-cut, the ability to weld it back together saves you from costly replacements and frustrating downtime. Instead of paying premium prices for pre-welded blades, you can create custom-length blades from bulk coil stock, repair broken blades on the spot, and extend the life of expensive bimetal material that would otherwise end up in the scrap bin. The process uses resistance welding to join blade ends, followed by annealing to restore flexibility and grinding to create a smooth joint that runs true on your saw’s wheels. This guide walks you through the complete process of how to use a bandsaw blade welder, from initial setup through executing the weld, annealing properly, and finishing the joint. You’ll also discover an alternative silver brazing method many experienced users prefer for bimetal blades.
Why Weld Bandsaw Blades
Purchasing bulk coil stock and welding blades to exact lengths makes economic sense for several reasons. Pre-welded blades carry a significant markup, and buying coil material instead can reduce your per-foot blade cost by up to 70%. This advantage compounds if you frequently cut different lengths, operate a riser-block-equipped saw requiring longer blades, or work with expensive bimetal stock where waste becomes costly.
Beyond cost savings, welding provides practical flexibility. When a blade breaks during an important job, the ability to repair it in the field eliminates hours of downtime. You can also join short remnants to new stock, squeezing every bit of usable life from expensive blade material. These advantages make blade welding particularly valuable for production shops, serious hobbyists, and anyone who depends on their bandsaw for regular work.
The welding process itself joins blade ends through resistance heating, bringing the metal to its critical temperature and applying pressure to form a solid metallurgical bond. After welding, the joint undergoes annealing to relieve stresses and restore flexibility, followed by grinding to remove excess material and create a smooth profile. Each stage requires proper execution—a brittle weld, an improperly annealed heat-affected zone, or an uneven grind can all cause premature failure.
Essential Equipment Overview
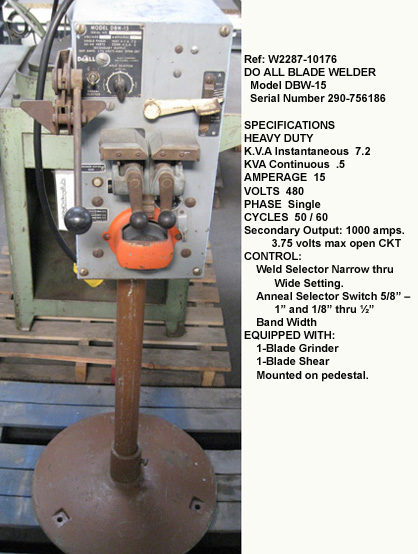
Bandsaw blade welders are specialized resistance welders designed specifically for the thin, high-carbon steel used in bandsaw blades. Most built-in units operate on standard 110-120V household current, though industrial machines may require 240V. The basic components include stationary and movable jaw assemblies that clamp the blade ends, an electrical system providing controlled heating, and a mechanical system that brings the jaws together under pressure.
DoAll blade welders represent the most common units found on used bandsaws and enjoy a reputation for reliability when properly maintained. Before attempting your first weld, familiarize yourself with your welder’s controls. Most units have adjustments for welding time or power level (typically calibrated to blade width), an annealing control, and mechanisms for adjusting jaw alignment and pressure.
Jaw condition directly affects weld quality. The jaw faces must remain clean, flat, and properly aligned to ensure good electrical contact and even pressure distribution. Before each welding session, inspect the jaw faces for debris, scale, or damage. Clean them with a wire brush or fine file. If jaws show uneven wear or pitting, dress them with a mill file to restore flat, smooth surfaces. When dressing jaws, work carefully to maintain parallel alignment between upper and lower jaw faces—any angular misalignment causes uneven welding and poor blade tracking.
Prepare Blade Ends Properly
:max_bytes(150000):strip_icc()/DadoPart-30c6e608eeaf4394a9abcc930c892894.jpg)
Proper preparation of blade ends determines whether your weld succeeds or fails. The ends must be cut square and clean, with no burrs, oxidation, or contamination that could interfere with the welding process. Rushing this stage virtually guarantees problems later.
Begin by cutting the blade to your desired length. If you’re repairing a broken blade, cut back at least 1/4 inch on both sides of the break to ensure removal of all damaged material. Use quality cutting tools—aviation snips can work but may roll the edge of the stock, making proper alignment difficult. A Dremel-style tool with a cut-off wheel or a fine-toothed hacksaw typically produces cleaner cuts with flat, square ends.
After cutting, clean the blade ends thoroughly to remove any oil, grease, or manufacturing residue. Oil creates an insulating layer that prevents proper electrical contact, leading to weak welds or porosity. Many experienced welders dip blade ends in lacquer thinner or acetone immediately before welding to ensure a clean surface. Handle the cleaned ends with clean gloves or rags to avoid transferring oils from your hands.
Position Blades for Welding
:max_bytes(150000):strip_icc()/Weld20blades202-3038d07a63b04068aea84eb18d586366.jpg)
With blade ends prepared, position them in the welder jaws for welding. The standard technique involves reversing the blade ends so that the cutting edge of one end meets the back edge of the other. This reverse-butting technique distributes any mismatch across the weld rather than creating a stress concentration at a single point—important if your cuts aren’t perfectly square.
Insert one blade end into the stationary jaws, then position the other end in the movable jaws. Adjust the movable jaw to leave approximately 1/16 inch or less of blade material extending beyond the jaws on the movable side. This overlap provides sufficient material for the upset (the plastic deformation during welding) while keeping the heated zone narrow.
Set the teeth to point toward the back of the jaws, approximately 1/4 inch from the jaw faces. This positioning keeps teeth out of the heated zone, preventing annealing or damage to tooth geometry. Before welding, verify that both blade ends are properly aligned with each other. There should be no gap between the ends, and they should be flush along their entire mating surface. Any misalignment creates a weak spot in the weld that may fail during use.
Set Weld Parameters Correctly
Modern blade welders offer adjustable settings for welding time and power, calibrated to blade width. The correct setting ensures sufficient heat to fuse blade ends without excessive heating that causes grain growth, brittleness, or tooth damage.
If your welder uses a timer-based system, select the appropriate setting for your blade width. Thicker, wider blades generally require longer weld times. If your welder has more basic adjustments, you’ll need to experiment with small test pieces to find correct settings. Start conservative and increase until you achieve good fusion.
For users with older or less sophisticated welders, the “feel” of the welding process becomes important. A properly executed weld produces a distinctive flash and small sparks as current flows and metal briefly reaches welding temperature. The upset should be minimal—just enough to ensure good contact and fusion. Excessive upset indicates too much heat or pressure; no visible flash suggests insufficient heat.
Execute the Weld Step
With everything positioned and parameters set, clamp the blade securely in the jaws. Some welders have a separate clamping mechanism while others rely on jaw pressure alone. Ensure the blade is held firmly and cannot shift during the welding cycle.
Initiate the welding cycle according to your welder’s design. On most units, press and hold a button or switch controlling the welding sequence. The sequence typically includes a heating phase (blade ends reach welding temperature through resistance heating) followed immediately by an upset phase (jaws bring heated ends together under pressure to form the weld).
For DoAll and similar resistive welders, the process is often automated once initiated—the timer controls heating duration, then automatically triggers upset. After the welding cycle completes, allow jaws to open and carefully remove the blade. A properly executed weld appears as a small, rounded bump at the joint with no visible gaps or porosity. The blade should feel solid at the joint with no indication of incomplete fusion. If the weld looks questionable, it’s better to cut and re-weld than to risk failure during use.
Anneal the Weld Zone
The welding process heats blade steel to high temperatures, creating a hard, brittle microstructure in the heat-affected zone. Without proper annealing, this brittle zone cracks and fails during cutting. Annealing—controlled heating and slow cooling—relieves stresses and restores ductility to the hardened steel.
After welding, the blade remains clamped in the jaws for the annealing process. Most blade welders have a separate annealing control providing a different heating cycle than welding—the annealing cycle offers less intense heat over a longer period, allowing temperature to penetrate deeper into the weld zone.
The standard annealing technique for carbon steel blades involves heating the weld zone until it reaches dull red color, then gradually reducing heat in multiple pulses. A common approach bumps the anneal button three times: first until any oil or scale smokes off, second until the blade is faintly red, and third until it reaches dull red. Temperature should not exceed orange—if metal turns orange or brighter red, you’ve overheated and may have softened the blade excessively.
Grind and Finish Smooth
After annealing, the weld zone shows a visible bump or flash where excess material was forced out during upset. This material must be completely removed to allow the blade to run smoothly on saw wheels without wobbling or tracking problems.
Begin by grinding the weld on both faces (the surfaces contacting wheel flanges) until flush with surrounding blade surface. Use a fine-grit grinding wheel and work carefully to avoid removing too much material or creating gouges. Your goal is restoring the blade to original thickness and profile.
After grinding both faces, grind the back of the blade in the weld area as well. Some DoAll units have a dedicated grinding station built into the machine; others require removing the blade for bench grinding. Either way, ensure the back surface is smooth and flush with surrounding material.
Throughout grinding, check progress frequently by feel and visual inspection. The blade should feel smooth and uniform throughout the weld zone with no visible step or ridge at the joint. Any remaining bump causes tracking problems and premature wear on saw wheels.
Troubleshoot Common Problems
Blade breaking at the weld typically indicates welding or annealing problems. If the blade breaks in the heat-affected zone a short distance from the weld, annealing was insufficient—the metal became hard and brittle during welding and wasn’t properly softened. Increase annealing time or temperature slightly. If the blade breaks directly at the weld, the welding process itself may be at fault: insufficient heat (incomplete fusion), excessive heat (grain growth and brittleness), or contamination at the joint. Verify clean blade ends and experiment with welding parameters.
Weld not sticking can stem from several causes. Check jaw cleanliness—oxidation or debris prevents proper electrical contact. Clean jaws thoroughly. Verify blade end preparation—oil or contamination creates an insulating layer. Check welding parameters; if too low, blade ends won’t reach proper temperature. Ensure proper blade positioning with minimal extension beyond jaw faces.
Tracking problems indicate the weld isn’t perfectly square or grinding created imbalance. Check joint squareness—if blade ends weren’t aligned during welding, the blade has a permanent bend at the joint. The only remedy is cutting and rewelding with attention to alignment. If tracking problems developed after grinding, you may have ground more material from one side than the other, creating imbalance.
Alternative: Silver Brazing Method
Silver brazing offers advantages that make it preferable to resistance welding for many applications. This method uses a silver-based filler metal and torch heat source rather than electrical resistance heating.
Silver brazing doesn’t anneal the teeth—the heat-affected zone is limited to the immediate joint area, eliminating the primary failure mode reported with resistance-welded bimetal blades. The joint is often actually stronger than surrounding blade material. And unlike resistance welding, silver brazing doesn’t require expensive specialized equipment—a simple propane or MAPP torch, silver solder, flux, and a fixture are all you need.
Silver brazing requires a scarf joint—an angled cut providing increased surface area for the joint. The standard scarf angle measures 20 degrees along the blade face. Clamp the blade securely and use a fine file or Dremel tool to cut the angle. Repeat on the second blade end but cut in the opposite direction so the angled surfaces mate. The joint should show no gap when fitted.
Safety Guidelines to Follow
Blade welding involves electrical current, high temperatures, sparks, and flying debris. Take appropriate precautions to protect yourself and your workspace.
Electrical safety requires that your welder is properly grounded with cords and plugs in good condition. If you notice damage, have the unit inspected before use. When accessing the welder’s interior for cleaning or maintenance, always unplug first and allow capacitors to discharge.
Fire and burn hazards accompany welding and annealing. Keep flammable materials away from the work area and have a fire extinguisher accessible, particularly when using torch-based methods. The blade and welder jaws become extremely hot—use pliers or gloves when handling hot components.
Always wear safety glasses or a face shield when grinding. Stand to the side of the grinding wheel rather than directly in front of it. Ensure the wheel is properly dressed and free of damage.
Torch-based operations produce fumes that should not be inhaled. Work in a well-ventilated area or use local exhaust ventilation. Flux fumes from brazing operations are particularly irritating.
Leave a Reply