Nothing stops a fabrication project faster than a poorly executed weld, but mastering your Miller welder unlocks professional-quality results for everything from automotive repairs to custom metal art. Whether you’re using a compact 90-amp unit for thin sheet metal or a powerful 300-amp system for thick structural work, understanding the complete workflow ensures safe operation and consistent welds. The Millermatic 211 exemplifies Miller’s versatility, handling both gas metal arc welding and flux core welding with minimal adjustments, while portable units like the Sidekick-XL provide flexibility for field work. This guide delivers the exact steps you need to set up, configure, and operate your Miller welding machine like a professional.
Learning how to use a Miller welder correctly requires understanding three critical areas: proper machine configuration, meticulous metal preparation, and correct welding technique. Each step builds upon the previous one, and skipping any part leads to frustration and weak welds. By following these procedures, you’ll avoid common pitfalls like excessive spatter, porosity, and inconsistent wire feed that plague beginners. You’ll gain the confidence to tackle automotive repairs, farm equipment maintenance, and custom fabrication projects with professional results.
Install Your Miller Welding Gun Properly
A secure welding gun connection prevents frustrating interruptions during critical welds and ensures consistent electrical contact for stable arc performance.
Secure the Gun Connection
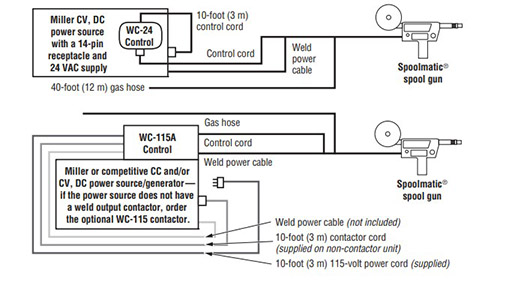
Begin by inserting your welding gun’s connector into the front socket of your Miller welder. The trigger wiring must plug into its corresponding receptacle—this connection tells the machine when to fire the arc. Open the access panel on the machine’s side, locate the gun retention knob, and turn it clockwise until the gun locks firmly in place. A loose gun connection creates intermittent electrical contact that causes arc instability and poor weld quality. If you own a Miller Sidekick-XL model KBO77125, consult page 22 of your owner’s manual for specific connection diagrams to ensure proper installation.
Thread Wire Through the Drive System
Place your wire spool onto the reel assembly, confirming it rotates freely without binding. Feed the wire under the reel toward the machine’s front, following the path diagram in your owner’s manual. The wire must pass through the inlet guide, over the drive roll, and into the conduit that runs through the welding gun. Loosen the pressure knob on the drive assembly, carefully guide the wire through every designated guide, then retighten the knob firmly but not so tightly that you crush the wire. Overtightening causes feeding problems by deforming soft flux core wire, while undertightening leads to inconsistent wire feed that creates arc instability.
Verify Proper Wire Feed Before Welding
With wire threaded, unscrew the nozzle tip from the torch end. Turn the machine on and squeeze the trigger to feed wire until it emerges from the torch’s tip. Watch for smooth, wobble-free feed—excessive movement indicates threading problems that will cause arc instability. Hand-tighten the tip back onto the nozzle, then locate the tension adjustment knob inside the machine and set it according to wire type specifications. Connect your shielding gas hose to the fitting on the machine’s rear, and you’re ready to begin welding. This 15-minute setup process prevents hours of frustration troubleshooting poor weld quality later.
Configure Correct Polarity for Your Welding Process
Using the wrong polarity creates some of the most frustrating welding problems, including poor penetration, excessive spatter, and unstable arcs that make technique mastery impossible.
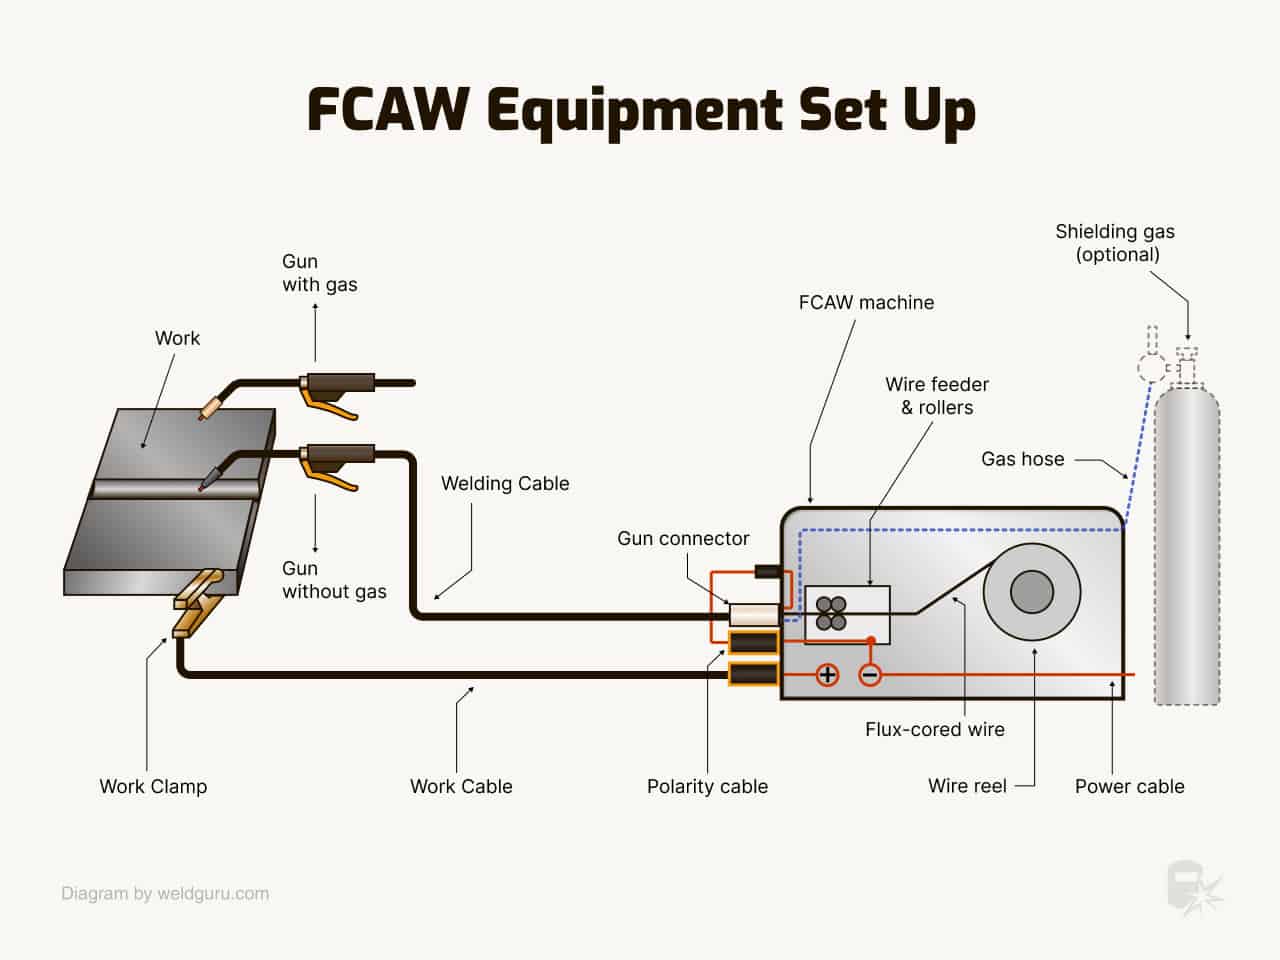
Switch Polarity for Flux Core Welding
If you’re using a Miller Sidekick-XL and need to switch from solid wire with argon shielding to flux core welding, rotate both bus bars 90 degrees at the connection point. This simple movement swaps the positive and negative connections to achieve the required DC electrode positive (DCEP) polarity. Flux core welding requires DCEP polarity, meaning the stinger connects to the positive terminal and the work clamp to the negative terminal. When polarity is reversed, you’ll notice the weld bead following the stinger, unstable arc performance, and excessive spatter everywhere except where you want it. The correct polarity setting takes less than two minutes but makes the difference between professional results and constant frustration.
Optimize Gas Settings for Clean Welds
Flux core wire can weld without shielding gas since the flux core creates its own protective atmosphere, but results look messier and contain more spatter than gas-shielded flux core welding. For professional-looking results on your Miller welder, use a 75% argon and 25% carbon dioxide gas mixture when flux core welding. This blend produces cleaner beads with less spatter and better penetration than self-shielding flux core alone. Typical gas flow rates range from 15-35 cubic feet per hour—set your regulator accordingly before starting. If you weld outdoors where wind blows shielding gas away, self-shielding flux core becomes necessary, but accept that you’ll deal with more smoke and a less aesthetically pleasing bead appearance.
Prepare Metal for Flawless Weld Joints

Even the best welding technique cannot overcome poor metal preparation. Contaminants like rust, oil, paint, and mill scale cause porosity, weak welds, and excessive spatter that ruin project quality.
Remove All Surface Contaminants
Arrange your metal pieces in their final configuration before cleaning, confirming proper fit-up and alignment. Once satisfied with the arrangement, scrub all edges and surfaces that will enter the weld joint using a dedicated wire brush. Remove rust, mill scale, paint, oil, dirt, and any other contaminants from approximately one to two inches on either side of the joint. Contaminants vaporize during welding, creating gas pockets in the weld pool that manifest as porosity—small holes throughout your bead that dramatically weaken joint strength. Clean metal might look like extra work, but it prevents rework and failed welds that could compromise your entire project.
Secure Workpieces to Prevent Movement
After cleaning, clamp the workpieces together using appropriate clamps, jigs, or fixtures. Any movement during welding creates discontinuities in the bead, incomplete fusion at the joint edges, and potentially dangerous situations if the workpiece shifts unexpectedly. For production work or complex assemblies, consider building dedicated fixtures that guarantee consistent positioning for every weld. The goal is creating a rigid, stable welding environment where the workpiece remains precisely positioned throughout the entire welding operation. This preparation takes just 5-10 minutes but prevents hours of rework from failed welds.
Execute Perfect Welds with Proper Technique
With your machine configured and metal prepared, you can focus on the actual welding process. Proper technique combines correct body positioning, consistent torch movement, and appropriate parameter settings for your material.
Wear Essential Safety Gear Before Starting
Before striking any arc, don essential personal protective equipment. A properly fitted welding helmet with the correct shade lens—typically shade five through eight for MIG welding—protects your eyes and face from intense arc radiation that causes permanent damage. Welding gloves made of leather or flame-resistant material shield your hands from sparks and spatter. Flame-resistant clothing, including a welding jacket or apron, long sleeves, and appropriate pants, covers all exposed skin. Steel-toed boots protect your feet from dropped metal pieces, and ear protection prevents hearing damage during extended sessions. Adequate ventilation or respiratory protection becomes critical when welding in enclosed spaces.
Maintain Consistent Torch Distance and Motion
Position the welding torch so the nozzle sits approximately one-eighth inch (3mm) from the welding seam. This distance provides optimal stick-out length for most MIG welding applications and ensures proper arc formation and gas coverage. Squeeze the torch trigger fully to initiate the electrical arc, which instantly heats the base metal and electrode wire. Move slowly and steadily along the welding seam in a controlled motion—most applications benefit from a slight zigzag pattern that ensures fusion at the joint edges. Travel speed dramatically affects weld quality—moving too quickly creates thin, inadequate welds with poor fusion, while moving too slowly produces thick, convex beads with potential burn-through. Release the trigger when you reach the seam’s end, then allow the weld to cool naturally without disturbance.
Fix Common Miller Welder Problems Quickly

Even experienced welders encounter problems requiring systematic diagnosis. Understanding common issues and their solutions keeps your projects moving forward without costly delays.
Resolve Wire Feed Issues in Minutes
If wire feeds inconsistently, bunches up, or causes drive roll slippage, first check tension adjustment—the pressure knob should grip firmly without crushing the wire. Inspect drive rolls for wear, grooves, or debris that interferes with consistent feeding. The inlet guide and wire conduit must remain clean and free of burrs or sharp edges that snag the wire. Flux core wires, being softer than solid wires, require particular attention to tension settings and drive roll condition—adjust tension 10-15% lighter than for solid wire. This simple adjustment takes less than five minutes but prevents hours of frustration.
Diagnose and Fix Arc Instability
An unstable arc characterized by popping, sputtering, or erratic behavior usually stems from polarity problems, contaminated base metal, or incorrect voltage settings. Verify polarity matches your wire type and welding process—solid wire typically requires DCEP, while some flux core wires have specific requirements. Confirm the base metal is thoroughly cleaned of all contaminants. Check that voltage and wire speed settings suit your material thickness and joint configuration. The contact tip should match your wire diameter and remain free of spatter buildup. These checks take less than three minutes but solve 90% of arc instability issues.
Learning how to use a Miller welder properly requires patience and systematic practice, but the skills you develop open unlimited possibilities for fabrication, repair, and creative metalwork. Start with simple projects on clean, thin metal to build confidence with your machine’s settings and your own technique. As proficiency develops, tackle increasingly complex joints and thicker materials. The investment in understanding proper setup, polarity configuration, metal preparation, and technique pays dividends in strong, professional-quality welds that last for years. Remember that consistent practice with correct fundamentals produces better results than occasional welding with poor technique—dedicate 30 minutes daily to practice welds on scrap metal, and you’ll see dramatic improvement within weeks.
Leave a Reply