Stud welder dent pullers revolutionize auto body repair by fixing dents without damaging factory paint. This specialized tool attaches small metal pins to dented surfaces, creating secure anchor points that gradually restore metal to its original shape. Whether you’re removing minor door dings or tackling larger collision damage, mastering this equipment delivers professional results that preserve vehicle value. Understanding how to use a stud welder dent puller properly prevents common pitfalls like metal stretching or paint damage that compromise repair quality.
Essential Safety Measures for Stud Welder Operation
Operating a stud welder demands strict safety protocols to protect both you and the vehicle. The high electrical current and UV radiation generated during welding require specific protective equipment and workspace preparation before you even touch the tool.
Required Safety Gear includes welding gloves with electrical resistance ratings, safety glasses with UV protection specifically designed for welding operations, and a welding helmet with shade 5 or 6 lens protection. Flame-resistant clothing prevents sparks from causing burns, while adequate ventilation removes hazardous welding fumes from your workspace. Many professionals add ear protection when working in enclosed spaces where welding sounds echo intensely.
Workspace Preparation involves clearing flammable materials from the repair area, disconnecting the vehicle’s battery to prevent electrical interference, and ensuring the work surface is completely clean and dry. Moisture causes inconsistent welding results and creates electrical hazards. Position the vehicle away from walls or objects that could be damaged by sparks, and keep a Class ABC fire extinguisher immediately accessible for emergencies.
How to Configure Your Stud Welder Components Properly

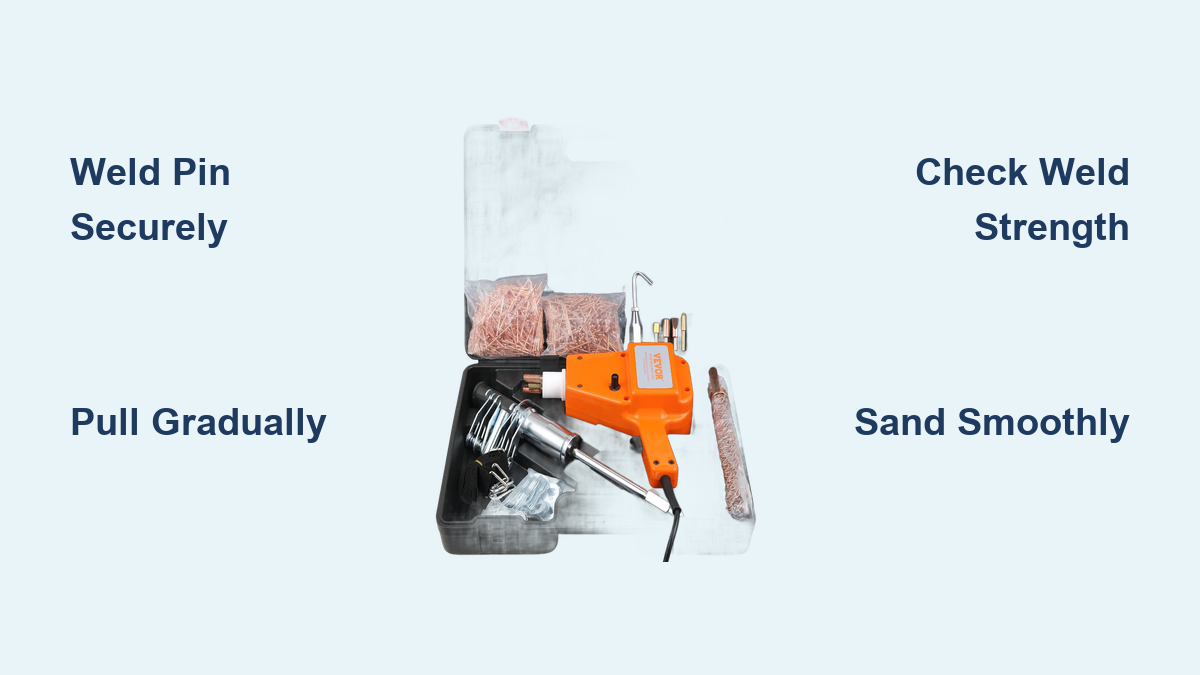
Understanding each component of your stud welder system prevents operational errors that compromise repair quality. Most professional systems share similar core elements despite manufacturer variations.
The Welder Unit contains the capacitor system that stores and releases electrical energy for spot welding. Modern units feature adjustable power settings—shown on numbered scales or LED displays—that let you match output to specific pin sizes and metal thickness. Higher settings deliver more current for deeper penetration on thicker metals, while lower settings work better for thin sheet metal or pull-only applications requiring minimal penetration.
The Welding Gun serves as your hand-held applicator for positioning and firing stud pins. The trigger initiates the weld cycle, while professional setups often include a foot pedal for hands-free precision work. The gun’s nosepiece accommodates different pin sizes and must stay clean and properly aligned for consistent results. Many guns feature depth adjustment collars controlling how far pins extend during welding.
Dent Pulling Pins come in various head styles and lengths for specific applications. Flat-head pins work well for shallow dents, providing smooth surfaces for pulling attachments. Stepped pins with larger heads offer greater surface area for heavier pulls, while nail-head pins penetrate metal slightly during welding for exceptionally strong attachment points ideal for stubborn dents.
Pin Selection and Power Settings for Different Dent Types

Matching pins and settings to your specific dent characteristics determines whether your repair succeeds or creates additional damage. Taking time to evaluate these factors prevents frustration and tool damage.
Pin Size Selection depends primarily on dent depth and vehicle panel thickness. For shallow dings on thin door panels, 2mm flat-head pins provide sufficient holding strength without excessive penetration. Deeper dents on thicker panels, like truck doors, benefit from larger 3mm or 4mm pins that distribute pulling force across more surface area. Stepped pins with 6mm or 8mm heads work best for large, shallow dents where spreading the load prevents pin pull-through.
Power Setting Guidelines typically follow manufacturer recommendations but follow universal principles. Start with the recommended setting for your pin size, then adjust based on weld quality during testing. A successful weld creates a small, clean fusion point where the pin head merges with the panel without burn-through or spatter. If pins pull free during pulling, increase power slightly. If you notice burn-through marks, decrease power or switch to a larger pin head that distributes force more effectively.
Surface Preparation Techniques for Strong Welds
Proper surface preparation directly impacts weld quality and determines how invisible your repair will be. Even minor contamination at this stage causes weak welds, inconsistent pulls, or visible marks requiring additional work.
Cleaning Requirements demand complete removal of dirt, wax, grease, or paint contaminants from the dent area and surrounding surface. Use isopropyl alcohol or dedicated wax and grease remover applied with a clean lint-free cloth, working in circular motions outward from the repair center. Avoid sanding painted surfaces unless necessary—exposing bare metal creates color differences visible after repair. Document any cracked or chipped paint before proceeding, as these areas may need touch-up later.
Access Considerations affect both weld quality and your ability to position pulling tools effectively. Ensure adequate access to the dent’s backside when possible—many repairs require working from both sides with welding from the exterior and pulling support from behind. Remove interior panels to gain necessary access in enclosed areas like door cavities. Clear obstacles that might interfere with gun positioning and verify pulling equipment has sufficient range of motion.
How to Execute Perfect Stud Welds for Dent Pulling
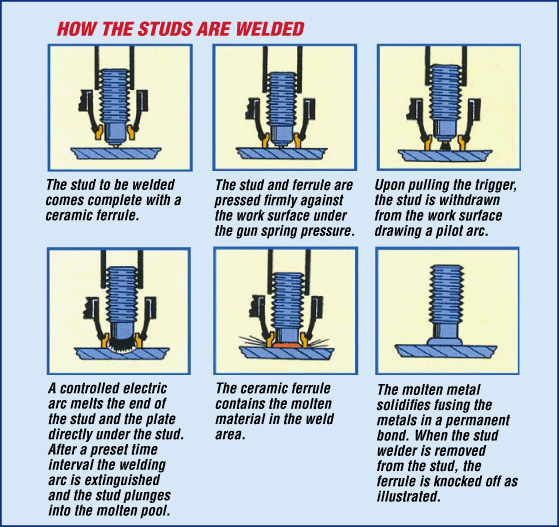
Mastering welding technique requires developing a feel for proper pin placement, trigger control, and timing that comes through practice. Understanding the underlying principles helps you diagnose issues systematically.
Pin Placement Strategy follows specific patterns designed to gradually reshape metal without overstressing any single area. Place pins around the dent perimeter, approximately one to two inches apart, creating a framework to work toward the center. Larger dents may need eight to twelve perimeter pins, while small dings might require only two or three surrounding pins. Position final pins at the deepest point of the original dent.
Welding Technique demands consistent positioning and timing. Place the gun’s nosepiece firmly against the surface with the pin centered in the dent, maintaining steady pressure throughout the one-second weld cycle. Avoid lifting the gun prematurely—this causes weak welds that pull free under load. After welding completes, lift the gun straight away without lateral movement that might stress the fresh weld.
Testing Weld Strength before applying significant pulling force prevents frustrating mid-repair failures. Gently wiggle each pin with your fingers—properly welded pins feel firmly attached with no movement. Any pin that moves or produces a hollow sound when tapped requires rewelding in a nearby location.
Pulling Process: Restoring Metal to Original Contour
With pins securely welded, the pulling process begins restoring the dented metal to its original shape. This phase requires patience and controlled force application to avoid stretching metal or causing pins to pull free.
Pulling Tool Selection depends on pin count and configuration. Small repairs with two or three pins work well with simple slide hammers or manual pullers. Larger repairs benefit from hydraulic or pneumatic systems applying consistent force across multiple pins. Some technicians prefer adjustable pulling bridges that span dents and allow gradual tightening to redistribute metal evenly.
Force Application Principles emphasize gradual correction over aggressive instant pulls. Apply initial pulling force and observe metal response—slight movement indicates proper attachment, while resistance suggests strong metal memory or insufficient weld strength. Increase force incrementally, pausing between adjustments to allow metal to settle. Periodically release force and feel the panel surface with your palm to assess progress accurately.
Sequential Pulling Strategy involves working methodically from the dent’s outside inward. After achieving movement with outer pins, release pulling force, let metal settle, and relocate pins closer to the original dent center. This stepping process gradually draws metal back without creating waves or surface irregularities.
Troubleshooting Common Stud Welder Issues
Even experienced technicians encounter difficulties during repairs. Recognizing common problems enables quick correction before they compromise your work.
Weak Weld Solutions address pins pulling free during pulling, often accompanied by popping sounds. Revisit surface preparation, increase power by one setting, and verify you’re holding the gun perpendicular to the surface with consistent pressure. For difficult situations, slightly roughening the surface with fine sandpaper can improve weld penetration, though this may require touch-up painting.
Burn-Through Prevention stops small holes caused by excessive welding current melting through thin metal. Test settings on scrap metal before vehicle work, and avoid staying in one position too long if the weld seems slow to complete. When burn-through occurs, assess damage—small pinholes can sometimes be filled with body filler, but larger burns require panel replacement.
Metal Stretching Fixes address raised areas or “oil canning” that returns after pressing down. Reduce pulling force and consider switching to larger pin heads that distribute force more evenly. In severe cases, use shrinking techniques with a torch or heat gun to contract stretched metal, though this requires additional skill.
Professional Finishing Techniques for Invisible Repairs
The final phase involves removing welded pins and blending the repair area so seamlessly that no evidence of damage remains visible.
Pin Removal Methods vary by pin type and appearance requirements. Flat-head pins can be ground flush with the panel using fine-grit sanding discs, while nail-head pins require grinding below surface level followed by spot putty application. Some technicians prefer knocking pin heads off at the weld point with a punch, then grinding the remaining stud flush.
Surface Refinement involves progressively finer sanding to blend grinding marks. Start with 80-grit sandpaper for significant material removal, then step through 120-grit, 180-grit, and finally 320-grit for proper paint adhesion. Between grits, wipe clean and inspect for scratches that might telegraph through final paint.
Paint Assessment determines if touch-up is needed. Small scratches can often be addressed with touch-up paint applied with fine brushes. Evaluate repairs in various lighting conditions—sunlight, shade, and artificial lighting—to identify remaining imperfections.
Proper stud welder dent puller technique preserves original factory paint while restoring vehicle panels to their pre-damaged condition. Start with small, accessible dents to develop your skills before tackling more challenging repairs. With practice, you’ll achieve professional results that maintain vehicle value without expensive paint work. Regular equipment maintenance ensures consistent performance for years of reliable service.
Leave a Reply