
Mastering how to use a welding gun transforms your metalworking capabilities, enabling you to tackle automotive repairs, structural fabrications, and creative DIY projects with confidence. The MIG (Metal Inert Gas) welding gun serves as your primary tool for joining metals efficiently, delivering continuous wire electrode while shielding the molten weld pool from atmospheric contamination. This guide eliminates the guesswork from your welding journey by providing actionable steps, safety protocols, and troubleshooting techniques that deliver professional results from your very first weld.
Before striking an arc, understanding that the welding gun connects to a power source supplying electrical current while a wire feeder pushes electrode wire through the gun at controlled speeds is crucial. Shielding gas—typically argon, CO₂, or mixtures—flows through the gun nozzle to protect the weld pool from oxidation. When properly configured, these systems work in harmony to create strong, clean welds on steel, stainless steel, and aluminum materials. This comprehensive approach ensures you develop proper technique while avoiding common beginner mistakes that compromise weld integrity and safety.
Essential Safety Gear for Welding
Welding produces intense ultraviolet and infrared radiation that can cause permanent eye damage and severe skin burns within seconds of exposure. Investing in proper protective equipment isn’t optional—it’s absolutely essential before operating any welding gun. Your auto-darkening welding helmet stands as your most critical safety item, automatically darkening upon arc ignition to protect your eyesight while providing clear visibility of the weld pool during operation. Never attempt to weld with standard sunglasses or inadequate eye protection—this risks permanent vision damage.
Your hands require robust protection from the spatter and heat inherent to MIG welding. Choose leather gloves specifically rated for MIG applications rather than TIG gloves, as MIG generates more molten particles that penetrate inadequate protection. A flame-resistant welding jacket shields your torso and arms from sparks and radiant heat, while steel-toed boots protect against dropped metal pieces and sparks. Complete your protective ensemble with welding pants made of flame-resistant denim or specialized welding trousers.
Prepare Your Workspace for Safe Operation
Ensuring proper ventilation to dissipate harmful welding fumes released when heating metals and coatings is non-negotiable for safe operation. Clear all flammable materials—including solvents, oils, wood, and fabrics—from your welding zone, keeping a fire extinguisher within immediate reach at all times. Position your workpiece on a stable, non-flammable surface and secure it with clamps to prevent movement during welding.
Never weld in wet or damp conditions that could create electrical hazards or compromise ground connections. Keep a dedicated welding curtain or barrier to protect others from arc flash when working in shared spaces. Before striking your first arc, perform a complete safety check: verify all connections are secure, protective gear is properly worn, and emergency equipment is accessible.
Set Up Your MIG Welding Equipment Properly
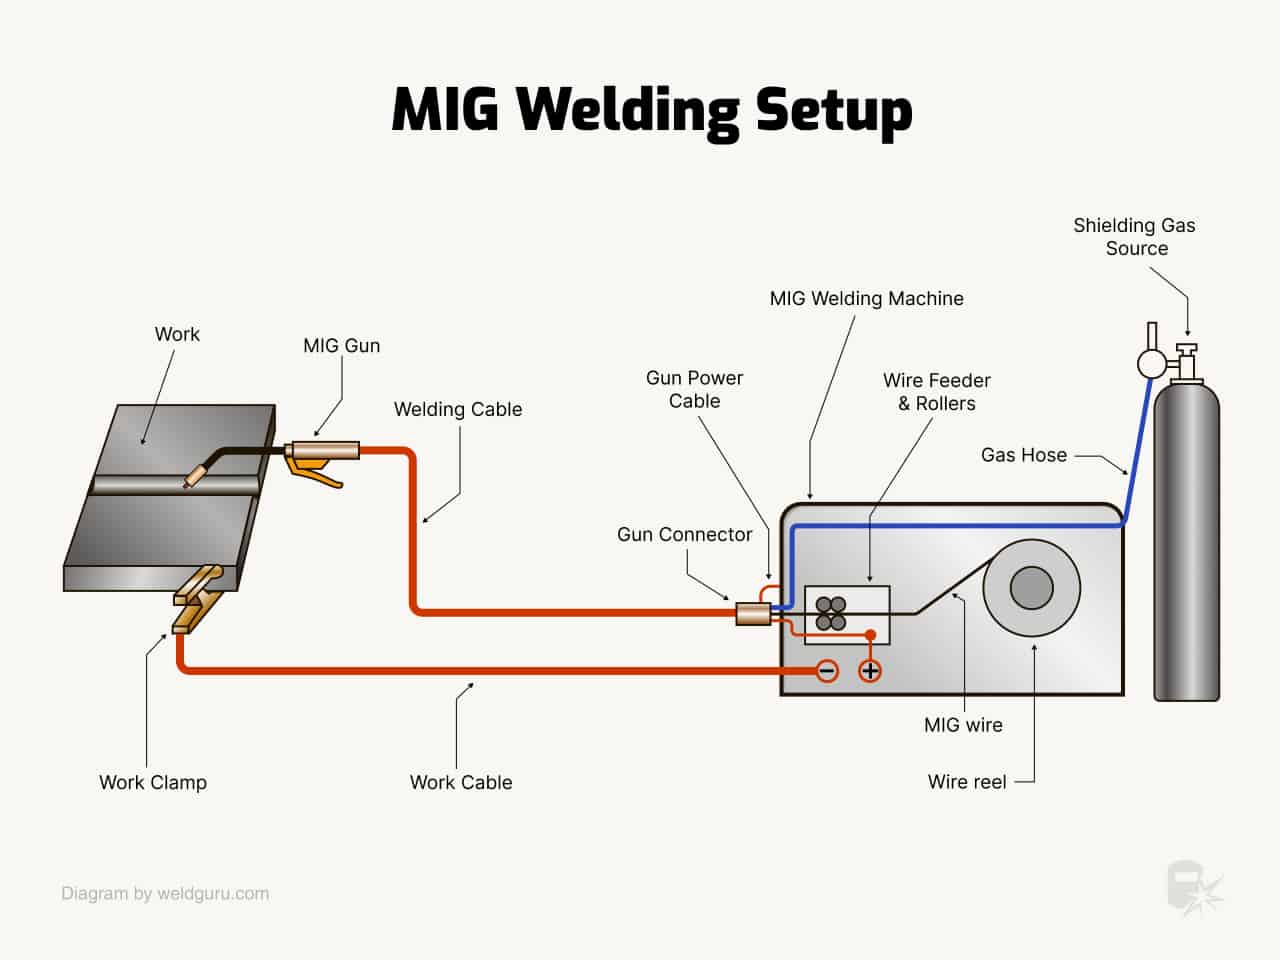
Proper equipment setup forms the foundation for successful welding and must be completed carefully before attempting any welds. Begin by attaching the ground clamp to your workpiece, ensuring a tight metal-to-metal connection that provides reliable electrical conductivity. Clean any paint, rust, or scale from the clamping surface, as these contaminants interfere with electrical contact and cause arc instability. Position the clamp as close to the weld area as possible for optimal electrical path.
Connect the welding gun to the welder, verifying the cable connection is secure and provides sufficient reach to maneuver comfortably around your workpiece. For gas-shielded MIG welding, attach the shielding gas tank using the appropriate hose and regulator assembly. Thread the regulator onto the gas bottle and tighten it securely, always staying clear during initial pressure application. Set your gas flow rate between 15 and 35 cubic feet per hour depending on your welding conditions and joint configuration.
Verify Electrical Connections
Plug the welder into a properly grounded outlet matching the machine’s voltage and amperage requirements. Verify your electrical circuit can handle the welder’s draw without tripping breakers or causing voltage drops that affect arc stability. Position yourself comfortably with good access to all machine controls and your workpiece, ensuring adequate lighting to see the weld joint clearly throughout the operation. Check that your work area has sufficient space to move freely while maintaining proper welding posture.
Configure Polarity and Settings Correctly
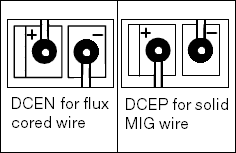
Correct polarity configuration directly affects arc characteristics, penetration depth, and wire melting rate. Standard MIG welding with solid wire and shielding gas requires DCEP (Direct Current Electropositive) polarity, connecting the wire to the positive terminal. Flux-cored self-shielding wires require DCEN (Direct Current Electronegative) polarity with the wire connected to the negative terminal.
Modern MIG machines use either DINSE front-panel plugs or internal bus bar connections for polarity changes. For machines with DINSE plugs, connect the wire drive lead to the positive socket for MIG welding and the negative socket for flux-cored welding. Machines requiring bus bar changes need the connection adjusted inside the filler metal compartment to match your wire type.
Adjust Voltage and Wire Feed Speed
The two most fundamental machine settings are voltage and wire feed speed, which together determine heat input and weld characteristics. These settings are interrelated—increasing wire feed speed requires corresponding voltage increases to maintain proper arc. Many machines offer synergic settings that automatically adjust both parameters together based on material thickness, providing excellent starting points for beginners.
The inductance setting adjusts the rate of current change during welding. Higher inductance produces a softer arc with reduced spatter, beneficial for thin materials and vertical welding. Lower inductance increases arc force and penetration for thicker materials or when welding through mill scale.
Master Basic Welding Techniques
Proper welding technique develops through deliberate practice on scrap metal before attempting actual projects. Start by thoroughly cleaning your workpiece surface with a wire brush or angle grinder to remove mill scale, rust, and oils that cause weld defects and arc instability. While MIG welding tolerates some contamination, clean metal produces better-looking welds and more stable arcs.
Hold the MIG torch with both hands for improved precision, using your secondary hand to support the primary hand controlling torch movement. Maintain consistent stick-out—the distance between the contact tip and workpiece—at approximately 3/8 to 1/2 inch, as this distance directly affects arc length and heat input. Keep the torch as straight as possible to ensure consistent gas coverage and penetration.
Perfect Your Gun Angle and Travel Speed
The push technique involves angling the gun 10-15 degrees and directing the arc ahead of the weld pool, reducing penetration and preventing burn-through on thin materials. The drag technique angles the gun behind the weld pool, concentrating heat into the base metal for deeper penetration on thicker sections. Most fabricators use a modified push technique for general work, balancing penetration with control.
Consistent travel speed directly affects bead shape and penetration. Moving too slowly causes excessive heat buildup, burn-through, and overly wide beads with potential undercutting. Moving too quickly produces insufficient penetration, narrow beads, and potential lack of fusion. The ideal speed creates a bead approximately three times the wire diameter with a consistent ripple pattern.
Troubleshoot Common Welding Problems

Developing troubleshooting skills helps you quickly identify and correct welding issues as they arise. Spitting or inconsistent wire feed typically indicates a dirty contact tip, incorrect wire tension, or wire feeding problems. Clean or replace the contact tip regularly, as metal buildup inside interferes with consistent wire delivery. Adjust tension using the tensioner mechanism—too little causes slippage while excessive tension deforms the wire.
Porous or weak welds suggest insufficient shielding gas coverage from leaks, inadequate flow rates, or improper gas nozzle positioning. Check all gas line connections for leaks using soapy water application and verify your regulator functions correctly. Ensure gas flow stays between 20-35 CFH and that your nozzle size matches the application—nozzles that are too small provide insufficient coverage while oversized nozzles may not fit tight spaces.
Fix Burn-Through and Excessive Spatter
Burn-through occurs when excessive heat melts completely through the material, creating holes. Reduce voltage and wire feed speed or increase travel speed to decrease heat input. On thin materials, use smaller diameter wire, lower settings, and the push technique to minimize heat concentration.
Excessive spatter results from imbalanced wire feed speed and voltage settings. When wire feed speed is too high relative to voltage, the wire pushes into the weld pool before melting sufficiently. Adjust settings to achieve proper balance—a stable arc with minimal spatter and smooth metal transfer indicates correct configuration.
Maintain Your Welding Equipment Regularly
Regular maintenance extends equipment life and ensures consistent welding performance session after session. After each use, clean the contact tip and nozzle to remove spatter buildup that obstructs gas flow and interferes with wire feeding. Use a brass wire brush for nozzle cleaning, as this material removes spatter without damaging internal surfaces. Replace contact tips when the wire feeding hole becomes enlarged or deformed.
Inspect welding wire before loading each spool, checking for kinks, bends, rust, or contamination that causes feeding problems or weld defects. Store wire in a dry location and use it within a reasonable timeframe to prevent degradation. When changing wire types—such as switching from steel to aluminum—thoroughly clean the entire wire drive system to prevent cross-contamination.
Periodically check the ground clamp and cable for damage, ensuring clamp jaws make clean metal contact and cable insulation remains intact. A poor ground connection causes arc instability, inconsistent performance, and potential electrical hazards. Clean clamp contact surfaces regularly and tighten any loose connections.
Mastering how to use a welding gun requires patience, systematic practice, and attention to safety throughout the learning process. Start with scrap metal practice to develop comfort with equipment before tackling valuable projects. Focus on consistent gun angle, steady travel speed, and proper parameter settings for your material thickness. As skills develop, gradually tackle increasingly challenging joint configurations and materials. The welding gun becomes your tool for creative metal fabrication—treat it with respect, maintain it properly, and it will serve your projects for years to come. Remember that every professional welder started exactly where you are now; consistent practice transforms uncertainty into confidence and skill.
Leave a Reply