Struggling to get your first clean weld? You’re not alone—many beginners face frustration when learning how to use an arc welder properly. Arc welding creates joints at temperatures reaching 6,500°F by generating an electrical arc between an electrode and your workpiece. Unlike gas welding, this process uses electricity rather than flammable gases, making it more portable and cost-effective for most DIY projects and repairs. Whether you’re fixing farm equipment, building custom metal furniture, or preparing for a welding career, mastering these fundamentals will transform your results. This guide cuts through the complexity to deliver exactly what you need to know to produce strong, professional-looking welds from your very first attempt.
Essential Equipment Setup for First-Time Welders
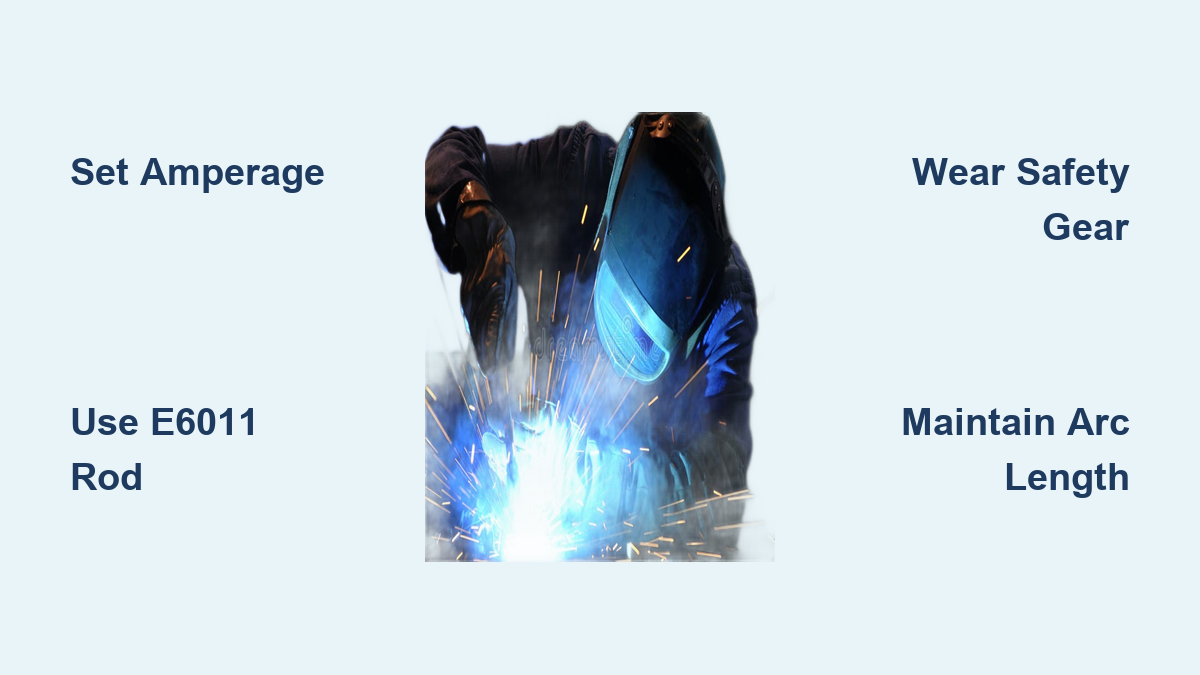
Before striking your first arc, you need the right equipment configured properly. Your welding machine’s amperage range determines what thickness of metal you can weld—most beginner machines offer 40-200 amps, sufficient for everything from thin sheet metal to quarter-inch steel plate. For your initial practice, select a DC machine since it produces more stable arcs that are easier to control than AC alternatives.
Choosing the Right Electrode for Practice
Skip the confusing array of rods and start with E6011 electrodes—they tolerate dirty metal reasonably well and accept both AC and DC current, forgiving common beginner mistakes. These rods have 60,000 PSI tensile strength and work in all positions, making them ideal for learning how to use an arc welder. For your first practice sessions on 1/4-inch steel plate, grab 1/8-inch diameter rods requiring 80-100 amps.
Must-Have Supporting Tools Checklist
Don’t skip these critical accessories:
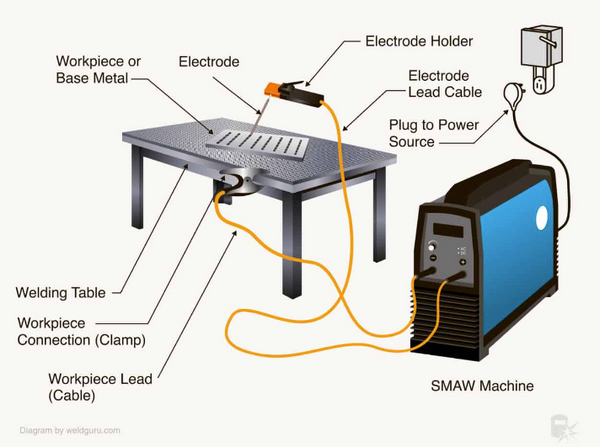
– Electrode holder (stinger): Grips the rod and conducts current
– Ground clamp: Completes the electrical circuit (attach to clean metal)
– Chipping hammer: Removes slag from completed welds
– Wire brush: Cleans weld areas and removes debris between passes
– Angle grinder: Prepares joint edges and flattens high spots
Critical Safety Steps Before Striking Your First Arc

Helmet, Gloves, and Clothing Requirements
Your auto-darkening welding helmet is non-negotiable—without it, the arc’s intense light causes immediate eye damage. Set the shade to 10 for 80-100 amp welding, ensuring it automatically darkens when you strike the arc. Never attempt to weld without proper eye protection, even for “quick” test arcs.
Wear flame-resistant leather gloves that provide dexterity while protecting against heat and spatter. Cover your entire body with natural fiber clothing—synthetic materials melt on contact with hot metal, causing severe burns. Steel-toed leather boots complete your essential protection.
Workspace Preparation Checklist
Clear all flammable materials within 10 feet of your work area before starting. Position a fire extinguisher within immediate reach and ensure your workspace has adequate ventilation—welding fumes cause respiratory damage with prolonged exposure. Ground your workpiece directly (not through a table) to prevent electrical shock hazards. Never weld in wet conditions—even damp concrete increases electrocution risk.
Step-by-Step Guide to Your First Successful Weld
Preparing Metal for Flawless Results
Clean your practice metal thoroughly with a wire brush—rust, paint, and grease cause porosity that weakens welds. For 1/4-inch steel plate, no beveling is needed, but ensure joint edges fit tightly with minimal gaps. Clamp pieces securely using C-clamps or vise grips to prevent movement during welding.
Machine Configuration Checklist
- Set amperage to 90 for 1/8-inch E6011 rods (1 amp per 0.001 inch of diameter)
- Attach ground clamp to clean metal on your workpiece
- Insert electrode into holder with 1-2 inches exposed
- Position yourself comfortably with clear visibility of the weld area
Striking Your First Arc: Tap vs. Scratch Method
Tap start method (recommended for beginners):
1. Position helmet in place
2. Lightly tap electrode tip against workpiece
3. Immediately pull back 1/8 inch to establish arc
4. Maintain distance equal to electrode diameter
If electrode sticks: Jerk holder sharply to break free. This happens when arc gap is too short or amperage is too high.
Maintaining Proper Arc Length and Travel Speed
Hold the electrode at a 15-degree angle in direction of travel. Arc length should never exceed electrode diameter—for 1/8-inch rods, maintain 1/8-inch gap. Listen for a steady crackling sound; popping indicates inconsistent arc length.
Move steadily along the joint at speed producing bead width 3x electrode diameter. Too slow causes burn-through and excessive spatter. Too fast results in shallow penetration. Practice stringer beads (straight-line motion) before attempting weave patterns.
Diagnosing and Fixing Common Beginner Problems
Why Your Electrode Keeps Sticking
Electrode sticking occurs when arc gap is too short, amperage is excessive, or electrode angle is incorrect. Fix: Increase arc length slightly, reduce amperage by 10%, and ensure you’re traveling at consistent speed. Keep electrodes dry—moisture-contaminated rods stick more readily.
Reducing Excessive Spatter
If metal droplets are spraying everywhere, your amperage is likely too high or arc length too long. Quick fix: Reduce amperage by 5-10 amps and maintain tighter arc gap. Also check that your ground clamp connects to clean, bare metal—rusty connections cause erratic arcs.
Eliminating Porosity (Tiny Holes in Weld)
Porosity happens when contaminants (moisture, oil, rust) release gases that get trapped in cooling weld metal. Prevention: Clean base metal thoroughly with wire brush or grinder, use dry electrodes, and maintain proper arc length. If porosity persists, increase travel speed slightly to reduce heat exposure time.
Finishing and Evaluating Your Weld
Proper Slag Removal Technique
After completing your weld, wait 30 seconds for initial cooling, then use chipping hammer to break away slag. Don’t force it—properly executed welds release slag easily. Follow with wire brush scrubbed in direction of bead (not across it) to reveal clean weld surface.
Critical Visual Inspection Points
Examine your weld for these quality indicators:
– Uniform bead width (approximately 3/8 inch for 1/8-inch rod)
– Smooth transition between weld metal and base metal
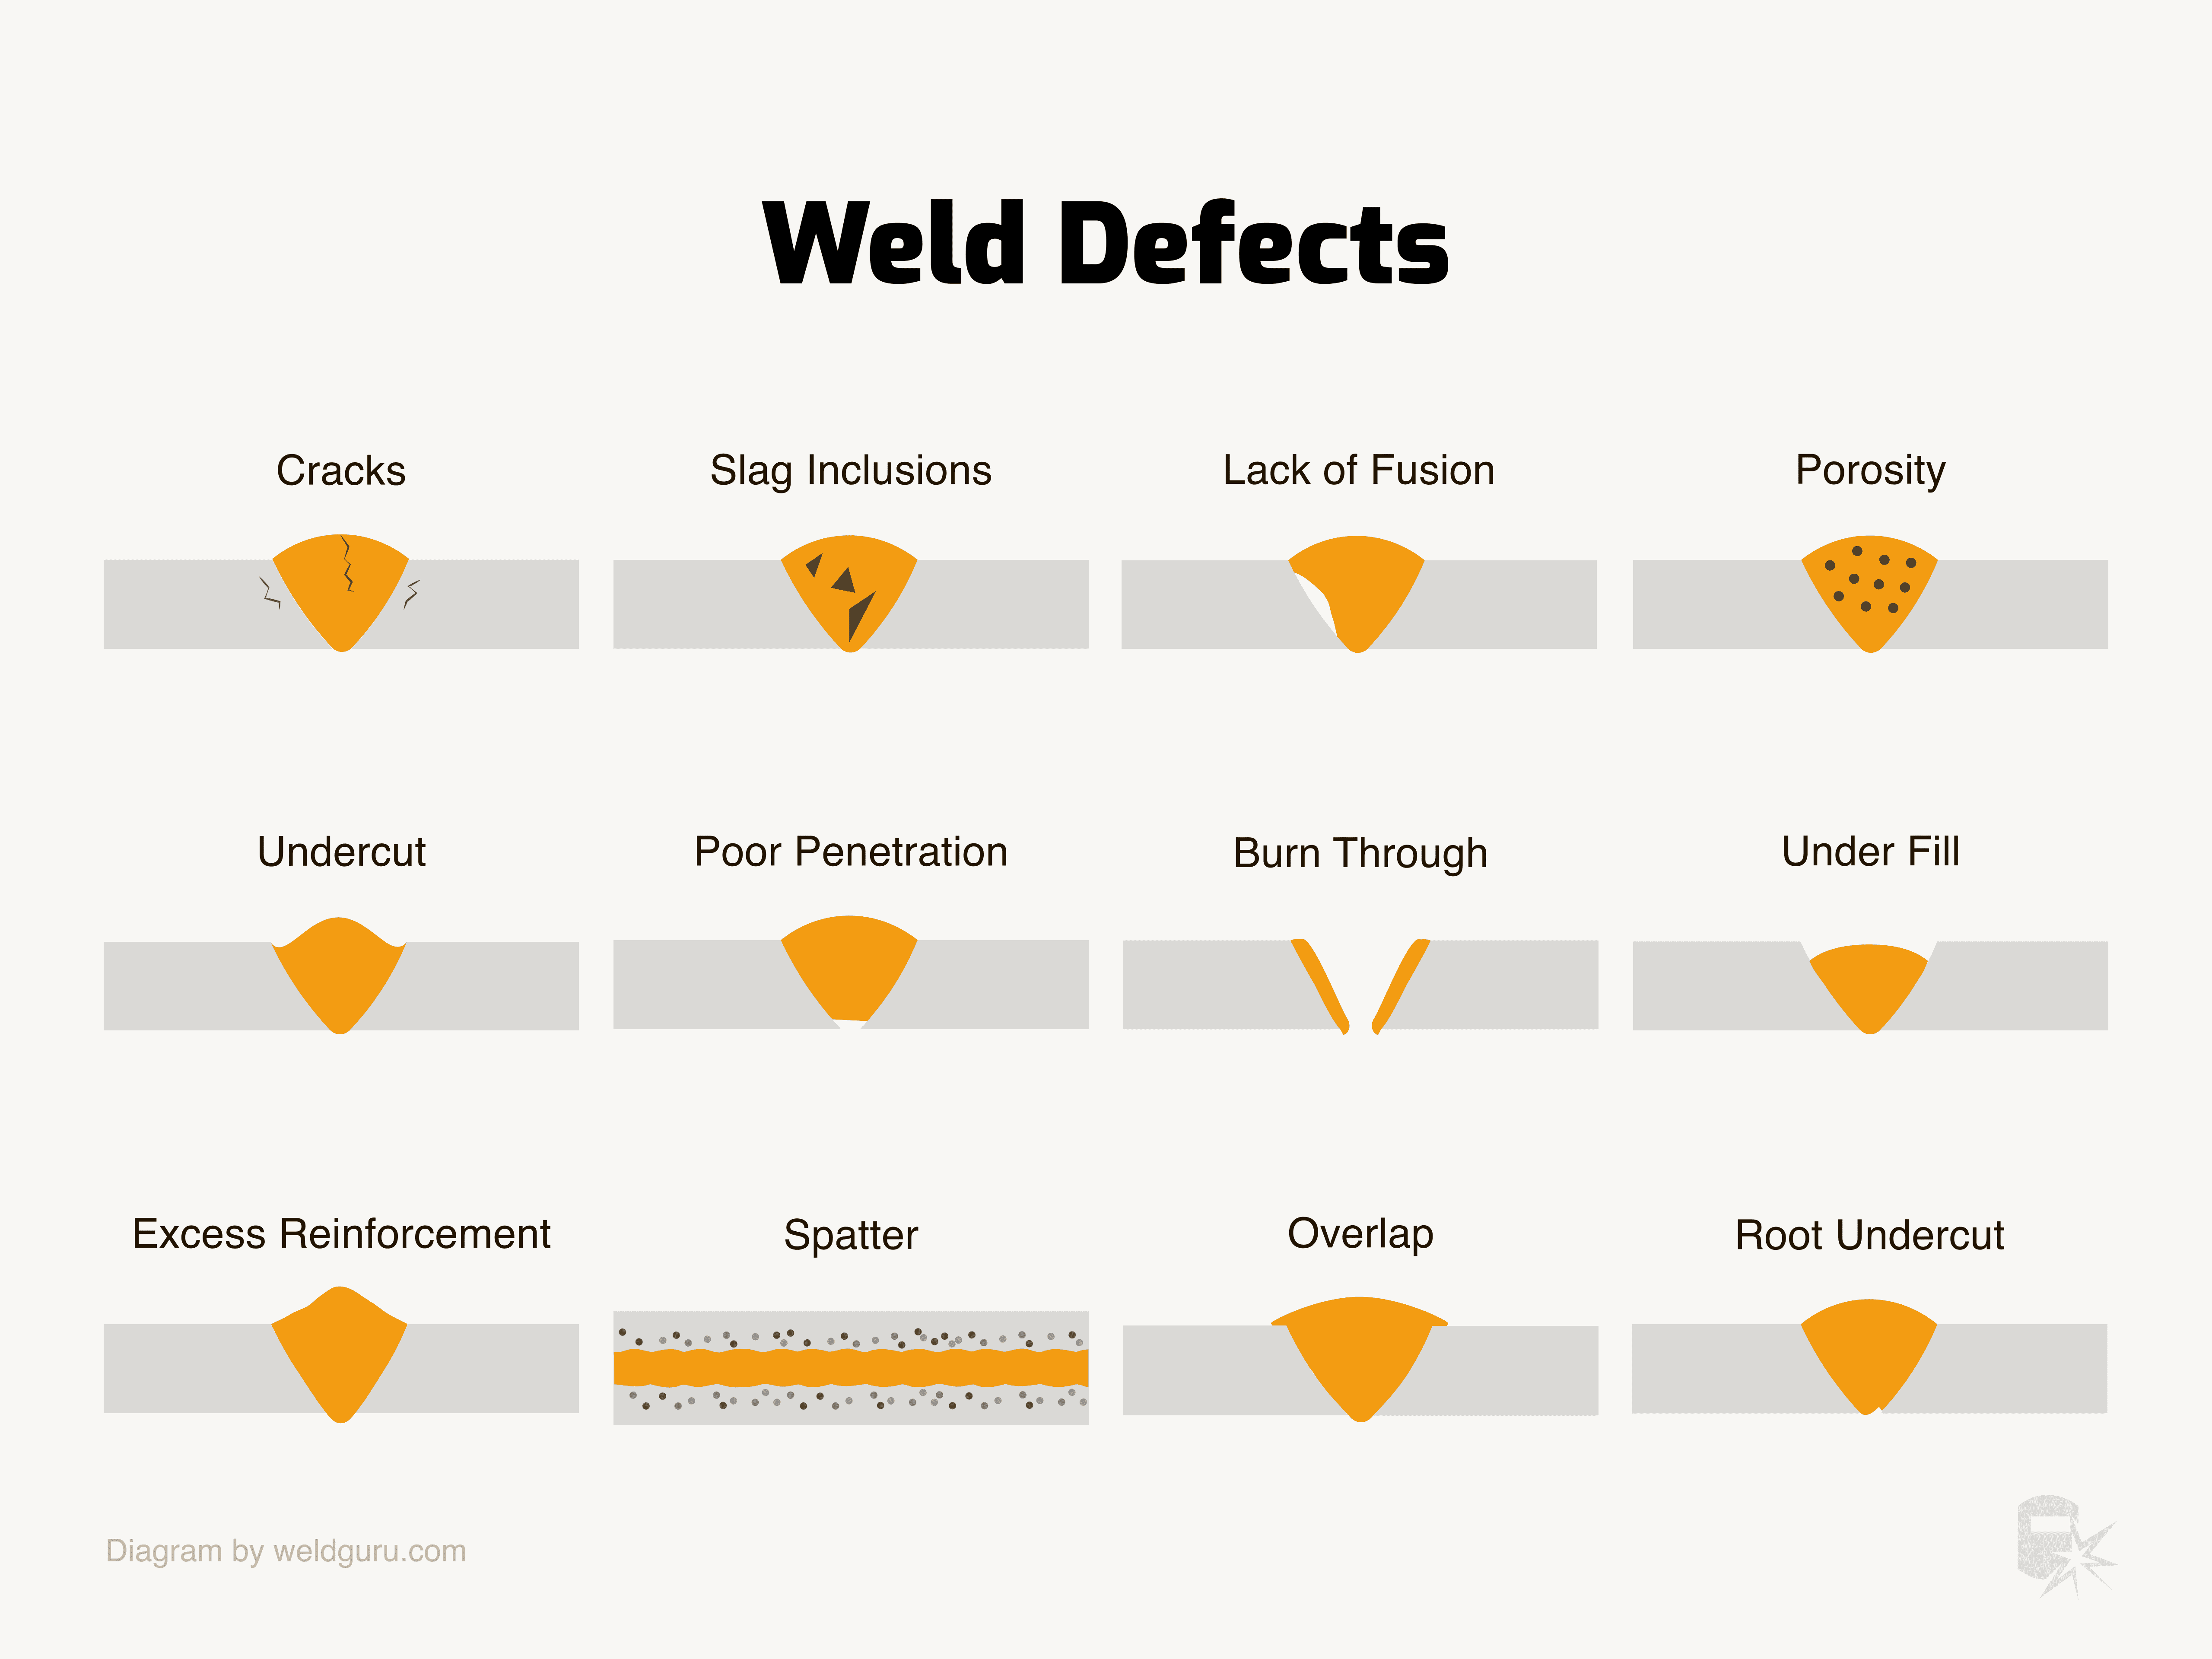
– No cracks, porosity, or undercut (grooves along weld edges)
– Complete fusion at both joint edges
If you notice defects, grind out the weld completely and reattempt with adjusted technique—never build new welds over flawed ones.
Essential Practice Routine for Rapid Skill Development
Building Muscle Memory Through Targeted Drills
Start with these progression exercises on scrap steel:
1. Straight-line beads: Practice maintaining consistent travel speed on flat surface
2. Overlapping passes: Build weld pad with parallel beads, overlapping by 1/3
3. Lap joints: Weld two pieces with one overlapping the other
4. Butt joints: Weld pieces edge-to-edge with minimal gap
Pro tip: Weld with your non-dominant hand for 10 minutes daily—this dramatically improves overall control and dexterity.
Learning from Every Weld
After each practice session, critically examine your work:
– Sound analysis: Record audio of your welding—steady crackle indicates proper technique
– Bead profile assessment: Measure width and check for uniformity
– Penetration test: Break sample weld to examine internal structure
Most beginners skip this step, but analyzing your results accelerates learning more than any other practice.
Mastering how to use an arc welder requires understanding equipment setup, safety protocols, and fundamental techniques—but most importantly, consistent deliberate practice. Start with proper preparation, maintain safety awareness at all times, and approach each weld as a learning opportunity. Within weeks of dedicated practice following these guidelines, you’ll progress from struggling with basic arc strikes to producing clean, professional-quality welds on various projects. The key isn’t natural talent but systematic practice of these essential techniques—your first successful weld is closer than you think.
Leave a Reply