Ever struggled to hold two metal pieces perfectly aligned while trying to tack weld them? Magnetic welding holders solve this universal problem by acting as your essential “third hand” during fabrication. Learning how to use magnetic welding holders properly transforms frustrating welding projects into smooth operations where pieces stay perfectly positioned. These tools deliver up to 150 pounds of holding force on ferromagnetic materials like steel and iron—though they won’t work on aluminum, copper, or austenitic stainless steel. Whether you’re building a simple frame or fabricating complex automotive parts, mastering these magnetic assistants improves precision, reduces rework, and makes you significantly more efficient in the workshop.
The key to effective magnetic holder usage lies in understanding which type works best for your specific project and applying proper techniques to maximize their capabilities. Unlike manual clamps that require constant adjustment, magnetic holders maintain consistent pressure without slipping—critical when positioning delicate sheet metal or heavy structural components. Before diving into specific techniques, remember that all magnetic welding holders must be removed before final welding passes. Leaving them in place exposes them to damaging heat and spatter that can ruin these valuable tools. This guide covers everything you need to know about positioning, securing, and maintaining each major type of magnetic welding holder for professional results.
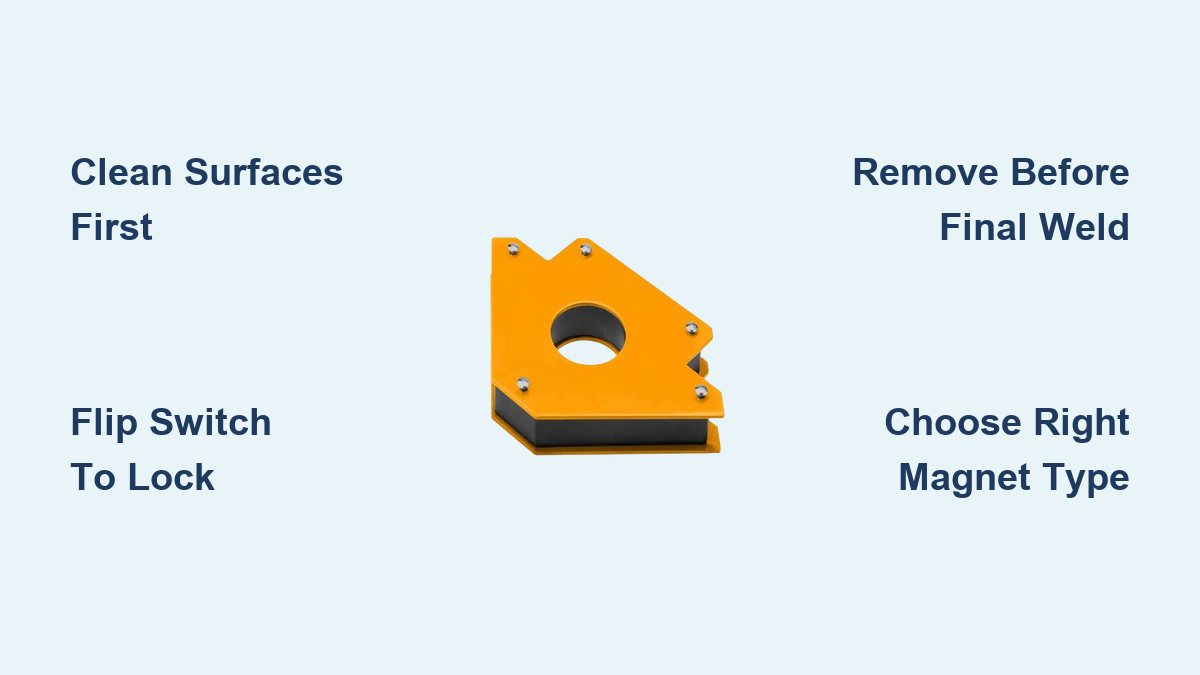
Flip the Switch: Using Adjust-O Magnets for Perfect 90° Welds
Adjust-O magnets are your go-to solution when precision angles matter most. Their unique switch mechanism lets you position workpieces without fighting magnetic pull—simply place the magnet, align your pieces, and flip the switch to lock everything in place. This eliminates the frustration of trying to manually separate powerful magnets after welding.
Step-by-Step Setup Procedure:
– Position the Adjust-O magnet on your horizontal workpiece surface
– Align the cross piece using either the 90° or 45° edge guide based on your joint requirements
– Verify alignment before flipping the switch to “on” position
– Complete tack welds while the magnet holds pieces perfectly stationary
– Flip the switch back to “off” for clean removal after tacking
The dual-switch model takes precision to the next level for complex assemblies. Start by securing your first workpiece with the first magnet, then align the cross piece and activate the second magnet. This sequential locking system prevents movement during critical alignment phases. With 150 pounds of holding force and precision-machined surfaces, these magnets handle everything from thin sheet metal to substantial structural steel while maintaining exact angles throughout your tack welding process.
Secure Automotive Panels with Sheet Metal Magnets: Step-by-Step Guide
When working with large automotive panels or thick sheet metal, standard magnets often lack sufficient holding power. Sheet metal magnets solve this problem with rare earth magnetic elements that deliver superior grip on heavy materials. Their ergonomic plastic handles provide safe handling near hot workpieces—unlike metal handles that become dangerously hot during welding operations.
Critical features that matter:
– Replaceable rubber pads protect delicate surfaces from scratches while increasing friction
– Rare earth magnets provide up to 3x the holding force of basic ferrite magnets
– Plastic handles stay cool during operations and provide comfortable grip
– Flat and contoured surfaces accommodate both sheet metal and curved panels
Before positioning sheet metal magnets, clean both the workpiece surface and magnet contact points thoroughly. Any rust, oil, or debris dramatically reduces holding effectiveness. For large panels requiring multiple magnets, place them strategically around the perimeter first, then add interior supports—never leave these magnets in place during final welding passes as spatter can permanently damage the rubber pads and magnetic elements.
Fix Awkward Angles: Snake Magnet Techniques for Complex Welds
Snake magnets solve the frustrating problem of positioning workpieces at odd angles where standard magnetic holders can’t maintain contact. This specialized tool features two magnetic pads connected by an 18-inch flexible cable that bends and twists to reach impossible positions.
Effective usage techniques:
– Bend the cable to position magnets at extreme angles (up to 180°)
– Use one magnet on the base piece and the other on the cross piece
– For confined spaces, position one magnet outside the work area and snake the cable through openings
– Replace one magnetic head with the included spring clamp to hold small tools or markers
The flexibility of snake magnets makes them indispensable for complex assemblies like roll cages, custom exhaust systems, or any project where multiple pieces converge at non-standard angles. Remember to remove snake magnets before final welding—while the cable provides some heat resistance, prolonged exposure to welding temperatures will damage the magnetic elements. Their real value shines during the tacking phase when precise alignment determines the final quality of your weld.
Boost Weld Quality: Proper Ground Hog Clamp Installation for Arc Welding
The Ground Hog clamp isn’t a positioning tool but a critical component for proper electrical grounding during shielded metal arc welding (SMAW). Many welders overlook grounding quality, not realizing how much it affects arc stability and overall weld quality.
Proper installation steps:
– Attach the Ground Hog clamp to a clean, bare metal surface as close as possible to your welding area
– Ensure the contact surface is free of paint, rust, or coatings that might impede electrical flow
– Position the clamp so the welding cable won’t interfere with your movement
– Verify solid contact by checking for consistent arc performance
This specialized clamp isolates the contact surface from the welding cable connection point, reducing power consumption and eliminating current fade that causes inconsistent heat transfer. Unlike standard grounding clamps, the magnetic base allows quick repositioning as you move around the workpiece. Proper grounding with a Ground Hog clamp delivers smoother arcs, cleaner weld beads, and more consistent penetration—making it an essential part of your “how to use magnetic welding holders” knowledge base.
Avoid Common Mistakes: 4 Critical Steps When Using Welding Magnets
Most magnet failures stem from preventable errors in setup and usage. Follow these critical steps to maximize effectiveness:
Surface preparation is non-negotiable
Clean both workpiece and magnet contact surfaces thoroughly. Even thin layers of oil or rust significantly reduce magnetic holding force. Use a wire brush or grinder to expose bare metal at contact points.
Plan your welding sequence first
Position magnets to hold pieces in their final configuration, considering where you’ll make tack welds. Never place magnets where they’ll interfere with your welding path or where spatter will directly hit them.
Mind the temperature threshold
Magnetic properties degrade when exposed to temperatures above 176°F (80°C) for extended periods. Maintain at least 6 inches of distance between active welding and stored magnets. For high-heat operations, use heat-resistant barriers.
Remove before final passes
This bears repeating: never leave any magnetic holder on the workpiece during final welding. The intense heat and spatter will damage the magnet’s internal components and potentially contaminate your weld.
Match Your Project: Choosing Between Adjust-O, Sheet Metal, and Snake Magnets

Selecting the right magnetic holder starts with analyzing your project requirements:
Small to medium projects with standard angles
Choose Adjust-O magnets when working on frames, boxes, or any project requiring precise 45° or 90° joints. Their switch mechanism makes positioning and release effortless for repetitive tasks.
Large panels and heavy materials
Opt for sheet metal magnets with rare earth elements when handling automotive body panels, thick plate, or substantial sheet metal sections. The replaceable rubber pads protect expensive materials while providing maximum holding force.
Complex assemblies with unusual angles
Reach for snake magnets when building roll cages, custom brackets, or any project requiring positioning at non-standard angles. Their flexible cable reaches where rigid magnets cannot.
Extend Magnet Life: Cleaning and Storage Tips for Welding Magnets
Proper care ensures your magnetic welding holders deliver years of reliable service:
Daily maintenance routine
After each use, wipe magnets clean with a dry cloth to remove metal filings and debris. Check switch mechanisms for smooth operation and verify that rubber pads (if equipped) are intact and clean.
Storage best practices
Store magnets in a dry environment away from extreme temperatures. Keep Adjust-O magnets in the “off” position to prevent accidental attraction to tools. Store snake magnets coiled neatly to prevent cable damage.
Service life extenders
Replace rubber pads on sheet metal magnets when they show significant wear—this maintains consistent holding force and protects workpieces. Never drop magnetic holders, as impacts can damage internal magnetic components and reduce holding power.
Understanding how to use magnetic welding holders properly transforms your metal fabrication capabilities. By selecting the right type for your project, applying proper positioning techniques, and maintaining your tools correctly, you’ll achieve professional-quality results with significantly less frustration. Remember to always remove magnets before final welding passes, prepare surfaces thoroughly, and match your holder type to your specific project requirements. These versatile tools pay for themselves in saved time, reduced rework, and improved weld quality—making them indispensable for both professional fabricators and serious DIY welders.
Leave a Reply