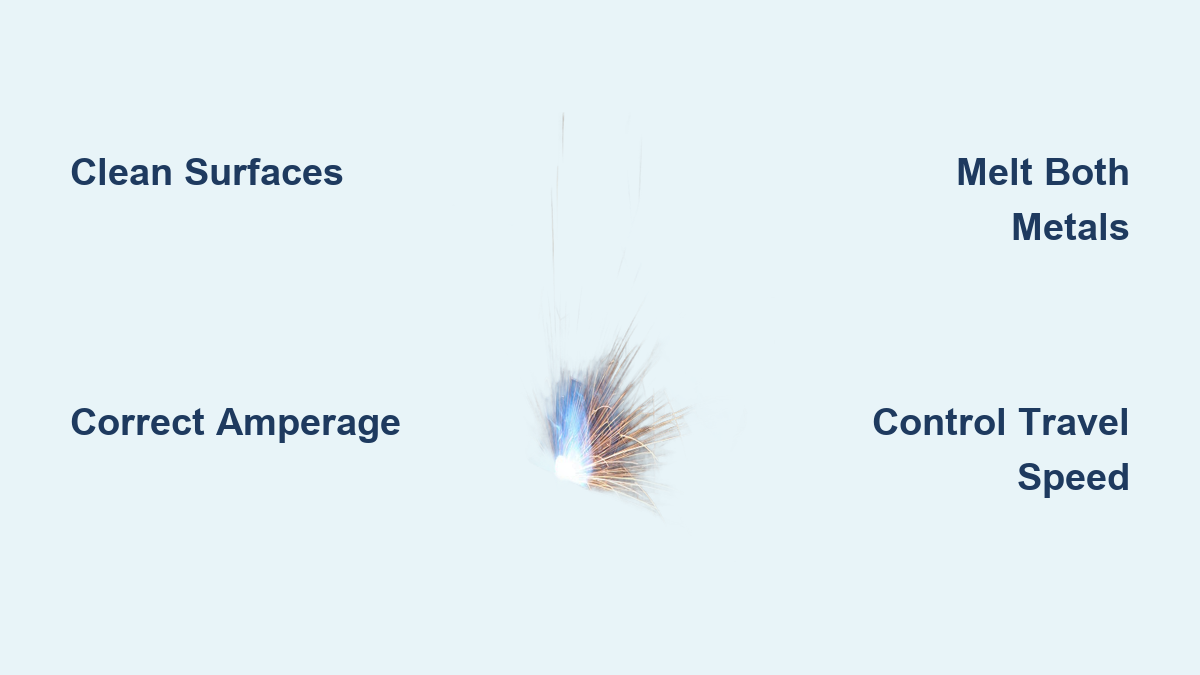
When your welding project fails despite a perfect-looking bead line, the culprit is almost always poor fusion between the two metal pieces. Unlike mechanical fasteners that simply hold metal together, a proper weld actually fuses both pieces into a single, unified structure at the molecular level. This guide reveals exactly how to weld 2 pieces of metal together with techniques that guarantee true metallurgical bonding rather than just surface adhesion. You’ll discover specific amperage settings, electrode choices, and hands-on techniques that solve the most common fusion problems beginners face.
Many DIYers struggle with the critical difference between appearance and actual strength in welded joints. That smooth bead might look professional, but if the two metal pieces separate when stressed, your weld failed at the most fundamental level. The secret lies in melting both base metals sufficiently so the filler material intermingles with each surface. By following these precise steps and understanding why they work, you’ll create joints that withstand real-world forces rather than just looking good.
Why Your Metal Joints Fail Despite Good Bead Appearance
When two pieces separate after cooling despite a perfect-looking weld bead, you’re experiencing lack of fusion—the most common failure in beginner welding. The filler metal solidified on top of both pieces without actually bonding to them, creating what appears to be a weld but provides zero structural strength. This happens because the base metals never reached proper melting temperature before the weld pool solidified.
Critical factors causing fusion failure:
- Insufficient amperage: The most frequent cause—low current prevents heat from reaching the joint root
- Excessive travel speed: Moving too quickly gives the arc insufficient time to melt both pieces
- Poor electrode angle: Directing heat away from one base metal piece rather than the joint interface
- Contaminated surfaces: Oil, rust, or mill scale creates barriers between base metal and filler
Don’t confuse lack of fusion with weld metal failure—the problem isn’t weak filler material but the absence of actual bonding between the filler and base metals. To verify true fusion, break open a test weld; you should see the filler metal intermingled with both base pieces rather than sitting on top of them.
E6013 vs E6011 Electrodes: Choosing for Your Metal Thickness

Selecting the right electrode makes or breaks your ability to successfully weld 2 pieces of metal together. E6013 rods provide the best starting point for beginners working with 3-6mm steel. Their light flux coating creates a stable arc with excellent visibility of the weld pool, and the iron powder enhances deposition rates without requiring excessive amperage.
For 2.5mm E6013 on 4mm steel:
– Set amperage between 70-80A
– Maintain arc length equal to electrode diameter
– Focus on melting base metal, not the coating (watch for bright, fluid molten metal vs dark slag)
E6011 electrodes become essential when welding metals with surface contamination. Their cellulose coating burns through light rust and mill scale, making them invaluable for field repairs. However, their deep penetration requires careful heat management on thin materials to prevent burn-through. Never use cheap electrodes—they feature inconsistent flux coatings that cause unstable arcs and poor fusion.
Setting Exact Amperage for 2.5mm Electrodes on 4mm Steel
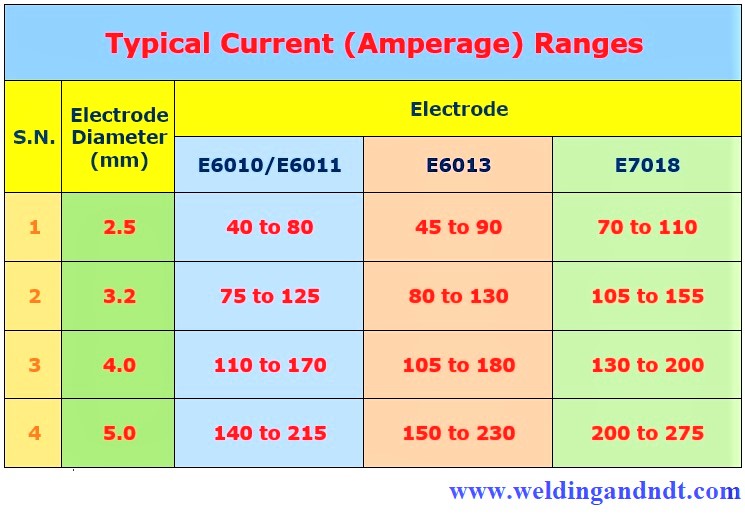
Proper amperage settings form the foundation of successful metal joining. For most hobbyist applications welding 4mm steel with 2.5mm electrodes, 70-80 amps provides the ideal balance of penetration and control. Higher current generally produces better results, but only if you can maintain control of the weld pool.
Critical setup steps:
1. Connect ground clamp directly to clean metal on your workpiece (not the workbench)
2. Verify clean electrical connections—poor connections cause current fluctuations
3. Start at 75A for 2.5mm E6013 on 4mm steel as a baseline
4. Adjust up if penetration seems shallow, down if burning through
The ground connection point must be clean metal free from paint or rust—this direct path ensures consistent current flow through your weld zone. Remember: amperage depends primarily on electrode diameter, not your welder’s maximum capacity. A 100A machine works perfectly for most household projects when properly configured.
Complete Metal Surface Prep Before Welding Two Pieces
Surface contaminants cause 80% of welding failures when attempting to join two metal pieces. Oil, grease, paint, rust, and mill scale all create barriers that prevent true fusion between base metals and filler material. These substances either vaporize during welding (creating porosity) or block molecular bonding.
Effective cleaning methods:
– Wire brush or grinder for removing rust and mill scale
– Solvent cleaning (acetone or dedicated metal cleaner) for oils and greases
– Dedicated stainless steel brushes for stainless work (prevents carbon steel contamination)
Joint alignment matters as much as surface cleanliness. Clamp pieces securely before welding—movement during the process creates gaps that compromise fusion. For thicker materials, bevel edges to 30-45 degrees to ensure the arc reaches the joint root. Proper fixturing allows you to focus entirely on welding technique rather than holding pieces together.
Creating Proper Fusion: Melting Both Metal Pieces Together
True welding success requires both base metals to reach melting temperature simultaneously. The arc transfers heat to the surface, but conduction carries this energy into the material thickness. Without sufficient dwell time at temperature, heat won’t penetrate fully to create that critical metallurgical bond.
Fusion troubleshooting:
– Sluggish weld pool? → Increase amperage or slow travel speed
– Filler balls up without wetting base metal? → Clean surface or increase heat
– Narrow, weak weld? → Travel too fast or amperage too low
Watch the weld pool closely—it should appear fluid and bright with the filler metal flowing smoothly into the joint interface. If you see dark, viscous slag dominating the pool, your technique needs adjustment. For E6013 electrodes, maintain an arc length equal to the electrode diameter (about 1/8 inch for 2.5mm rods) to ensure proper heat transfer to both pieces.
Preventing Burn-Through on Thin Sheet Metal Welds
Thin materials challenge welders because the arc’s heat can melt through before adequate fusion occurs. The key is applying just enough heat to melt the surfaces without overheating any single area. Low-quality electrodes make this problem significantly worse—invest in name-brand rods for thin metal work.
Techniques for thin materials (under 3mm):
– Use 1.6mm or 1.5mm diameter electrodes
– Set amperage to 50-60A for E6013
– Start with tack welds every 2-3 inches
– Complete the joint with short, intermittent welds
– Move quickly but maintain pool visibility
Develop a steady rhythm that balances speed against the need for adequate fusion. The electrode tip should remain within the visible weld pool while melting both pieces simultaneously. If you see holes forming, reduce amperage or increase travel speed immediately—don’t try to fill them with more weld metal.
Fixing Separated Welds: Solving Lack of Fusion Issues

When your welded pieces separate but the bead looks fine, you’re dealing with lack of fusion at the joint root. This hidden defect occurs when the filler metal solidifies against cold base metal surfaces rather than fusing with them. The solution requires increasing heat input without compromising control.
Immediate fixes for lack of fusion:
– Increase amperage by 10-15% (to maximum you can control)
– Slow travel speed slightly to allow more heat penetration
– Adjust electrode angle to 10-15 degrees in travel direction
– Ensure arc length equals electrode diameter
Never attempt to weld over a failed joint—grind out the defective weld completely before trying again. Quality matters more than speed; take the time to verify proper fusion on test pieces before committing to your actual project. Breaking open test welds provides the only reliable verification of true fusion quality.
Essential Safety Gear for Arc Welding Metal Pieces
Welding produces intense hazards that require proper protection—never skip safety gear when learning how to weld 2 pieces of metal together. Arc radiation can cause permanent eye damage in seconds, while spatter creates serious burn risks even through regular clothing.
Non-negotiable safety equipment:
– Auto-darkening welding helmet (shade 10-13 for 70-80A)
– Heavy-duty welding gloves (leather, gauntlet style)
– Flame-resistant clothing (cotton or treated workwear)
– Safety glasses (worn under helmet for chip protection)
– Steel-toed boots (leather, no synthetic materials)
Work in a well-ventilated area—welding fumes contain hazardous particles that accumulate in your lungs over time. Keep a fire extinguisher nearby and clear flammable materials from your workspace. Never weld on containers that held flammable substances, even if they appear empty.
Practice Techniques for Beginners Welding Steel Pieces
Developing proper welding skills requires deliberate practice focused on specific techniques rather than random experimentation. Pad welding on flat scrap metal builds the muscle memory and sensory awareness needed for actual joints.
Effective practice routine:
1. Start with 2.5mm E6013 on 4mm steel at 75A
2. Practice maintaining consistent arc length (1/8 inch)
3. Focus on steady travel speed that creates uniform bead width
4. Vary electrode angle to see effects on penetration
5. Break open test welds weekly to check internal fusion
Document your practice sessions—note amperage, travel speed, and results. This creates a reference that accelerates learning by revealing patterns in what works. Spend 20 minutes daily on fundamentals before attempting actual projects; this focused practice develops skills faster than occasional, unfocused welding.
By following these specific techniques and understanding the science behind proper fusion, you’ll consistently create strong, reliable joints when welding two pieces of metal together. Remember: true welding joins metals at the molecular level, not just on the surface. Focus on melting both base pieces simultaneously, verify fusion through destructive testing, and always prioritize safety in your workspace. With deliberate practice using these methods, you’ll transform from a beginner into a capable welder who produces structurally sound joints every time.
Leave a Reply