Welding a bicycle frame demands precision that separates frame building from general welding projects. The thin-wall chromoly tubing requires heat control so exact that many compare it to “dropping into a black diamond trail” after basic TIG welding. If you’ve tried frame welding before and struggled with burn-through or distortion, you’re not alone—most beginners face these challenges when first working with 0.035-inch chromoly tubing. This guide delivers the specific techniques you need to create strong, durable bicycle frames that meet professional standards, whether you’re building your first frame or refining your skills for custom commissions.
Choose the Right TIG Welder for Chromoly Tubing

Selecting appropriate welding equipment makes or breaks your frame-building success. The thin-wall nature of bicycle tubing demands a machine with precise amperage control that responds instantly to your foot pedal inputs. While Miller and Lincoln Electric machines carry strong reputations, many first-time builders successfully use inverter-based machines in the $600-$800 range for bicycle applications. The critical requirement is high-frequency start capability—this eliminates tungsten contamination that ruins clean welds on thin materials.
Why Foot Pedal Control Is Non-Negotiable
Attempting frame welding without a foot pedal severely limits your control over heat input. As you navigate from thin seat stays to thicker bottom bracket shells, you need real-time amperage adjustment that only a pedal provides. Set your machine to approximately 80 amps and use the pedal to dial between 50-60 amps during welding—this range handles most bicycle tubing without burn-through. Never skip the foot pedal, even if your machine manual suggests alternatives; the precision it provides is essential for managing heat on thin chromoly.
Best Value Machines Under $1,000
For builders on a budget, the Everlast Powertig 165STH offers high-frequency start capability at an accessible price point. While not as powerful as professional units, it handles 4130 chromoly tubing adequately when set correctly. Key features to verify before purchasing:
- High-frequency start capability (non-negotiable)
- Foot pedal compatibility
- Minimum 100-amp output capacity
- DC polarity for steel welding
Configure Your Torch for Bicycle-Specific Welding
/9_20_consumables_setup-1.png?width=2250&name=9_20_consumables_setup-1.png)
The compact spaces between bicycle tubes demand specialized torch configuration. A #9 air-cooled torch serves as the ideal starting point—its 150-amp rating exceeds bicycle welding requirements while providing the compact profile needed for tight intersections. Water-cooled torches add unnecessary complexity for home builders working on occasional frames.
Gas Lenses Prevent Porosity in Thin-Wall Welds
Standard collet bodies create turbulent gas flow that allows atmospheric contamination on thin materials. Gas lenses with internal screens diffuse shielding gas for smooth, consistent coverage that prevents porosity. Pair a gas lens with a standard #8 alumina cup for virtually all bicycle welding applications—this configuration costs under $50 and dramatically improves weld quality. Set your gas flow to 15-20 CFH with 0.5 seconds pre-flow and 10 seconds post-flow to ensure complete protection during critical cooling phases.
Flex-Head Torches Reach Impossible Angles
Fixed-head torches simply can’t access many bicycle frame joints. Flex-head torches let you bend the head to accommodate various tube angles, reaching spots that would otherwise require complex frame repositioning. The modest price difference ($20-$30 more than standard torches) makes this upgrade essential for serious frame builders. Pro tip: Super-flexible hoses further improve maneuverability in complex jig setups without adding significant cost.
Select the Correct Filler Metal for Chromoly Frames
ER70s-2 in 0.040-inch diameter represents the optimal filler choice for 4130 chromoly tubing. While ER70s-6 works acceptably, ER70s-2 contains additional deoxidizing elements that improve weld pool cleaning—critical when working without back-purging. This “under-matched” filler provides greater ductility than the base metal, allowing your welds to absorb impacts without crack propagation.
Why ER70s-2 Outperforms ER70s-6
The extra deoxidizers in ER70s-2 make a significant difference in weld quality, particularly on thin materials where contamination has greater impact. For bicycle applications, this translates to fewer porosity issues and cleaner fusion at the weld toes. When welding stainless steel components like certain dropouts to chromoly tubing, switch to 309L filler to accommodate the metallurgical differences between materials.
Set Precise Amperage for 0.035-Inch Chromoly
The 1-amp-per-thousandth rule provides your starting point: 35 amps for 0.035-inch tubing. However, bicycle frames join thin tubing to thicker components, requiring dynamic adjustment throughout the weld. With your machine set to 80 amps, use the foot pedal to control actual amperage between 50-60 amps depending on joint thickness.
The 1-Amp-Per-Thousandth Rule in Practice
Follow these steps to dial in perfect amperage:
- Start with machine set to 80 amps with foot pedal control
- Practice on scrap chromoly tubing matching your frame material
- Adjust pedal position until you achieve consistent penetration without burn-through
- Note the pedal position for different thickness transitions
- Maintain slightly slower travel speed when moving from thin to thick sections
Warning: Exceeding 60 amps on thin sections will cause burn-through within seconds—reduce amperage immediately if the weld pool becomes excessively fluid.
Execute the Professional Frame Welding Sequence
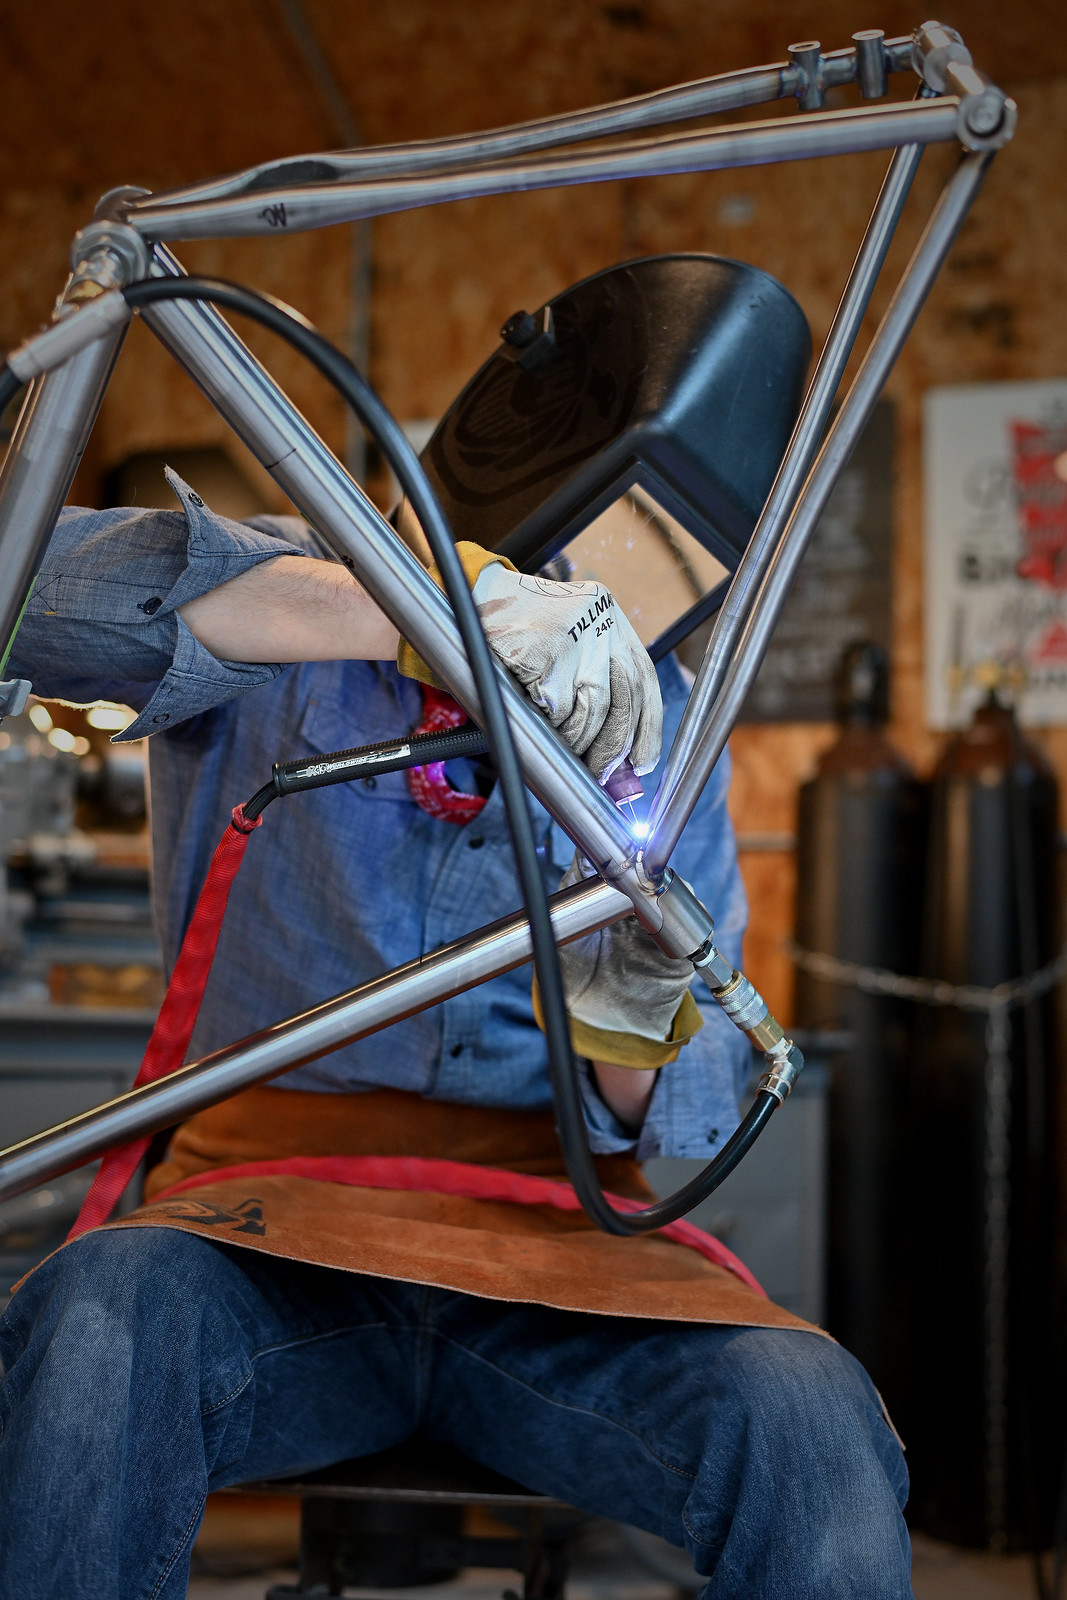
Professional builders follow a logical sequence that manages heat buildup while maintaining alignment. Begin with the bottom bracket and seat tube junction, then add dropouts and chainstays before tacking remaining frame components. This sequence creates the most stable foundation before proceeding to more delicate joints.
Avoid Distortion with Strategic Tack Placement
Tack each joint in three to five locations distributed around the circumference rather than completing full welds on one tube before moving to another. This approach allows balanced heating and cooling that minimizes distortion. Check alignment after each major welding phase—professional builders verify frame straightness approximately ten times per frame.
Bottom Bracket First Creates Stable Foundation
Welding the bottom bracket shell to seat tube first provides critical stability for subsequent joints. This thick-to-thin transition requires careful heat management:
- Start at 55 amps for initial tack
- Reduce to 50 amps as you complete the joint
- Allow 30 seconds cooling between tacks
- Check alignment before proceeding to chainstays
Prevent Common Frame Welding Failures
Burn-through, porosity, and lack of fusion represent the most frequent frame welding failures. Recognizing early warning signs prevents these issues before they compromise your frame’s integrity.
Stop Burn-Through Before It Happens (3 Early Warning Signs)
Burn-through occurs when excessive heat melts completely through thin material. Watch for these precursors:
- Excessively fluid weld pool that moves ahead of the torch
- Discoloration spreading beyond the immediate weld zone
- Increased arc length as the material begins to sag
Reduce amperage immediately when you notice these signs—don’t try to “push through” the problem.
Fix Porosity Without Grinding Out Entire Welds
Porosity appears as tiny gas pockets trapped in the weld metal. Instead of grinding out the entire weld:
- Identify the contaminated area using magnification
- Grind only the affected section to shiny metal
- Clean thoroughly with alcohol before rewelding
- Increase gas flow slightly (1-2 CFH) for the repair
Prevention works best—ensure clean base metal, appropriate gas flow, and proper torch positioning to maintain consistent shielding gas coverage.
Final Inspection Techniques Every Builder Needs
Thorough inspection before riding prevents catastrophic failures. Visually examine all welds for obvious defects like cracks or porosity. Run your fingernail along weld toes to detect subtle irregularities that might indicate lack of fusion. Check frame alignment using precision alignment plates or string-based measurement systems to verify symmetry.
Pro tip: Perform a bounce test—place the frame on a hard surface and drop it from 1 inch height. A properly welded frame produces a clear “ping” sound; a dull “thud” indicates potential internal defects.
Building your first bicycle frame requires patience and practice, but following these specific techniques dramatically increases your success rate. Remember that properly welded joints are generally stronger than the surrounding tubing—failure typically occurs in the tube rather than the weld when built correctly. As you gain experience, you’ll develop the muscle memory and heat management skills that transform challenging frame building into a satisfying craft. Each frame you build develops skills that transfer to future projects, making the investment in learning these techniques valuable far beyond your first completed bicycle.
Leave a Reply