When a critical bolt snaps off flush with the surface—leaving you staring at a frustrating metal stub in your brake caliper, exhaust manifold, or equipment housing—you’re facing one of mechanics’ most common nightmares. Whether it’s a sheared winch mount bolt or a seized exhaust manifold fastener, conventional extraction methods often fail when the broken fastener leaves nothing to grip. The professional solution? How to weld a bolt using a technique that creates an entirely new gripping point. This guide reveals the exact process mechanics use to extract even the most stubborn broken fasteners by welding a nut directly to the remaining stub, transforming an impossible situation into a straightforward repair.
The secret to successful extraction lies in creating a metallurgical bond strong enough to transmit substantial torque from your wrench to the seized fastener. By welding a nut, washer, or steel tab to the broken bolt’s end, you establish a fresh engagement point that standard tools can grip. This technique works because the weld forms a continuous metal structure between your extraction hardware and the broken fastener—one capable of withstanding the torsional forces needed to break corrosion bonds. Master how to weld a bolt correctly, and you’ll never fear a broken fastener again.
Gather Essential Welding Equipment for Bolt Extraction

Your success rate depends entirely on having the right tools at your disposal. For most home mechanics, a flux-core welder represents the most practical choice—its 110V capability handles smaller bolts up to 3/8 inch diameter, while 220V units deliver the heat needed for larger fasteners. The self-shielding nature of flux-core wire (typically 0.035 inch) makes it ideal for outdoor work where controlling the welding atmosphere proves challenging. TIG welders offer superior precision for smaller fasteners in tight spaces, while stick welders provide excellent penetration for heavy-duty applications but lack the finesse needed for delicate extraction work.
Select extraction hardware that matches your specific situation:
– Coarse-threaded nuts with minimal clearance (1-2mm) around the broken bolt
– Flange-style nuts for additional surface area when welding
– Large washers to bridge gaps when direct nut welding proves difficult
– 5/16 inch steel bar stock with drilled holes for tab welding in recessed applications
Surface preparation tools complete your kit. A wire brush attached to an angle grinder removes rust and scale from both the broken bolt and extraction hardware. An air-powered right-angle drill helps work the extraction point back and forth once welded. A propane torch serves for preheating the bolt and applying thermal shock treatments—both techniques that dramatically improve extraction success rates.
Prepare Surfaces for Maximum Weld Penetration
Skipping surface preparation guarantees weld failure during extraction. The cleaner the metal surfaces, the stronger your metallurgical bond will be between extraction hardware and broken fastener. Begin by thoroughly cleaning the broken bolt end with a wire brush on your grinder—remove all rust, scale, oil, and corrosion from the surface where your weld will contact the bolt. Pay special attention to the very end of the bolt, as this is where you’ll initiate the weld puddle. For heavily corroded bolts, additional cleaning with acetone removes contaminants that compromise weld penetration.
Clean the interior surface of your extraction nut with equal thoroughness. Rust inside the nut prevents proper weld flow and creates weak spots in the bond. Run the wire brush through the threads several times, then blow out debris with compressed air. Preheating the broken bolt before welding offers significant advantages—it drives out moisture, reduces thermal shock, and most importantly, helps the bolt expand enough to break corrosion bonds within its threads. This expansion creates tiny gaps at the interface between bolt and housing, gaps your weld will fill while simultaneously providing thermal expansion to aid extraction.
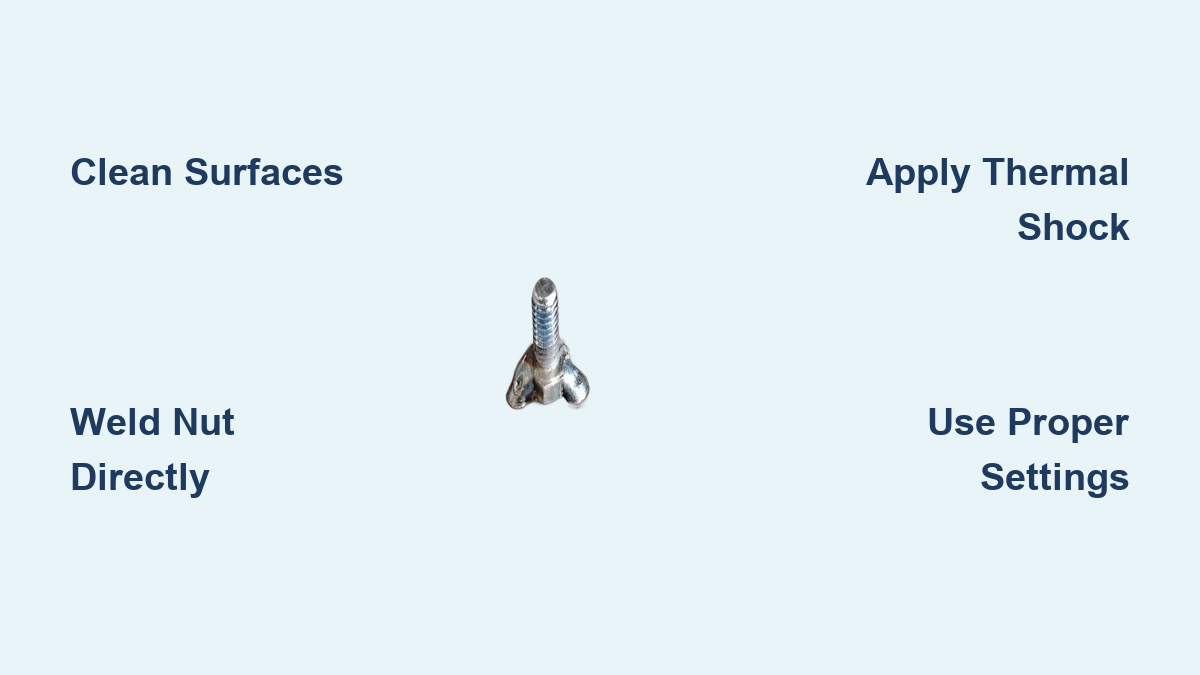
Weld Nut Directly to Broken Bolt Stub
The most common mistake that leads to extraction failure is directing too much heat toward the nut rather than the bolt itself. Position the nut over the broken bolt, ensuring it sits as flush as possible with minimal wobble. Set your welding machine to maximum heat output appropriate for the bolt diameter—higher amperage ensures adequate penetration into the relatively massive bolt, which acts as a heat sink drawing energy away from your weld zone.
Initiate the weld by positioning your arc directly on the end of the broken bolt, not on the nut. Allow the puddle to develop on the bolt surface first, then gradually flow the molten metal toward the interior wall of the nut. Watch the weld puddle itself rather than the bright arc light—this allows you to assess penetration and fusion accurately. Continue adding filler material until the nut interior is filled and a solid bond is established around the entire circumference. Your goal is a plug weld that fuses the bolt and nut together as a single unit, capable of transmitting substantial torque from your wrench to the frozen fastener.
For situations where direct nut welding proves challenging, the washer-assisted method offers an effective alternative. Weld a large washer directly to the broken bolt end first, ensuring complete fusion around the bolt circumference. Then weld your extraction nut to the washer’s outer flange. This two-stage connection distributes stress more effectively and provides additional material for the weld to grip, often succeeding where direct nut welding fails.
Apply Thermal Shock for Stubborn Bolt Extraction

Once you’ve successfully welded your extraction hardware, thermal shock techniques dramatically improve your chances of completing the extraction. After welding and allowing the assembly to cool to approximately gray color (roughly 500-600°F), apply cold water or ice water to the nut and surrounding area. The rapid thermal contraction creates mechanical stress waves at the interface between different materials—stress that can break through corrosion that held the bolt fast for months or years.
Alternatively, heat the bolt to glowing red, then immediately apply penetrating oil. The combination of thermal expansion, rapid cooling, and oil penetration often succeeds where simple torque alone fails. For particularly stubborn cases, the sequential welding approach may be necessary—after each attempt to loosen the bolt, re-weld the nut or tab, allowing more heat to penetrate the assembly with each cycle. Some experienced mechanics report success after five to seven sequential welding cycles, applying penetrating oil during each cooling phase.
Optimize Welder Settings for Bolt Extraction
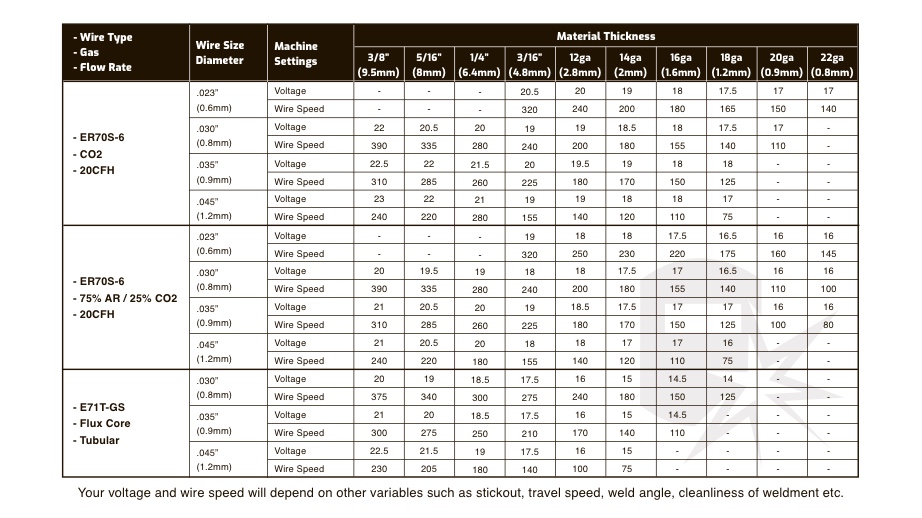
Achieving successful extraction requires understanding how your equipment settings affect weld penetration. For 110V flux-core welders working with smaller bolts, increase amperage to your machine’s maximum output. The bolt’s mass requires substantial thermal energy to achieve proper fusion, and insufficient amperage produces a weld that looks adequate but lacks the depth needed for extraction work. Wire feed speed should be high enough to deliver filler material faster than it can burn back, creating a flat, wide weld bead with good fusion rather than a narrow, ropey bead indicating insufficient heat.
TIG welding allows more precise heat control, which proves advantageous for smaller fasteners. Use a smaller diameter tungsten (1/16-inch or 3/32-inch) and appropriate filler rod. The key lies in establishing a small, focused arc that concentrates heat on the bolt while minimizing thermal impact on adjacent areas. Higher argon gas flow rates help shield the weld pool from atmospheric contamination, producing cleaner welds with better penetration characteristics.
Troubleshoot Common Weld Extraction Failures
When your weld breaks during torquing, insufficient penetration is the most likely culprit. Increase your welding heat and reduce wire feed speed slightly to ensure deeper penetration into the bolt. Consider switching from nut welding to tab welding for difficult cases—a smaller tab heats more efficiently, and the weld sits outboard of the torque center, reducing stress on the bond.
If the nut spins freely without moving the bolt, your weld likely fused to the nut interior but failed to penetrate the bolt surface. Your next attempt should direct more heat to the bolt itself, starting the weld puddle on the bolt before flowing material toward the nut. Verify that the bolt surface is completely clean and free of rust, scale, or oil.
Excessive heat dissipation into surrounding material causes problems when the bolt is embedded in cast iron or aluminum. Preheat the entire area surrounding the bolt to reduce the temperature differential between your weld zone and the surrounding material.
Complete Post-Extraction Thread Restoration
Once the broken bolt is extracted, clean the threads in the housing using an appropriate tap. Run the tap through the threads to remove any debris, corrosion, or damaged thread material left behind. Apply penetrating oil and allow it to soak before installing any replacement fastener. Always apply anti-seize compound when installing the new bolt—this proves especially critical for bolts in aluminum components or high-heat applications like exhaust systems where thermal cycling accelerates corrosion.
Follow Critical Safety Guidelines
Welding involves significant hazards that demand appropriate precautions. Always wear welding gloves rated for your welding type, a helmet with proper shade lens (minimum shade 10-12 for MIG), and flame-resistant clothing. Welding sparks can pass through regular cotton clothing and cause serious burns—use leather or flame-treated cotton garments specifically designed for welding work.
Adequate ventilation is essential, particularly with flux-core wires that produce fumes containing potentially harmful compounds. Keep a fire extinguisher nearby, especially when working near flammable materials. For heat-intensive operations, use heat-resistant barriers to protect adjacent components and wiring from thermal damage.
Maximize Bolt Extraction Success Rate
The most successful approach to how to weld a bolt combines thorough surface preparation, adequate heat input directed primarily at the bolt, patience in allowing proper penetration, and multiple attempt cycles when necessary. The washer-assisted and tab methods often outperform direct nut welding for difficult extractions, as they better manage heat distribution and provide more robust mechanical connections. Preheating and post-weld thermal shock treatments significantly improve success rates on severely seized fasteners.
Regardless of your equipment, the key to successful bolt extraction through welding lies in treating the process as a metallurgical bonding operation. You must overcome the thermal sink effect of surrounding materials and the mechanical resistance of corrosion-seized threads. Approach each extraction as a problem-solving exercise, diagnose failures to improve your technique, and persist through multiple attempts when necessary. With practice, this technique becomes an invaluable tool for handling one of mechanics’ most common and frustrating challenges.
Leave a Reply