Welding car body panels requires precision, patience, and the right techniques to achieve professional results without damaging thin sheet metal. Whether you’re repairing rust damage, fixing collision cracks, or replacing entire panels on a classic car, understanding the fundamentals of automotive sheet metal welding separates successful repairs from burned-through disasters. This comprehensive guide walks you through selecting equipment, mastering critical techniques, and executing body repairs that last—transforming you from a welding beginner into a competent auto body welder capable of tackling most common car body projects.
Auto body sheet metal typically ranges from 0.6mm to 1mm thickness, making it remarkably thin compared to structural steel applications. This thinness creates the primary challenge: applying enough heat to fuse metals together without simply burning holes through your workpieces. The metal surrounding welded areas shrinks as it cools, producing warping that distorts panels and creates additional bodywork requirements. Understanding these dynamics before striking your first arc dramatically improves your chances of success and minimizes frustration throughout your learning journey.
Choose Your Welding Method

Selecting the right welding process for automotive bodywork depends on your experience level, project requirements, and budget constraints. Each method offers distinct advantages and limitations that impact repair quality and learning curve.
MIG Welding for Auto Body
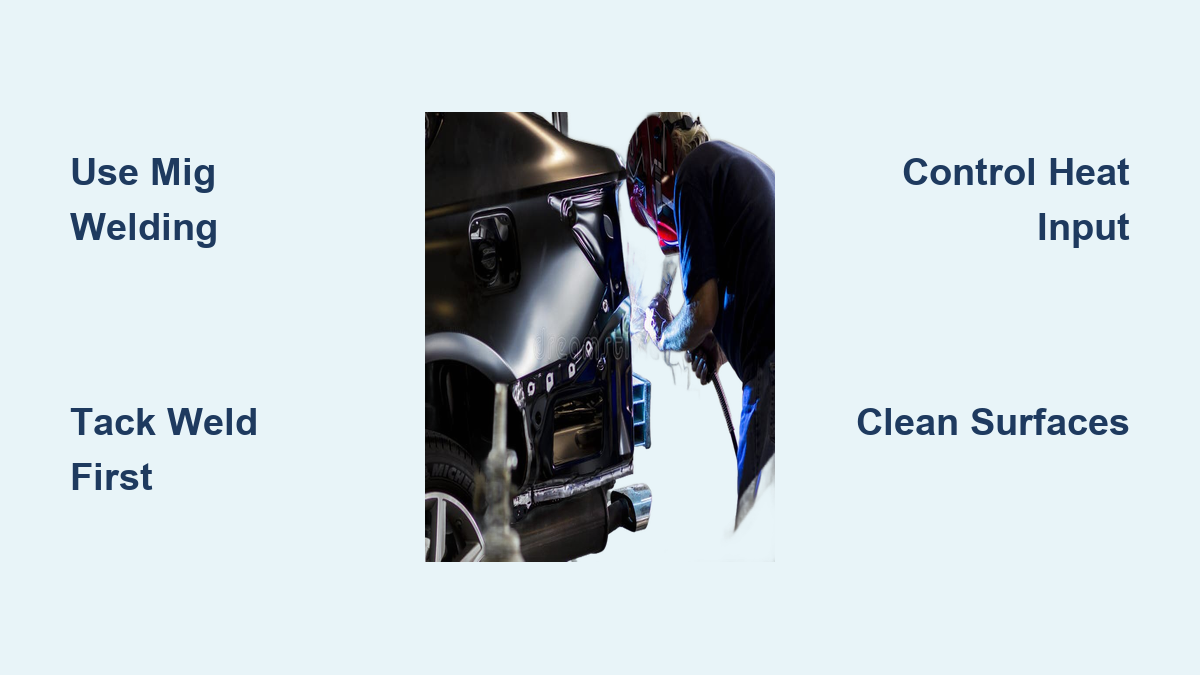
MIG (Metal Inert Gas) welding stands as the dominant choice in collision repair facilities and represents the most accessible starting point for DIY enthusiasts learning how to weld a car body. This process uses a continuously fed wire electrode combined with shielding gas to protect the weld pool from atmospheric contamination. The single-handed operation—requiring only one hand to manipulate the torch while wire feeds automatically—enables you to maintain consistent torch positioning while simultaneously adding filler material. MIG welding produces clean, fast results exceptionally well-suited to thin metal sheets, with 0.6mm to 0.8mm diameter wire providing ideal filler material for typical auto body panels. The gas mixture, commonly Sureshield 5, creates a protective atmosphere around the weld pool, producing spatter-free results that require minimal cleanup. For beginners, MIG offers the shortest path to competent welds on car body panels, though proper machine settings remain critical to avoiding burn-through.
TIG Welding for Precision Work
TIG (Tungsten Inert Gas) welding delivers superior precision and weld quality but demands significantly more skill to master. This two-handed technique requires one hand controlling the torch while the other feeds filler rods into the weld pool, utilizing a non-consumable tungsten electrode to generate the electric arc. Originally developed in the 1940s, TIG excels with aluminum and thin stainless steel applications—skills growing in importance as vehicles increasingly incorporate lightweight materials for improved fuel efficiency. The process produces high-quality, precise welds with minimal spatter, allowing skilled operators to fill skipped areas after initial tacks secure panels. However, the steep learning curve means TIG requires substantial practice before producing reliable results on auto body work. For serious enthusiasts committed to developing advanced skills, TIG provides capabilities beyond MIG, particularly for specialized materials and show-quality repairs where appearance matters most.
Stick Welding for Heavy Sections
Stick welding (Shielded Metal Arc Welding) offers portability advantages and handles heavier structural applications adequately, but presents significant challenges for thin auto body panels. The process uses consumable electrodes with 6013 rods being particularly suitable for thin-gauge mild steel at approximately 0.09375-inch diameter. Setting the machine to DCEN (Direct Current Electrode Negative) puts two-thirds of the heat on the workpiece and one-third on the electrode, reducing penetration and helping prevent burn-through. While stick welding can work for replacing damaged frame pieces that require structural strength, the technique produces rougher beads and offers less control than MIG for sheet metal work. Most auto body welding projects benefit from prioritizing MIG equipment unless specific circumstances favor stick welding’s portability.
Essential Equipment for Bodywork
Successful car body welding requires more than just a welding machine—it demands a carefully selected arsenal of equipment optimized for thin sheet metal work. Understanding which tools matter most helps prioritize investments and avoid wasting money on unnecessary items.
Welding Machine Requirements
The single most critical piece of equipment is a light-duty wire-feed MIG welder capable of operating on household current while delivering precise low-amperage output. Many budget MIG machines offer settings starting at 50 to 80 amps, which proves far too hot for automotive panels and consistently burns through thin metal. Successful sheet metal welding requires the ability to operate at 30 amps or lower—ideally down to 10 amps when using appropriate equipment. Small inverter MIG units excel for this application due to their portability, weight efficiency, and ability to deliver the fine current control necessary for panel work. When evaluating machines, prioritize those offering fine adjustment capabilities at low settings rather than high peak power that will never serve car body applications. A quality auto-darkening helmet proves equally essential since weld pool visibility directly correlates with weld quality—a poor mask that obscures the molten pool produces inferior results regardless of operator skill.
Supporting Tools and Accessories
Beyond the welding machine itself, comprehensive sheet metal repair capability requires an arsenal of supporting tools. Grinders with various disc types handle everything from weld cleanup to surface preparation. Body hammers and dollies enable shaping metal after welding, while aviation snips allow precise cutting of sheet metal for patch panels. Multiple clamp varieties secure workpieces during welding—quality welding clamps deserve particular investment since any automotive part that shifts during welding compromises joint integrity. A half-inch drill with drill index creates plug weld holes in replacement panels, while various putty knives and spreaders handle filler application after welding completes. The ground clamp requires direct contact with clean, bare metal to establish proper electrical connection, making a stiff brush for surface cleaning essential before every welding session. Leather gloves and face shields protect the operator during the welding process, with steel-tipped boots guarding against dropped tools and hot metal.
Master Tack and Skip Welding Techniques
The difference between successful panel welding and burned-through failures lies almost entirely in heat management technique. Abandon continuous bead welding in favor of tack welding and skip welding approaches specifically designed for thin sheet metal.
Tack Welding Fundamentals
Tack welding secures metal pieces together with a series of small, quickly-made welds before completing the final joint. This technique begins by setting the welder slightly lower than normal practice settings—err on the side of too cool rather than too hot. Create one to two second tack welds spread along the joint, allowing each tack to cool completely before proceeding to the next. These initial tacks prevent the sheets from shifting while you work and provide anchor points for subsequent welding passes. After placing initial tacks across the seam, grind these small round welds flatter, then return to your preferred practice setting and perform short one to two second welds beginning at one tack location and stopping before moving to a different tack. This trigger-on trigger-off approach—essentially performing many small overlapping tacks while letting metal cool between welds—dramatically reduces heat accumulation and the distortion that plagues continuous bead welding on thin panels.
Skip Welding for Heat Distribution
Unevenly distributed heat causes sheet metal to distort and warp, making heat management the primary technical challenge in body panel welding. Skip welding addresses this by distributing heat as evenly as possible through a series of short welds at key spots that secure thin sheet metal, allowing cooling periods between weld sequences before filling skipped areas. The technique involves welding at several points along a joint, letting those areas cool completely, then returning to weld the gaps between previous welds. This cyclical pattern continues until the entire joint is complete. Keeping the heat-affected zone in contact with a backing or chill bar accelerates heat dissipation—strapping an aluminum or copper bar to the workpiece provides rapid heat transfer away from the weld zone. Vary torch-to-work distance dynamically as the weld heats up, pulling back slightly when the weld pool indicates excessive heat buildup. Using the smallest diameter solid wire electrodes available—0.023″ or 0.024″ for light gauge sheet metal—provides better control and requires less energy to melt, further reducing overheating issues.
Set Correct Welding Parameters
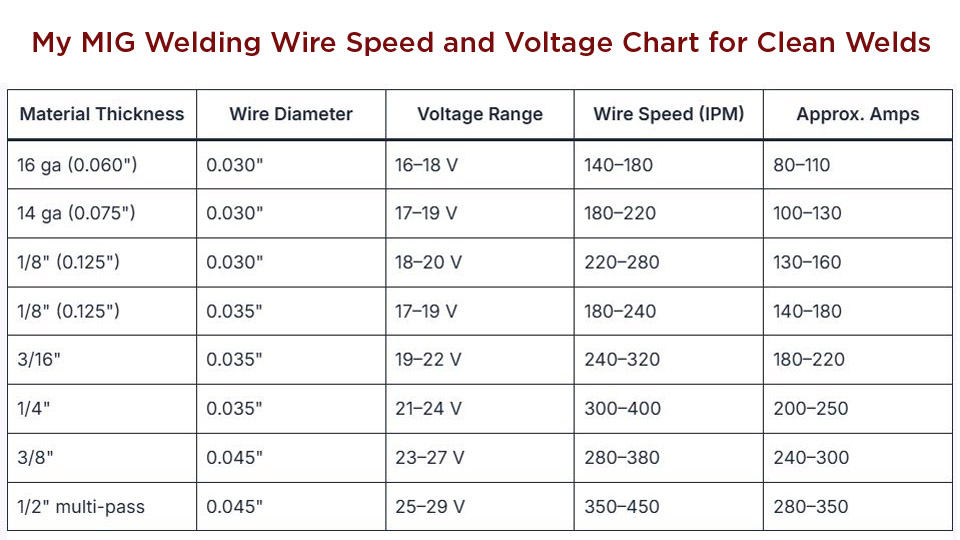
Proper machine settings prove critical for successful thin metal welding, with excessive heat input representing the most common cause of burn-through failure. Understanding how amperage, voltage, and wire speed interact helps you dial in settings appropriate for your specific panel thickness.
Amperage and Voltage Guidelines
For 0.8mm sheet metal panels, settings around 30 amps or lower are typically required, with experienced welders achieving success at settings as low as 10 amps using appropriate equipment. Voltage should generally fall in the 16-17 volt range for this thickness; running at 60 amps guarantees burning through thin panels regardless of operator technique. Wire speed on inverter machines correlates directly with amperage, making wire speed adjustment effectively an amperage control—when you increase wire speed, amperage increases proportionally. Start with conservative settings and increase gradually until you achieve proper penetration without burn-through. The goal is sufficient heat to fuse base metals together without creating a molten puddle that burns through the workpiece. When using flux-cored wire for thicker 1mm steel plate, apply similar low-current principles, adjusting settings downward from parameters you would use for heavier material.
Filler Material Selection
Choosing appropriate filler metal involves matching mechanical properties to the base material while ensuring the filler diameter is less than the sheet metal thickness. For welding 1mm thin metal sheets, a 0.6mm diameter filler provides an ideal combination of manageable heat input and adequate strength. The correct filler selection reduces the probability of corrosion, cracking, and other welding defects that could compromise repair longevity. Solid wire electrodes work best for MIG applications on automotive body panels, with copper-coated varieties providing smooth feed characteristics and stable arc behavior. Avoid using filler materials with diameters approaching or exceeding the base metal thickness, as these require excessive heat to melt and dramatically increase burn-through risk.
Prepare Metal Surfaces Properly
A clean metal surface stands as an absolute prerequisite for quality welds. Dirt, grease, and other contaminants compromise joint integrity and create defective welds that fail prematurely or exhibit poor appearance.
Cleaning Requirements Before Welding
Before beginning any welding operation, use a stiff wire brush to thoroughly remove all impurities from the joint area, extending cleaning beyond the immediate weld zone to include areas where ground clamp attachment will occur. The ground clamp requires direct contact with clean, bare metal to establish proper electrical connection—painted, rusted, or dirty surfaces create resistance that interferes with weld consistency and may produce irregular arc behavior. Pay particular attention to seams and joints where contaminants accumulate, scrubbing until the metal surface shows bright, clean metal across the entire area that will be welded. When tackling complete vehicle projects involving rust issues or multiple paint and filler layers, consider having the body shell media blasted or chemically dipped to achieve completely clean metal and reveal the true condition of the underlying structure. Sandblasting should generally be avoided for sheet metal body panels since it tends to be too harsh and can cause warping—instead, use more metal-friendly media such as baking soda, dry ice, or walnut shells.
Weld-Through Primer Application
Corrosion protection must be prioritized during panel replacement since applying paint to all bare metal in pinch weld areas after assembly proves impossible. Weld-through primer, sprayed prior to welding, provides corrosion resistance without hindering the welding process and should be applied to all surfaces that will be joined or that will contact other metal components. This specialized primer maintains its protective properties through the welding thermal cycle and continues preventing rust formation in the finished assembly. Apply primer to both surfaces of joints before clamping and welding, ensuring coverage extends beyond the immediate weld zone into areas where moisture might penetrate after assembly. The minor additional time spent priming pays significant dividends in repair longevity, particularly in climates where road salt and moisture create corrosive conditions.
Welding car body panels successfully requires understanding thin metal behavior, selecting appropriate equipment, mastering heat management techniques, and following proper safety practices. By approaching learning methodically—practicing on scrap, starting with simple projects, and progressively tackling more complex work—you can develop skills that save significant money on collision repair and rust restoration while providing satisfaction from completing work with your own hands. The techniques outlined in this guide provide a foundation for learning how to weld a car body effectively, with the understanding that real proficiency comes only through patient practice and accumulated experience.
Leave a Reply