Welding your fence creates permanent, professional-grade connections that outlast bolted or screwed alternatives by decades. When you learn how to weld a fence properly, you’re building molecular bonds between metal components that resist environmental stress, physical impacts, and time-related degradation that compromise conventionally assembled fencing. Whether installing ornamental estate boundaries, securing commercial properties, or constructing agricultural enclosures, mastering fence welding delivers structures that maintain integrity with minimal maintenance. This guide provides the specific techniques and equipment knowledge you need to create fence installations that rival professional fabricators.
The decision to weld rather than mechanically fasten your fence brings immediate advantages that compound over time. Welded joints never loosen from vibration, thermal expansion, or physical stress—problems that demand ongoing maintenance for every bolted or screwed metal fence. The sealed nature of welded connections prevents moisture infiltration at joint interfaces, dramatically reducing corrosion that plagues mechanically fastened fencing. For property owners seeking permanent perimeter solutions, learning how to weld a fence represents one of the most valuable DIY skills you can develop.
Why Welded Fence Construction Beats Bolted Alternatives
Welded fence joints create permanent molecular bonds that maintain structural integrity throughout the fence’s entire lifespan. Unlike mechanical fasteners that gradually loosen due to environmental stresses, welded connections remain solid against vibration, thermal cycling, and physical impacts. This permanence proves critical for security fencing where compromised joints create vulnerabilities intruders can exploit.
The corrosion resistance of welded fences significantly outperforms bolted alternatives. Sealed welded joints eliminate the crevices where moisture collects and initiates rust formation—problem areas that plague every mechanically fastened metal fence. In coastal environments or high-humidity regions, this moisture barrier extends your fence’s service life by decades compared to bolted assemblies requiring constant maintenance.
Welded fencing delivers substantial cost savings for large installations. While pre-fabricated panels offer convenience, learning how to weld a fence reduces material costs by 30-50% for multi-section projects. On-site welding also allows real-time adjustments for terrain variations, post spacing inconsistencies, or design changes that would otherwise require expensive custom panel fabrication.
MIG vs. Arc Welding: Choosing Your Fence Welding Method

MIG Welding for Clean, Efficient Fence Joints
MIG welding delivers the smoothest results for most fence projects with minimal spatter and faster learning curves. For standard estate fencing using mild steel materials, set your MIG welder to 110-130 amps with 0.8mm wire to achieve optimal penetration without burn-through on typical rail and post thicknesses.
This process excels at vertical welding positions essential for fence construction, producing stable arc characteristics that maintain quality when welding rails to posts at multiple heights. Before starting, thoroughly clean all joint areas—MIG welding demands pristine metal surfaces free of rust, paint, or moisture that would cause porosity and weaken your fence joints.
When welding in windy conditions, position temporary windbreaks around your work area. MIG’s shielding gas disperses easily in breezes, exposing the molten weld pool to atmospheric contamination that creates brittle, weak joints. For outdoor projects, schedule welding during calm morning hours to avoid this common pitfall.
Arc Welding for Weather-Resistant Fence Construction
Arc (stick) welding proves invaluable for fence projects in unpredictable weather conditions. Its flux-coated electrodes create protective slag that remains effective in wind and light rain—conditions that would ruin MIG weld quality. For standard 2.5mm fence materials, use 90-110 amp settings with E6013 electrodes for optimal results.
The key to quality arc welding lies in maintaining consistent electrode-to-work distance—approximately 2-3mm for 2.5mm rods. Beginners typically move too quickly, producing thin, spattery welds with inadequate penetration. Slow your travel speed and focus on building a proper weld pool that fuses completely with base metal.
When welding vertically on fence posts, reduce amperage by 10-15% compared to horizontal welding. This decreases weld pool size, giving you better control during upward travel and preventing drip-through that creates weak spots in your fence joints. Keep welding rods dry in a heated container—moisture causes porosity that compromises structural integrity.
Essential Safety Gear for Fence Welding
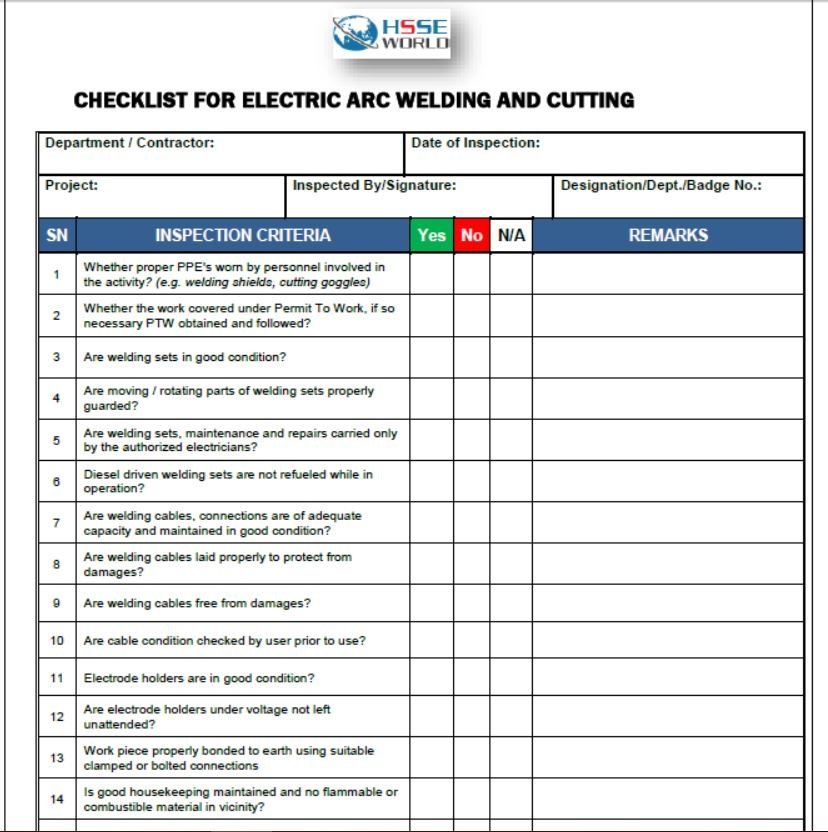
Protect Yourself from Welding Hazards
Welding demands comprehensive personal protection that addresses multiple hazard categories simultaneously. Standard safety glasses won’t cut it—invest in an auto-darkening welding helmet that protects against UV/IR radiation while maintaining visibility during non-arc periods. This eliminates constant helmet raising and lowering, reducing fatigue during extended fence welding sessions.
Your hands need specialized protection from spatter and radiant heat. Choose heavy-duty leather welding gloves rated for your specific welding process—thicker gloves for arc welding, slightly more flexible options for MIG work. Inspect gloves before each use for holes or thin spots that compromise protection during critical operations.
Flame-resistant clothing covering all exposed skin prevents burns from spatter and arc flash. Wear heavy cotton or denim shirts with no synthetic blends that could melt onto skin. For extended projects, consider a leather welding jacket that provides superior protection without overheating in summer conditions.
Preparing Fence Materials for Successful Welding
Clean Metal Surfaces Before Welding
Proper material preparation directly determines weld quality and joint strength. Remove all rust, scale, paint, grease, and dirt from joint areas using a wire brush, angle grinder, or appropriate solvent. For MIG welding, this step is non-negotiable—any surface contamination creates porosity that weakens your fence structure.
Check material condition before assembly, especially for components stored outdoors. Allow damp materials to dry completely before welding—trapped moisture converts to steam during welding, disrupting weld pool integrity and creating weak spots. This is particularly crucial for fence components delivered during wet weather.
Verify all fence components fit together properly before welding begins. Check rail lengths against post spacing and ensure proper alignment. Making adjustments after welding starts wastes time and materials—pre-assembly verification prevents costly mistakes during production welding.
Step-by-Step Fence Welding Process
Proper Rail-to-Post Welding Technique
Traditional estate fence construction requires welding horizontal rails to vertical posts at each intersection. Before welding, verify post verticality using a spirit level applied adjacent to each rail position—posts can flex between connection points, so check plumb alignment at every weld location.
Where rails pass completely through posts, welding only the entrance side may suffice for structural integrity. However, when rail ends terminate within post interiors, weld both sides of each intersection to develop full joint strength. For terminal connections at end posts or gate frames, ensure rails achieve flush contact with post faces before welding—gaps create stress concentrations that weaken joints.
Execute complete penetration welds around the full perimeter of rail-post connections. While partial penetration might satisfy structural requirements, continuous weld beads flowing smoothly across joint geometry provide maximum strength and eliminate crevices where moisture could collect and initiate corrosion.
Professional Finishing and Maintenance Tips
Achieving Quality Weld Beads Consistently

Develop consistent weld quality through deliberate practice on scrap materials matching your fence components. Focus on three critical elements:
- Travel speed: Move too fast and you get thin, weak welds; too slow causes burn-through
- Electrode angle: Maintain 10-15 degrees drag angle for MIG, consistent distance for arc
- Joint tracking: Keep the electrode centered in the joint for even penetration
For multi-pass welds on thicker materials, overlap each new pass slightly with the previous one. Begin by remelting the edge of the prior pass to create fusion between layers, developing the joint as a continuous metallurgical structure rather than stacked deposits.
Long-Term Fence Protection Strategies
Welded fence structures require minimal maintenance but benefit from annual inspections focusing on joint areas where corrosion most frequently initiates. Apply protective coatings immediately after welding and cooling—before oxidation develops—to maximize corrosion protection on weld beads and adjacent heat-affected zones.
Address minor rust spots promptly by wire brushing and applying rust-inhibiting paint. For significant weld defects or corrosion, remove the compromised weld completely and re-execute using proper technique rather than attempting patch repairs that compromise structural integrity.
Learning how to weld a fence transforms your capability to create permanent, professional-quality boundary installations. By selecting appropriate equipment, following safety protocols, mastering fundamental techniques, and maintaining your structure properly, you achieve results that rival professional fabricators while enjoying significant cost savings. The skills developed serve across numerous fencing scenarios—from simple property boundaries to elaborate ornamental installations—delivering decades of reliable service with minimal maintenance.
Leave a Reply