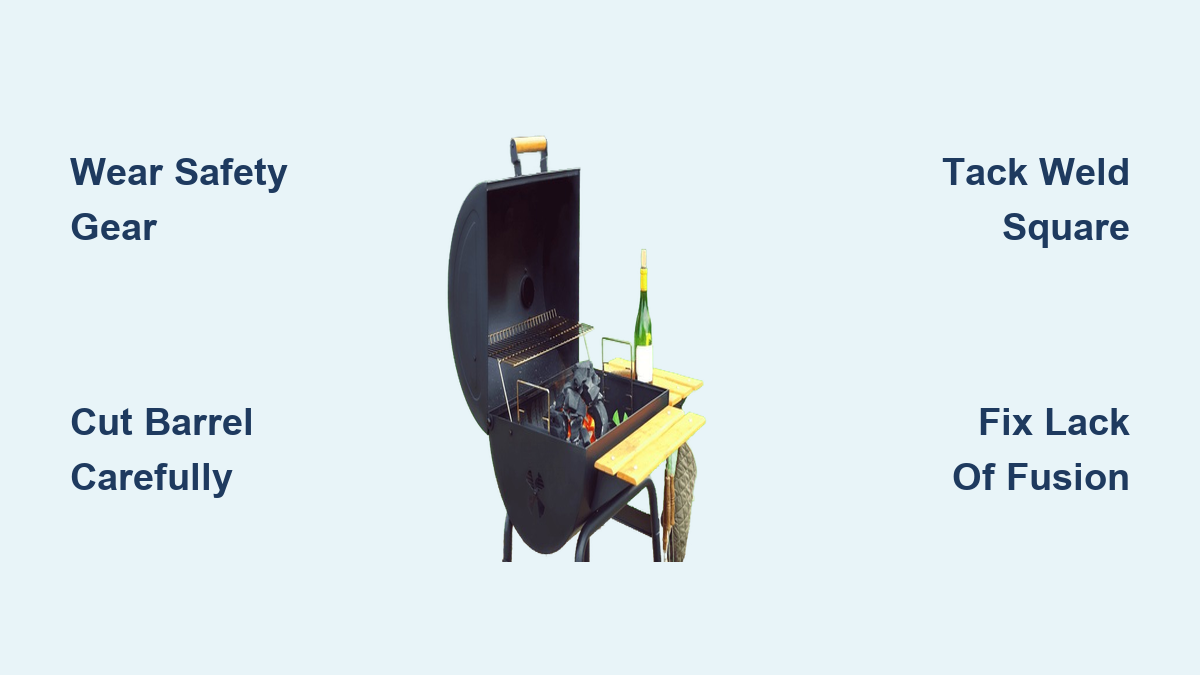
Nothing beats the satisfaction of firing up a backyard barbecue you built with your own hands. Learning how to weld a grill transforms you from a backyard cook into a true craftsman, creating a functional piece of equipment that delivers authentic smoky flavor while showcasing your metalworking skills. This Texas-style barrel grill project is the perfect entry point for beginners—structural requirements are forgiving enough that imperfect welds won’t compromise performance, yet challenging enough to develop genuine welding proficiency. Within a weekend, you’ll have a mobile, waist-high cooking station with side shelves, wheels, and all the features of professional competition grills.
The best part about learning how to weld a grill is the immediate payoff—you’re not just practicing welding techniques on scrap metal, but creating something genuinely useful for years to come. Whether you’re completely new to welding or have some experience, this guide walks you through every critical step, from selecting safe materials to troubleshooting common welding problems specific to grill construction. By the time you finish, you’ll have both a functional barbecue and foundational skills applicable to countless future metal projects.
Why Building Your Own Welded Grill Beats Store-Bought Models
Store-bought grills often compromise on features to hit price points, but welding your own gives you complete control over design and quality. A DIY welded grill provides authentic charcoal-grilled flavor that gas models can’t match, while costing significantly less than high-end competition-style units. Plus, you’ll gain practical welding experience you can’t get from theoretical practice.
Your custom grill solves common backyard problems—no more hunching over low cookers or struggling with flimsy side shelves. The Texas barrel design sits at comfortable waist height, rolls easily across your patio, and features generous prep space. Most importantly, this project forgives the learning curve of developing welding skills; structural requirements aren’t as critically demanding as high-stress applications, making it ideal for beginners.
Essential Safety Gear for Welding Your First Grill

Welding produces hazards that require serious protective equipment—skipping safety gear risks serious injury regardless of project complexity. Your clothing forms the first line of defense: always wear a long-sleeve cotton shirt (never polyester, which can melt onto your skin when exposed to sparks). Cotton won’t ignite as easily and won’t adhere to burns if stray sparks land on you.
Eye protection includes safety glasses for general work and a welding helmet with proper shade rating (typically shade 10-12 for stick welding). Auto-darkening helmets simplify the process by automatically adjusting when you strike an arc. For cutting operations, brazing goggles protect your eyes from the bright flame. Welding gloves designed for stick welding protect your hands from sparks and heat, with gauntlet-style providing additional forearm protection. Never weld without a fire extinguisher nearby and proper ventilation—open garage doors or position a portable fan to circulate air.
Texas-Style Barrel Grill Materials Checklist
Successful grill construction requires having all materials assembled before cutting and welding begins. For the frame structure, you’ll need angle iron cut to your measured dimensions—3/16-inch to 1/4-inch thickness provides adequate strength while remaining manageable with entry-level welding equipment. Three 3-inch butt hinges attach the barrel lid, and one pair of 7-inch wheels (lawn mower wheels work excellently) provide mobility.
Finding the Perfect 55-Gallon Barrel (Without Toxic Residue)
The barrel selection is the most critical safety decision—you need a 55-gallon liquid barrel sealed on both ends that has never contained flammable substances, chemicals, or hazardous materials. These barrels often come from industrial applications and may have threaded openings perfect for chimney attachment. Never use barrels that previously held pesticides, solvents, fuels, or any substance you wouldn’t want contaminating your food. When sourcing a barrel, verify its history thoroughly—many transfer stations have programs for collecting discarded barrels, and welding enthusiasts often find excellent candidates there.
Angle Iron Thickness: 3/16″ vs. 1/4″ for Frame Stability
For the frame structure, 3/16-inch angle iron provides sufficient strength for most DIY grills while being manageable with entry-level welding equipment. If you have more powerful welding gear, 1/4-inch offers additional rigidity for larger grills. The cooking grates require either expanded stainless steel cut to size, a grate from a home improvement store, or the grill assembly from an old barbecue (verify it’s not painted, as burned paint releases toxic fumes).
Step-by-Step Frame Welding Process
The frame construction forms your grill’s skeleton and requires careful attention to squareness. This stage establishes the foundation for everything that follows, so taking extra time here prevents problems during later assembly.
Measuring and Cutting Angle Iron for Perfect Squareness
Begin by measuring and marking all angle iron pieces according to your planned dimensions. Some cuts require 45-degree angles where pieces fit against opposing members, so mark these carefully using a combination square. Use a table clamp to hold each piece securely while cutting through the angle iron with a jig saw (a metal chop saw produces cleaner cuts if available).
Tack Welding Techniques to Prevent Frame Warping
With all pieces cut, lay them out on the floor in configuration of one frame half. Measure diagonals repeatedly to ensure everything is square before welding. Attach the ground clamp to your workpiece and set your welder to 90 amps (appropriate for E6011 electrode). Make small tack welds at each joint—these temporary welds hold pieces in position while allowing correction if something shifts. After completing tack welds on the first half, repeat for the back half, then join the two halves using three cross pieces.
Barrel Cutting and Modification Secrets

The barrel becomes your cooking chamber and requires careful cutting to create the lid, ash hatch, and proper frame fit. This stage demands patience—mistakes here affect both appearance and functionality.
Creating the Perfect Lid Cut Without Distorting the Barrel
Verify once more that your barrel has never contained hazardous chemicals. Lay the barrel horizontally in the completed frame to check fit, then remove it for marking. Find the center of each barrel end using a measuring tape and mark two chalk lines intersecting at the center. Stand the barrel vertically and use a chalk line to mark down one segment—this creates your lid section. Cut along this line with your jig saw, taking time to follow the chalk guide precisely.
Installing Hinges Before Final Cutting (Pro Tip)
Attach your three butt hinges to the lid piece before completing all barrel cuts. Position them evenly along the seam edge, then secure with screws. This sequence makes the process significantly easier than trying to maneuver a partially cut barrel. Once hinges are secure, complete remaining cuts following your chalk lines, then use a metal file to dull all sharp edges.
Troubleshooting Common Grill Welding Problems
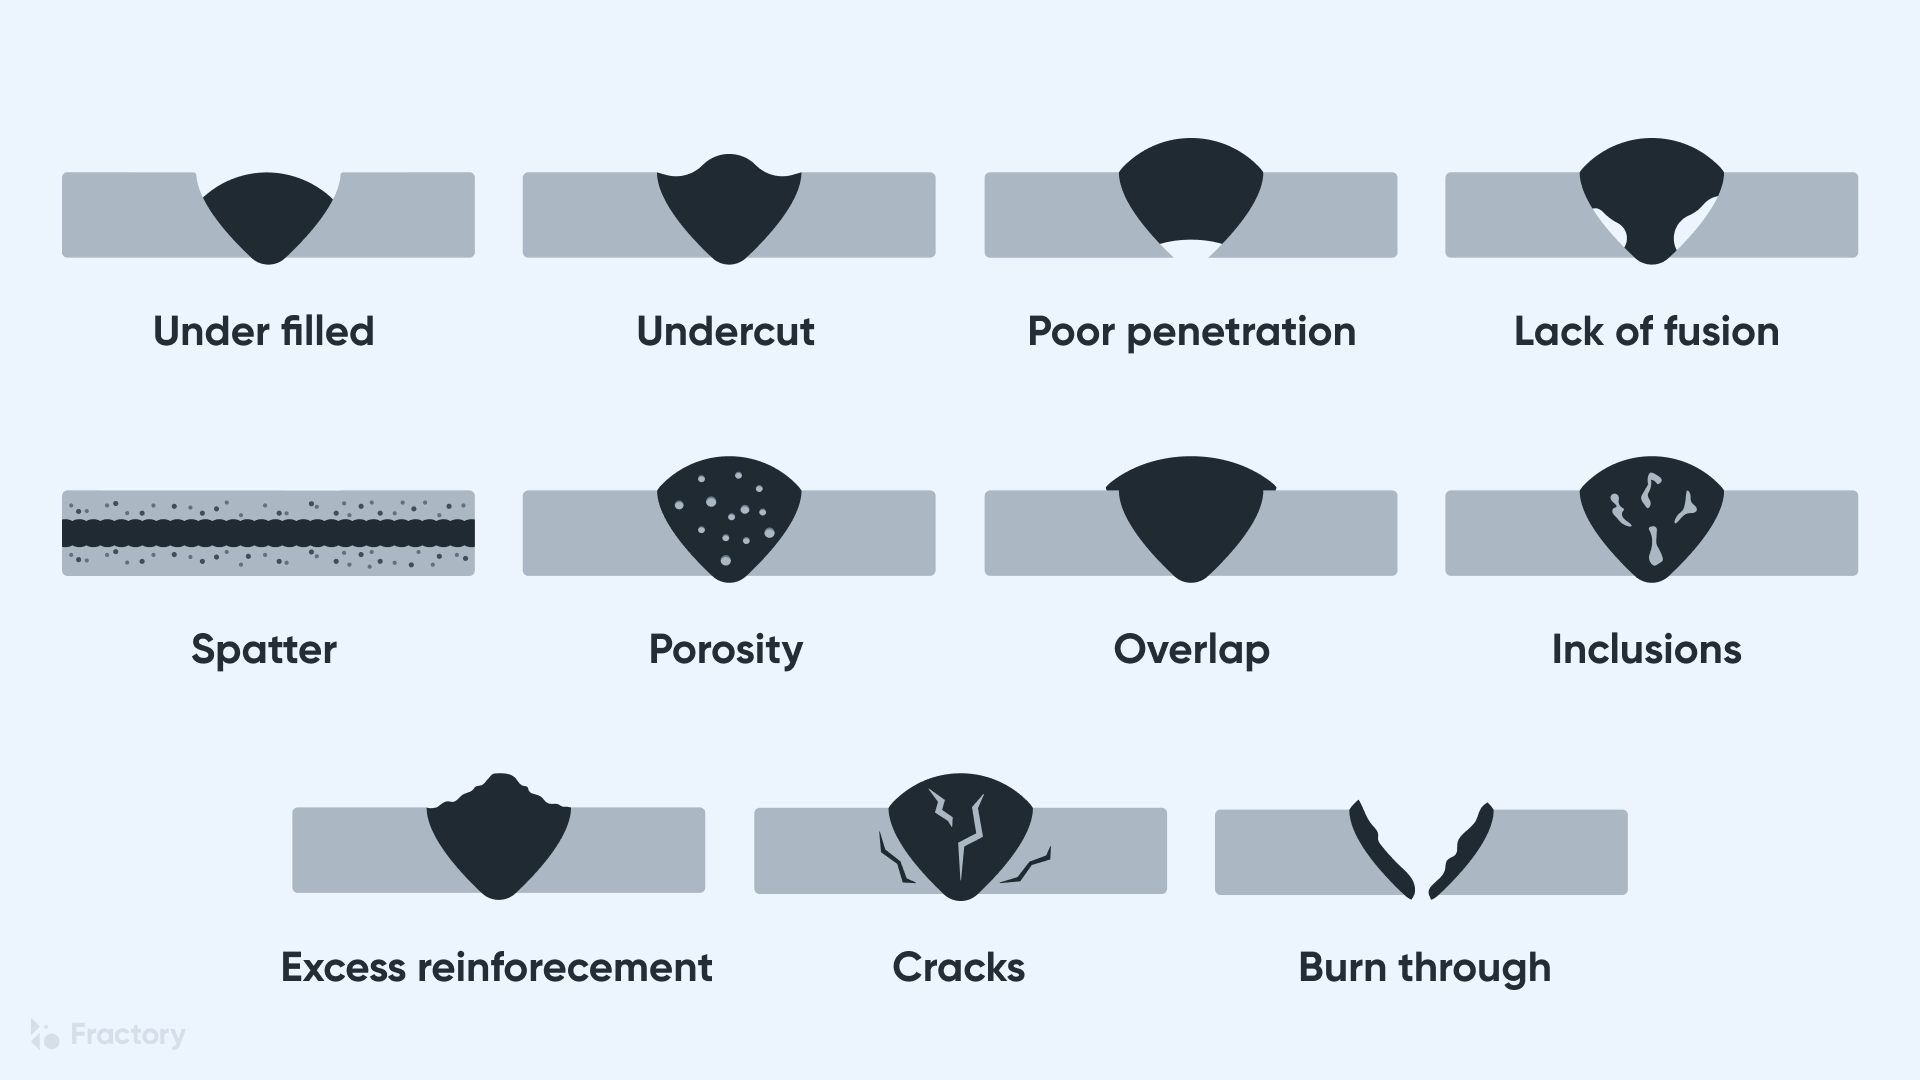
Even experienced welders encounter problems, and recognizing common issues helps you troubleshoot effectively during your grill build.
Why Your Welds Lack Fusion (And How to Fix It)
Lack of fusion occurs when weld metal fails to bond properly with base metal, producing weak joints. This typically stems from insufficient heat (amperage too low), improper electrode angle, traveling too fast, or contaminated metal surface. Increase amperage slightly, slow your travel speed, and ensure the electrode angle promotes proper puddle wetting. Clean metal surfaces thoroughly before welding—grind off mill scale with an angle grinder and flap disk.
Solving Excessive Spatter During Frame Construction
Excessive spatter creates messy welds and wastes material. This problem often results from incorrect polarity, wire feed speed set too high, voltage too high, or contaminated wire. Check your polarity settings first (most flux core wires require DCEP), then adjust wire feed speed and voltage according to your machine’s guidelines. Keep wire and contact tips clean to prevent contamination that disrupts the welding arc.
Finishing Touches: Painting and Seasoning Your New Grill
With all construction complete, finishing touches transform your welded assembly into a polished backyard centerpiece. Apply high-temperature paint to all metal surfaces excluding cooking grates and cedar shelving—this protects against rust and weather damage while providing attractive appearance.
Place cedar boards into your shelf frames and install the two-level grate system: a lower piece holding charcoal with ash falling through, and an upper piece serving as the cooking surface. Regular maintenance extends your welded grill’s life significantly—remove ash buildup through the flip hatch after each use, periodically check joints, and touch up any worn paint. With proper care, your DIY welded grill will provide decades of reliable service and countless meals enjoyed outdoors with family and friends.
Leave a Reply