Discovering a crack in your kayak after an epic river trip can feel devastating, but knowing how to weld a kayak turns potential disaster into a manageable DIY project. Most modern kayaks are made from high-density polyethylene (HDPE), a thermoplastic that responds beautifully to heat welding techniques. Unlike fiberglass or composite repairs that require toxic resins and complex processes, plastic welding creates molecular bonds that restore structural integrity without compromising safety. This guide cuts through the confusion to deliver practical, step-by-step instructions anyone can follow to fix cracks, holes, and stress fractures in their polyethylene watercraft.
The ability to weld your kayak yourself saves hundreds of dollars in professional repair fees while extending your boat’s lifespan on the water. Many paddlers mistakenly believe damaged kayaks must be replaced, but with proper technique, a welded repair can be stronger than the original hull material. Before reaching for epoxy or duct tape, learn how to weld a kayak correctly—the method that actually fuses plastic at the molecular level rather than just covering up problems. Whether you’re dealing with a hairline fracture from winter storage or a gash from scraping against river rocks, this guide provides everything you need to execute professional-quality repairs.
Identifying Your Kayak’s Plastic Material
Confirming your kayak’s construction material before starting any repair prevents wasted effort and ensures you choose the appropriate approach. Attempting to weld incompatible materials leads to frustration and failed repairs that leak or crack again after minimal use.
HDPE and XLPE: Understanding the Difference
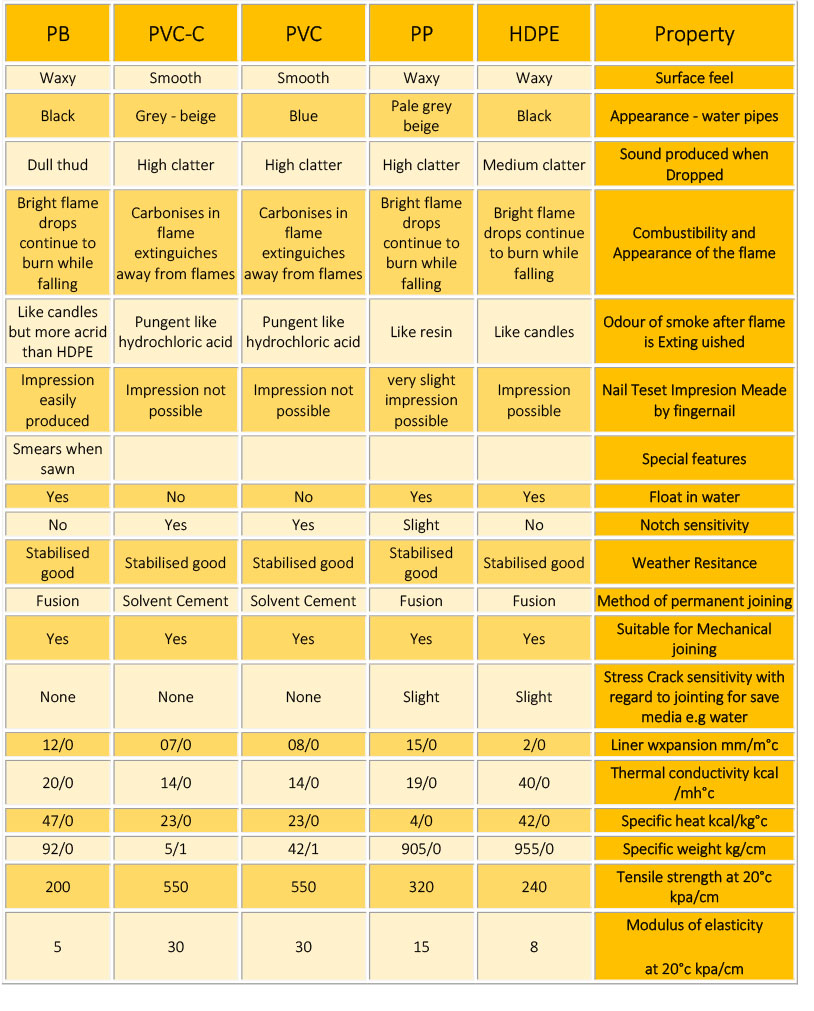
The vast majority of modern kayaks are manufactured from high-density polyethylene (HDPE), a thermoplastic that becomes pliable when warmed and fuses molecularly with additional HDPE material. When you heat HDPE to the correct temperature, the polymer chains intermingle with those of welding rod material, creating a bond nearly as strong as the original hull construction. Crucially for DIY repairs, HDPE is forgiving—if your first weld attempt doesn’t meet your standards, you can simply reheat the area and try again without degrading the material.
Some older kayaks, particularly certain Jackson Kayak models from the early 2000s, use high-density crosslinked polyethylene (XLPE) instead. This thermoset plastic underwent a manufacturing process that creates permanent covalent bonds between polymer chains. XLPE can only be heated once before permanent degradation occurs, making conventional welding impossible. Attempting to weld XLPE typically results in burning rather than fusing, producing weak, brittle repairs that fail quickly. If your kayak contains XLPE, explore adhesive-based repairs or consult the manufacturer for professional options.
Choosing the Right Welding Rod
Once you’ve confirmed your kayak is made from weldable HDPE, selecting appropriate welding rod becomes critical. Both low-density (LDPE) and high-density polyethylene rods are available, each offering distinct advantages. LDPE melts at lower temperatures and flows more readily into crack channels, making it more forgiving for beginners and producing smoother finishes with less effort. The lower melting point also reduces the risk of accidentally burning the base plastic during your first attempts at how to weld a kayak.
HDPE rods produce stronger, more abrasion-resistant repairs but demand greater skill to weld successfully. The higher melting temperature requires more heat applied for longer durations, increasing the risk of damaging the base plastic if you lose focus. However, for repairs in high-wear areas like the keel or where the hull contacts a kayak cart during transport, the superior durability of HDPE often justifies the additional difficulty.
Essential Tools for Plastic Welding
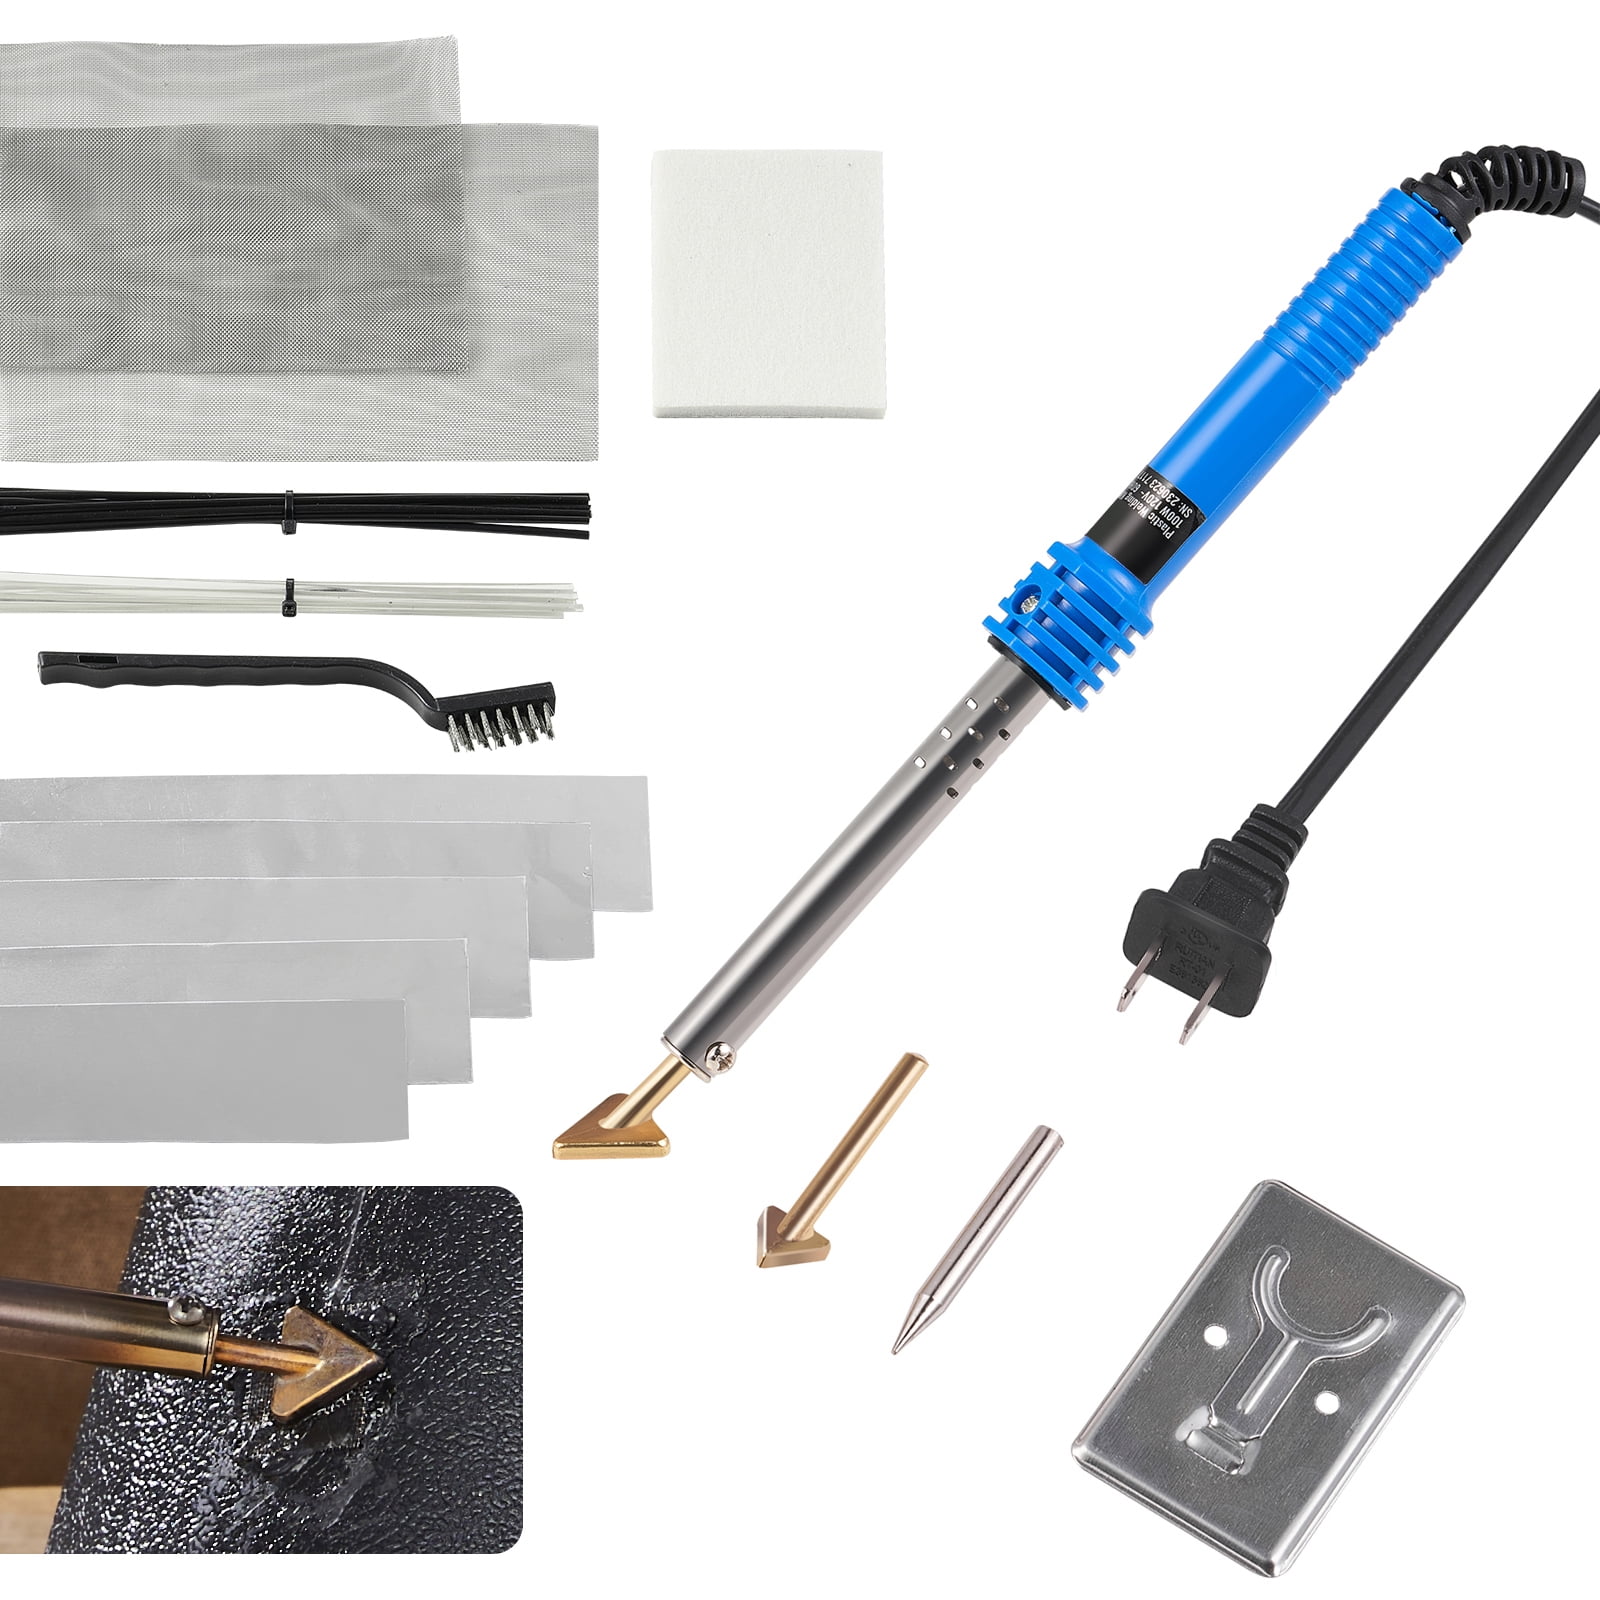
Gathering all necessary tools before beginning your repair ensures a smooth workflow and professional-quality results. Plastic welding requires specific equipment designed to prepare surfaces, apply heat precisely, and manipulate melted plastic.
Surface Preparation Equipment
The foundation of any strong weld begins with proper surface preparation. You’ll need a drill with small bits that match the width of cracks you intend to repair—smaller bits are preferable because they create less material removal. A scraper or metal edge tool serves multiple purposes: creating the characteristic V-shaped groove that improves plastic bonding, smoothing welded areas after completion, and removing damaged material from around the crack perimeter. Sandpaper in various grits allows you to roughen the surface around the repair area, promoting better adhesion.
Cleaning supplies are equally critical. Soap and water provide initial cleaning to remove dirt, grime, salt residue, and biological growth. Following the initial wash, rubbing alcohol or mineral spirits eliminate any remaining oils or contaminants that could compromise the weld bond. These solvents evaporate quickly and leave no residue.
Heat Sources and Safety Gear
Specialized airless plastic welders designed specifically for watercraft repairs provide the most consistent results, maintaining precise tip temperatures. These dedicated tools simplify the process considerably but represent a significant investment for one-time repairs.
Heat guns offer a more economical alternative that produces acceptable results with practice. The variable temperature control on quality heat guns allows adjustment for different plastic thicknesses. Work in a well-ventilated area and wear a respirator with organic vapor cartridges to protect yourself from fumes released during heating, regardless of which heat source you choose.
Preparing the Repair Surface

Proper surface preparation determines whether your weld creates a lasting bond or fails prematurely. Rushing through this phase is the most common mistake made by beginning plastic welders.
Cleaning and Assessing Damage
Begin by washing the entire repair area thoroughly with soap and water. Pay particular attention to the crack itself, working the cleaning solution into the channel to dislodge trapped debris. Rinse completely and allow the area to dry. Once clean, assess the crack and plan your approach.
For cracks longer than approximately two inches, drill termination holes at each end to prevent further propagation. Select a drill bit that matches the crack width as closely as possible. Drill the termination holes approximately one-quarter inch past the visible end of each crack.
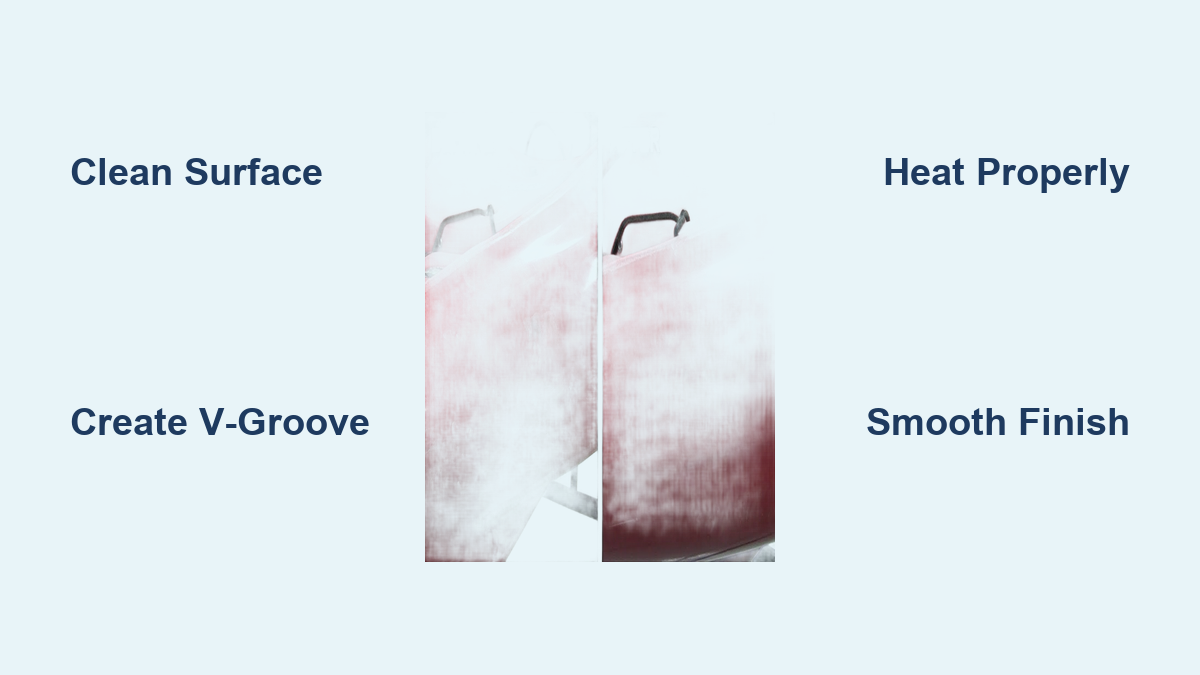
Creating the V-Groove
Prepare the surrounding surface by lightly sanding the area within approximately two inches of the crack. Use your scraper or edge tool to create a V-shaped groove along the entire length of the crack. This groove serves multiple critical purposes: it removes damaged plastic from the crack walls, provides a channel for molten welding rod to flow, and increases the surface area available for bonding.
The V-groove should widen as it goes deeper, with the narrowest point at the crack itself. Complete the preparation by cleaning the area one final time with rubbing alcohol to remove any remaining contaminants.
Master the Welding Technique
With the surface properly prepared, you can begin the actual welding process. This phase requires patience and careful attention to temperature control.
Heating to the Correct Temperature
Work in a well-ventilated area wearing your respirator. Begin by heating the area surrounding the crack with your heat source set to low or medium temperature. Move the heat source in slow, circular motions approximately three to four inches from the surface. Watch for the plastic to become shiny and slightly glossy—this visual cue indicates the material has reached the appropriate temperature.
While maintaining heat on the base plastic, begin warming your welding rod. Grip the rod firmly with pliers and apply heat to one end, working the warmth along the rod’s length. The goal is to bring both the base plastic and the welding rod to similar temperatures simultaneously.
Executing the Weld
Once both surfaces are properly heated, press the warm end of the welding rod into the V-groove with a slight twisting motion. This twisting action helps the molten plastic flow into the groove channels. Continue applying heat to both the rod and the surrounding base plastic while slowly feeding additional rod material into the crack. Move along the entire length of the crack, extending approximately one-half inch past each termination point.
The most common cause of repair failure is improper temperature management. Insufficient heating results in a weak bond, while overheating causes the plastic to degrade, discolor, and become brittle.
Finish and Smooth Your Repair
After completing the weld bead, proper finishing transforms an adequate repair into a professional-quality result.
Cooling and Initial Smoothing
Allow the plastic to cool for approximately two to three minutes before proceeding with finishing work. The plastic should be firm but still slightly warm to the touch. Use your scraper to carefully smooth the welded area, blending it into the surrounding hull surface. Work in long, smooth strokes that follow the contour of the kayak.
Inspect the completed repair carefully for thin spots or gaps. If detected while the plastic is still warm, additional heating and material application can address these deficiencies.
Final Inspection and Testing
Continue smoothing until the repair blends seamlessly with the surrounding hull both visually and to the touch. Run your hand over the repaired area in multiple directions to detect any raised edges or rough spots. When satisfied with the repair’s appearance and texture, allow the plastic to cool completely.
While plastic welds achieve initial strength during cooling, the bond continues developing maximum strength over the following twenty-four to forty-eight hours. During this curing period, avoid subjecting the repair to significant stress.
Maintain Your Welded Kayak
Proper post-repair care and ongoing maintenance maximize the lifespan of your plastic welding work.
Post-Repair Curing and Inspection
After the curing period, inspect the repair carefully before returning the kayak to regular service. Check for any signs of separation, cracking, or leakage along the weld line. Apply gentle pressure to the repaired area from both interior and exterior directions to verify structural integrity.
Regular inspection of repaired areas after each significant paddling outing helps identify developing problems before they result in catastrophic failure.
Preventive Care
Reduce conditions that cause kayak damage by avoiding dragging kayaks across rough surfaces and storing them supported evenly to prevent stress concentrations. Protect kayaks from direct sunlight exposure when not in use, as UV radiation gradually degrades polyethylene plastic. When paddling in rocky rivers, consider applying protective tape to high-wear areas including the keel and bow sections.
Plastic welding transforms kayak repair from an intimidating specialty task into an accessible DIY project that any determined paddler can master. The investment in basic tools pays for itself after just one successful repair, while the skills you develop improve with each project. Combined with proper maintenance practices, knowing how to weld a kayak enables you to keep your watercraft in service for decades rather than years.
Leave a Reply