Radiator damage ranks among the most common cooling system failures vehicle owners encounter, and understanding how to weld a radiator can save you significant time and money compared to complete replacement. Whether you’re dealing with a cracked aluminum end tank on a modern vehicle or a leaking seam in a classic brass-and-copper radiator, the repair techniques vary dramatically based on construction materials. This comprehensive guide walks you through every aspect of radiator welding and repair, from initial diagnosis through final pressure testing, helping you determine whether a DIY repair makes sense for your situation or whether professional service would be more appropriate.
The decision to repair versus replace a radiator depends on several factors: the vehicle’s value, the availability of replacement parts, the extent of damage, and your access to appropriate tools and skills. New radiators for common vehicles typically cost $70-200, making replacement economically competitive with professional repair in many cases. However, radiators for older vehicles, specialty applications, or commercial equipment often cost significantly more or prove difficult to source, making skilled repair the practical choice. Understanding the materials in your radiator and the specific repair techniques required will help you make an informed decision before investing time and money in either path.
This guide covers the complete spectrum of radiator repair approaches, from traditional soldering of brass and copper units to TIG welding of aluminum radiators, along with alternative methods when welding isn’t appropriate. Each section provides actionable details you can apply immediately, whether you’re a seasoned welder attempting your first radiator repair or a DIY enthusiast facing your first cooling system challenge.
Identify Your Radiator Material Before Starting
Before attempting any radiator repair, you must identify what material you’re working with, as this determines which techniques will succeed and which will cause further damage. Traditional automotive radiators were constructed from brass and copper, with brass tanks permanently joined to copper core tubes using tin-lead solder alloys. These materials respond well to standard soldering techniques, making them the most accessible radiators for DIY repair. The zinc content in brass creates acceptable bonds with tin-lead solders when properly prepared, though excessive heat causes the zinc to “burn out,” leaving copper-colored metal that will no longer accept proper solder bonds.
Modern radiators increasingly utilize aluminum construction, which presents entirely different welding challenges compared to brass and copper units. Aluminum radiators have their tubes and core assemblies brazed together during manufacturing using specialized alloys with higher melting points than standard solders. This brazing creates strong, leak-proof joints throughout the core, but it means repairs near these joints must avoid temperatures that could remelt the original brazing material. The end tanks on aluminum radiators may be welded on, crimped on, or attached using epoxy sealants depending on the manufacturer, and each construction method affects how you approach repairs.
The fundamental choice in radiator repair involves selecting between soldering, brazing, or welding, each offering different strength characteristics and suitability for specific applications. Soldering remains the traditional method for brass and copper radiators, creating joints at temperatures typically below 600°F using tin-lead or similar alloys. Brazing operates at higher temperatures and produces stronger mechanical bonds but requires more heat control to avoid damaging the parent metal. Welding, particularly TIG welding for aluminum radiators, offers the strongest repairs but demands significant skill and appropriate equipment. Your choice depends on your available tools, skills, and the specific radiator material you’re repairing.
How to Determine If Your Radiator Is Aluminum or Brass
Determining your radiator’s material takes just a few minutes but prevents costly mistakes. For aluminum radiators, use a magnet—aluminum won’t attract it while brass and copper radiators will. Aluminum radiators often have a dull, silvery-gray appearance compared to the golden hue of brass. Check the end tanks: aluminum tanks typically have visible weld seams while brass tanks show solder joints. Another test involves scratching an inconspicuous area—brass produces yellowish shavings while aluminum creates silvery-white filings that quickly oxidize. If you’re still uncertain, consult your vehicle’s service manual or contact a professional radiator shop for identification help before proceeding.
Prepare and Clean Your Radiator
Surface preparation represents the single most critical factor determining radiator repair success, yet many DIYers underestimate its importance. Contamination from corrosion, oxidation, old solder, dirt, and coolant residue prevents proper bonding regardless of the technique or materials employed. The cleaning process must expose bright, virgin metal at the repair site, and this requirement extends beyond the immediate leak area to surrounding surfaces that will interact with flux or filler materials. Skipping or rushing this step virtually guarantees repair failure, regardless of how skilled your welding technique might be.
Begin mechanical cleaning with wire brushing to remove loose debris and superficial corrosion, but recognize that wire brushing alone proves insufficient for radiator repair. The brushing action merely polishes contaminated surfaces rather than removing them, leaving a barrier between clean metal and your filler material. Follow wire brushing with coarse steel wool or emery cloth to cut through the contaminated layer and expose bright brass or copper. This aggressive approach ensures the flux and solder can actually contact clean metal rather than bonding to oxidized surface material that will fail under pressure.
Professional-Grade Cleaning Techniques for Maximum Adhesion
For severely corroded radiators, sandblasting provides the most thorough cleaning method, provided your compressed air supply is free of moisture that could introduce new contamination. Sandblasting effectively removes all surface oxidation and old solder, leaving the metal in optimal condition for repair. However, this method works best when the radiator has been removed for complete restoration and proves impractical for radiators still installed in vehicles. Professional radiator shops historically maintained pickling tanks containing acidic solutions that dissolved oxidation and flux residue between soldering operations, using an iterative process that ensured each joint received optimal attention.
Complex radiator repairs often require partial disassembly to access leaking seams or joints properly. When leaks occur along tank-to-core seams, attempting repairs without removing the tank typically results in failure because contaminants trapped in the seam prevent proper solder flow and bonding. Removing hose nipples and radiator necks before soldering provides significant advantages during the repair process, as these fittings can be cleaned separately, tinned with solder, and then joined to the main radiator body under controlled conditions that ensure complete joint penetration.
Solder Brass and Copper Radiators

Soldering remains the most accessible and effective method for repairing brass and copper radiators, requiring only basic tools that most DIYers already own or can inexpensively acquire. The choice of solder alloy directly impacts repair strength and longevity, with standard 50-50 tin-lead solder (50% tin, 50% lead) remaining the most commonly recommended option for radiator repair. This alloy melts at approximately 420-460°F and produces joints with sufficient strength and corrosion resistance for automotive cooling system pressures. Higher tin content solders like 60-40 or 70-30 blends produce stronger joints with better corrosion resistance but require slightly higher working temperatures and flow more quickly, making control more challenging for inexperienced operators.
Flux serves the critical function of preventing oxidation during the heating process and promoting solder flow across prepared metal surfaces. For radiator work, acid-based fluxes designed for plumbing applications provide the necessary cleaning action to maintain metal surfaces in a condition that accepts solder. HCL-based fluxes prove particularly effective for radiator soldering, though they require thorough cleaning after the repair is complete to prevent ongoing corrosion of surrounding metal. Apply flux to the thoroughly cleaned surface using a small natural-bristle brush, with enough flux to cover the joint area without excessive pooling.
Perfect Your Soldering Technique in Minutes
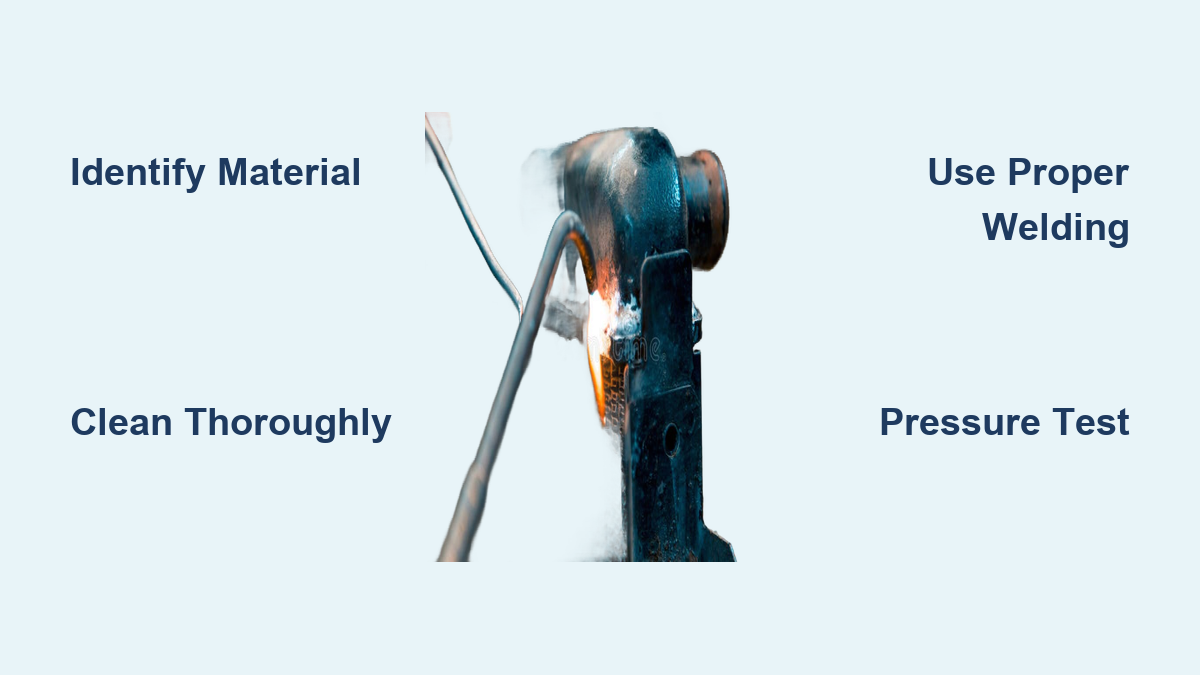
The technique for torch heating involves heating approximately 2-3 inches of the joint area before applying solder, with the torch flame maintained in constant motion to distribute heat evenly. Heat the metal to soldering temperature, then apply flux to the heated area, repeating the heat-flux cycle until the flux turns black and begins to bubble off as a tarry residue. When this contamination burns away and the flux flows clear, the solder is applied and should flow smoothly into the joint. Professional radiator technicians emphasize that successful soldering requires speed and confidence—the metal must be heated to proper temperature quickly, the flux applied and allowed to clean the surface, the solder flowed into the joint, and the heat removed all in a continuous sequence.
Experienced technicians describe the ideal repair happening so quickly that the process feels like a single continuous motion rather than a sequence of discrete steps. If the process takes too long, heat spreads through the metal and can open seams in adjacent areas as previously solidified solder melts again. The concept of “getting in and out before the solder a quarter inch away knows you’ve been there” captures this essential timing requirement. A weak or too-large heat source that requires more than a half-second to melt the solder typically indicates improper technique or equipment selection.
Weld Aluminum Radiators Properly
Aluminum radiator repair requires fundamentally different approaches than brass and copper units, with TIG welding (GTAW) representing the most common professional method for repairs and modifications. The process uses a non-consumable tungsten electrode to establish an arc that heats the base aluminum to melting temperature, with filler metal added manually to build up the weld pool and create the joint. Understanding the construction of aluminum radiators is essential before attempting repairs, as the tubes and core assemblies are typically brazed together during manufacturing using specialized alloys with higher melting points than standard solders.
Filler wire selection significantly impacts aluminum weld quality and corrosion resistance. Aluminum 5356 filler wire provides good strength and corrosion resistance for general radiator work, while 4043 filler offers better crack resistance but slightly reduced strength compared to 5356. The choice between alloys depends on the specific application and the operator’s experience level. Welds in aluminum radiators for high-pressure or critical applications require exceptional skill and attention to technique, as leaks most frequently occur at weld stops, cratering that wasn’t properly filled out, and improper arc taper-off at weld termination points.
Master Aluminum Radiator Welding in Five Steps
-
Clean thoroughly: Aluminum requires meticulous cleaning to remove oxidation before welding. Use stainless steel wire brushes dedicated to aluminum only (never use the same brush on steel).
-
Preheat strategically: Aluminum conducts heat rapidly, so preheating the entire repair area to 200-300°F helps maintain consistent temperature during welding.
-
Control heat input: Use the lowest amperage setting that maintains a stable arc to prevent burn-through on thin radiator material.
-
Maintain proper gas coverage: Use 100% argon shielding gas with adequate flow (15-20 CFH) and keep the nozzle close to the work (1/4-3/8 inch).
-
Finish welds properly: Always fill the crater at the end of each weld pass to prevent cracking, and use a back-step technique for longer welds.
Specialized aluminum welding rod systems have been developed specifically for radiator repair, offering alternatives to full TIG welding for operators without access to welding equipment. These systems typically use aluminum-based filler rods combined with specialized fluxes that allow the filler to bond to the parent aluminum at temperatures significantly lower than those required for conventional welding. Some systems use aluminum welding rod with matching powder flux designed to work synergistically for repairs in any position, with the flux acting as a temperature indicator by turning liquid and thin when the base metal reaches the proper working temperature of approximately 600°F. These systems can be used with various fuel gases including propane, MAPP gas, oxyacetylene, or oxy-MAPP, providing flexibility based on available equipment.
Pressure Test for Leak Detection
Before attempting any radiator repair, positively identifying the leak location is essential, as guesswork leads to wasted time, unnecessary repairs, and potential damage from repeated heating cycles in areas that aren’t actually leaking. Pressure testing provides a systematic method to locate leaks before beginning repair work. A basic DIY pressure test setup requires a way to pressurize the radiator and a method to identify where coolant escapes, using an air compressor with a regulator capable of maintaining 10-12 PSI (the typical operating pressure of most automotive cooling systems) with fittings adapted to radiator hose connections.
Alternative pressure testing methods use hand pumps specifically designed for radiator testing, available at automotive parts stores. These pumps typically include adapters for various radiator neck sizes and a pressure gauge for monitoring system pressure. The advantage of these dedicated tools is their portability and the controlled pressure they provide. Some technicians use innertube material for pressure testing when formal testing equipment isn’t available—a section of bicycle innertube (from balloon-tire bikes) can be clamped to the radiator using hose clamps, with the radiator cap in place to seal the system, then inflated to pressurize the radiator.
Once the radiator is pressurized, applying soapy water to suspected areas reveals leaks through bubble formation at leak sites. This technique works for both air pressure testing (bubbles from escaping air) and liquid pressure testing (bubbles from pressurized coolant escaping). Apply the soap solution systematically across the entire radiator surface, with particular attention to joints, seams, and areas showing signs of corrosion or damage. For internal leaks—those where coolant escapes into areas not visible from the exterior—pressure testing combined with visual inspection may not identify the leak location; in these cases, removing the radiator and inspecting the interior, or using dye-based leak detection products that show fluorescence under UV light, may be necessary.
After completing any radiator repair, pressure testing is essential to verify the repair’s success before returning the radiator to service. The pressure test should be performed at or above normal operating pressure to ensure the repair can withstand the stresses it will encounter during actual use. Visual inspection of soldered or welded joints should reveal smooth, shiny solder or weld fillets without cracks, voids, or signs of incomplete fusion. Any questionable areas should be addressed immediately rather than hoping they will perform adequately in service.
Follow Critical Safety Practices
Radiator soldering and welding involve significant heat, open flames, and potentially hazardous materials requiring appropriate safety precautions. Traditional radiator soldering uses lead-containing solders that pose health risks if ingested or inhaled, occurring through ingestion (hand-to-mouth contact after handling solder) or inhalation of fumes produced during heating. Proper safety practices include washing hands thoroughly after handling lead solder, avoiding eating or drinking in work areas, and using adequate ventilation to remove fumes. Lead-free solder alternatives eliminate lead exposure concerns and may be preferable for operators who prefer to avoid lead handling entirely, though these solders have different working characteristics that may require technique adjustments.
Heat safety requires heat-resistant gloves to protect hands during torch operation and when handling heated components. Eye protection appropriate to the specific process—shaded lenses for torch work, appropriate TIG welding helmet and lens—prevents eye damage. Fire safety considerations include clearing flammable materials from the work area, having appropriate fire extinguishing equipment available, and ensuring adequate ventilation when working with heated materials. The combination of open flames, heat, and potentially flammable materials in a garage or shop environment requires vigilance to prevent fires.
Fluxes used in radiator soldering are acidic and can cause skin irritation or chemical burns with prolonged contact, requiring appropriate gloves and eye protection to prevent accidental contact. Spills should be cleaned promptly, and contaminated materials disposed of according to local regulations. Aluminum welding produces intense ultraviolet radiation that can cause eye damage and skin burns similar to sunburn—proper welding helmets with appropriate shade lenses and protective clothing prevent these injuries. The UV radiation can also damage nearby materials and cause fires if flammable items are within the arc’s reach.
Troubleshoot Common Welding Problems
When solder refuses to flow into the joint, the most common causes are inadequate cleaning, insufficient heat, or contamination. Double-check that the metal surface is truly clean down to bright metal—hidden contamination can prevent solder flow even when the surface appears clean. Ensure the metal is hot enough to melt the solder; a torch that appears to be heating adequately may not be transferring enough heat to the metal for solder flow. Verify that the flux is appropriate for the task and has not been deactivated by excessive heat or age.
Solder that flows away from the joint rather than staying where applied typically indicates oil or contamination on the metal surface that the flux has not adequately removed. The contamination creates a barrier that prevents proper wetting of the metal surface, causing the solder to bead up and flow to cleaner areas. Thorough re-cleaning of the joint area is necessary. New cracks appearing near the repair area during or shortly after soldering indicate excessive heat application that has weakened the surrounding metal or melted previously solid solder joints—reducing heat input, working more quickly, and using a smaller, more focused heat source prevents this problem.
Recurring leaks suggest either an incomplete initial repair (the leak was not properly identified or the joint was not fully sealed) or a fundamental problem with the radiator beyond the repaired area. Re-pressure testing identifies whether the original repair is holding or has failed. If the repair itself is sound but another leak has developed, the radiator may have systemic corrosion issues that make additional repairs impractical. Porosity in aluminum welds results from contamination or inadequate shielding gas coverage—ensuring the aluminum is clean (free from oil, dirt, and oxidation), using appropriate filler wire, and maintaining proper gas flow and torch positioning eliminates most porosity issues.
Developing radiator repair skills requires patience and acceptance of initial failures, as even experienced technicians describe learning processes that included numerous failures before achieving reliable results. Starting with low-stakes practice pieces (inexpensive damaged radiators purchased from scrap yards) and progressively working toward actual repairs allows skill development while minimizing the cost of learning experiences. Video resources from experienced practitioners provide visual demonstrations of techniques, and watching multiple perspectives on the same techniques helps identify variations in approach and develop understanding of the principles underlying successful repairs.
Leave a Reply