Nothing beats the satisfaction of stepping up to a squat rack you built yourself—especially when it handles 400 pounds without a single wobble. Commercial power racks often cost $500-$1,500, but with basic welding skills and the right approach, you can weld a squat rack that matches or exceeds store-bought quality for just $150-$300 in materials. The process demands intermediate welding ability and careful attention to structural details, but the payoff is equipment perfectly tailored to your space, lifting style, and budget. This guide cuts through the confusion to deliver precise, actionable steps for welding a squat rack that won’t fail when you’re under heavy weight.
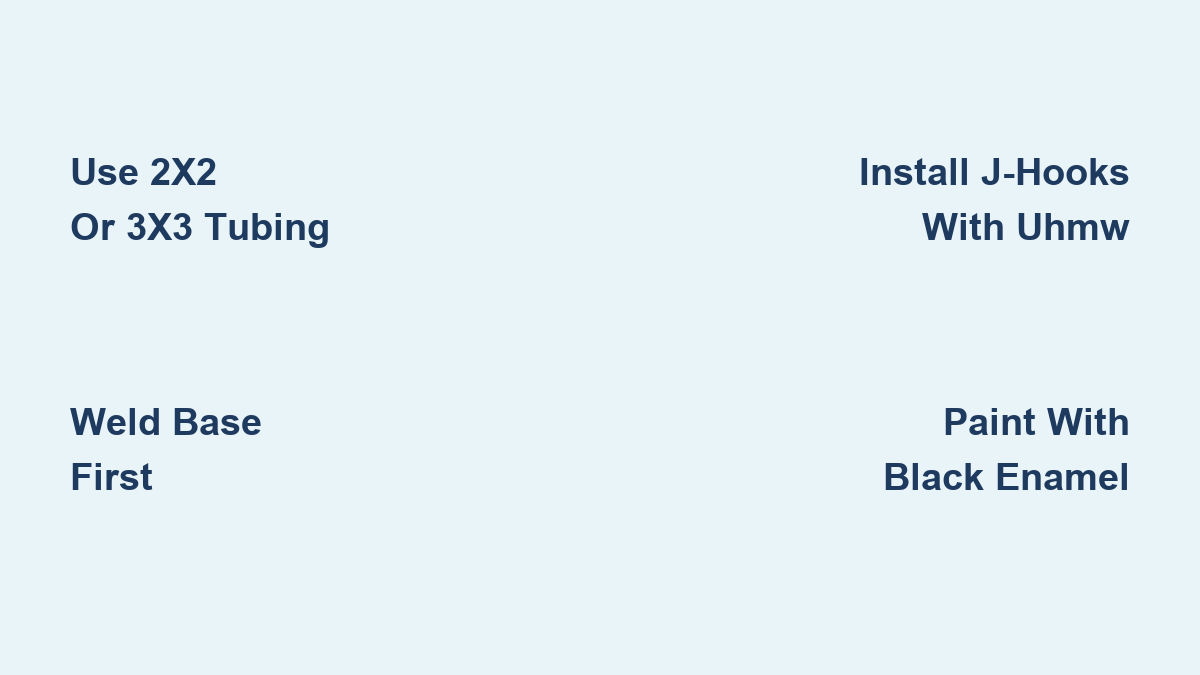
Choose 2×2 or 3×3 Steel Tubing for Maximum Stability
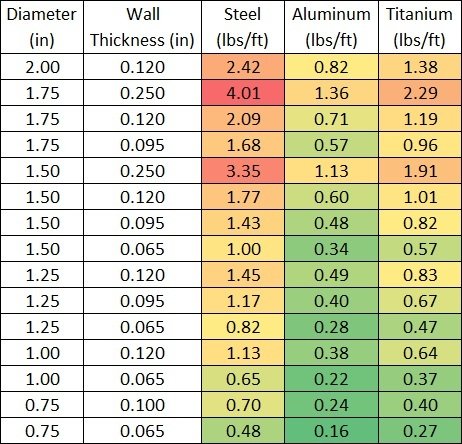
Your squat rack’s durability depends entirely on the steel tubing you select. Square hollow structural section (HSS) tubing delivers the ideal balance of strength, weldability, and cost for home gym builds. You’ll primarily choose between 2×2 inch and 3×3 inch square tubing, but wall thickness determines actual strength more than outer dimensions.
For 2×2 inch tubing, use minimum 11 gauge (0.120 inch) wall thickness for standard home use handling 300-500 pound loads. If you plan extreme lifting or want absolute rigidity, upgrade to 1/4 inch wall thickness—this builder chose it specifically because he wanted a rack solid enough to swing on the pull-up bar without worrying about tipping. The thicker wall also provides more material for weld penetration, forgiving minor technique errors.
For 3×3 inch tubing, 11 gauge represents the commercial standard used by brands like Elitefts. The larger profile increases bending resistance while keeping weight manageable. One builder using Elitefts specs noted his rack felt unstable until bolted to the floor, proving even robust designs need proper anchoring.
Critical Material Additions for Professional Results
Beyond main tubing, these components complete your build:
– Pull-up bar: Solid 1-inch round steel bar mounted over rack center
– J-hook lining: UHMW plastic strips to prevent steel-on-steel contact
– Structural bolts: Grade 5 or higher for any bolted connections
– Paint system: Metal enamel primer plus topcoat (black recommended)
Avoid Tubing Tolerance Surprises Before Cutting
Most first-time builders hit this snag: HSS tubing isn’t manufactured to consistent tolerances. One fabricator who sold 500 DIY racks emphasized he had to adjust designs to accommodate dimensional variations between suppliers. Pro tip: Buy all tubing from one supplier and measure actual dimensions before finalizing cuts—this prevents misaligned joints during assembly.
Determine Exact Dimensions for Your Space and Lifting Style
Standard sizing gets you close, but customization is your DIY advantage. Measure your space and lifting preferences before cutting a single piece.
Base Width and Depth: The Foundation of Functionality
- Width: Maintain 4-foot spacing between uprights to accommodate a 7-foot Olympic barbell with clearance
- Depth: Use 4 feet minimum for squats/benching; extend to 5 feet if deadlifting in the rack
- Critical mistake: Narrowing width saves space but restricts barbell movement during squats
Calculate Perfect Upright Height for Your Ceiling
Most residential ceilings measure 96 inches high. Subtract 8 inches for barbell clearance and headroom, leaving 88-inch uprights as the standard. Adjust based on your height—taller lifters need extra space for overhead movements. One fabricator designed all his racks to this specification after realizing users constantly hit their heads on improperly sized racks.
Optimize Hole Spacing for Precise Height Adjustments
Drill holes at 1-inch intervals in the bench press zone (18-40 inches high) for fine-tuned j-hook positioning. Use 1/2-inch diameter holes for 11 gauge steel uprights—they maintain structural integrity while accommodating standard hardware. Warning: Wider spacing (like 2-inch increments) forces uncomfortable height compromises during lifts.
Pick Your Welding Process: MIG Wins for Most Builders
Choosing the right welding method affects both build difficulty and final strength. Forget what you’ve heard about “professional-grade” TIG—your squat rack has different requirements.
Why MIG Welding Beats Other Methods for Squat Racks
MIG delivers the best balance of strength and accessibility for DIY builders. Multiple fabricators confirmed it provides more than adequate strength when penetration is sufficient. One builder put it bluntly: “MIG is better than arc welding for this purpose, and the welds don’t need to look pretty to function properly.” Set your machine correctly, maintain steady travel speed, and focus on achieving full penetration into the base metal.
Avoid TIG Welding Unless You Enjoy Unnecessary Pain
TIG produces beautiful welds but requires immaculate surface preparation. As one frustrated fabricator warned: “Unless you hate yourself, don’t make a steel rack with TIG because the metal must be very, very clean for good weld flow.” Mill scale and minor surface impurities common on structural tubing will ruin TIG welds.
Consider Stick Welding If You Prefer Control
Some experienced welders swear by stick for squat racks. One builder explained: “I personally prefer stick welding because I seem to pull the puddle better than with MIG.” Different rod types let you match filler metal strength to your project requirements. While MIG remains the top recommendation, stick works well if it’s your preferred method.
Cut and Prepare Steel with Precision Before Welding

Accuracy at this stage prevents headaches during assembly. The woodworking mantra “measure twice, cut once” applies doubly to expensive steel tubing.
Cutting Methods Compared: Saw vs. Plasma vs. Torch
- Metal saw: Cleanest cuts for precise fit-up (ideal for beginners)
- Plasma cutter: Fast with clean edges but requires skill (holes may not be perfect circles)
- Oxy-acetylene torch: Fastest but hardest to control—produces slag needing removal
One builder who used plasma cutting chose black paint specifically because it hides minor hole imperfections. Time-saver: Cut all identical pieces at once using a stop block for consistent lengths.
Deburring Is Non-Negotiable for Quality Welds
Sharp edges and slag interfere with proper fit-up and create safety hazards. Use a metal file or deburring tool on all cut ends—this takes seconds per piece but prevents major alignment issues. Critical step: Round sharp corners slightly to reduce stress concentrations during use.
Drill Perfectly Aligned Mounting Holes
Hole misalignment ruins j-hook functionality. One builder’s cheap drill press failed after three holes, forcing him to use a mill: “It made short work of the steel like a hot knife through butter.” Without a mill:
- Clamp uprights securely together
- Use transfer punches through existing templates
- Drill with sharp cobalt bits at slow speed
- Verify alignment with a long rod through corresponding holes
Weld the Base First for Unshakeable Stability
The base bears lateral forces when you rack heavy weights—it’s the most stressed part of your squat rack.
Tack Weld with Alignment Verification
Position base members on a flat surface and verify squareness before welding. Apply small tack welds at each joint, then recheck alignment with a framing square. Warning: Heat distortion can twist your base—catch misalignment at this stage before completing welds.
Complete Base Welds with Corner Reinforcement
Weld all around each joint with special attention to corners where stress concentrates. One builder noted: “The base primarily resists the legs trying to slide apart, so these welds experience more stress than you might expect.” Use multiple passes on critical joints rather than one heavy bead.
Install Uprights with Laser-Level Precision
Misaligned uprights cause wobbly j-hooks and uneven bar placement—a frustrating problem you can’t fix easily after welding.
Vertical Alignment Checklist
- Position uprights on base and check with spirit level on two adjacent faces
- Tack weld at base while helper holds upright perfectly vertical
- Recheck alignment after tacking—heat causes movement
- Verify equal height and width at top before final welding
One fabricator who sold hundreds of racks emphasized: “If your uprights aren’t perfectly vertical, your entire rack will feel unstable no matter how thick your tubing is.”
Add J-Hooks with UHMW Protection for Longevity
Bare steel J-hooks scratch uprights and create annoying noise during re-racking. The fix takes minutes but transforms user experience.
Build Professional J-Hooks in 3 Steps
- Cut steel hooks to desired depth (deeper = more secure)
- Line contact surfaces with 1/4-inch UHMW plastic strips
- Secure plastic with small bolts or rivets through pre-drilled holes
One builder upgraded his design after realizing: “My original J-hooks had no protection; it was just steel on steel.” UHMW lining reduces wear and makes re-racking smoother.
Apply Protective Finish That Hides Imperfections
Paint isn’t just cosmetic—it prevents rust in your humid gym environment. Skip this step and your rack will deteriorate within months.
Black Paint: The Smart Builder’s Choice
Multiple builders chose black enamel because it:
– Hides minor weld imperfections
– Masks plasma-cut hole irregularities
– Provides professional appearance
– Makes touch-ups less noticeable
Apply two thin coats rather than one heavy coat—this prevents runs and ensures even coverage. Allow full drying time between coats as specified by the manufacturer.
Your welded squat rack will serve for decades when built correctly. The solid feel comes from proper material selection, adequate weld penetration, and thoughtful design that distributes forces through the structure. Beyond the functional benefits, using equipment you created yourself adds significant psychological value to your training—every rep reminds you of the skills you developed and the confidence you earned building it. Whether you saved $500 or spent the same as buying commercial, you gained a rack built to your exact specifications and the satisfaction of something you made with your own hands.
Leave a Reply