When your trailer hitch fails at highway speeds, it transforms from a simple towing accessory into a deadly projectile capable of causing catastrophic accidents. Learning how to weld a trailer hitch correctly isn’t just about technical skill—it’s about understanding the life-or-death consequences of faulty welds. Unlike decorative welding projects, a trailer hitch must withstand extreme forces from acceleration, braking, and road vibrations while carrying hundreds or thousands of pounds of cargo. This guide cuts through the noise to deliver the specific techniques and critical safety considerations you need to weld a trailer hitch that won’t fail when it matters most.
Most DIY welders don’t realize that professional fabricators routinely refuse to weld hitches for others—not because they lack skill, but because the liability exposure is too great. A single catastrophic failure can result in lawsuits, medical expenses, and even criminal charges. If you’re considering welding your own hitch, you must accept full responsibility for the outcome. This isn’t a beginner project; it demands welding competence, proper equipment, and respect for the serious risks involved.
Why Trailer Hitch Weld Failures Cause Highway Disasters
Weld failures on trailer hitches rarely give warning signs before catastrophic separation. One documented case showed a trailer dragging 200 feet on its safety chains after the hitch failed at 65 mph—all because the weld appeared sound but had zero penetration into the base metal. This invisible defect occurs when welders focus on surface appearance while neglecting proper fusion at the joint root. The resulting weld holds minimal weight before failing completely under stress.
The legal consequences of hitch failures extend far beyond property damage. If you weld a hitch for someone else (even as a favor) and it fails, expect to face lawsuits regardless of payment. Courts consistently hold welders personally liable for damages from hitch failures, and homeowner’s insurance typically excludes coverage for vehicle modifications. Professional fabrication shops have explicit policies against hitch welding because they’ve already experienced the devastating financial impact of just one failure.
Select the Right Welding Process for Structural Integrity
Why Stick Welding Outperforms MIG for Hitch Applications
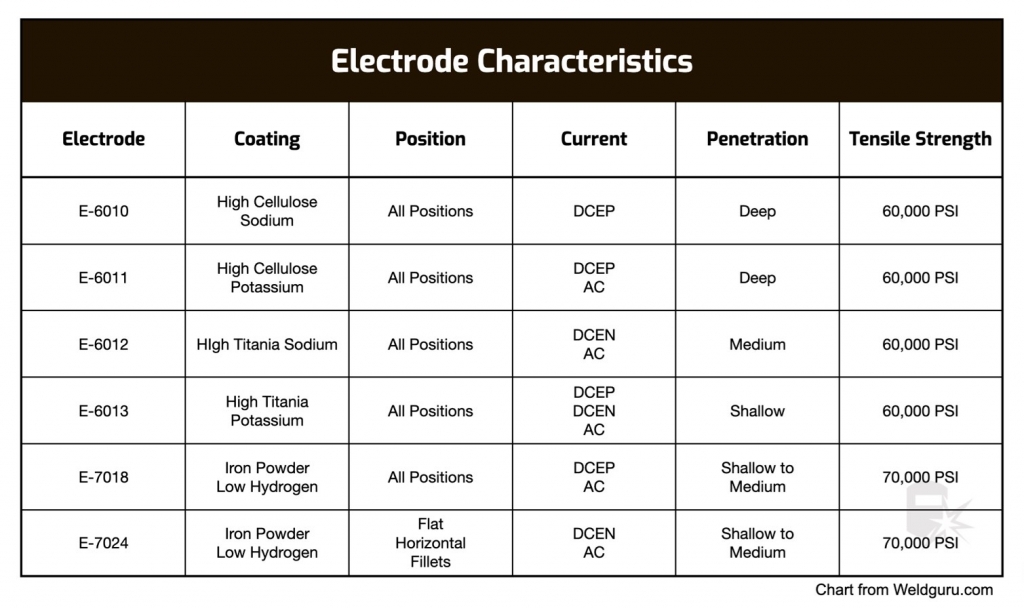
E6011 electrodes for root passes followed by E7018 for fill passes deliver the penetration needed for safety-critical hitch welding. While MIG offers cleaner appearance, stick welding provides superior penetration on dirty or painted surfaces and tolerates outdoor conditions where wind would disrupt MIG’s shielding gas. For class III hitches (up to 5,000 lbs), the deep, aggressive penetration of E6011 ensures complete joint fusion where other processes might leave unwelded zones.
MIG welding remains viable for controlled shop environments using ER70S-6 wire with 75% argon/25% CO2 gas mixture, but requires immaculate surface preparation. Never use stainless steel wire on mild steel hitches—the dissimilar metals create junctions prone to cracking and accelerated corrosion. Flux-cored wire provides a practical middle ground with deeper penetration than solid wire MIG and better outdoor performance.
Execute Proper Surface Preparation Before Welding
Remove All Contaminants to Prevent Hidden Defects
Clean both sides of the joint to bright bare metal using a grinding wheel or wire brush. Rust, mill scale, paint, oil, and grease all compromise weld integrity by creating porosity, reducing penetration, and establishing corrosion pathways. MIG welding is particularly sensitive to surface contaminants, making thorough preparation non-negotiable for structural applications.
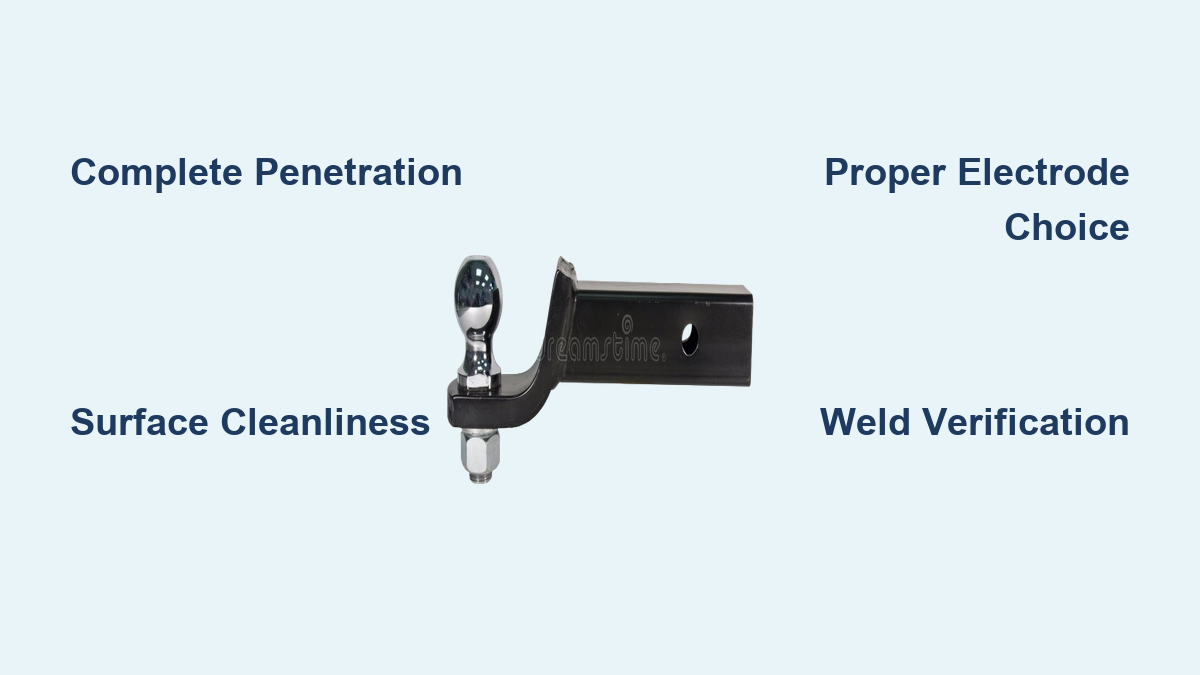
Joint fit-up requires equal attention—maintain minimal gaps (under 1/16 inch) to ensure complete penetration without excessive filler material. Use clamps or temporary tack welds to hold components in position, preventing distortion during welding. For receiver-style hitches, never weld directly on the receiver tube—heat distortion can prevent proper insertion of hitch accessories and create dangerous stress concentrations.
Apply Critical Welding Techniques That Prevent Failure
Achieve Complete Penetration with Proper Technique
Your weld must penetrate fully through the joint thickness—not just create surface buildup. Many hitch failures occur because welders deposit attractive surface beads while the underlying joint remains unwelded. To achieve proper penetration:
– Maintain appropriate travel speed (too fast = no penetration, too slow = burn-through)
– Keep consistent 70-80 degree drag angle with stick welding
– Use multiple passes rather than attempting single-pass fills
– Verify penetration by cutting test samples before final welding
Heat management prevents distortion on thin-walled hitch components. Use the lowest heat input that still achieves adequate penetration, and allow cooling between passes. Weld size directly affects strength—maintain proper throat dimension (shortest distance from root to face) with smooth, uniform profiles that avoid undercut or excessive convexity.
Identify and Avoid Costly Welding Mistakes

Common Errors That Compromise Hitch Safety
Inadequate penetration represents the most dangerous hitch welding mistake—it creates false confidence in seemingly sound welds that carry no actual load. Prevent this by:
– Performing root passes with deep-penetrating electrodes like E6011
– Cleaning between passes to ensure proper fusion
– Never trusting visual appearance alone for structural welds
Using incompatible materials ranks nearly as dangerous. Stainless steel wire on mild steel creates dissimilar metal junctions prone to cracking. Improper heat management causes distortion and weakened heat-affected zones. Neglecting surface preparation invites porosity that dramatically reduces weld strength. If you lack confidence in your ability to produce structurally sound welds, seek professional help—the consequences of failure are too severe for learning experiments.
Ensure Long-Term Hitch Durability Against Corrosion
Protect Your Welds from Environmental Damage
Proper weld profile prevents water pooling that accelerates corrosion. Smooth transitions without crevices allow moisture to drain rather than collecting at stress points. After welding, apply appropriate coatings to protect against road salt and moisture—pay special attention to weld toes where stress concentrations and environmental exposure combine.
Schedule regular inspections to catch developing problems before they become critical. Look for:
– Cracks radiating from weld toes
– Rust at weld/base metal junctions
– Distortion or deformation under load
– Loose mounting hardware
For frequent users, inspect after every 1,000 miles or 50 towing cycles. Address minor corrosion immediately before it compromises structural integrity.
When Professional Alternatives Outperform DIY Welding

Recognize When Not to Weld Your Own Hitch
Bolt-on modifications eliminate welding risks while providing customization. High-strength Grade 8 bolts with proper torque specifications and lock mechanisms often deliver safer, more reliable connections than field welds. Commercial hitch components manufactured under controlled conditions come with documented load ratings and quality control that DIY welding can’t match.
Professional installation services provide peace of mind through proper equipment, insurance coverage, and expertise. While costing more upfront, professional installation eliminates your liability exposure and ensures the hitch meets safety standards. If you’re welding for someone else, always recommend professional installation—the risks simply aren’t worth the potential reward.
Final Verdict on Welding Your Own Trailer Hitch
Welding a trailer hitch successfully requires proven competence, appropriate equipment, and complete respect for the consequences of failure. If you’re welding on your own vehicle where you accept all risk, use stick welding with E6011/E7018 electrodes, achieve complete penetration, and verify your work meets structural requirements. Never use a trailer hitch as a learning project—the stakes are too high when lives depend on your welds.
If you lack confidence in your welding skills, the only responsible choice is professional installation. Quality trailer hitch welding demands complete penetration, proper fusion, and sound technique throughout. Approach this work with appropriate seriousness, and you’ll create a hitch that performs safely for years. Approach it casually or without essential skills, and you create unacceptable risks for yourself and everyone on the road. When it comes to how to weld a trailer hitch, there’s no room for compromise—your welds must hold, every single time.
Leave a Reply