Acrylic welding stands as one of the most reliable methods for joining thermoplastic materials in fabrication projects ranging from aquarium construction to retail displays. Unlike simple adhesive bonding that merely sticks surfaces together, solvent welding chemically fuses acrylic pieces into a single, monolithic structure with strength approaching that of the original material. This comprehensive guide walks you through every aspect of acrylic welding, from selecting the right materials and solvents to executing professional-quality joints in your workshop.
Whether you’re building your first display case or constructing a water-tight aquarium tank, understanding the fundamental principles of acrylic welding ensures successful results. The process requires attention to detail at every stage—proper material selection, meticulous surface preparation, appropriate solvent choice, and correct clamping technique all combine to determine joint quality. With the right approach, you can create nearly invisible seams that maintain structural integrity for decades of service.
This guide covers both solvent-based welding techniques and heat bending methods, providing you with the complete skill set needed for any acrylic fabrication project. Each section builds on the previous one, creating a logical progression from foundational concepts to advanced techniques you can apply immediately.
Essential Acrylic Welding Fundamentals
Acrylic welding differs fundamentally from conventional gluing methods, and understanding this distinction proves essential before beginning any fabrication project. When you apply solvent cements to acrylic, you’re not simply creating a sticky connection between two surfaces. Instead, the solvent actually dissolves the bonding surfaces of both acrylic pieces, causing the materials to fuse together as the solvent evaporates. This molecular-level joining creates what fabricators call a “true weld”—a joint where the boundary between pieces effectively disappears.
The terminology surrounding acrylic joining often confuses beginners. When professionals refer to “gluing” acrylic sheeting, they’re describing this welding process, not using standard adhesives. This matters because the technique demands different preparation, materials, and skills compared to typical adhesive bonding. Standard wood glues, epoxies, and construction adhesives simply don’t work with acrylic because they create a separate bond layer rather than fusing the material itself.
Why Solvent Welding Creates Stronger Joints Than Adhesives
The strength advantage of solvent welding comes from the chemical process itself. As the solvent dissolves the acrylic surfaces, it creates a thin layer of liquid polymer that flows together across the joint. When the solvent evaporates, the polymer chains interlock across the entire joint area, creating a single continuous piece rather than two separate pieces held together with glue.
Pro Tip: Think of solvent welding like melting two ice cubes together—they become one solid piece as the melted water refreezes, not two cubes stuck together with syrup.
Acrylic responds predictably to both chemical solvents and controlled heat, giving fabricators two primary joining options. Solvent welding excels at creating transparent, strong joints between flat pieces, while heat bending allows you to form complex curves and angles before or after welding. The techniques complement each other, with most projects requiring both approaches at different stages. Aquariums, for example, need heat-formed curved corners joined to flat panels using solvent welding—a combination that produces both the necessary shape and the leak-proof seams that keep water contained.
Choose Cast or Extruded Acrylic

The fabrication characteristics of acrylic vary dramatically between cast and extruded varieties, and selecting the right material directly impacts your welding success. Cast acrylic is manufactured by pouring liquid polymer between glass plates, producing material with consistent properties throughout its thickness. Extruded acrylic forms by forcing molten polymer through rollers, making it less expensive but considerably more challenging to work with.
Why Extruded Acrylic Causes Welding Problems
Extruded acrylic presents several challenges that make it less suitable for critical welding applications. The material has a narrower working temperature range during both bending and welding operations, transitioning quickly from rigid to overly soft with less margin for error. When heated, extruded material demands precise timing—leave it in the heat source a moment too long, and it becomes unworkable; remove it slightly early, and it refuses to bend cleanly. Additionally, extruded acrylic is prone to stress cracking along bend lines and near sanded edges, with these cracks sometimes appearing days after your work initially looked perfect. Surface bubbles and burning become common problems when overheating occurs during any heating operation.
Why Professional Fabricators Prefer Cast Acrylic
Cast acrylic demonstrates superior fabrication characteristics that professional fabricators consistently prefer. The material cuts more cleanly with band saws operating at moderate feed rates, and edges can be smoothed without the stress cracks that plague extruded material. When machining cast acrylic on a lath, excellent finishes result from conventional metal cutting tools operated at high speeds with low feed rates and moderate depth of cut. Most importantly for welding applications, cast acrylic accepts solvent welding more predictably, producing joints of consistent strength and clarity every time.
Critical Consideration: For projects where joint reliability matters—and that’s virtually any functional application—investing in quality cast acrylic makes more economic sense than troubleshooting failures in cheaper material. Simple flat windows and basic bends might tolerate extruded material, but any project requiring reliable solvent welded joints benefits from premium cast acrylic. The age of stored acrylic also affects welding characteristics, with sheets that have been aged for extended periods potentially showing reduced solvent weld reliability, so using fresh material whenever possible improves your results.
Select Proper Solvents and Cements
The choice of solvent significantly affects both your welding process and the final joint characteristics. Common solvents for acrylic welding include chloroform, dichloromethane, and specialized commercial formulations sold under brand names like Weld-On and Tensol. Each option presents distinct handling properties and performance profiles that suit different applications.
Chloroform for Custom Acrylic Cement Formulation
Chloroform has a long history in acrylic fabrication and produces excellent results when handled properly. This solvent can be heated and used to dissolve powdered acrylic, creating a custom cement with predictable properties. Working with chloroform requires properly functioning fume extraction due to its potency and toxicity, but the results justify the precautions for serious fabrication work. Laboratory-grade chloroform produces the most consistent results for custom cement preparation.
Safety Note: Chloroform requires extreme caution—always use in well-ventilated areas with proper respiratory protection and never near open flames or heat sources.
Best Commercial Solvents for Different Applications
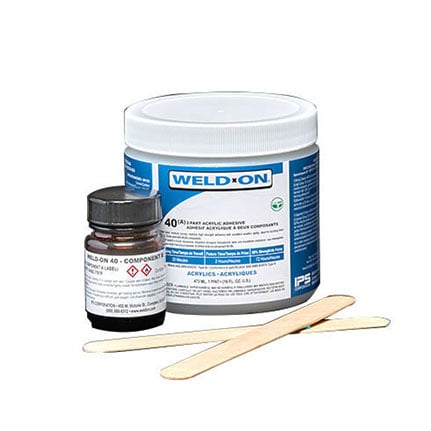
Commercial acrylic cements offer convenience and standardized performance that appeals to many fabricators. Weld-On 40 stands as a preferred choice among professional fabricators, particularly for demanding applications like aquarium construction. This two-part cement provides exceptional strength and gap-filling capability but demands greater skill to apply correctly than single-part alternatives. The product creates chemically welded joints suitable for applications involving water pressure and structural loads, with professional tank builders reporting thousands of successful installations without joint failures.
Tensol cement represents another professional-grade option available in formulations suited to different joint requirements. The liquid version relies on capillary action for tight-fitting joints, while the thicker formulation handles gaps up to one millimeter. Both variants produce true welded joints rather than simple adhesive bonds, and Tensol enjoys widespread use in educational and industrial settings where its predictable behavior is valued.
Weld-On 3 and 4 provide thinner formulations that penetrate tight joints effectively but may present challenges in vertical applications or when significant gap filling is required. These products work well for their intended purposes but require appropriate joint preparation and application technique to achieve optimal results. Beginners often find commercial cements with slower evaporation rates easier to work with, while experienced fabricators may prefer pure solvents for their versatility and control.
Prepare Surfaces for Welding
Proper surface preparation directly determines weld quality and joint strength, making this stage critical for successful acrylic fabrication. All mating surfaces must be completely clean and dry before applying any solvent cement, because contamination interferes with the welding process and creates weak spots in the finished joint.
Cleaning Acrylic Surfaces Before Welding
The cleaning process should remove dust, fingerprints, oils, and any other contaminants that might prevent intimate contact between the mating surfaces. Isopropyl alcohol or specialized plastic cleaners work effectively for removing fingerprint oils and light contamination. For heavier contamination, mild detergent solutions followed by thorough rinsing and complete drying prepare surfaces properly. Take care to inspect sheets for protective films before cleaning, as many sheets ship with paper or plastic films that must be removed completely before attempting any welding operation.
Achieving Perfect Edges for Capillary Welding
The quality of cut edges significantly affects welding success, particularly for joints relying on capillary action. Rough, angled, or damaged edges create gaps that weaken joints or prevent effective welding entirely. Proper edge preparation begins with cutting techniques that minimize damage—band saws with moderate tooth counts at slow feed rates produce cleaner cuts than aggressive cutting methods. Regardless of your cutting method, edges typically require some finishing before welding.
Router tables with straight flute bits provide the best edge preparation for welding applications. A half-inch spiral up-cut bit in a router table produces clean, square edges suitable for tight joints. The technique involves running the acrylic past the bit with consistent feed rate, removing a small amount of material to achieve the desired finish. Double-sided tape can hold panels together for identical processing of mating edges, ensuring that both surfaces of a joint match perfectly.
Table saws with plastic-cutting blades offer an acceptable alternative when router tables are unavailable. The blade should be sharp and designed specifically for plastics to minimize melting and chipping during cutting. Some fabricators apply Teflon spray or similar release agents to blades to prevent gum-up when cutting acrylic. Laser cutting, despite its precision for complex shapes, introduces heat stress that compromises edge quality for welding applications—professional fabricators strongly advise against welding laser-cut edges.
Apply Capillary Action Technique
The most common method of joining acrylic involves applying liquid solvent to the joint area and allowing capillary action to draw the adhesive into the gap between mating surfaces. This technique requires that joint surfaces fit together with minimal gap, as excessive separation prevents effective solvent penetration and weakens the resulting weld.
Step-by-Step Capillary Welding Process
- Clean all mating surfaces thoroughly to remove any dust, oils, or contamination that might interfere with solvent action
- Position the pieces in their final arrangement and clamp them to maintain alignment during welding
- Apply solvent along the joint line using a syringe, needle applicator, or fine brush, depending on joint configuration
- Allow capillary action to draw solvent into the gap between pieces (no additional pressure needed)
- Let the joint cure for at least 30 minutes before handling, with full strength developing over 24-48 hours
As the solvent contacts the acrylic surfaces, it begins dissolving the material at the molecular level. Capillary action draws the solvent-depleted acrylic and dissolved material into the joint gap, where it recombines as the solvent evaporates. This evaporation-precipitation cycle creates a fusion zone that chemically bonds the two pieces into a single structure. The process continues over time, with the joint achieving initial handling strength within minutes and full cure strength after 24 to 48 hours.
For tight-fitting joints, standard liquid solvent cements work effectively through capillary action alone. The solvent flows into the joint space and initiates welding without requiring external pressure beyond that needed to maintain contact between the surfaces. This simplicity makes capillary joining the preferred method for most applications, particularly where jigging or complex fixturing would be impractical.
Master Gap-Filling Methods
Situations frequently arise where joint gaps exceed the minimal tolerances that capillary action can bridge effectively. In these cases, gap-filling cement formulations provide the necessary body to create strong joints despite imperfect fitting.
Using Thickened Cement for Imperfect Joints
Thickened cements contain dissolved acrylic that fills gaps while the solvent component initiates welding at the interface. Tensol cement exemplifies this approach, available in both liquid formulations relying on capillary action and thicker, nearly gel-like consistencies capable of filling gaps up to one millimeter. The thicker formulation proves particularly valuable when joining pieces with slight dimensional variations or when achieving perfect mating surfaces proves impractical.
For larger gaps, some fabricators add acrylic dust collected from sanding operations to solvent cement, creating a custom fill material that matches the parent material exactly. This approach requires collecting sufficient dust from your specific material, but produces exceptional results when properly executed. The resulting cement holds reliably in demanding applications, with fabricators reporting successful bonds lasting years under stress.
Pro Tip: Create custom gap-filling cement by dissolving powdered acrylic from offcuts in dichloromethane or chloroform. This produces a cement that matches your material precisely, though it requires careful attention to ventilation and safety precautions.
Bend Acrylic with Heat Tools
Heat bending allows you to form acrylic into curves and angles before or after welding, enabling the complex shapes that many projects require. Several heating methods suit different scales and complexity levels, each with distinct advantages and limitations.
Strip Heater Bending for Precision Angles
Strip heaters provide the most controlled environment for bending acrylic to precise angles and radii. These devices create a narrow heated zone along the material’s length, softening the acrylic within a specific temperature range while leaving the surrounding material unaffected. Commercial strip heaters feature temperature controls and heating elements sized for common sheet thicknesses, creating a heated zone approximately 25 millimeters wide.
The bending process begins by positioning the acrylic sheet over the heated zone and allowing it to reach the appropriate temperature. Cast acrylic typically bends successfully at temperatures around 160-180°C, though the exact temperature depends on sheet thickness and specific material formulation. The sheet becomes pliable and can be lowered onto a former to achieve the desired radius or angle. Maintaining consistent pressure against the former during cooling ensures the bend retains its shape without distortion.
Alternative Bending Methods for Different Projects
Hot air guns provide portability for bending operations where strip heaters would be impractical. These tools deliver heated air to localized areas, softening the acrylic sufficiently for bending. The technique works well for small parts and simple bends but presents challenges for larger or more complex geometries. Cheap or basic hot air guns may produce inconsistent heating, with some areas reaching appropriate temperature while others remain too cool or overheat.
Domestic or industrial ovens provide an alternative approach for bending larger sheets or achieving complex curves. The technique involves placing the acrylic sheet over a former and heating the entire assembly until the acrylic softens sufficiently to conform to the former’s shape under gravity. This method works particularly well for large curved pieces, with the acrylic first flexing in various directions as it softens, then quite abruptly dropping to conform to the former shape.
Clamp and Cure Welded Joints
Maintaining proper alignment and pressure during the welding process requires appropriate clamping, and the clamping method must hold pieces securely without damaging the acrylic or interfering with solvent application. Understanding joint configurations and curing timelines ensures your welds develop full strength.
Best Clamping Methods for Different Joint Types
Different joint configurations serve different purposes, and selecting the appropriate configuration for your application improves results. Lap joints provide substantial bonding area and create strong connections for joining flat sheets, with the overlapping configuration distributing stress across a larger area than simple butt joints. Housing joints, where one piece accepts the edge of another into a groove, provide excellent strength and alignment assistance. Butt joints represent the simplest configuration but require the tightest tolerances for successful welding.
Masking tape serves as an effective clamping method for many applications, particularly for smaller pieces and when working with solvents that might damage other clamping materials. The tape applies even pressure across the joint while protecting adjacent surfaces from accidental solvent contact. Electric tape provides sufficient pressure for many applications while being easily removed after the initial set.
Purpose-built clamps designed for acrylic work provide more positive engagement and consistent pressure. These clamps typically feature padded jaws to prevent marking the acrylic surface and adjustable pressure to avoid crushing the material. The investment in appropriate clamps pays dividends in improved results and reduced frustration.
How Long to Wait Before Handling Welded Acrylic
Solvent-welded joints achieve initial strength relatively quickly but require extended curing time for full development of mechanical properties. Initial handling strength typically develops within 30 minutes of solvent application, allowing pieces to be moved without disturbing the joint. At this stage, the joint appears solid but has not yet achieved full strength and should not be subjected to significant stress. Full cure strength develops over 24 to 48 hours, depending on the specific solvent used, environmental conditions, and the dimensions of the joint.
Critical Timing: For aquariums or other water-holding applications, wait a full 48 hours before testing for leaks to ensure complete solvent evaporation and maximum joint strength.
Follow Critical Safety Practices
All acrylic welding operations produce fumes that require appropriate ventilation to protect your health. Solvent vapors can cause respiratory irritation, and prolonged exposure to certain solvents presents more serious health risks that demand respect and proper precautions.
Essential Ventilation Requirements for Acrylic Welding
Fume extraction systems provide the most effective protection, removing vapors directly from the work area before they can accumulate. Laboratory fume hoods work excellently for small-scale operations, while larger fabricators may install dedicated extraction systems at their workbenches. When dedicated extraction is unavailable, working in well-ventilated areas reduces exposure to hazardous concentrations.
The specific ventilation requirements depend on the solvents you use, with more potent solvents demanding more rigorous protection. Chloroform and dichloromethane particularly require careful handling in well-ventilated spaces, with some fabricators noting that cigarette smokers should be excluded from the area due to interactions between solvent vapors and tobacco smoke.
Personal Protective Equipment Every Welder Needs
Direct contact with solvent cements can cause skin irritation and should be avoided through appropriate protective measures. Nitrile gloves provide good resistance to most acrylic solvents while allowing sufficient tactile sensitivity for detailed work. Changing gloves regularly prevents solvent penetration through the glove material that can occur with extended contact.
Many acrylic solvents present fire and explosion hazards that require appropriate precautions. The solvents are typically flammable, and their vapors can accumulate to explosive concentrations in enclosed spaces. Keeping all welding solvents away from heat sources represents the most fundamental safety precaution, including not only obvious sources like open flames and heating elements but also electrical equipment that might produce sparks.
Troubleshoot Common Welding Problems
Even experienced fabricators encounter welding problems occasionally, and recognizing the causes enables quick correction. The most common issues include bubble formation, weak joints, and edge flaring during bending.
How to Fix Bubbles in Acrylic Welds
Bubbles in welded joints typically result from either solvent application technique or material overheating. Solvent applied too quickly or in excessive quantities can become trapped within the joint as it wicks between the mating surfaces, creating bubbles as it evaporates. Applying solvent slowly and in appropriate quantities prevents this type of bubble formation. Overheating during either pre-weld preparation or bending operations causes decomposition of the acrylic, releasing gases that form bubbles within the material.
Why Your Acrylic Joints Are Failing and How to Strengthen Them
Joints that fail under stress usually result from contamination, poor fit, or inappropriate solvent selection. Contamination at mating surfaces prevents the solvent from properly dissolving the acrylic and creating a true weld. Even seemingly clean surfaces may have invisible contamination that affects joint strength. Gaps between mating surfaces prevent effective capillary action and leave the joint dependent on gap-filling cement rather than true welding.
The tendency of heated acrylic edges to flare outward creates problems when forming tubes and other closed shapes. When acrylic heats, the molecular structure relaxes and the material expands, with expansion most pronounced at the edges where stress from original manufacturing is released. The solution involves forming pieces slightly longer than final dimensions and trimming the expanded ends after cooling.
Extend Acrylic Lifespan
Proper maintenance extends the service life of welded acrylic assemblies significantly. Understanding stress crack prevention and appropriate cleaning techniques keeps your projects looking and performing their best for years.
Preventing Stress Cracks in Welded Acrylic
Acrylic is susceptible to stress cracking when exposed to certain chemicals or conditions, particularly at points where stress concentrations exist. The primary prevention strategy involves minimizing residual stress in the material through proper handling and processing. Rapid cooling after bending, excessive clamping pressure, and machining damage can all introduce stresses that later develop into cracks. Careful attention to processing techniques reduces the likelihood of stress-related failures.
Proper cleaning maintains appearance and integrity of welded acrylic assemblies. Microfiber cloths and mild soap solutions effectively clean acrylic without scratching or damaging the surface. Abrasive cleaners, paper towels, and rough cloths should be avoided as they create scratches that accumulate over time and degrade optical clarity. Solvent cleaning of welded joints requires caution, as some solvents can attack the joint material and weaken the weld.
With proper technique and appropriate materials, welded acrylic assemblies provide decades of reliable service. The key lies in respecting the material’s characteristics throughout the fabrication process—from initial selection through final assembly. Whether you’re creating functional equipment or decorative pieces, the principles outlined in this guide provide the foundation for successful acrylic welding projects of any scale.
Leave a Reply