When your brass project develops a crack or needs assembly, knowing how to weld brass properly separates amateur attempts from professional results. This copper-zinc alloy demands special techniques because zinc vaporizes at 907°C (1665°F), creating toxic fumes and porous, weak welds if mishandled. Unlike steel or aluminum welding, brass requires precise heat control to prevent zinc burn-off while achieving proper fusion. This guide reveals exactly how to weld brass safely and effectively using common workshop equipment, whether you’re repairing a plumbing fitting or creating decorative brass artwork.
The secret to successful brass welding lies in managing that narrow temperature window between proper melting (900-940°C) and destructive zinc vaporization. Without proper technique, you’ll face dangerous fumes, brittle joints, and unsightly porosity that compromises structural integrity. By following these proven methods and safety protocols, you’ll create brass welds that match the base metal’s appearance and strength while protecting your health from zinc oxide exposure.
Why Zinc Vaporization Creates Dangerous Fumes During Brass Welding
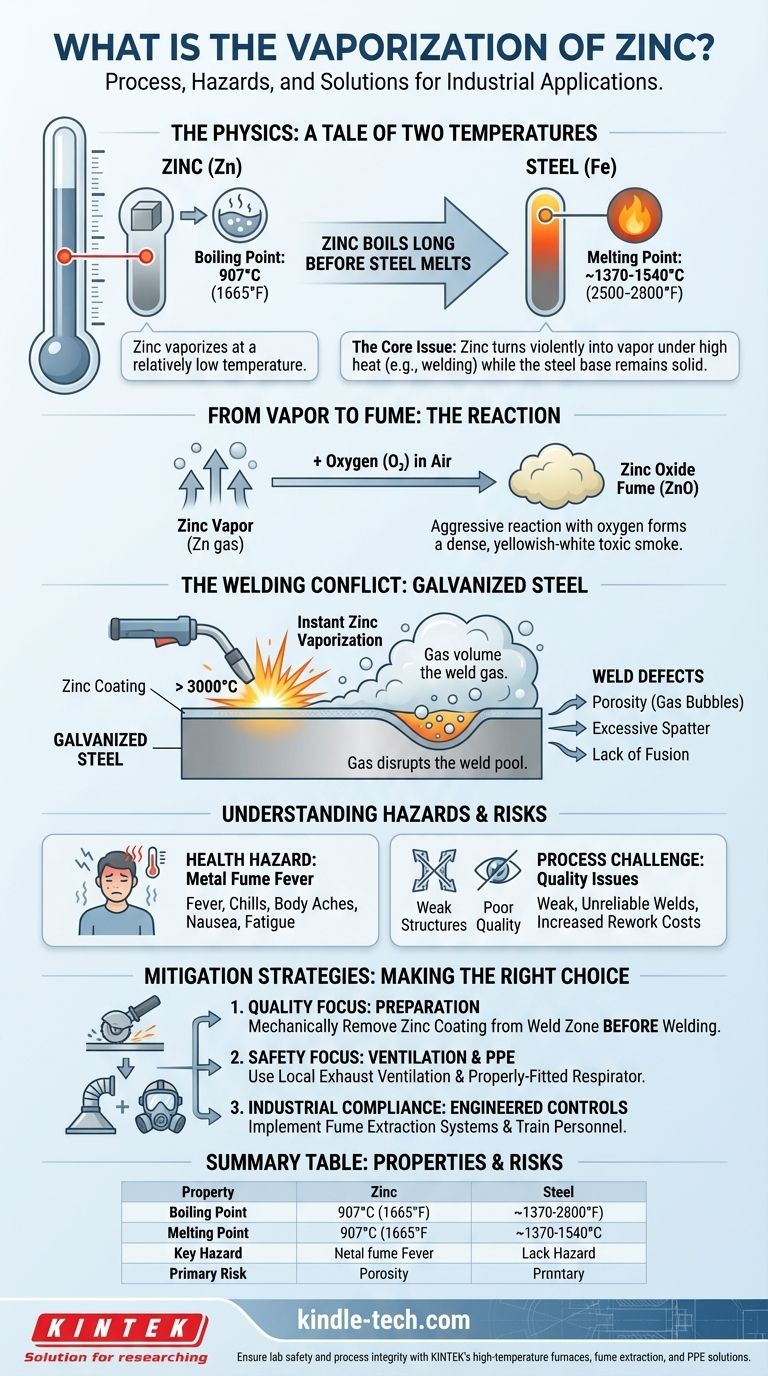
Attempting to weld brass without understanding zinc’s low boiling point guarantees failure and health risks. As your torch or arc heats brass past 907°C, zinc begins vaporizing immediately, creating a visible blue-white smoke that contains toxic zinc oxide particles. These particles cause metal fume fever—a condition with flu-like symptoms including chills, fever, nausea, and respiratory distress that typically appears 4-12 hours after exposure. While symptoms usually resolve within 24-48 hours, repeated exposure leads to permanent lung damage and neurological issues.
Recognizing metal fume fever symptoms immediately prevents serious health complications. If you experience metallic taste in your mouth, headache, or fever within hours of welding brass, stop work immediately and move to fresh air. Drink plenty of fluids and monitor symptoms—seek medical attention if breathing difficulties develop. Never ignore early symptoms, as repeated exposure builds tolerance while causing cumulative damage to your respiratory system.
Setting up proper ventilation for toxic zinc fume removal isn’t optional—it’s mandatory for brass welding. Position a fume extractor within 6-12 inches of your welding arc to capture fumes before they enter your breathing zone. For enclosed spaces, use a dedicated ventilation system rated for 2,000+ cubic feet per minute with HEPA filtration. Open workshop doors and windows create cross-ventilation but provide insufficient protection alone—always combine natural airflow with mechanical extraction when welding brass.
Essential Safety Gear for Welding Brass Without Health Risks

Skipping proper safety equipment when welding brass risks immediate and long-term health consequences. Unlike welding steel, brass demands specialized protection against zinc fumes that standard welding gear doesn’t address. Your respiratory system requires specific filtration to capture microscopic zinc oxide particles that penetrate standard dust masks.
Selecting the right respirator for zinc fume protection determines your safety during brass welding. Use a half-face respirator with P100 particulate filters and organic vapor cartridges rated for metal fumes (look for NIOSH approval code “OV/AG/P100”). Check filter expiration dates monthly—saturated cartridges provide zero protection. For production work exceeding 30 minutes, upgrade to a powered air-purifying respirator (PAPR) that delivers constant clean air through a hood system.
Choosing flame-resistant clothing that won’t melt near brass completes your safety ensemble. Wear 100% cotton or leather welding jackets without synthetic linings that melt onto skin when exposed to brass spatter. Cover all exposed skin with long sleeves and pants—zinc fumes cause skin irritation through contact. Specialized welding gloves with extended cuffs protect wrists from both heat and fume exposure during brass welding projects.
Preparing Brass Surfaces for Flawless Weld Penetration
Surface preparation makes or breaks your brass welding results—more so than with other metals. Any contamination on brass surfaces causes severe porosity because zinc vapor combines with impurities to create gas pockets trapped in solidifying weld metal. Clean joints are non-negotiable for strong, aesthetic brass welds.
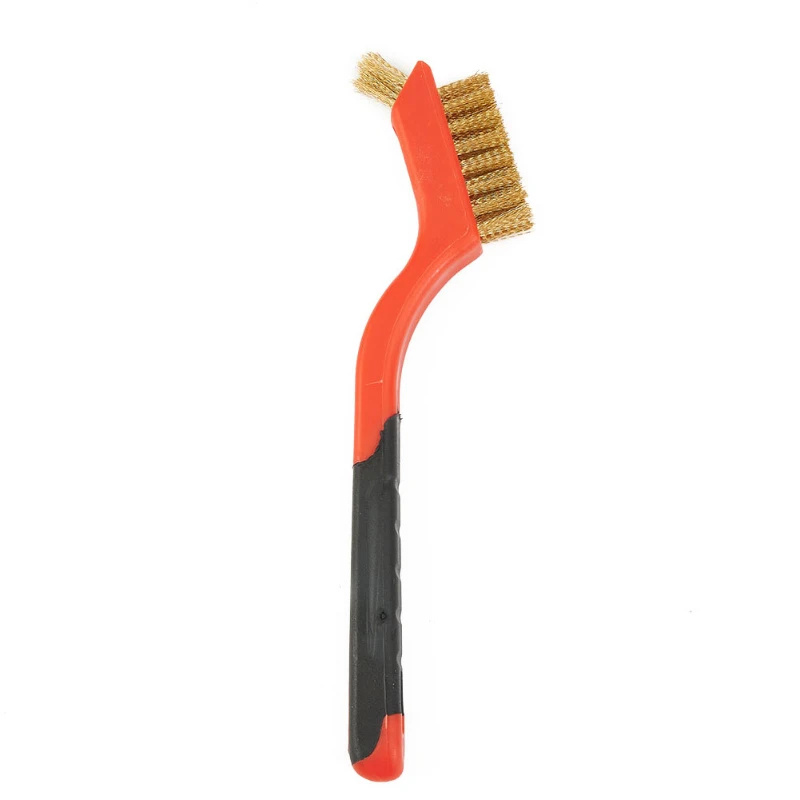
Removing oxidation without contaminating the joint area requires specific techniques. Use a dedicated stainless steel wire brush (never carbon steel) to scrub joint surfaces until bright metal appears. Follow with acetone wipe to remove oils, then immediately apply flux for torch welding or proceed directly to welding for TIG/MIG processes. Never touch cleaned surfaces with bare hands—skin oils compromise weld integrity on brass.
Setting up perfect joint fit-up to prevent porosity follows surface cleaning. Brass requires tighter tolerances than steel due to its lower thermal conductivity. Hold pieces with clamps or tack welds so gaps don’t exceed 10% of material thickness. For thin brass sheets under 1/8 inch, use copper backing bars to conduct heat away from the joint and prevent burn-through during welding.
Torch Welding Brass with Oxy-Acetylene: Complete Procedure
Oxy-acetylene welding remains the most accessible method for hobbyists welding brass, especially for repairs and small projects. This process provides precise heat control crucial for managing zinc vaporization while creating strong, leak-proof joints in plumbing fixtures and decorative items.
Selecting the correct tip size for your brass thickness prevents common welding failures. Use a #1-3 tip for thin brass under 1/8 inch, #4-6 for medium thickness (1/8-1/4 inch), and larger tips for heavy sections. Test on scrap brass first—proper flame size creates a small, defined weld pool without excessive spatter or blue-white smoke indicating zinc burn-off.
Applying flux properly to stop zinc oxidation during welding follows joint preparation. Dip your brass welding rod (BZn-3 or BZn-5) into flux powder before each pass, or apply paste flux with a small brush. Maintain a neutral flame (equal oxygen and acetylene) held at 45 degrees to the work surface. Feed the rod into the leading edge of the molten pool while moving steadily—never stop moving the torch, as stationary heat causes immediate zinc vaporization and porosity.
TIG Welding Brass: DC Settings and Technique for Clean Results
TIG welding produces the highest quality brass welds with minimal distortion, making it ideal for precision work and thin materials. This process gives you complete control over heat input—the critical factor in preventing zinc loss while achieving proper fusion in brass components.
Choosing the right tungsten electrode for brass welding affects arc stability and weld quality. Use 2% lanthanated tungsten (gold tip) ground to a 1/8 inch point for most brass applications. Never use thoriated tungsten due to radioactive concerns when welding zinc-containing metals. For thicker brass over 1/4 inch, blunt the tip slightly to 1/4 inch for greater heat input without sacrificing control.
Maintaining proper arc length to prevent zinc burn-off separates successful brass TIG welds from failures. Keep arc length equal to tungsten diameter (typically 1/16 inch) and use DC electrode negative polarity. Feed silicone bronze rod (ERCuSi-A) continuously into the leading edge of the weld pool while moving at steady speed—too slow causes excessive zinc vaporization, too fast creates cold laps. Shielding gas flow should be 15-20 CFH of pure argon with a #6-8 cup for adequate coverage.
MIG Welding Brass with Silicone Bronze Wire: Production Method
MIG welding brass using silicone bronze wire delivers the fastest, most consistent results for production work and larger projects. This method minimizes zinc fumes while producing strong, ductile welds that resist cracking—ideal for fabricating multiple brass components efficiently.
Why 100% argon is mandatory for MIG welding brass relates to weld chemistry. CO2 or mixed gases cause excessive spatter and oxidation when welding brass, creating porous, brittle joints. Pure argon provides stable arc transfer with silicone bronze wire (0.030-0.035 inch diameter), producing smooth, clean beads with minimal cleanup. Never substitute shielding gases—this single factor determines MIG brass welding success.
Adjusting voltage for optimal silicone bronze wire performance follows material thickness. Start with 16-18 volts and 200-250 inches per minute wire feed speed for 1/8 inch brass. Increase voltage 1-2 volts per 1/16 inch thickness increase. Push technique (10-15 degree angle) produces better results than pull technique on brass. Maintain 3/8 inch stick-out and travel speed that keeps weld pool size consistent—too slow creates zinc vaporization, too fast causes lack of fusion.
Fixing Common Brass Welding Failures in Under 5 Minutes
Even experienced welders encounter problems when welding brass due to its narrow working temperature range. Recognizing and correcting these issues immediately saves time and prevents wasted materials on failed welds.
Repairing porous welds caused by excessive heat input requires grinding out the defective section completely. Clean the area thoroughly with stainless steel brush, then reweld using 15-20% less heat input. For TIG welding, increase travel speed; for MIG, reduce voltage; for torch welding, use smaller tip and neutral flame. Add a slight back-step motion to allow brief cooling between weld segments on thicker brass.
Eliminating blue-white smoke during brass welding indicates immediate zinc vaporization. Reduce heat input immediately by lowering amperage (TIG), voltage (MIG), or flame size (torch). Increase travel speed while maintaining proper penetration. For torch welding, ensure you’re using neutral flame—not oxidizing. On thick brass, preheat to 300-400°F to reduce thermal shock but never exceed 500°F, which accelerates zinc loss.
Post-Weld Cleaning Process for Professional Brass Finish
Proper post-weld treatment preserves your brass project’s appearance and structural integrity. Skipping these steps leaves corrosive residues that eventually eat through your carefully created welds, especially on plumbing or outdoor applications.
Removing corrosive flux residue after torch welding prevents long-term joint deterioration. While still warm (not hot), scrub weld area with stainless steel brush, then soak in 50% vinegar/water solution for 10 minutes. Rinse thoroughly with clean water and dry immediately. Repeat if white flux residue remains visible—this step is critical for brass plumbing components exposed to moisture.
Achieving mirror finish on welded brass surfaces completes professional results. Start with 120-grit sandpaper to remove weld crown, progressing through 220, 400, and 600 grits. For highest polish, use rouge compound on buffing wheel at 1,800 RPM. Always buff in direction of weld for seamless appearance. For decorative pieces, consider chemical dip treatment to restore uniform brass color across the entire piece after mechanical finishing.
Leave a Reply