Your MIG welder works perfectly on thick steel, but turns exhaust pipes into swiss cheese. You’re not alone—thin-walled exhaust tubing (typically 0.035″ to 0.065″) burns through with standard settings, while rust, galvanizing coatings, and awkward under-vehicle positions complicate every repair. This guide reveals the exact techniques professional exhaust shops use to create leak-proof welds on thin tubing. You’ll learn specific machine settings, proven welding methods that prevent burn-through, and clever positioning tricks for working under cars. By the end, you’ll weld exhaust pipes with confidence, saving hundreds compared to professional repairs while achieving durable, professional results.
The secret to successful exhaust pipe welding lies in understanding that standard MIG techniques for thicker materials fail catastrophically on thin tubing. What works on 1/8″ steel creates holes in exhaust pipe. With the right approach—proper equipment settings, meticulous preparation, and specialized heat management techniques—you can consistently produce strong, leak-free welds. We’ve distilled decades of professional exhaust welding experience into this practical guide, focusing exclusively on techniques that deliver results for DIYers and hobbyists.
Why Your MIG Welder Burns Holes in Exhaust Pipes (and How to Stop It)
Standard MIG settings overwhelm thin exhaust tubing because they deliver too much heat too quickly. Most entry-level machines have minimum settings around 60-65 amps—perfect for thicker materials but disastrous for delicate exhaust work. The solution requires four critical adjustments: lower amperage (25-40 amps), smaller wire diameter, reduced wire stick-out, and shorter weld times. Machines like the Clarke MIG 100E, 155, and 160E excel at exhaust work because they maintain stable arcs at these low settings, unlike cheaper flux-core-only models that become erratic when turned down.
Optimal Amperage Settings for Different Exhaust Thicknesses
Your exhaust tubing’s wall thickness determines the precise settings you need:
– 0.035″ aluminized tubing: 25-30 amps, .023″ wire
– 0.049″ standard exhaust: 30-35 amps, .023″ wire
– 0.065″ header tubing: 35-40 amps, .023″ or .030″ wire
Always test settings on scrap material first—exhaust tubing varies significantly between manufacturers. Listen for the “sizzle” sound of proper fusion rather than the “pop” of burn-through. If you see blue sparks shooting through the back of your weld, immediately reduce voltage or increase travel speed.
Critical Wire Stick-Out Adjustment for Thin Metal
Maintain wire stick-out of 3/8″ or less when welding exhaust pipes—significantly shorter than the 5/8″ used for thicker materials. This reduces electrical resistance in the wire, concentrating heat precisely at the weld pool rather than spreading it across the base metal. Use a marker to draw a reference line on your welding gun showing the ideal stick-out length. If your welds consistently burn through despite correct voltage settings, this simple adjustment often solves the problem.
.023″ vs .030″ Wire: Which Is Better for MIG Welding Exhaust Systems?
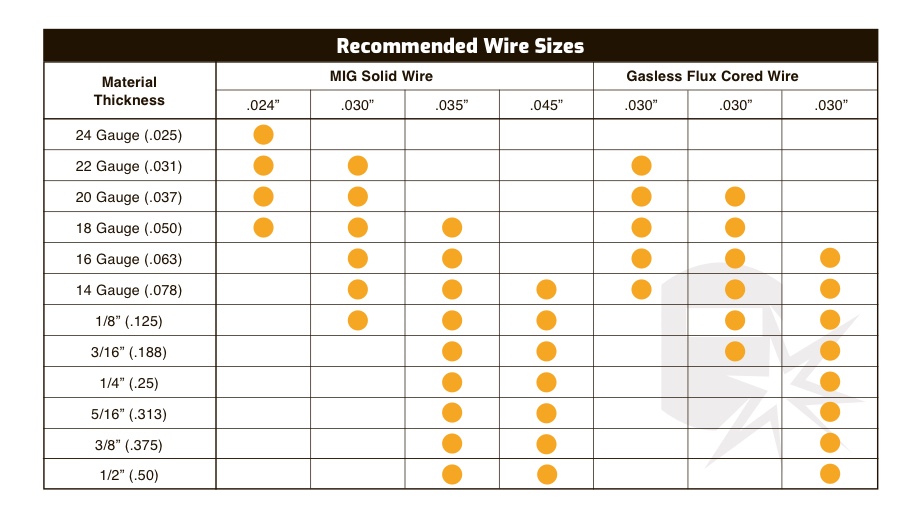
The wire diameter you choose makes or breaks your exhaust welding success. .023″ wire is overwhelmingly recommended by professional exhaust welders for standard 0.035″-0.049″ tubing. Its smaller diameter allows precise heat control—you can deposit tiny amounts of filler material without overwhelming the thin base metal. While .030″ wire works for slightly thicker header tubing, it requires near-perfect technique on standard exhaust pipes and frequently causes burn-through for beginners.
Gas Mixtures That Prevent Porosity in Exhaust Welds
Use ER70S-6 wire with 75% argon/25% CO2 (C25 mix) for most exhaust work. This combination provides deep enough penetration while minimizing spatter compared to pure CO2. If you’re welding galvanized or aluminized tubing, grind away the coating from the weld zone first—no gas mixture prevents zinc fume hazards or fusion problems caused by these coatings. Never use pure argon for steel exhaust work; it creates an unstable arc that increases burn-through risk on thin materials.
Complete Exhaust Pipe Prep: Removing Rust and Galvanizing Safely

Skipping proper preparation guarantees weld failure. Rust, oil, and galvanizing create porosity and prevent fusion. For used exhaust components, aggressively clean both inside and outside of pipe ends using a die grinder with a sanding cone or flap disc—extend cleaning 1/2″ beyond the weld zone. Pay special attention to the inside diameter where rust accumulates; failure to clean this area causes leaks that appear weeks after your repair.
Galvanized Pipe Safety Protocol Before Welding
Galvanized exhaust tubing requires special handling:
1. Grind away zinc coating from entire weld zone (1/4″ beyond joint on all sides)
2. Clean both inside and outside surfaces where possible
3. Work in well-ventilated area—outdoors is ideal
4. Wear a P100 respirator rated for metal fumes
5. Never weld galvanized without proper protection—zinc fumes cause metal fume fever
Skip this step and you’ll get weak, porous welds while risking serious health consequences. Aluminized tubing requires similar preparation but produces less hazardous fumes.
Step-by-Step Stitch Welding for Exhaust Pipes: No Burn-Through Guarantee
Stitch welding (spot tacking) is the single most reliable technique for MIG welding exhaust pipes, especially on vehicles. This method deposits small, controlled tacks around the pipe circumference rather than attempting a continuous bead, minimizing heat buildup that causes burn-through.
How to Execute Perfect Exhaust Pipe Stitch Welds
- Position gun at 15-degree angle to pipe surface
- Pull trigger for exactly 1 second to deposit small, flat tack
- Move 180 degrees around pipe and repeat
- Continue alternating sides until pipe is fully tacked
- Overlap each new tack by 50% to ensure continuity
Practice trigger timing on scrap material first—most beginners weld spots too long. The ideal tack should show slight penetration on the backside without creating a hole. For rusty or thin sections, allow 15-20 seconds between tacks for cooling.
Emergency Fix: Repairing Burn-Through Holes in Exhaust Tubing
Burn-through happens even to experienced welders. When it occurs:
1. Immediately stop welding and let area cool completely
2. Clean hole edges with wire brush
3. Use smaller wire diameter if available (.023″ instead of .030″)
4. For small holes (<1/8″), continue stitch welding pattern through hole
5. For larger holes, cut out damaged section and replace with new pipe
Never try to fill a burn-through hole with excessive weld metal—that just creates more heat and worsens the problem. If replacing a section, design your new joint as a slip fit (one pipe inserted into another) rather than a butt joint—this provides double material thickness at the weld point.
Mirror Trick: Welding the Top of Exhaust Pipes While Under Your Car

Welding overhead on vehicle exhaust requires clever positioning solutions. The most effective method uses a small inspection mirror:
1. Epoxy a small magnet to mirror back
2. Position mirror to reflect top of pipe while you’re underneath
3. Weld while watching the mirror image
4. Start with practice welds on scrap to adjust to reversed image
Alternatively, develop “feel” welding by positioning the gun based on reference points like pipe seams. Rest the gun nozzle lightly on the pipe edge and “ride” it around the circumference. This takes practice but works when mirrors aren’t practical.
Soapy Water Test: Finding Hidden Leaks in Your Exhaust Welds
Visual inspection alone misses many exhaust leaks. Perform this definitive test:
1. Mix dish soap with water in spray bottle
2. Start engine and let idle
3. Spray soapy water on all welds
4. Watch for bubble formation indicating leaks
For critical applications, pressurize the system with 5-10 PSI compressed air while submerged in water—this reveals even microscopic leaks. Repair any leaks by grinding out defective section completely before rewelding. Never try to weld over existing bad welds.
Zinc Fume Danger: Essential Safety Steps for Galvanized Exhaust Welding
Welding galvanized exhaust without protection risks metal fume fever with flu-like symptoms that appear hours after exposure. Always:
– Remove zinc coating from weld zone first
– Work outdoors or with strong ventilation
– Wear a P100 respirator (N95 masks don’t protect against metal fumes)
– Never weld near fuel tanks—even “empty” tanks contain explosive vapors
Keep a fire extinguisher nearby when welding on vehicles. Wrap heat-sensitive components with wet rags to prevent melting. Wear full protective gear including a welding cap under your helmet to catch spatter.
MIG vs TIG for Exhaust: Cost, Speed, and Quality Comparison

While TIG produces cleaner-looking welds, MIG remains the practical choice for most DIYers:
– MIG advantages: Faster, easier to learn, lower equipment cost ($200-$400 vs $800+ for TIG)
– TIG advantages: Better heat control on ultra-thin materials, no spatter, superior appearance
– Verdict: Stick with MIG for exhaust repairs—master stitch welding technique before considering TIG
For home welders, investing in proper MIG technique delivers better results than upgrading to TIG. The stitch welding method produces exhaust joints strong enough for daily driving while being significantly more accessible to beginners.
Exhaust pipe welding rewards patience and proper preparation. Take time to clean materials thoroughly, verify settings on scrap first, and execute each tack with precision. The relatively low-stress nature of exhaust systems allows you to develop skills without catastrophic consequences for minor errors. With these techniques, you’ll create professional-quality exhaust welds that last for years—saving significant money while gaining valuable welding skills. Remember the golden rule: when in doubt, use less heat and more tacks. Your exhaust system will thank you with leak-free performance.
Leave a Reply