You’ve found a broken gold chain or a damaged heirloom piece and wondered, “How to weld gold?” While true welding isn’t practical for precious metals, mastering gold soldering—the professional technique jewelers use to join gold pieces—gives you the power to repair and create stunning jewelry at home. Unlike steel or iron welding where base metals melt together, gold requires specialized soldering using a lower-melting-point filler metal that bonds components without damaging your valuable pieces. This precise process creates nearly invisible joints that maintain the integrity and beauty of your gold items. Whether you’re fixing a family heirloom or crafting your own designs, understanding how to weld gold (properly called soldering in jewelry work) saves hundreds in repair costs while giving you creative freedom most people never experience.
The confusion between welding and soldering causes countless beginners to damage valuable gold pieces. True welding melts the base metal itself—a dangerous approach for gold that often results in melted, pitted, or ruined jewelry. Professional jewelers exclusively use soldering for gold work because it offers precise control while preserving the metal’s value. By the time you finish this guide, you’ll know exactly why soldering—not welding—is the correct technique, what tools you actually need (no expensive welding rig required), and step-by-step methods to create strong, seamless joints that look professional. Let’s transform your understanding of how to weld gold into practical skills you can use immediately.
Why Gold Soldering Beats Traditional Welding
Gold’s unique properties make standard welding techniques disastrous for jewelry repair. With a melting point of 1,947°F (1,064°C), gold requires extreme precision—too little heat won’t create a bond, while excessive heat melts your entire piece into an unrecognizable blob. Professional jewelers avoid true welding because gold doesn’t conduct heat evenly like silver, causing localized hot spots that ruin intricate designs. Soldering solves this problem by using a specialized gold alloy with a lower melting point that flows into joints without melting the base metal.
Critical distinction: Gold soldering uses capillary action to draw molten solder into microscopic gaps between pieces, creating bonds stronger than the original metal when done correctly. This technique preserves your gold’s value while allowing repairs impossible with welding. The solder’s melting point must sit precisely between your gold’s annealing temperature and melting point—typically 100-200°F lower than the base metal. For example, 14k gold melts at 1,605°F, so its matching solder flows around 1,550°F. This narrow window demands proper technique but becomes manageable with the right approach.
Pro tip: Start practicing with 18k gold instead of 14k—it has a higher melting point (1,700°F vs. 1,605°F), giving you a wider safety margin when learning. Many jewelers recommend this “forgiving” approach because melting your first practice piece destroys confidence faster than any other mistake.
Essential Gold Soldering Tools You Can’t Skip
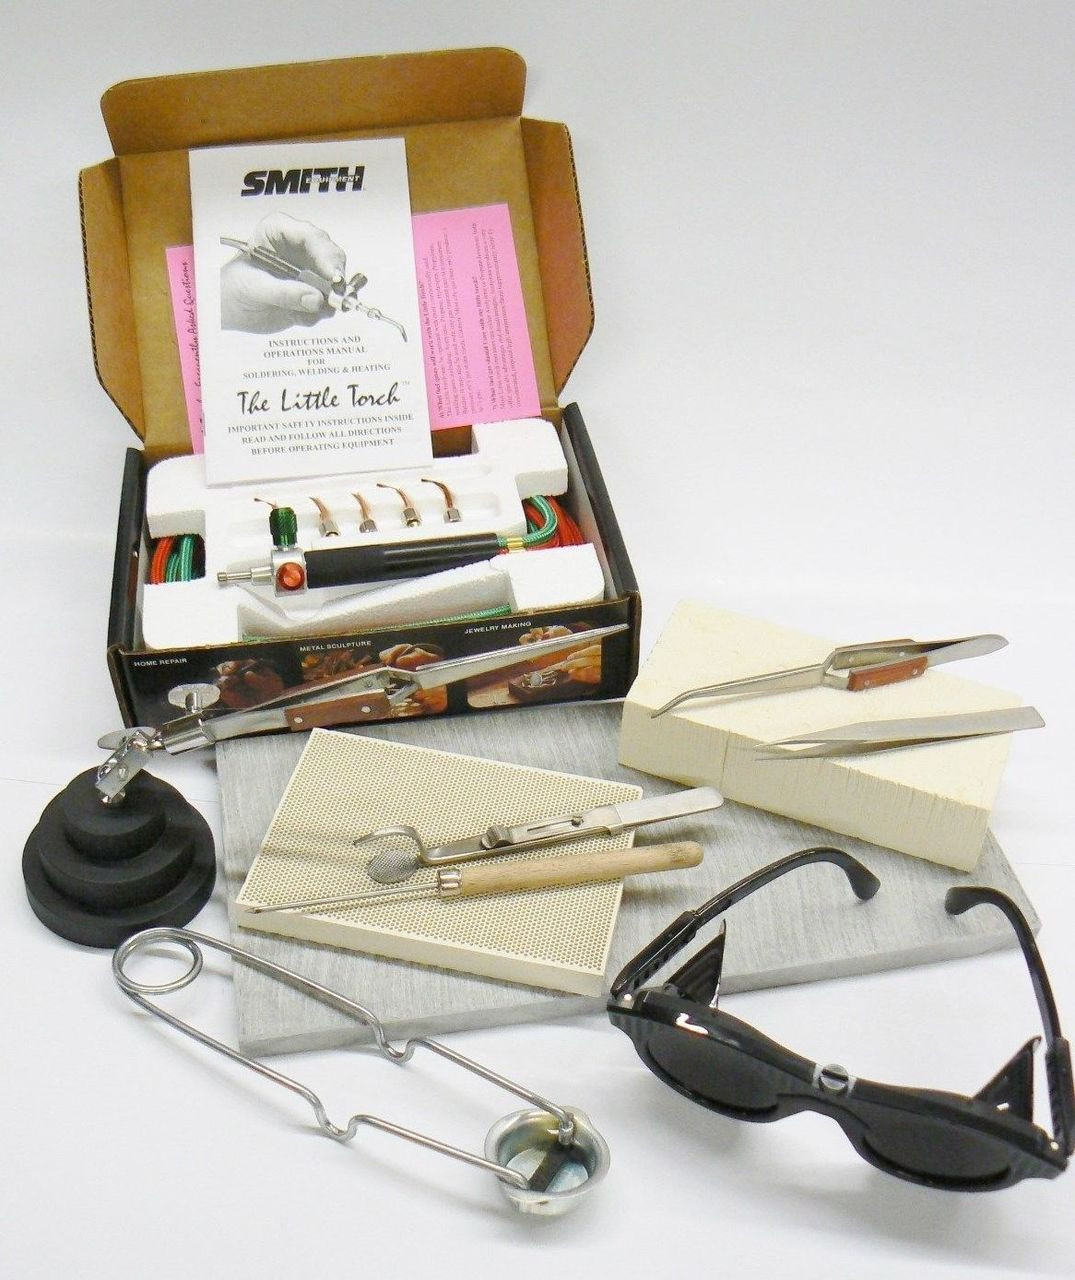
Precision Torch Setup for Perfect Heat Control
Your torch selection makes or breaks gold soldering success. Forget welding torches—gold requires a specialized micro-torch with adjustable flame control. The Smith Little Torch with a #4 tip delivers the ideal balance of heat intensity and precision for most jewelry work. Propane fuel provides sufficient temperature (up to 3,600°F) while remaining manageable for beginners. Avoid acetylene unless you’re experienced—it burns hotter but requires expert control to prevent melting gold.
Flame adjustment is critical: A properly adjusted flame has three distinct zones—a blue inner cone, light blue intermediate zone, and nearly invisible outer envelope. For gold soldering, use the tip of the inner cone where temperature peaks. Your flame should produce a gentle “whoosh” sound, not a loud roar indicating excessive gas flow. Practice creating a pencil-thin flame that can melt solder without scorching adjacent areas.
Must-Have Supporting Equipment
- Charcoal soldering block: Absorbs flux drips while reflecting heat upward (prevents cold spots)
- Reverse-action tweezers: Hold pieces securely without hand fatigue during heating
- Third-hand tool: Positions components at perfect angles while freeing both hands
- Copper pick: Transfers heat away from sensitive areas during complex repairs
- Heat-resistant soldering brick: Essential for larger gold items requiring extended heating
Expert note: Never use steel tweezers with gold—they transfer iron particles that discolor your piece permanently. Opt for titanium or brass alternatives that won’t contaminate precious metals.
Selecting the Right Gold Solder for Your Project
Match Karat and Color Precisely
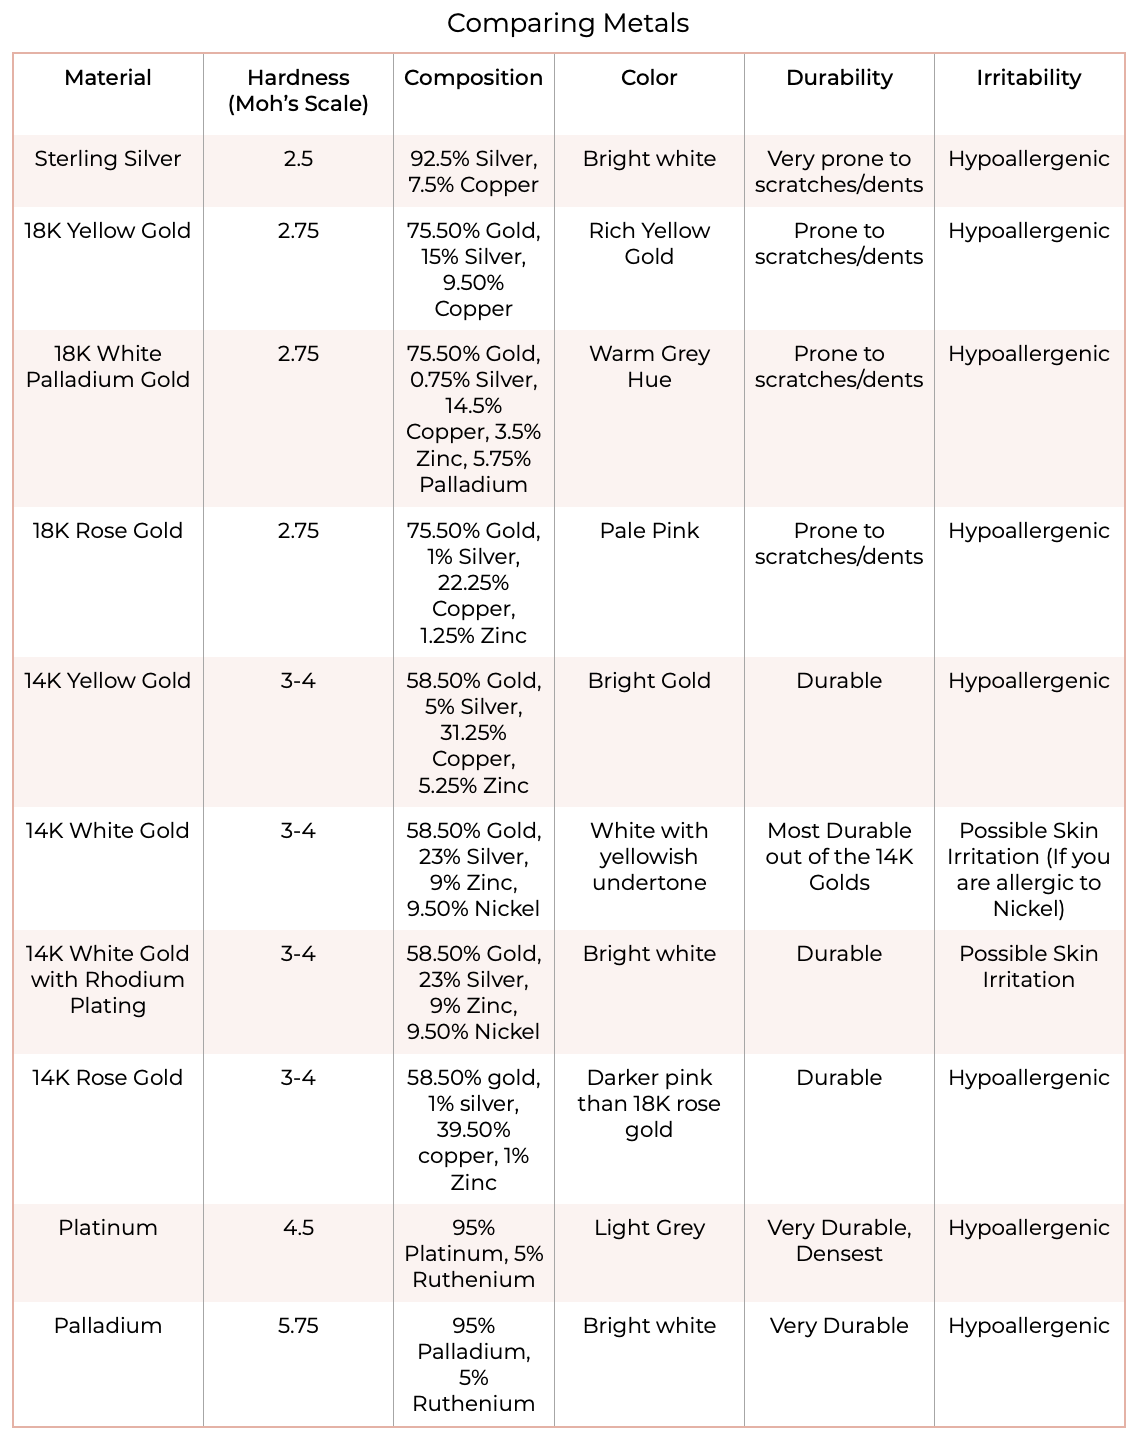
Using mismatched solder ruins gold repairs permanently. When working with 14k yellow gold, you must use 14k yellow gold solder—no exceptions. Solder comes in four karat grades (8k, 10k, 14k, 18k) and three color variations (yellow, white, rose). Even slight mismatches create visible seams that no amount of polishing can hide. Plumb solder (exactly matching its labeled karat) costs more but prevents color discrepancies that cheaper alternatives cause.
Choose Correct Solder Hardness
Gold solder comes in four hardness grades based on melting temperature:
| Hardness | Flow Temperature | Best For |
|---|---|---|
| Hard | 1,550-1,650°F | First joints on multi-part assemblies |
| Medium | 1,500-1,550°F | Secondary joins requiring moderate heat |
| Easy | 1,450-1,500°F | Simple repairs like chain links |
| Extra Easy | 1,400-1,450°F | Delicate pieces or beginner practice |
Critical rule: Always start with hard solder for initial joins, progressing to easier grades for subsequent work. This prevents previously completed joints from melting when adding new connections. For most home repairs like broken chains, easy or extra-easy solder provides the forgiveness beginners need.
Prepare Gold Surfaces for Flawless Bonding
Clean Like a Professional
Surface contamination causes 90% of soldering failures. Follow this exact cleaning sequence:
- Scrub with ammonia-based cleaner and soft brass brush
- Ultrasonic clean for 5 minutes (or soak in warm soapy water for 10 minutes)
- Rinse thoroughly under running water
- Dip in pickle solution for 2 minutes to remove oxidation
- Neutralize with baking soda solution (1 tbsp per cup water)
- Final rinse in distilled water
Warning: Never skip the neutralization step—residual pickle prevents solder flow and creates weak joints. Your fingers should feel slightly slippery after proper neutralization, indicating all acid has been removed.
Create Perfect Gap-Free Joints
The magic of capillary action requires microscopic gaps (0.001-0.002 inches) between pieces. File mating surfaces with 600-grit paper until they fit seamlessly. Test fit by holding the joint vertically—if pieces stay aligned without pressure, you’ve achieved proper contact. For curved surfaces like rings, use a mandrel to maintain shape during alignment.
Apply Flux Correctly for Oxidation-Free Results
Flux prevents oxidation during heating—the #1 cause of failed solder joints. For gold work, Battern’s flux outperforms generic alternatives with its higher temperature tolerance. Apply flux using these professional techniques:
- Paste method: Mix Easy-Flow Flux Powder with water to toothpaste consistency
- Dip method: Immerse entire piece in liquid flux for complex assemblies
- Boric acid method: Dip in 50% boric acid/alcohol solution, then burn off alcohol
Pro tip: Heat flux-coated pieces until bubbling stops and surface turns glassy—this indicates proper activation temperature. Reapply flux immediately if it dries out during extended heating.
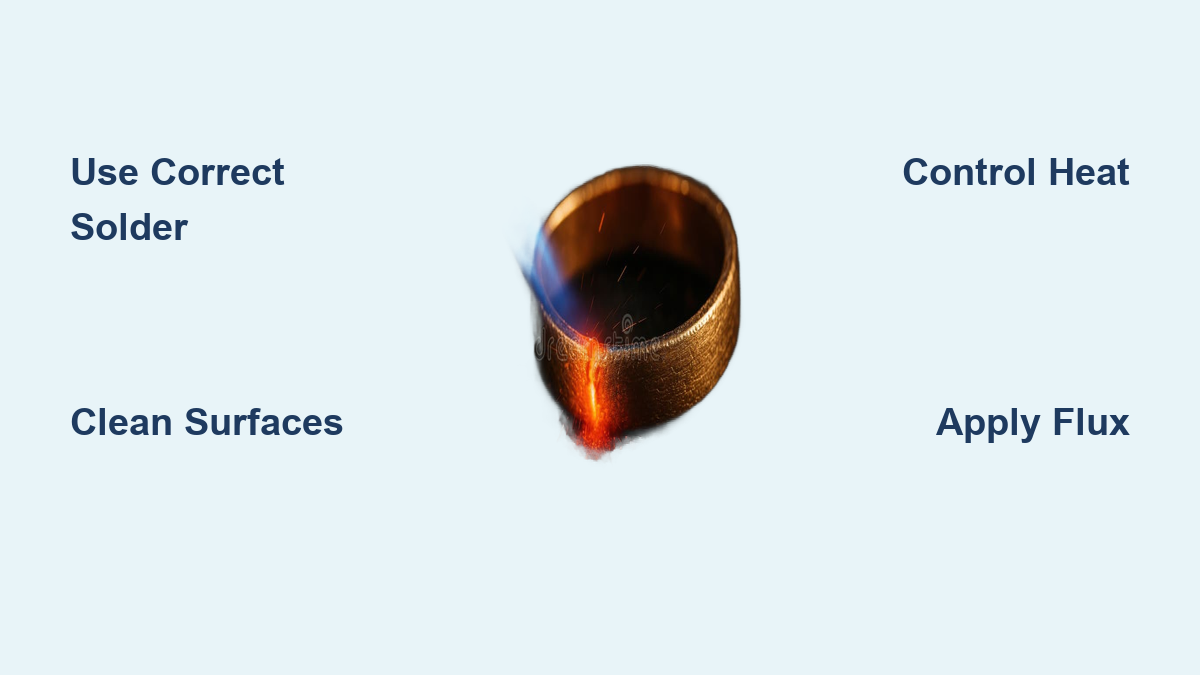
Master the Heating Technique That Makes Solder Flow
The “Paint the Metal” Method
Heating technique separates professionals from beginners. Follow these exact steps:
- Position solder chip on joint edge (size of a grain of rice)
- Heat entire piece evenly with circular torch motion
- Focus heat on thickest section first (acts as “heat sink”)
- Watch for flux to turn glassy—indicator of proper temperature
- Apply direct heat to joint area until solder flows like water
Critical mistake to avoid: Never heat solder directly—this causes beading and failure. Solder flows toward hotter metal, so heat the gold behind the solder chip until it visibly wicks into the joint.
Expert shortcut: Dim workshop lights slightly—this makes it easier to see gold’s color changes during heating. Proper temperature shows as a faint orange glow visible in low light.
Troubleshoot Common Gold Soldering Failures

Solder Beads Up Instead of Flowing
This frustrating problem has three primary causes:
- Flux burned off: Reapply fresh flux and restart heating process
- Incorrect heating: Focus on heating surrounding metal, not the solder
- Contaminated surfaces: Clean and pickle again before retrying
Quick fix: Use paste solder with integrated flux—it solves 80% of flow problems by eliminating separate flux application variables.
Gold Melts Before Solder Flows
This indicates mismatched materials or improper technique:
- Verify you’re using correct karat solder (e.g., 14k solder for 14k gold)
- Switch to larger torch tip for better heat distribution
- Pre-heat entire piece before focusing on joint area
Warning: If gold melts during soldering, stop immediately—continued heating destroys the piece’s crystalline structure, making it brittle and unrepairable.
Essential Safety Practices for Home Gold Soldering
Pickle solution demands respect—it can cause severe burns if mishandled. Always:
- Use copper tongs for handling hot pieces (steel causes discoloration)
- Wear safety glasses with UV protection (gold reflects intense light)
- Work in ventilated area with fume extractor (solder fumes are toxic)
- Keep fire extinguisher rated for electrical/chemical fires nearby
Critical rule: Never quench gold hotter than 400°F—rapid cooling causes stress cracks. Allow pieces to cool to dull red heat (about 1 minute) before water quenching.
Gold Soldering Success Checklist
Before starting any gold repair, verify these five critical elements:
- Surface preparation: Metal must reflect your face like a mirror
- Solder match: Exact karat and color match to base metal
- Flux activation: Glassy appearance indicates proper temperature
- Gap tolerance: Joint fits snugly with microscopic capillary space
- Heat control: Entire piece heated evenly before focusing on joint
Mastering how to weld gold (properly called soldering) transforms you from a jewelry owner into a creator. The precise techniques outlined here prevent costly mistakes while giving you the confidence to repair family heirlooms or craft custom pieces. Remember: perfect gold joints come from heating the metal—not the solder—and using materials matched precisely to your gold’s composition. Start with 18k practice pieces to build confidence, then progress to valuable repairs. Within weeks of consistent practice, you’ll create seamless joins that look like they came from a professional jeweler’s bench—not your home workshop.
Leave a Reply