
Have you ever tried to repair a cherished pewter heirloom only to watch it melt into a puddle under your torch? You’re not alone. Pewter’s remarkably low melting point—just 450°F—makes traditional welding techniques disastrous for this unique metal. Unlike copper, steel, or other common metals, pewter consists primarily of tin with trace amounts of copper, giving it poor thermal conductivity that traps heat in small areas. This characteristic actually enables incredibly precise welding when you understand the proper techniques, but it demands a completely different approach than welding other metals.
Whether you’re restoring antique tankards, creating decorative hollowware, or fabricating architectural elements, mastering how to weld pewter opens creative possibilities most metals can’t offer. This guide reveals the authentic fusing method that produces joints as strong as the parent metal itself, along with alternative techniques for different applications. You’ll learn why pewter welding requires special tools, how to avoid the most common beginner mistakes that ruin projects, and the finishing techniques that make your welds disappear completely. By the end, you’ll have the confidence to tackle pewter projects with professional results.
Essential Tools for Successful Pewter Welding
Before attempting how to weld pewter, gather the specialized tools that make this process possible. The right equipment transforms what seems impossible into a manageable task, while the wrong tools guarantee frustration.
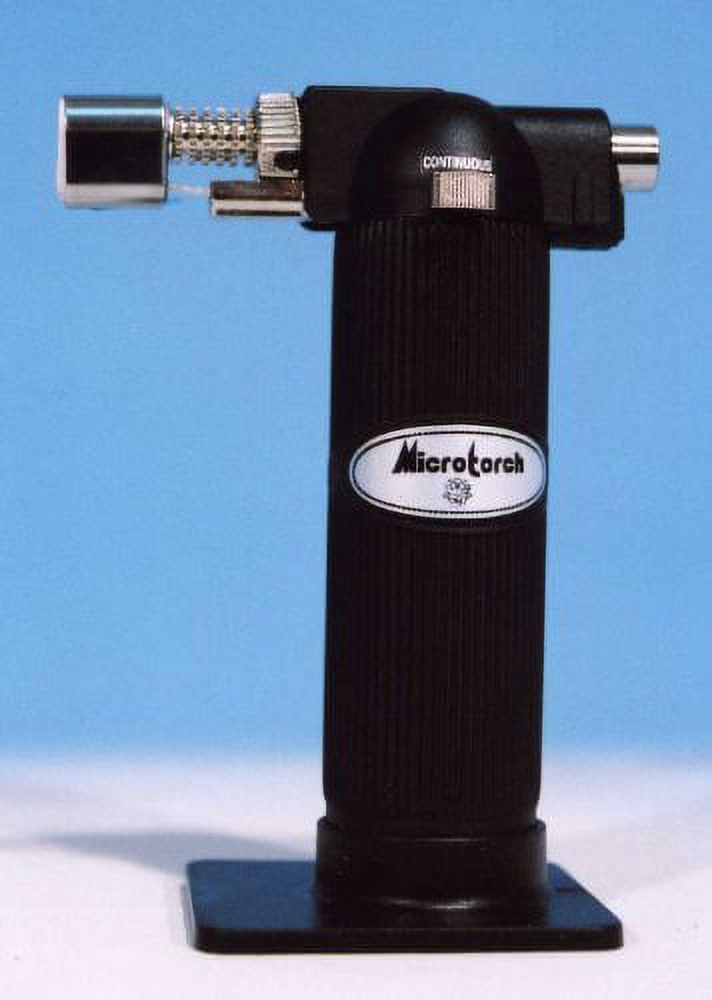
Your primary heat source must be a small torch with an adjustable flame and tiny tips for precise heat control. Larger flames overwhelm pewter’s limited heat capacity, causing instant burn-through. A butane micro-torch with multiple tip options provides the fine temperature regulation pewter demands—look for tips that produce a flame no wider than a pencil lead for most repairs.
For filler material, collect small chips of matching pewter alloy approximately rice-grain size. Never substitute random solder—using incompatible metals creates weak, discolored joints that fail prematurely. When matching alloy isn’t available, select fillers with similar tin content (at least 90%) to maintain metallurgical compatibility.
Planishing requires soft-faced hammers made of delrin, nylon, or hardwood—not steel, which will mar the soft surface. The hammer face must be mirror-polished since any texture transfers directly to your work. Surprisingly, homemade stakes from hardwood blocks often outperform expensive commercial tools for pewter work due to the metal’s forgiving nature.
Complete your setup with killed spirits (zinc chloride solution) for cleaning, heat-resistant clamps for secure holding, and fire suppression equipment within immediate reach. Remember: pewter oxidizes rapidly, so keep cleaning solutions handy for immediate surface preparation before welding.
Prepare Pewter Joints for Perfect Fusion
Skipping proper joint preparation causes 90% of failed pewter welds. Even experienced metalworkers encounter problems when they rush this critical phase, so develop meticulous habits from your first project.
Begin by cleaning all mating surfaces with killed spirits immediately before welding. Oils, oxides, and contaminants prevent proper fusion and create weak spots that fail under stress. Work quickly after cleaning, as pewter begins oxidizing within minutes of exposure to air. Never touch cleaned surfaces with bare fingers—the oils from your skin will compromise the joint.
Create a precise V-shaped channel along the seam where pieces will join, with the bottom meeting point and a 1mm gap at the top. This geometry allows capillary action to draw molten pewter deep into the joint while providing a reservoir for additional filler. Use fine files to achieve consistent gap width along the entire seam—variations cause weak spots or incomplete fusion.
Position your matching alloy chips along the prepared seam at regular intervals, ensuring they bridge the gap between pieces. The spacing matters less than consistent placement—each chip will be individually fused into a continuous bead during welding. Apply a thin coat of flux to both surfaces and filler chips to prevent oxidation during heating.
Master the Pewter Fusing Technique Step by Step
The authentic fusing method produces joints indistinguishable from the parent metal—stronger and more durable than soldered alternatives. This technique requires patience but delivers professional results when executed correctly.
Position your torch at a 45-degree angle to the workpiece and begin the distinctive “pecking” motion: apply heat to a single filler chip for 2-3 seconds, then immediately pull away for 1-2 seconds to allow slight cooling. This intermittent heating prevents burn-through while providing enough energy to fuse the chip completely. Rushing this step by applying continuous heat guarantees melted holes rather than welds.
Watch for visual cues indicating proper heat levels—the pewter develops a distinctive shiny sheen as it approaches melting point. If you see excessive shine, reduce heat immediately; you’re dangerously close to burn-through. Properly fused chips lose their distinct boundaries and flow smoothly into the joint, merging visually with surrounding metal.
Repeat the pecking motion along the entire seam, building up small fused lumps that connect into a continuous bead. Allow each section to cool slightly before moving to the next—pewter’s poor thermal conductivity means heat accumulates rapidly in localized areas. Complete fusion occurs when the bead appears uniform with no visible boundaries between chips or parent metal.
Planish and Finish Your Pewter Weld Seamlessly
After completing the fusion bead, you’ll notice a rough, lumpy surface standing proud of the surrounding metal—this is completely normal. The planishing process transforms this bead into an invisible seam that matches the original surface.
Begin planishing by gently hammering the weld bead with your soft-faced hammer, working from the center outward. Pewter’s unique property—it softens rather than hardens with working—means you can hammer the same area repeatedly without creating brittleness. Apply light, consistent pressure, rotating your workpiece frequently to maintain even contact.
Continue hammering until the weld bead is completely flush with the parent metal surface and invisible both visually and to the touch. Run your finger across the joint feeling for any raised edges—properly planished welds should feel completely smooth. This process typically takes 5-10 minutes of careful hammering for a 4-inch seam.
Complete finishing with progressive abrasives: start with 120-grit emery paper to remove hammer marks, then progress through 220, 320, and 400 grit. For antique finishes, stop at 220 grit and apply patina; for high-polish results, continue to 600+ grit before buffing with Tripoli compound. Pro tip: Use steel wool instead of high polish for functional pieces—finger contact quickly mars mirror finishes.
TIG Welding Pewter for Invisible Seams
For critical applications where appearance matters most, TIG welding produces exceptionally clean joints with minimal discoloration. This technique works particularly well for thin sections where torch control might otherwise be challenging.
Set your TIG welder to the lowest practical amperage (typically 5-15 amps) and use thin strip filler cut from matching pewter sheet. While argon shielding isn’t strictly necessary, it significantly reduces oxidation and produces cleaner results. Critical adjustment: use the smallest tungsten electrode possible (0.5mm) to maintain precise heat control.
The welding motion requires even more precision than torch fusing—move the torch steadily along the seam while adding tiny amounts of filler. Hesitation for even half a second causes burn-through due to pewter’s low melting point. Practice on scrap material first to develop the necessary hand speed and coordination.
TIG-welded joints can be ground down and polished to create completely invisible seams, making this technique perfect for display pieces and architectural elements. While requiring more expensive equipment, TIG welding delivers results that rival professional fabricators when executed correctly.
Avoid These 3 Critical Pewter Welding Mistakes
Understanding common errors prevents costly material waste and accelerates your learning curve. These three mistakes account for most failed pewter welding attempts:
-
Excessive heat application: The single biggest mistake beginners make is applying heat too long in one spot. Remember pewter’s melting point is lower than a soldering iron’s typical operating temperature. If the metal develops a bright, mirror-like sheen, you’ve already exceeded safe temperatures.
-
Inadequate joint preparation: Skipping the V-channel preparation or using inconsistent gap width creates weak spots that fail under stress. Always verify your joint geometry with a feeler gauge before starting.
-
Improper filler selection: Using standard plumbing solder or mismatched alloys creates joints that discolor differently than the parent metal and fail prematurely. Always use matching pewter alloy for invisible, durable results.
When mistakes happen, don’t panic—pewter’s low melting point makes repairs possible. Simply clean the area thoroughly and rebuild the joint using proper technique. Unlike harder metals, pewter forgives errors through multiple repair attempts without significant degradation.
Safety Practices Every Pewter Welder Must Follow
Working safely with pewter involves managing specific hazards that many beginners overlook. Implement these critical safety practices before your first welding attempt:
Handle fluxes with extreme care—they contain corrosive zinc chloride that can cause chemical burns. Always wear nitrile gloves and safety glasses when working with flux, and wash hands thoroughly afterward. Never touch your face while working with flux, as even small amounts transferred to eyes cause severe irritation.
Keep fire suppression equipment within immediate reach—pewter’s low melting point means projects can go from controlled to disastrous in seconds. Use heat-resistant clamps to secure workpieces, keeping hands clear of potential movement as metal heats.
Work in well-ventilated areas to avoid inhaling metal fumes, and consider a respirator when filing or sanding. Pewter dust may seem harmless, but fine particulates can irritate respiratory passages with prolonged exposure. Clean your workspace thoroughly after each session to prevent accidental contamination of future projects.
Mastering how to weld pewter transforms what seems like an impossible challenge into a rewarding craft. With these techniques in your toolkit, you can restore family heirlooms, create stunning decorative pieces, or fabricate functional hollowware with confidence. Remember the three pillars of successful pewter welding: precise heat control, meticulous joint preparation, and matching filler materials. Start with simple practice pieces to develop your technique before tackling valuable projects, and soon you’ll produce welds that are completely invisible after proper finishing. The unique properties of pewter that initially seem like obstacles actually become your greatest advantages once you understand how to work with them rather than against them.
Leave a Reply