Socket weld fittings fail inspection at alarming rates—not because they’re complex, but because most welders apply butt weld techniques to these specialized joints. When your socket weld leaks under pressure testing, it’s almost always due to one preventable mistake: improper gap control between the pipe and socket bottom. This critical 1/16″ space allows for weld metal contraction during cooling, preventing destructive residual stresses that cause cracking in the weld, pipe, or fitting itself. Without this gap, your weld appears perfect externally but contains hidden defects that compromise integrity from the moment it’s completed. In this guide, you’ll learn the exact techniques top pipefitters use to produce leak-proof socket welds every time, including the scribe-and-pullback method for perfect gap control and the walking-the-cup technique that ensures complete root fusion.
Industry data reveals a startling fact: 9 out of 10 welders who pass standard groove weld qualifications fail fillet break tests when tested on socket weld configurations. This statistic proves that socket welding requires specific skills beyond standard certification. The difference between a weld that passes radiographic inspection and one that fails lies in understanding that socket welds are fundamentally fillet welds, not groove welds. This guide provides the practical, field-tested knowledge you need to produce code-compliant socket welds that withstand pressure testing and deliver years of reliable service.
How to Set the Critical 1/16″ Gap for Socket Welds

The foundation of every successful socket weld is precise gap control between the pipe end and socket bottom. This isn’t just a recommendation—it’s an absolute requirement specified in ASME B31.3 and other piping codes. When weld metal solidifies, it contracts significantly, pulling the pipe further into the socket. Without the mandated 1/16″ minimum gap, this contraction creates severe residual stresses that frequently manifest as cracks in the completed joint.
Use the Scribe-and-Pullback Method for Perfect Gap Every Time
Forget measuring gaps with feeler gauges during fit-up—this approach introduces errors that lead to rejection during inspection. Instead, follow this foolproof technique:
- Fully insert the pipe into the socket until it bottoms out against the fitting
- Scribe a clear mark on the pipe where it meets the socket transition
- Pull the pipe back exactly 1/16″ using the scribe mark as your reference
- Verify the gap visually before tacking
This method creates a permanent reference point that quality control inspectors can verify without specialized tools. It eliminates measurement errors that occur when trying to insert feeler gauges into tight spaces, especially in field conditions where precision instruments may not be practical.
Avoid Common Gap Control Mistakes
Many welders make these critical errors during gap establishment:
- Using solid gap spacers without verification: Gap-o-let rings can leave foreign material in the system if forgotten during assembly
- Pulling back too far: Gaps larger than 1/8″ make achieving complete fusion to the socket bottom difficult
- Ignoring alignment on eccentric fittings: Reducers require proper rotational alignment using a framing square
For eccentric reducers, position a 2-foot framing square with its inside corner on the reducer, then roll it until the reducer face aligns with the square edge. Mark this position with soapstone before pulling back for gap verification. This ensures consistent orientation across multiple fittings and prevents rotational misalignment that creates interference issues.
Choose Between GTAW and SMAW for Socket Weld Fittings
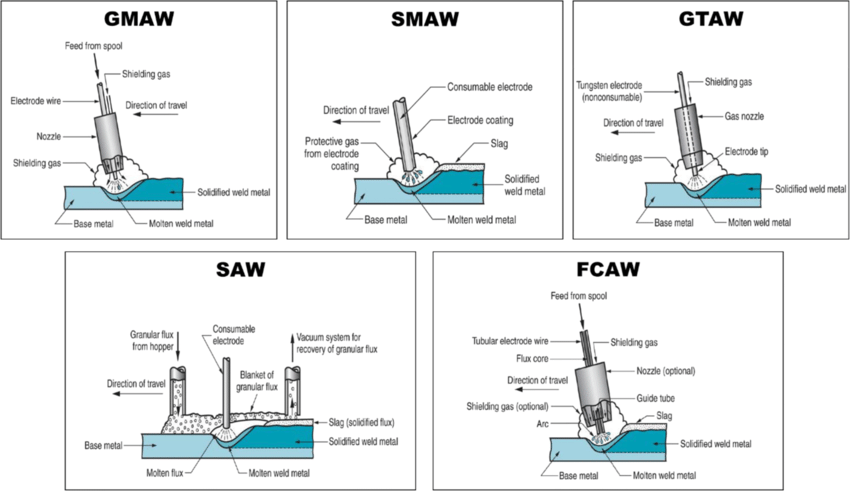
Your welding process selection directly impacts socket weld quality and should match both your application requirements and available resources. While GTAW (TIG) produces the highest quality welds for critical applications, SMAW (stick) remains the workhorse for field construction where portability matters most.
Optimize GTAW Parameters for Socket Welds
For carbon steel socket welds up to 1-inch Schedule 40, these settings consistently produce radiographic-quality results:
- Current: 125 amps DCEN
- Electrode: 3/32″ 2% lanthanated tungsten
- Gas cup: #5 with 15 CFH argon flow
- Filler rod: 3/32″ ER70S-2 for root pass, 1/8″ for fill passes
- Machine settings: 1-second upslope, 3-second downslope
The downslope setting is critical—it prevents crater cracking by gradually reducing current at the weld termination point. For stainless steel socket welds, switch to ER308L or ER316L filler metal depending on your base material grade.
Implement the E6010/E7018 SMAW Technique Combo
When GTAW isn’t practical, use this proven SMAW approach:
- Root pass: E6010 electrode for deep penetration that “breaks down the walls”
- Fill and cap passes: E7018 low-hydrogen electrode for quality fill metal
The E6010 root pass requires specific manipulation—drag the electrode at a 10-15 degree angle while ensuring complete fusion to the socket bottom. Many welders fail here by focusing only on the external appearance rather than developing proper root fusion. After the root pass cools to below 400°F, switch to E7018 for subsequent passes, maintaining proper interpass temperature control.
Master the Walking-the-Cup Socket Weld Technique
The technique you use for socket welding varies significantly based on pipe diameter, and applying the wrong method is the primary cause of failed inspections. For pipes 1 inch and larger, the walking-the-cup technique delivers consistent results that outperform freehand approaches.
Execute the Critical Root Pass for Complete Fusion
For the root pass on 1-inch and larger pipes:
- Select a gas cup that moves smoothly along the socket ledge without rocking
- Rest the cup rim on the internal shoulder where the socket bore meets the fitting body
- Maintain light contact while walking the cup around the circumference
- Focus on maximum penetration to the socket bottom rather than building fillet size
Pro Tip: Treat this pass like a butt weld root—your goal is complete fusion to both pipe and socket surfaces along the entire circumference. Attempting to build the full fillet size in one pass almost guarantees incomplete root fusion.
Adapt Technique for Smaller Diameter Pipes
For pipes below 1 inch diameter:
- Switch to freehand technique for better access
- Maintain a 10-15 degree torch angle for optimal shielding gas coverage
- Use short, controlled weaving motions rather than walking the cup
- Deposit smaller beads with more frequent manipulation
Smaller sockets don’t provide enough ledge for cup walking, making freehand the only practical approach. Focus on consistent travel speed and arc length control to ensure uniform penetration around the circumference.
Fix Incomplete Fusion: The #1 Socket Weld Failure

Incomplete fusion between the weld metal and socket wall represents the most common socket weld defect, accounting for over 60% of failed inspections. This hidden flaw occurs when the root pass fails to penetrate to the socket bottom or doesn’t properly wet the socket inner surface.
Prevent Root Fusion Failures with Proper Technique
Address incomplete fusion by focusing on these critical factors:
- Gap control: Verify minimum 1/16″ gap before welding begins
- Heat input: Use sufficient amperage to develop deep penetration
- Manipulation: Keep the arc on the socket wall long enough to develop fusion
- Pass sequence: Use minimum two-pass technique rather than single-pass deposition
Welders often compound this problem by attempting to build the full fillet size in one pass. Instead, deposit a small root pass focused solely on developing sound fusion, then build subsequent passes to achieve the required fillet size. Each pass must be cleaned of slag or oxides before depositing the next.
Identify and Repair Existing Incomplete Fusion
If radiography reveals incomplete fusion:
- Grind completely through the defective area to sound metal
- Re-establish proper 1/16″ gap if necessary
- Reweld using proper root pass technique
- Perform additional NDT to verify repair quality
Never attempt to “cover up” incomplete fusion with additional weld passes—this approach traps defects and creates even weaker joints. Complete removal to sound metal is the only reliable repair method.
Pass Inspection with Proper Socket Weld Quality Control
Visual examination alone cannot verify the critical internal characteristics of socket welds—the gap condition and root fusion determine joint integrity. Implement these inspection methods to catch defects before they cause field failures.
Verify Gap Before Welding Begins
Your quality control process must include these mandatory checkpoints:
- Confirm pipe end is square and free from burrs
- Inspect socket bore for debris or contamination
- Verify 1/16″ gap using the scribe mark reference
- Check alignment on eccentric fittings
Inspection personnel should reject any joint that lacks the visible gap at the pipe-socket interface before welding begins. This simple check prevents 90% of common socket weld defects.
Implement Radiographic Sampling for Critical Systems
For pressure-containing systems:
- Require radiographic examination of 10% of socket welds
- Focus on welds in critical service locations
- Reject welds showing gap less than 1/16″ or incomplete root fusion
- Expand examination to 100% if initial sample reveals defects
This statistical approach consistently identifies systematic problems with welder technique or fit-up procedures before extensive rework becomes necessary. When radiography reveals defects, trigger immediate retraining and requalification of affected welders.
Follow Critical Safety Practices for Socket Welding
Socket welding introduces unique safety hazards beyond standard welding operations, particularly when working with pressurized systems or in confined spaces.
Implement Pressure Safety Protocols
Before welding on any piping system:
- Isolate and depressurize the system using lockout/tagout procedures
- Verify zero pressure with calibrated gauges
- Purge lines containing flammable materials
- Maintain fire watch for 30 minutes after welding completion
For steam systems specifically, follow these additional steps:
- Close and lock isolation valves
- Open drain valves to release residual pressure
- Install blind flanges between work area and live system
- Verify zero pressure at work location before starting
Cutting corners on these safety steps risks catastrophic failure when the system returns to service. Remember: a socket weld that passes inspection but was made on an improperly isolated system becomes a deadly hazard under pressure.
Producing quality socket weld fittings requires attention to fundamentals that many welders overlook: proper gap control, thorough joint preparation, appropriate process selection, correct root pass technique, and effective quality control. The socket weld joint may appear simple, but its geometry creates challenges that demand specific skills beyond standard welder qualifications. Organizations that invest in proper training, establish rigorous procedures, and implement meaningful qualification requirements find that socket weld quality improves dramatically while rework costs decline. By implementing the techniques outlined in this guide—particularly the scribe-and-pullback gap method and the walking-the-cup welding technique—you’ll consistently produce leak-proof socket welds that pass inspection the first time and deliver reliable service for years to come.
Leave a Reply