You’ve probably searched “how to weld tin” because you’re holding a soda can, food container, or thin sheet metal and wondering how to join it without burning holes through the material. Here’s the critical first fact you need to know: what most people call “tin” isn’t actually tin at all. Those familiar food cans are primarily steel with thin coatings, not pure elemental tin—which fundamentally changes your welding approach. Attempting to weld pure tin with conventional methods leads to immediate failure due to its extremely low melting point, but welding tin-plated steel cans and thin sheet metal is entirely achievable with the right techniques.
The frustration of burned-through metal and weak joints stems from not understanding the material you’re working with and using inappropriate settings. This guide cuts through the confusion to deliver actionable steps specifically for welding what most people incorrectly call “tin.” You’ll learn why pure tin cannot be welded conventionally, discover the exact amperage settings that prevent burn-through on can material, master electrode selection for thin metals, and implement safety practices that protect you from hazardous fumes. Whether you’re repairing a small project or developing sheet metal skills, these proven techniques work regardless of your experience level.
Why Your “Tin Can” Isn’t Actually Tin (And Why It Matters)
When you search “how to weld tin,” you’re almost certainly working with steel cans mistakenly called “tin cans,” not pure elemental tin. This distinction determines whether your welding project succeeds or fails. Pure tin has a melting point of just 232°C (450°F)—so low that conventional fusion welding becomes impossible as heat dissipates too quickly to create a stable weld pool. Even if you could join pure tin, its softness and minimal structural strength make the weld pointless for practical applications.
Modern food containers labeled as “tin cans” are actually steel with various coatings. A century ago, these were genuinely tin-plated steel (hence the name), but today most feature plastic coatings inside and out. Cans holding acidic contents like pineapple use galvanized interior coatings instead. Aluminum beverage cans represent a completely different material requiring yet another approach. Identifying your actual material before striking an arc saves hours of frustration and ensures you select appropriate methods for steel cans rather than wasting effort on unweldable pure tin.
The Critical First Step: Preparing Tin Cans for Welding Success
Skipping proper preparation guarantees contaminated welds and potential health hazards when attempting to weld tin-plated steel. Most food cans have plastic coatings on both interior and exterior surfaces that must be removed from the weld area on both sides of the metal. Cans with acidic contents feature galvanized interiors containing zinc, which produces toxic fumes when heated.
Use a stainless steel wire brush to remove coatings from both sides of the joint area, working in consistent strokes until you reach bright bare steel. Extend cleaning beyond the immediate weld zone since heat conduction affects coatings several inches away. Residual coating burns during welding, creating porosity and weak joints while releasing harmful fumes. Proper preparation takes just minutes but dramatically improves weld quality and safety—don’t skip this essential step.
Choosing the Right Electrodes for Thin Tin-Plated Steel
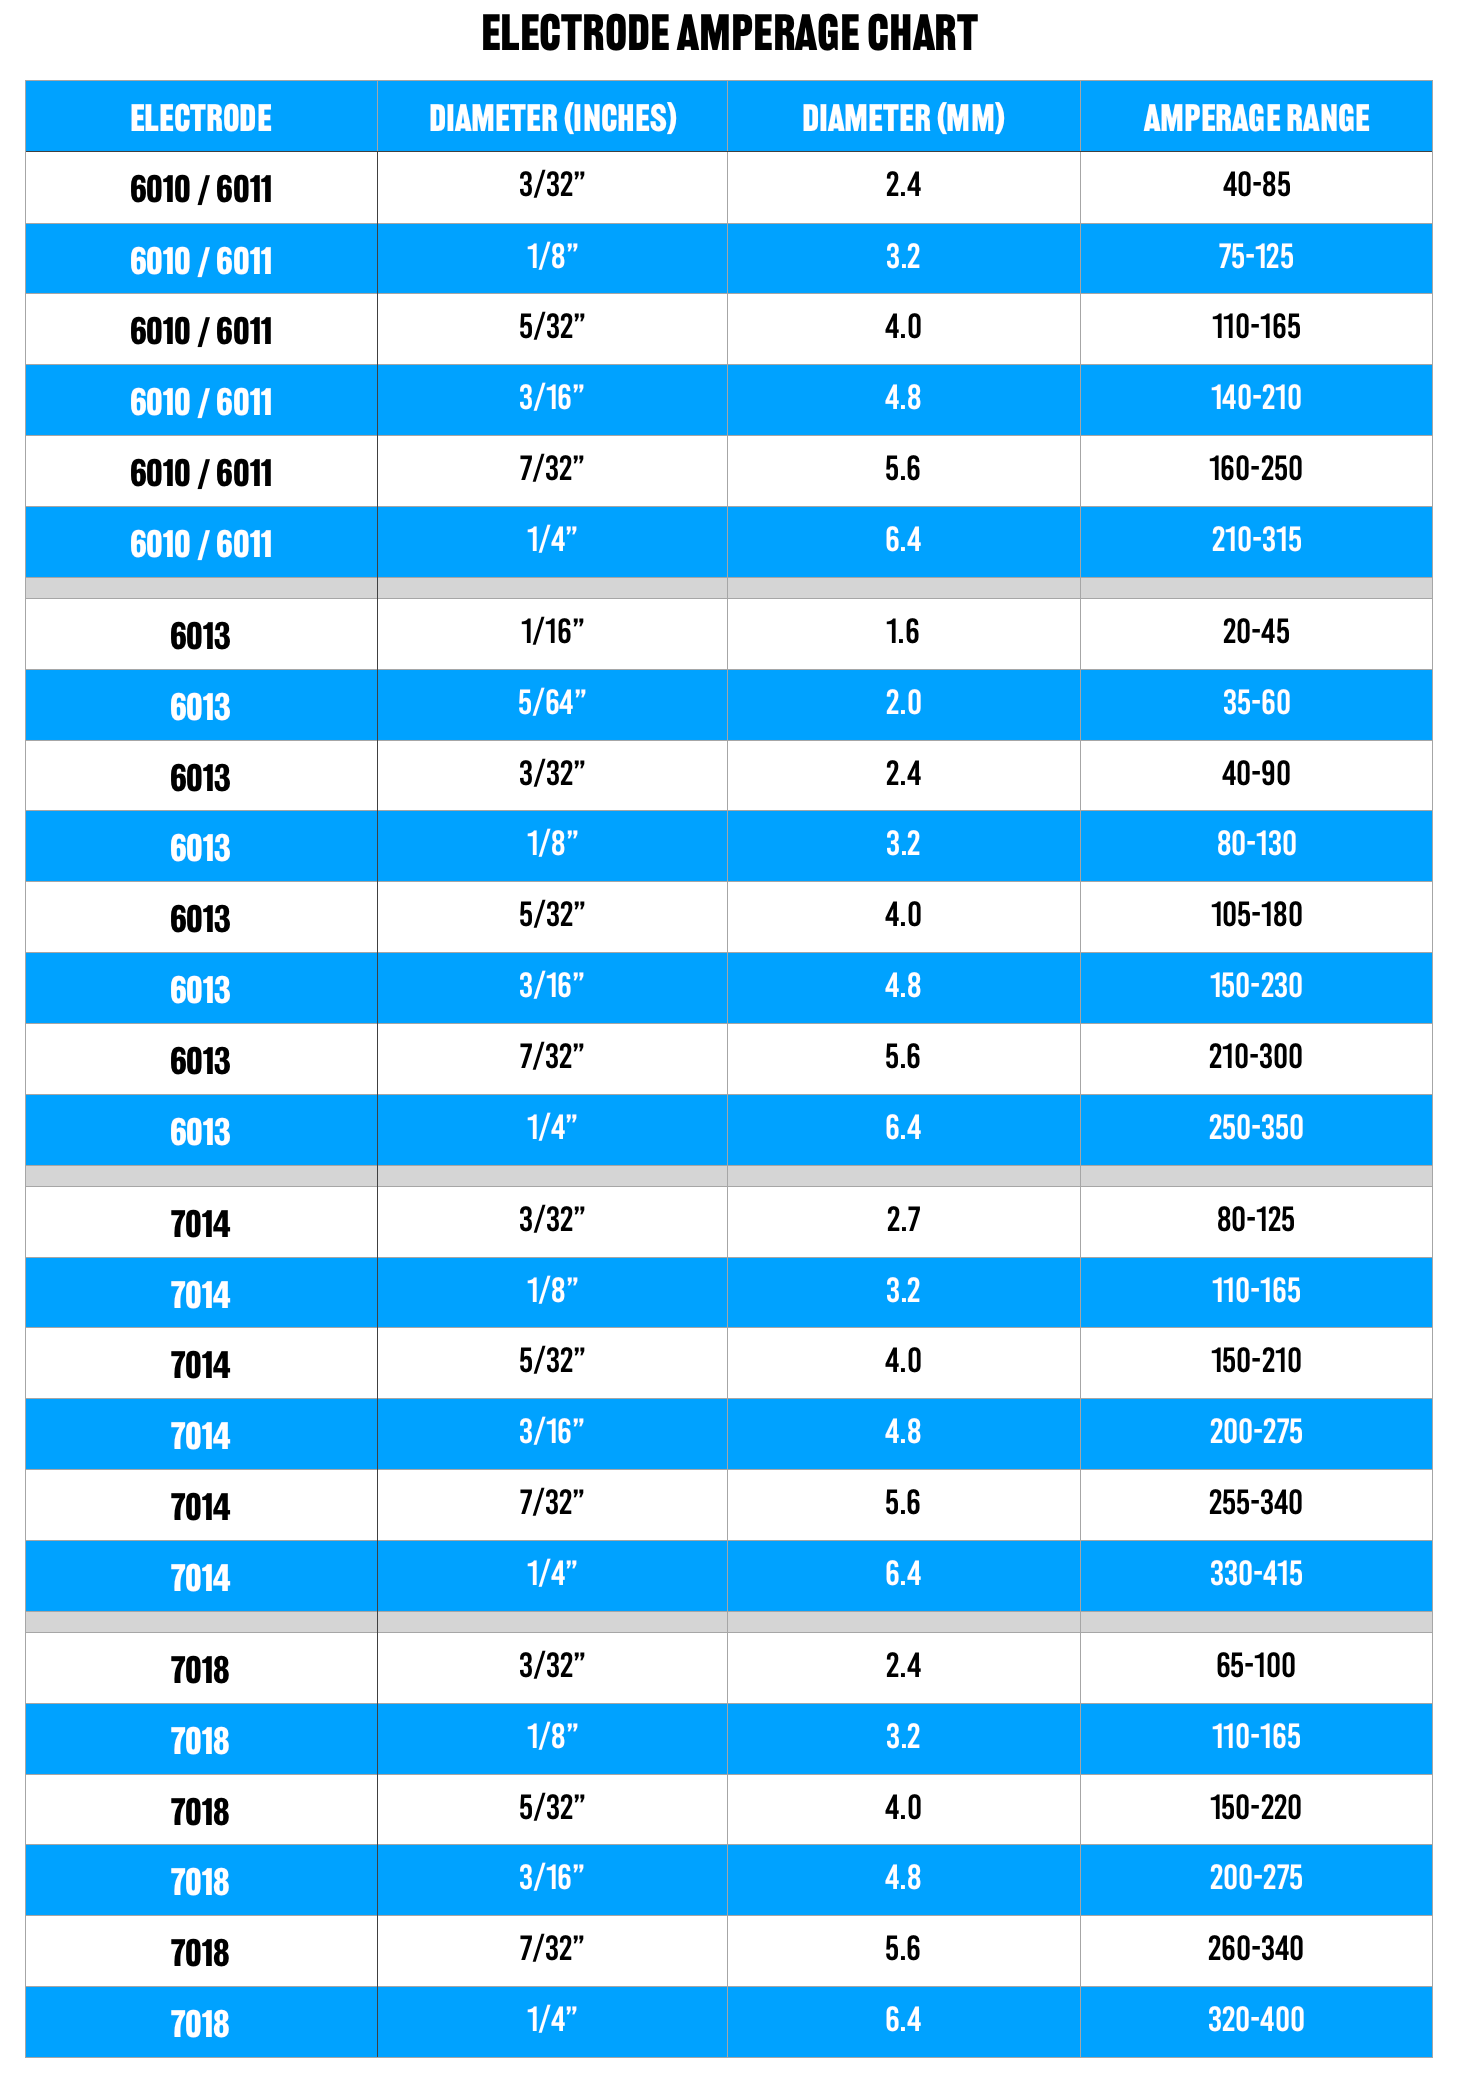
Electrode selection makes or breaks your “how to weld tin” project. For tin can thickness (approximately 28-30 gauge steel), 3/32-inch diameter 6013 electrodes provide the best starting point for beginners. This electrode produces a soft, forgiving arc that minimizes burn-through risk while allowing adequate control over the weld pool. Some experienced welders achieve excellent results with even smaller 1/16-inch diameter electrodes when extreme thinness demands maximum precision.
For slightly more aggressive penetration on marginally thicker sections, consider 6011 electrodes at 1/16-inch diameter. These work particularly well when welding galvanized material where cleaning isn’t perfect, as their digging arc cuts through surface contaminants. Never use oversized electrodes—the 1/8-inch electrodes common for structural work will inevitably burn through can material. Keep electrodes dry in a rod oven if possible, as moisture-degraded electrodes create inconsistent arcs and increased spatter on thin materials.
Setting Perfect Amperage for Tin Can Welding (30-40 Amp Sweet Spot)
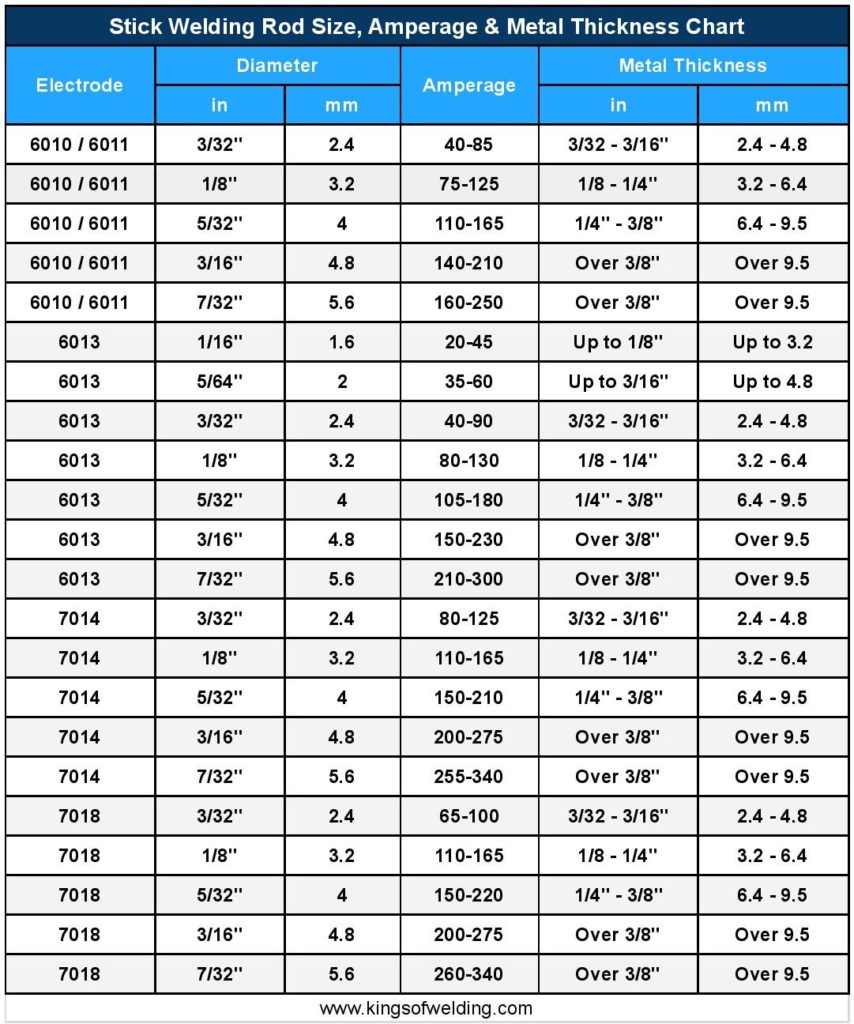
Amperage settings represent the most critical factor in successful tin can welding. Too much power burns through the ultra-thin material instantly, while too little prevents proper fusion. For actual tin-plated steel cans, start with 30-40 amps—significantly lower than most beginners expect. This low range accommodates the can’s extreme thinness while providing just enough heat for fusion.
Create a test piece from scrap material before welding your actual project. Start at 30 amps and gradually increase until you achieve consistent penetration without burn-through. Many welders report success at 35 amps with 3/32-inch 6013 electrodes using either polarity. If your machine offers fine amperage control, adjust in 2-3 amp increments. Remember that smaller machines often require settings at the lower end of this range, while larger machines may need slightly higher settings to maintain a stable arc.
Four Proven Techniques to Prevent Burn-Through on Thin Metal
Mastering these techniques separates successful thin metal welding from frustrating failures when attempting to weld tin-plated steel:
Tack Welding Instead of Continuous Beads
Apply multiple small tack welds around the joint perimeter rather than attempting continuous beads. For can-to-can joints, six to eight brief tack welds (3-5 seconds each) distributed evenly around the circumference provide adequate strength while minimizing heat concentration. Allow the metal to cool between tacks—this approach prevents the cumulative heat buildup that causes burn-through.
The Whip Technique for Heat Control
Move the electrode in rapid back-and-forth motions while slowly advancing along the joint. This oscillation allows the weld pool to partially freeze between passes, dissipating excess heat. Maintain a consistent arc length (approximately electrode diameter) while moving—too slow causes burn-through, too fast creates weak welds.
Wide Wash Bead Approach
Hold the electrode at a more extreme angle (60-70 degrees from vertical) and move more slowly to create a wider, flatter bead. This technique spreads heat across a broader area rather than concentrating it, reducing burn-through risk while still achieving fusion.
Aluminum Backing Strip Method
Place a 1/8-inch thick aluminum strip behind the weld area. This thermal conductor absorbs excess heat, preventing burn-through while allowing adequate fusion. The backing strip’s thermal mass extends the time available for proper weld formation before the thin material overheats.
Essential Safety Gear When Welding Coated Steel Cans
Welding what people call “tin” introduces specific safety hazards requiring proper protection. Galvanized coatings on many food cans produce zinc oxide fumes when heated, causing metal fume fever with symptoms including chills, fever, and nausea. Never weld galvanized material without adequate ventilation—work outdoors or use local exhaust ventilation to remove fumes at the source.
Wear standard welding PPE including:
– Auto-darkening welding helmet set to shade 10-12
– Full-leather welding gloves (not standard work gloves)
– Flame-resistant clothing covering all skin
– Steel-toed boots to protect against falling hot metal
– Safety glasses worn under your helmet for grinding operations
The thin nature of can material creates additional hazards from traveling spatter that stays hot longer than you might expect. Treat all welded pieces as hot for several minutes after welding, and keep a fire extinguisher nearby.
When to Consider MIG or TIG Instead of Stick Welding
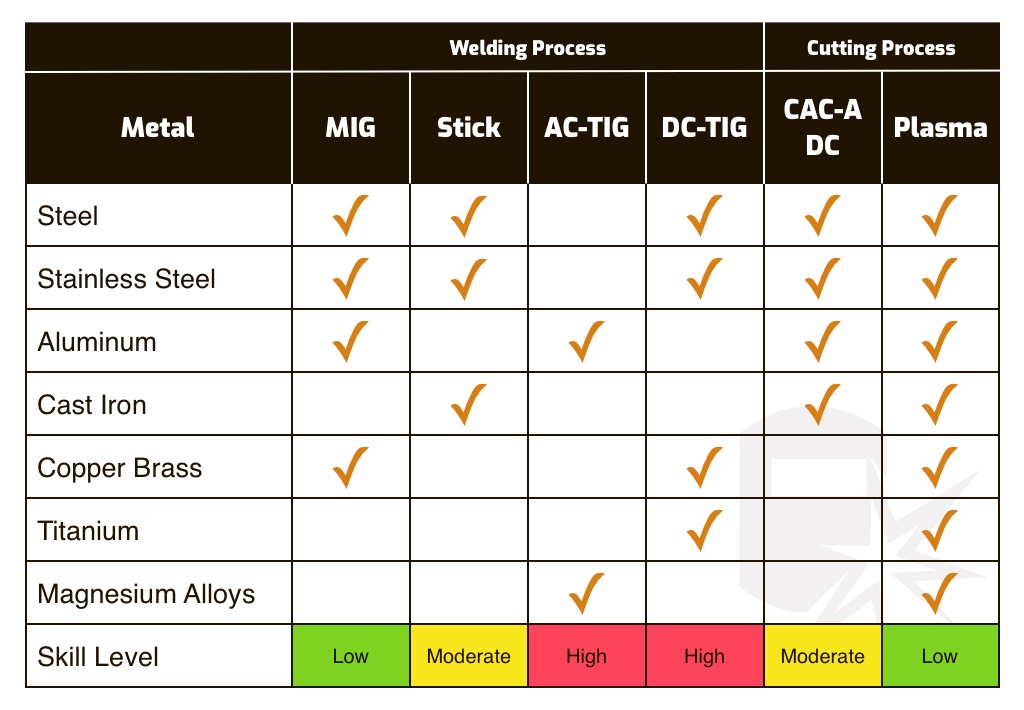
While stick welding works for tin-plated steel, MIG and TIG processes often deliver superior results with less difficulty:
MIG Welding Advantages
- Use .023-inch diameter wire with 75% argon/25% CO2 mix
- Precise voltage and wire feed speed control for consistent heat input
- Continuous wire feed eliminates electrode changes during welding
- Smoother arc characteristics reduce spatter on thin materials
TIG Welding Advantages
- Unmatched heat control through foot pedal operation
- Non-consumable tungsten electrode maintains stable arc at low amperages
- Independent filler metal addition provides maximum pool control
- Produces highest quality welds with minimal distortion
Both processes benefit from copper or aluminum backing bars that absorb excess heat. While stick welding remains accessible for beginners, MIG represents the best balance of affordability and results for serious thin metal work.
Troubleshooting Common Tin Can Welding Failures
When your “how to weld tin” attempts fail, these solutions address the most frequent problems:
Burn-Through Holes
- Cause: Excessive amperage or slow travel speed
- Fix: Reduce amperage by 5-10 amps and increase travel speed
Weak, Inconsistent Welds
- Cause: Insufficient amperage or contaminated base metal
- Fix: Increase amperage slightly and thoroughly clean both sides of the joint
Excessive Spatter
- Cause: Moist electrodes or incorrect polarity
- Fix: Dry electrodes in rod oven and verify proper polarity setting
Porous, Brittle Welds
- Cause: Residual coatings burning into weld pool
- Fix: Remove all coatings from both sides of weld area
Practice on multiple cans before attempting your actual project—each failure teaches valuable lessons about heat management that transfer directly to all thin metal welding applications. The skills you develop welding tin-plated steel cans form the foundation for automotive body work, HVAC fabrication, and countless other sheet metal applications.
Leave a Reply