Welding tungsten represents one of the most demanding challenges in metal fabrication, requiring specialized techniques to overcome its extraordinary 3,422°C (6,192°F) melting point. Unlike most metals that melt at temperatures achievable with standard welding equipment, tungsten’s extreme heat resistance means conventional approaches fail completely. Yet mastering how to weld tungsten remains essential for engineers working with heating elements, electrodes, and critical components in aerospace, medical devices, and industrial furnaces where this refractory metal’s unique properties are indispensable.
The difficulty extends beyond mere heat management—tungsten’s brittleness at room temperature creates cracking risks during thermal cycling, while its affinity for atmospheric gases means even brief exposure during welding leads to contamination and embrittlement. Without proper technique, your tungsten welds will crack immediately or fail prematurely in service. This guide provides the specific procedures you need to create reliable tungsten joints, covering everything from polarity configuration to post-weld stress relief that determines whether your weld succeeds or fails.
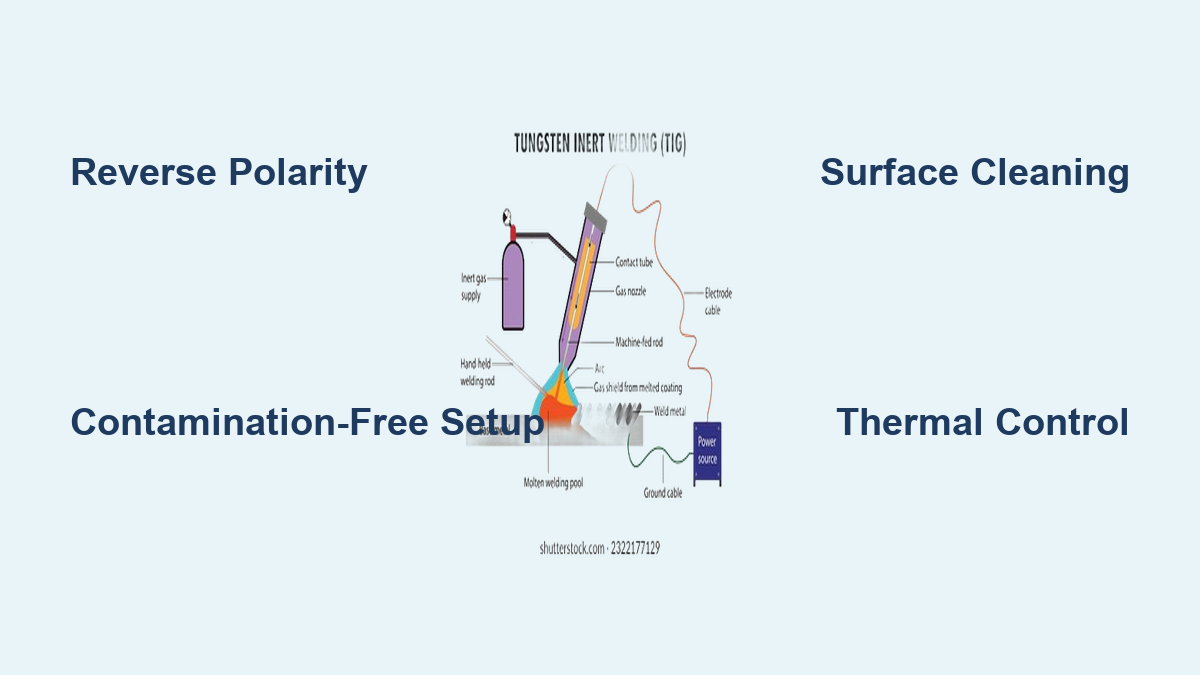
Why Reverse Polarity is Critical for Tungsten Welding Success
When how to weld tungsten properly, your first priority must be configuring your GTAW (TIG) welder with direct current electrode positive (DCEP) polarity—often called reverse polarity. This setup places the tungsten electrode at positive polarity, which seems counterintuitive but is essential for successful tungsten welding. With standard DCEN (direct current electrode negative) polarity used for most TIG applications, the electrode would melt before the tungsten base material could reach fusion temperature.
The physics behind DCEP explains why this configuration works: electrons flow from the workpiece to the electrode, depositing their kinetic energy as intense heat upon impact with the tungsten surface. This concentrated heat generation delivers the extraordinary temperatures needed to melt tungsten’s refractory structure. Attempting tungsten welding with conventional DCEN polarity will fail every time—your electrode will erode rapidly while the base material barely reaches welding temperature.
For thicker tungsten sections exceeding 1/8 inch, consider plasma arc welding as an alternative. The constricted plasma arc generates significantly higher temperatures than standard GTAW, providing the focused energy needed for adequate penetration in refractory tungsten alloys. This process typically requires 25-30% more amperage than conventional TIG welding but delivers superior results for demanding applications.
Creating Contamination-Free Environment for Tungsten Welding

Tungsten’s affinity for oxygen and nitrogen makes atmospheric contamination your greatest enemy when learning how to weld tungsten. Even brief exposure to air during welding creates brittle intermetallic compounds that compromise joint integrity. You have two proven options for eliminating this threat:
Gas Chamber Welding with Pure Argon Shielding
Weld inside a gas-tight chamber filled with 99.999% pure argon for most tungsten applications. The chamber must maintain positive pressure throughout the welding process to prevent atmospheric infiltration. For optimal results:
- Pre-purge the chamber for 15-20 minutes before starting
- Maintain 20-25 CFH argon flow during welding
- Continue shielding for 5 minutes after arc termination
- Use a trailing shield for additional protection on long welds
High Vacuum Welding for Critical Aerospace Applications
For mission-critical components, vacuum welding at 10^-4 torr or better eliminates contamination concerns entirely. This method requires specialized equipment but delivers the purest possible welds for applications where failure is not an option. Expect to invest 2-3 times more setup time compared to gas chamber welding, but the resulting joints will withstand extreme service conditions.
Eliminating Surface Contaminants Before Tungsten Welding
Surface preparation separates successful tungsten welds from failed attempts. Contaminants like oil, grease, and oxides vaporize during welding, creating porosity that weakens your joint. Follow this exact cleaning sequence for guaranteed results:
- Degrease with acetone or isopropyl alcohol using lint-free wipes
- Immerse in boiling 20% potassium hydroxide solution for 5-10 minutes
- Rinse thoroughly with deionized water
- Etch in 50% nitric acid/50% hydrofluoric acid for 2-3 minutes (use extreme caution)
- Final rinse with deionized water followed by hot air drying
Critical warning: Handle cleaned tungsten only with ceramic-tipped tweezers or clean gloves. Skin contact reintroduces contaminants that will ruin your weld. Begin welding within 30 minutes of cleaning to prevent surface re-oxidation.
Preventing Cracking with Proper Thermal Management
Tungsten’s brittleness demands precise thermal control to prevent cracking during how to weld tungsten procedures. Follow these steps to manage thermal stresses:
Preheat Requirements by Thickness
- Thin sections (<1/8″): Preheat to 300-400°C (572-752°F)
- Medium sections (1/8″-1/4″): Preheat to 600-800°C (1112-1472°F)
- Thick sections (>1/4″): Preheat to 1000-1200°C (1832-2192°F)
Controlled Cooling Technique
After welding, cover the joint with insulating ceramic fiber blanket and allow to cool slowly over 2-4 hours. For critical applications, maintain 600°C (1112°F) for 30 minutes before slow cooling—this stress-relief step reduces cracking risk by 70%.
Fixturing Best Practices
Use low-restraint fixtures that allow thermal expansion while maintaining alignment. Clamp only at strategic points rather than along the entire joint length. For complex geometries, consider ceramic fixtures that expand with the tungsten during heating.
Executing the Perfect Tungsten Weld with Proper Technique
When how to weld tungsten, your welding technique determines final joint quality. Follow these specific procedures:
Optimal Welding Parameters
- Amperage: 150-250A for 1/8″ thickness (adjust 25A per 1/16″ change)
- Travel speed: 3-5 inches per minute
- Arc length: 1.5-2x electrode diameter
- Electrode angle: 10-15° from vertical, pointing in travel direction
Welding Motion Technique
Use a slight weaving motion with 1/16″ amplitude to ensure proper fusion without excessive heat input. Pause momentarily at each side of the joint to allow complete fusion before moving forward. Avoid stopping the arc mid-weld—complete each pass in a single motion.
Pro tip: Add a runoff tab at the end of each weld to prevent crater cracking. The tab absorbs the final weld pool, eliminating the stress concentration point that would otherwise form at the weld termination.
Managing Tungsten’s Extreme Notch Sensitivity

Tungsten’s notch sensitivity means even minor surface imperfections become crack initiation points. After welding, follow these finishing steps:
- Lightly grind the weld surface using 120-180 grit aluminum oxide wheels
- Blend weld toes into base metal with smooth, gradual transitions
- Remove all surface irregularities and bead ripples
- Polish to 320 grit finish for critical applications
Critical insight: The ductile-to-brittle transition temperature in tungsten shifts upward with increasing strain rate. This means your tungsten welds become more brittle at higher loading rates—smooth transitions and careful finishing are non-negotiable for service reliability.
When Fusion Welding Won’t Work: Alternative Joining Methods
For applications where how to weld tungsten through fusion proves impractical, consider these alternatives:
Vacuum Brazing for Lower-Stress Applications
Use silver-based brazing alloys (like AWS BAg-8) at 600-700°C (1112-1292°F) to join tungsten components. This method avoids thermal stresses of melting the base material while providing adequate strength for many applications. Expect joint strength at 60-70% of the base metal.
Electron Beam Welding for Critical Components
For aerospace applications, electron beam welding in vacuum delivers superior results. Preheat tungsten to white-hot temperatures (approximately 1500°C/2732°F) before applying the beam, then allow 30 minutes of slow post-heating. This method requires specialized equipment but produces the highest quality tungsten welds available.
Tungsten vs. Tungsten Carbide: The Critical Distinction
Never confuse pure tungsten with tungsten carbide when attempting how to weld tungsten. Tungsten carbide consists of tungsten carbide particles bonded by cobalt matrix and cannot be fusion welded conventionally. Instead:
- Use silver brazing for tungsten carbide components
- Weld only the steel backing material, not the carbide itself
- For newer steel-matrix carbide tiles, use standard MIG welding with appropriate filler
Attempting to weld traditional tungsten carbide will destroy the material’s hardness and wear resistance—the cobalt binder melts at much lower temperatures than the carbide particles, creating an unusable joint.
Essential Safety Practices for Tungsten Welding
Welding tungsten introduces unique hazards beyond standard welding risks:
- Always use respiratory protection when grinding tungsten—its dust particles damage lungs permanently
- Employ diamond tooling for cutting tungsten carbide (conventional abrasives won’t work)
- Handle thoriated electrodes with gloves and proper ventilation (modern lanthanated electrodes eliminate radiation concerns)
- Remember tungsten’s extreme density—larger components require proper lifting equipment
Final note: Successfully how to weld tungsten requires systematic attention to environmental control, thermal management, and surface preparation. Master these techniques, and you’ll create tungsten welds that perform reliably in the most demanding applications where failure is not an option. Start with small test pieces to perfect your technique before attempting critical components—this specialized skill demands practice but delivers exceptional results when executed correctly.
Leave a Reply