Welding two rods together end-to-end is one of the most common fabrication challenges you’ll encounter, whether you’re repairing a broken axle, extending a shaft, or building something from scratch. The process sounds straightforward—heat the metal, add filler, let it cool—but getting a straight, strong joint that matches the original rod’s strength and dimensions requires careful attention to alignment, technique, and heat management. Many beginners struggle with warped results, weak welds, or rods that simply won’t stay aligned during welding. This guide walks you through proven methods that professional fabricators use to consistently produce excellent results, from basic alignment setups to techniques for handling mismatched diameters and precision lead screws.
The specific approach you need depends on several factors: the diameter of the rods, the material type, how strong the joint needs to be, and whether precision matters for your application. A decorative garden art project has very different requirements than repairing a steering axle or a precision lead screw. This comprehensive guide covers all the essential techniques, from simple V-block alignment methods to production welding strategies, so you can choose the right approach for your specific situation and achieve professional-quality results.
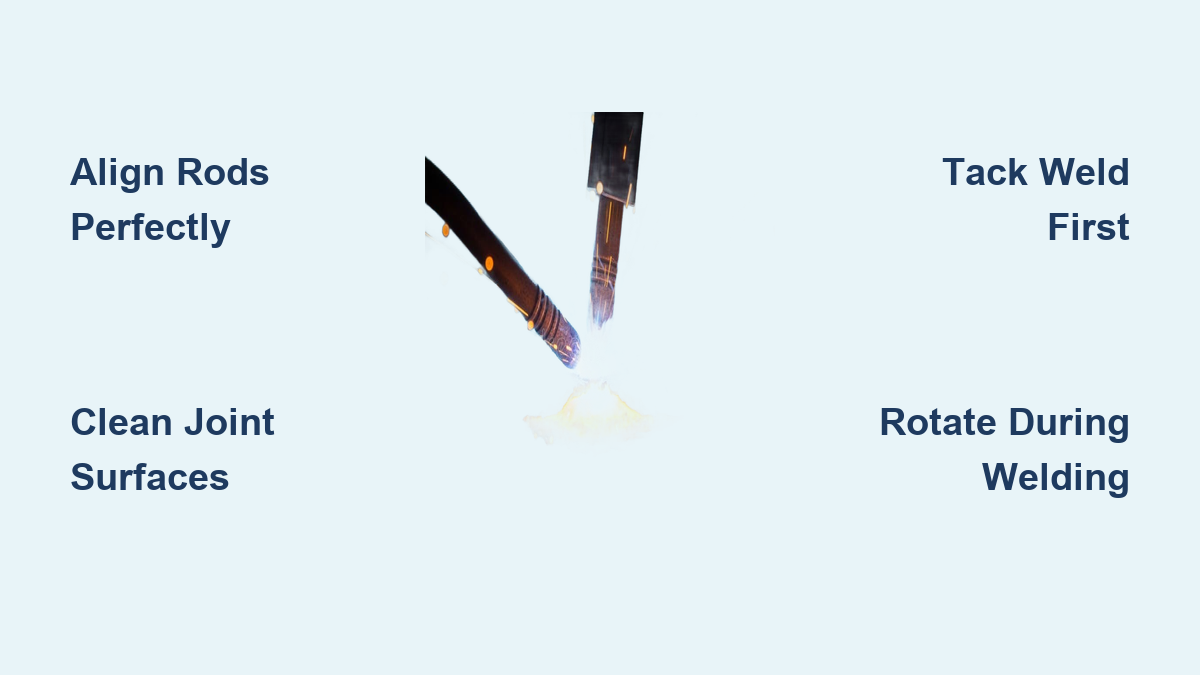
Align Rods Perfectly Before Welding
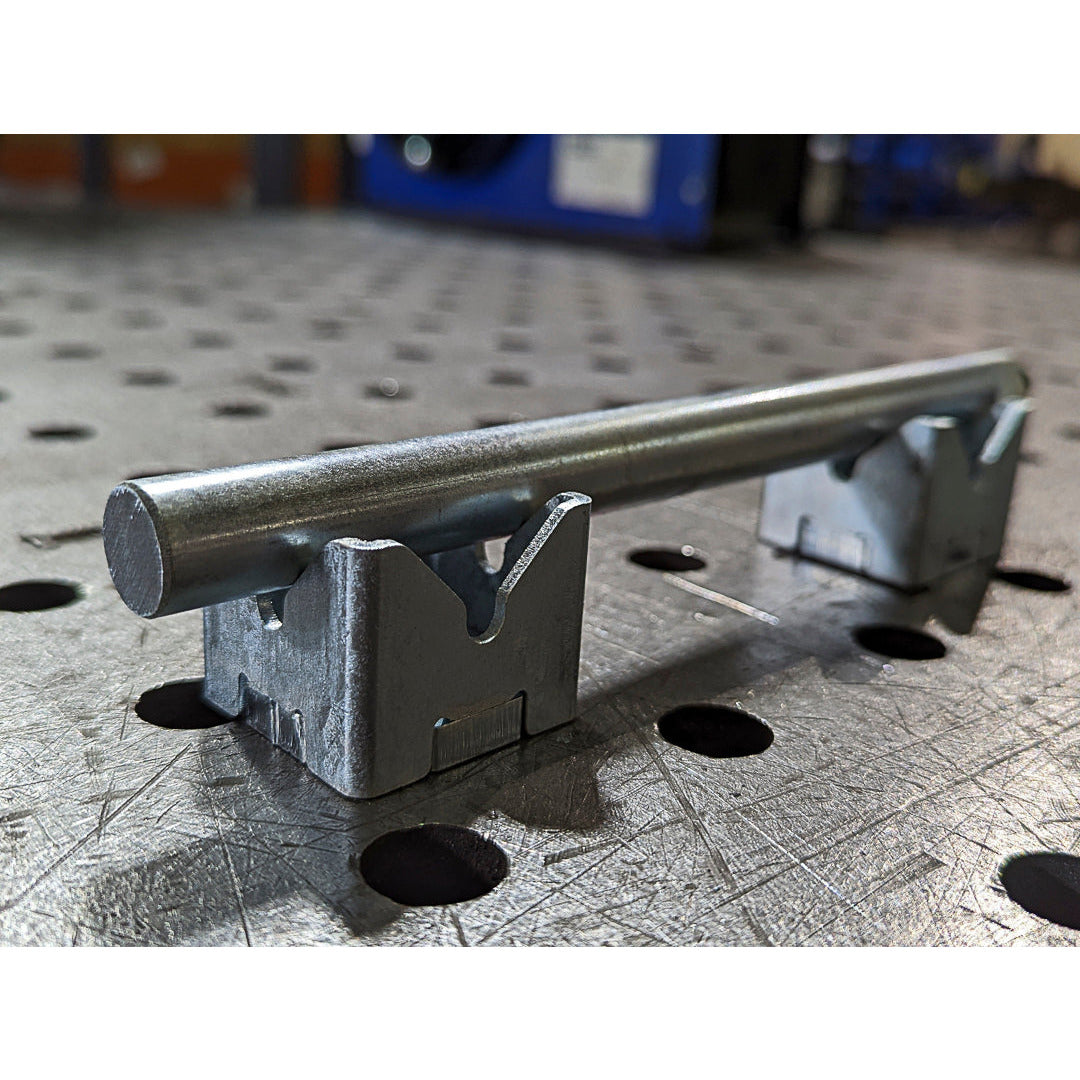
Misaligned rods guarantee a crooked weld—no matter how skilled your technique. The secret to straight rod-to-rod welding is proper alignment before you strike your first arc. For same-diameter rods, the most effective method uses V-blocks or the inside corner of angle iron. The V-shaped groove naturally cradles round stock while the angle iron’s corner provides two reference surfaces that create a stable channel.
Place both rod halves in the inside corner of a suitable length of angle iron, ensuring they butt together at the joint. The angle iron should support several inches of rod on either side of the joint for maximum stability. Pro welders often cut a hole in the back of the angle iron directly opposite the joint location, allowing you to weld all the way around the rod without removing it from the fixture.
How to Fix Misalignment During Welding
Even with perfect initial alignment, thermal expansion can pull your rods out of position mid-weld. Check alignment after each tack weld and make micro-adjustments while the metal is still warm. If you notice significant movement during welding:
- Stop welding immediately
- Allow the joint to cool slightly (but not completely)
- Apply gentle pressure to realign while the metal is still malleable
- Re-tack at the new position before continuing
For precision applications like lead screws, indicate the good portion in a 4-jaw chuck before welding. Any misalignment here translates directly to runout in your finished part—taking extra time with initial setup prevents costly rework later.
Prepare Joint Surfaces for Maximum Strength

Surface contamination is the silent killer of strong rod welds. Before striking an arc, thoroughly clean both rod ends to remove rust, scale, oil, or other contaminants. Wire brush, grind, or use solvent cleaning depending on contamination severity. Don’t just clean the immediate joint area—prepare several inches of rod on either side to prevent contamination from migrating into your weld zone.
Why Proper Beveling Makes Stronger Rod Joints
For rods 1/2 inch and larger, simply butting ends together creates weak joints with poor penetration. Grind a 60-90 degree bevel on each rod end to create a V-groove that allows weld metal to penetrate to the center. The bevel should be uniform around the entire circumference—use a bench grinder with a steady hand or a dedicated beveling tool for consistent results.
Smaller diameter rods (1/4 inch and below) often don’t require full beveling. For these, focus on achieving clean, square cuts with minimal gap—typically just enough space for the arc to bridge the joint. Too large a gap causes excessive weld metal buildup, while no gap prevents proper fusion.
Master Tack Welding for Rod-to-Rod Connections
Never attempt to weld the entire joint in one pass—that’s the fastest route to distortion and weak welds. Place four tacks equally spaced around the circumference before completing your main weld. These tacks should be substantial enough to hold alignment but not so large they create stress points.
Tack Welding Sequence for Large Diameter Rods
For rods over 1 inch in diameter, use this professional sequence:
- Place first tack at 12 o’clock position
- Rotate rod 90 degrees and place second tack
- Continue around the circumference until you have 4-6 tacks
- Check alignment after each tack and adjust if needed
- Only proceed with main weld once alignment is verified
This technique distributes heat evenly and prevents the rod from pulling out of position as you weld. For critical applications, use a backstepping technique—weld a short segment, then jump backward and weld another segment to further minimize heat buildup in one area.
Apply Main Weld with Minimal Distortion
The key to preventing “banana rods” is rotating the work between welding passes. After tacking, weld a few inches of the joint, then rotate the rod approximately 90 degrees and weld another section. Continue this pattern until the entire circumference is welded. This rotation prevents uneven heating that causes bending.
Build Up and Grind Down Technique
For strongest results on critical joints, deliberately build up the weld metal to create a slight bulge larger than the original rod diameter, then grind or machine it back to size after welding. This approach ensures adequate weld metal throughout the joint and is more forgiving of minor alignment issues.
Build up in multiple passes, allowing each to cool slightly before adding the next. After complete cooling, use a bench grinder or lathe to remove excess weld metal and restore the original diameter. For precision applications, this final machining step also corrects any minor misalignment that occurred during welding.
Join Different Diameter Rods Successfully

Mismatched diameters require special preparation techniques. Machine a tenon on the smaller piece that fits into a corresponding hole in the larger rod—cut the tenon a few thousandths smaller than the hole for slight interference fit. This provides mechanical keying that maintains alignment during welding.
Sleeving Method for Significant Diameter Differences
When diameter differences are substantial, use a sleeve that bridges both rods:
- Select tubing with inner diameter slightly smaller than the larger rod
- Insert smaller rod end into one side of the sleeve
- Insert larger rod end into the other side
- Weld both interfaces between sleeve and rods
This method works exceptionally well for joining rods with significantly different diameters, as the sleeve takes the load while the welds provide the connection. For added strength in high-stress applications, drill through both rods and the sleeve, then press in a dowel pin before final welding.
Fix Post-Weld Warping and Straighten Joints
Distortion is nearly inevitable with rod welding, but you can correct it. Begin straightening while the metal is still warm—it’s much easier to bend warm metal than cold. Support the rod at two points (typically at one-third positions from each end) and measure runout at the center to determine how much correction is needed.
Precision Straightening for Critical Applications
For precision work like lead screws where runout tolerance is critical:
- Support rod on V-blocks at consistent points
- Use dial indicator to measure runout across length
- Apply gradual pressure at high point of bend
- Re-measure after each adjustment
- Continue until runout is within 3 thousandths of an inch
For the highest precision, mount the welded assembly in a lathe with the good portion centered in a 4-jaw chuck. Machine the joint area to remove excess weld metal and perfect the alignment—this approach guarantees concentricity with the original rod.
Mechanical Alternatives When Welding Isn’t Possible
When welding isn’t practical, thread both rod ends and connect with a coupler nut. This creates a strong, adjustable connection that can be disassembled if needed. Cut threads deeply enough for at least one diameter of engagement for full strength—typically requiring a tap and die set matching your rod diameter.
Sleeve and Pin Combination for Maximum Strength
For applications requiring maximum strength without welding, use a sleeve with a dowel pin:
- Select tubing with inner diameter matching your rod
- Press both rod ends into the sleeve (extending past joint on both sides)
- Drill through sleeve and both rods at the joint location
- Press or drive a 3/8″ dowel pin through all three pieces
This combination provides mechanical alignment, takes shear loads, and offers redundancy—if one element fails, the other still provides strength. Commercial coupling devices with set screws work well for light-duty applications where quick assembly and disassembly are priorities.
Expert Tips for Strong, Straight Rod Welds
Use the minimum heat necessary to achieve proper fusion—excessive heat causes distortion and grain growth. Multiple passes with intermediate cooling produce less total distortion than a single large pass, though they require more time. For rods that will be machined after welding, use matching mild steel filler rather than stainless steel, which is significantly harder to machine.
Maintain alignment at every stage—verify before welding, after tacking, during welding, and while still warm after welding. For unknown materials, brazing often provides safer results than welding due to lower temperatures that reduce cracking risk. If welding mystery metals, always test on scrap first to assess weldability.
Successfully welding two rods together requires patience, proper technique, and attention to detail at every stage. By following these alignment methods, joint preparation techniques, and welding approaches, you can produce strong, straight joints that meet the demands of your specific application, whether you’re doing simple repairs or precision fabrication work.
Leave a Reply