Learning how to weld with a torch transforms your ability to repair metal objects, create custom projects, and tackle fabrication work without needing electrical power. Oxy-fuel welding remains one of the most versatile metal-joining techniques available to hobbyists and professionals alike, capable of reaching temperatures exceeding 3,500°C (6,332°F)—hot enough to melt steel effortlessly. This guide provides practical, step-by-step instructions for safely setting up your equipment, lighting your torch, and executing strong, clean welds that stand the test of time.
Developed by French engineers Edmond Fouché and Charles Picard in 1903, oxy-fuel welding was the premier method for high-quality metal joining until arc welding technologies emerged in the late 1920s. While industrial applications have largely shifted to faster arc welding methods, oxy-fuel welding retains its value in situations requiring precise heat control, portability, or the ability to work where electricity remains unavailable. The same equipment that welds can also cut, braze, heat metal for bending, and loosen corroded fasteners, making it an extraordinarily versatile addition to any workshop.
This guide focuses specifically on oxy-fuel welding techniques, though many principles apply across different torch welding methods. You’ll learn how to set up your equipment correctly, select the appropriate fuel gas for your application, adjust flames for different welding scenarios, execute proper weld beads, and maintain safety throughout every phase of your work. By following these guidelines and practicing the techniques outlined here, you’ll develop the skills needed to produce strong, clean welds that rival those of experienced fabricators.
Identify Your Torch Welding Equipment Components
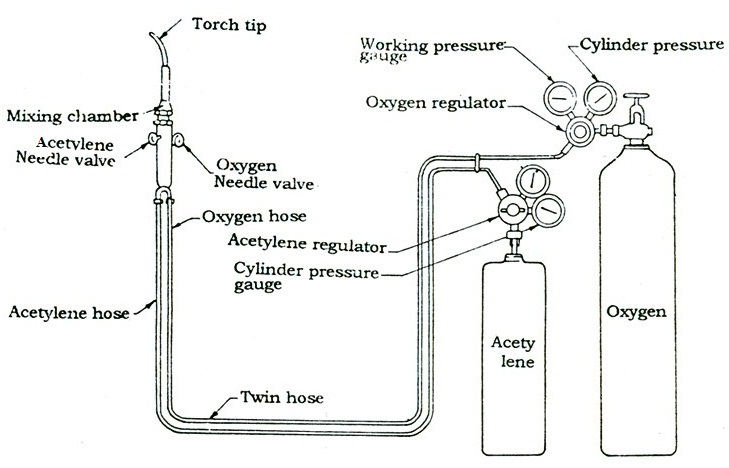
Before you attempt to weld with a torch, you must understand each component’s role in the system. The basic oxy-fuel setup consists of an oxygen cylinder, a fuel gas cylinder (typically acetylene), two pressure regulators, matching gas hoses, and a welding torch with appropriate tips. Each piece plays a critical role in delivering the right gas mixture at the right pressure.
Oxygen cylinders contain compressed gas at approximately 21,000 kPa (3,000 psi) when full, making them potentially dangerous if damaged. Always secure cylinders upright to a wall or cart, and keep valve caps installed during transport. The oxygen itself serves as the oxidizing agent that enables combustion—it is not the fuel, but rather the element that makes the fuel burn.
Acetylene cylinders require special handling because the gas becomes unstable above 207 kPa (30 psi) absolute pressure. Manufacturers solve this problem by filling cylinders with porous material soaked in acetone, which safely dissolves acetylene at pressures around 1,700 kPa (247 psi) when full. Never lay an acetylene cylinder on its side, as this allows acetone to enter the torch system and cause problems.
Recognize Proper Hose Connections and Safety Features
Hoses connect regulators to your torch and are color-coded for safety: green for oxygen (blue in the UK), red for fuel gases in the United States. Threaded connections are handed—right-handed for oxygen, left-handed for fuel—to prevent dangerous cross-connection errors. A left-handed fuel thread includes an identifying groove cut into its nut for easy recognition.
Flashback arrestors and check valves protect your equipment from potentially explosive situations. Acetylene can decompose explosively under certain conditions, and ordinary check valves cannot stop a detonation wave moving through the hoses. Flashback arrestors designed to shut down before a detonation wave reaches your cylinders must be installed between regulators and hoses.
Select the Correct Torch Type for Welding
Your welding torch mixes fuel and oxygen in a chamber before the tip, with valves allowing adjustment of each gas flow independently. Welding torch heads feature two adjustment knobs at the handle base and either one or two pipes leading to the nozzle—never an oxygen-blast trigger, which identifies a cutting torch instead. Select tip size based on metal thickness and joint design; larger tips accommodate thicker materials but require higher gas pressures.
Choose the Right Fuel Gas for Your Project

While acetylene remains the traditional fuel for oxy-fuel welding, several alternatives offer advantages for specific applications. Understanding the characteristics of each fuel helps you choose wisely for your projects and budget.
Acetylene excels in applications requiring high heat concentration and precise control. Its high flame temperature (3,200–3,500°C) and concentrated inner cone make it ideal for welding thin materials and achieving deep penetration in tight joints. However, acetylene costs significantly more than alternative fuels and cannot be used for underwater work.
Compare Alternative Fuel Options
Propane offers a cost-effective alternative for heating, bending, and cutting applications, though its lower flame temperature (approximately 2,526°C with oxygen) makes it poorly suited for welding most steels. The fuel excels in cutting applications where its outer flame provides excellent heat distribution.
Propylene has gained popularity in production welding and cutting, offering performance between acetylene and propane. The fuel cuts cleanly with minimal tip cleaning and works particularly well with injector-style torches. Several North American suppliers market propylene under proprietary names such as FG2 and Fuel-Max.
MAPP gas provides flame temperatures comparable to acetylene with the safety advantage of handling at much higher pressures—up to 40–50 psi in high-volume cutting torches. Unfortunately, the sole North American MAPP gas plant closed in 2008, and most commercial “MAPP” products today actually contain propylene as a substitute.
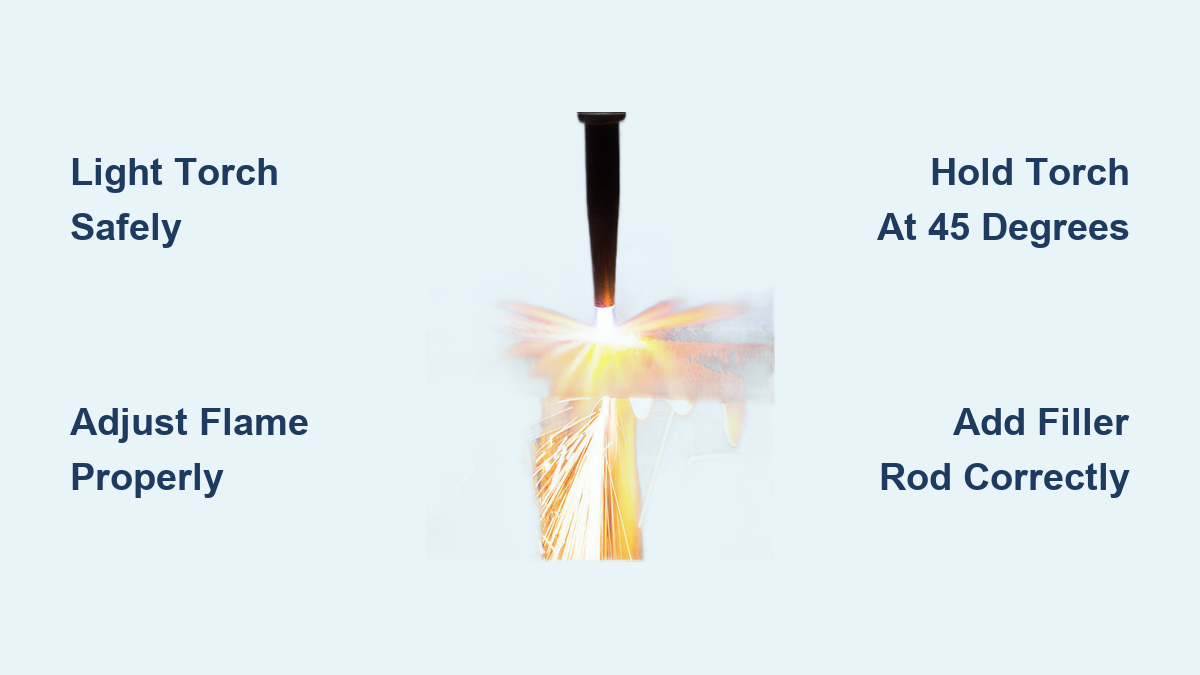
Light and Adjust Your Torch Flame Properly
Proper torch lighting and flame adjustment directly impact your welding results, making this skill essential to master before attempting actual welds. Follow this sequence to produce the correct flame type for welding.
Begin by fully opening the cylinder valves—slowly for acetylene to prevent acetone carryover, fully for oxygen. Crack open the torch fuel valve slightly (about one-quarter turn) and ignite the escaping gas using a spark lighter or striker positioned at the torch tip. Never use matches or a cigarette lighter for this purpose.
Create the Neutral Welding Flame
With an acetylene torch, you’ll initially see a smoky, sooty flame indicating fuel-rich conditions. Slowly open the oxygen valve while observing the flame, watching for the transition through three distinct stages. First, the flame develops a bright inner cone surrounded by a darker intermediate zone—still fuel-rich. Continue adding oxygen and the intermediate zone shrinks to become the “acetylene feather” characteristic of a carburizing flame. A final small adjustment produces the neutral flame with just two zones: the bright inner cone and the surrounding outer flame with no visible feather.
The neutral flame represents your starting point for all adjustments because its characteristics are easily recognized and reproduced. When you can reliably produce a neutral flame, you can then experiment with carburizing and oxidizing flames to understand their differences. Remember that the carburizing flame temperature drops to approximately 2,760°C (5,000°F), while the oxidizing flame becomes hotter but damages most metals through excessive oxidation.
Execute Proper Torch Welding Techniques
With your equipment assembled and flame adjusted, you’re ready to begin actual welding. The fundamental technique involves creating a molten metal pool and adding filler material to form a sound joint, but developing consistent results requires attention to multiple interconnected factors.
Position Your Torch Correctly for Strong Welds
Hold the torch at a roughly 45-degree angle to the workpiece, with the inner cone tip positioned 3–6 mm above the metal surface. Move the torch steadily along the joint line, maintaining consistent distance and angle throughout the bead. The molten pool will naturally form where the flame is hottest—the tip of the inner cone—and you’ll see the metal change color and become fluid as it heats.
Your travel speed directly controls bead width and penetration depth. Move too quickly and the pool remains small with minimal penetration, producing a narrow, weak bead. Move too slowly and excessive heat creates a wide, convex bead with deep penetration but also a large heat-affected zone that can weaken surrounding material.
Add Filler Rod Properly for Complete Fusion
Filler rod addition requires coordination with torch movement. Hold the filler rod at a shallow angle (15–20 degrees from the workpiece surface) and feed it into the leading edge of the molten pool, not directly into the flame. Keep the filler rod within the outer flame zone when not actively adding metal to protect it from oxidation. The rod should melt and flow into the pool smoothly, becoming indistinguishable from the base metal in the finished weld.
If the filler balls up or forms a series of cold dots on the surface, the base metal isn’t hot enough or the rod is being consumed by the flame rather than the pool. A good weld bead shows consistent width, gentle convex profile, smooth ripple pattern from steady travel, and complete fusion with the base metal at the edges.
Implement Critical Torch Welding Safety Practices
Oxy-fuel welding involves significant hazards that demand constant vigilance and proper protective equipment. Understanding these risks and implementing appropriate safeguards prevents injuries that can range from minor to life-threatening.
Protect Your Eyes from Harmful Radiation
Use welding goggles rated to ANSI Z87 standards specifically designed for gas welding—these filter the harmful wavelengths while providing a clear view of your work. Regular safety glasses do not provide adequate protection for torch welding. Some welders wear a welding helmet with appropriate shade when working on larger projects, though goggles suffice for many torch welding applications.
Handle Cylinders with Proper Safety Procedures
Always secure cylinders upright and leave valve caps in place during transport. Keep cylinders away from heat sources and electrical equipment, and never allow oil or grease to contact oxygen regulators or fittings, as these materials can ignite on contact with high-pressure oxygen. An oxygen cylinder at 3,000 psi becomes a potential projectile if the valve breaks off—the escaping gas propels the cylinder with enough force to penetrate brick walls.
Prevent Common Torch Welding Mistakes
Even experienced welders occasionally produce flawed welds, but recognizing and avoiding common mistakes accelerates your learning curve and produces better results from the start.
Clean Metal Thoroughly Before Welding
Oil, grease, rust, paint, and mill scale on base metal contaminate the weld pool, causing porosity, weak fusion, and unsightly beads. Clean the joint area thoroughly with a wire brush or appropriate solvent before welding, and keep the area clean throughout the welding process. Contamination introduced mid-weld from your hands or gloves can also cause problems.
Match Tip Size to Material Thickness
Using the wrong tip size for your application creates frustration and poor results. Tips too large for thin material overheat and burn through; tips too small for thick material produce inadequate penetration and require impossibly slow travel speeds. Match tip size to material thickness according to manufacturer recommendations, and don’t hesitate to change tips mid-project if conditions change.
Maintain Your Torch Welding Equipment Regularly
Proper equipment maintenance extends tool life, ensures consistent performance, and prevents dangerous failures. A systematic maintenance routine takes minimal time but provides significant returns in safety and reliability.
Clean Torch Tips After Each Use
Clean tip orifices using appropriate tip cleaners—never drill bits or wires that can enlarge the hole. Inspect seating surfaces for nicks or scratches that cause leaks, and replace damaged components immediately. When changing tips, use proper wrenches and avoid over-tightening, which can damage threads or seating surfaces.
Inspect Hoses Before Every Welding Session
Look for cuts, cracks, abrasion, or deterioration along the entire hose length, including near connections where flexing stresses the material. Replace damaged hoses immediately rather than patching them. Keep hoses organized and protected from foot traffic, hot metal, and spark exposure.
Learning how to weld with a torch combines technical knowledge with hands-on practice, and developing proficiency takes time and dedication. Start with scrap material, practice fundamental techniques until they become second nature, and gradually advance to more complex projects as your skills develop. The investment in learning proper techniques and safety practices pays dividends throughout your fabricating career, enabling you to tackle projects with confidence and produce results you can be proud of.
Leave a Reply