When your welding project requires precision on thin metals or portability in remote locations, oxy acetylene welding delivers results that electric welders can’t match. This versatile process creates strong, clean joints on steel, cast iron, and copper alloys without electricity—making it essential for field repairs, artistic metalwork, and restoration projects. Whether you’re fixing farm equipment at the back of the barn or crafting custom metal art, mastering the oxy acetylene torch gives you unmatched control over heat input and weld quality.
This guide cuts through the confusion and shows you exactly how to produce professional-quality welds with this time-tested technology. You’ll learn proper setup procedures, flame adjustment techniques, and welding methods that prevent common defects—saving you time, materials, and frustration.
Gather Your Oxy Acetylene Welding Equipment
Before lighting your first torch, assemble these critical components that work together to deliver precise metal joining capabilities.
Your core setup requires two gas cylinders (oxygen and acetylene), dual-stage regulators, a torch handle with interchangeable tips, specialized welding hoses, and essential safety gear. Victor-style torch handles dominate the industry, with tips ranging from #00 for delicate sheet metal to #5 for thick structural steel. Select tip size based on material thickness—#1-2 tips handle most 16-14 gauge steel work.
Choose filler rods matching your base metal: low-carbon steel rods for mild steel projects, nickel-based rods for cast iron, and copper alloys for non-ferrous metals. Keep rods clean and oil-free—contamination causes porosity that weakens weld integrity. Store rods in a dry container to prevent moisture absorption that creates gas pockets during welding.
Set Up Gas Cylinders and Regulators Correctly
Improper cylinder setup causes dangerous leaks and inconsistent flame performance—this preparation phase demands your full attention.
Secure cylinders upright in a stable cart, positioned at least 20 feet from ignition sources. Open oxygen cylinder valve fully (one full turn), then check high-pressure gauge (1800-2000 psi when full). Crack acetylene valve 1/4 turn, release impurities, close, and repeat before leaving valve fully open (250 psi when full).
Attach regulators carefully—right-hand threads for oxygen, left-hand for acetylene. Hand-tighten securely, connect hoses to regulator outlets, then press clamps firmly. Open torch valves slightly and crack regulator knobs to purge air from lines before closing valves. Set working pressures according to your tip size: typically 2-5 psi acetylene and 5-10 psi oxygen for mild steel work.
How to Prevent Dangerous Acetylene Leaks
Acetylene becomes explosive above 15 psi—never exceed safe pressure limits. Always use left-hand thread connections for acetylene to prevent accidental oxygen line attachment. Check connections with soapy water (never flame) while pressurized—bubbles indicate leaks requiring immediate attention. Store acetylene cylinders upright with valve caps secured to prevent valve damage during transport.
Light and Adjust Your Torch Flame Precisely

The flame type determines weld quality—learn to recognize and control these three critical flame characteristics.
Neutral flame (equal oxygen/acetylene) shows a single, defined inner cone with quiet combustion. This is your standard setting for mild steel, cast iron, and most non-ferrous metals. It creates clean weld pools with minimal spatter and optimal penetration control—essential for strong joints.
Carburizing flame (excess acetylene) features a white inner cone surrounded by a feathered envelope. Use this for high-carbon steels and brazing, but avoid it for mild steel as it creates brittle, weakened joints through carbon deposition.
Oxidizing flame (excess oxygen) has a shortened, pointed cone with a hissing sound. Reserve this for brass/bronze welding where zinc loss matters less—never use it on steel due to excessive oxidation and brittleness.
Light your torch by cracking acetylene valve 1/4 turn and igniting with flint striker. Gradually increase acetylene until flame stabilizes, then introduce oxygen while adjusting pressures to achieve desired flame type. Practice transitions until you can consistently produce neutral flame—the foundation of quality welding.
Prepare Metal for Strong Weld Joints
Clean, properly fitted joints determine weld strength—never skip this critical preparation step.
Remove all rust, scale, paint, oil, and grease using wire brush or grinder. Organic contamination creates gas pockets while scale prevents proper fusion. For materials over 1/8 inch, bevel edges at 30-45 degrees to create a V-groove allowing full penetration to the joint root.
Achieve precise fit-up with root gaps matching filler rod diameter (approximately 1/16 inch). Align edges within 1/32 inch to prevent excessive grinding later. Tack weld at 1-2 inch intervals to maintain alignment as metal expands under heat. Preheat thick sections to 200-300°F to prevent cracking in hardenable steels.
Execute Proper Welding Technique for Clean Beads
Master these coordinated movements to control heat input and weld pool behavior for professional results.
Hold torch at 30-45 degrees from workpiece surface, pointing in travel direction. This angle efficiently directs heat while maintaining visibility of the weld pool. Insert filler rod into flame envelope (not inner cone) at 15-30 degrees, using dipping motion to add small metal amounts to the pool’s leading edge. Keep rod tip within the flame’s protective atmosphere to prevent oxidation.
Adjust travel speed to create even ripples with appropriate width (2-3 times rod diameter). Move too slowly and you burn through; too quickly and you get lack of penetration. The ideal bead shows smooth transitions to base metal without undercutting at edges. For multi-pass welds, clean previous bead thoroughly before adding subsequent passes.
How to Weld Butt Joints Without Burning Through
Butt joints on thin materials require careful heat control. Use smaller tips (#0-1) and lower pressures. Maintain slight weave motion to bridge gaps while watching the backside for weld pool formation. When the molten pool appears on the opposite side, you’ve achieved proper penetration. For thicker materials, bevel edges and make multiple passes, overlapping each by one-third.
Apply Essential Safety Precautions Immediately
Oxy acetylene welding involves explosion risks, intense radiation, and toxic fumes—ignore safety and risk serious injury.
Wear AWS-approved shade 4-6 goggles with flip-up lenses—never substitute sunglasses. The intense UV radiation causes painful “arc eye” even during brief exposures. Use fire-resistant clothing and leather gloves that cover wrists completely.
Clear combustibles within 35 feet of work area and keep Class B fire extinguisher within immediate reach. Sparks travel over 30 feet—survey entire area before starting. Never weld galvanized metal without proper ventilation—zinc fumes cause severe metal fume fever.
Troubleshoot Common Welding Defects Quickly
Recognize these problems and their solutions to avoid wasted time and materials.
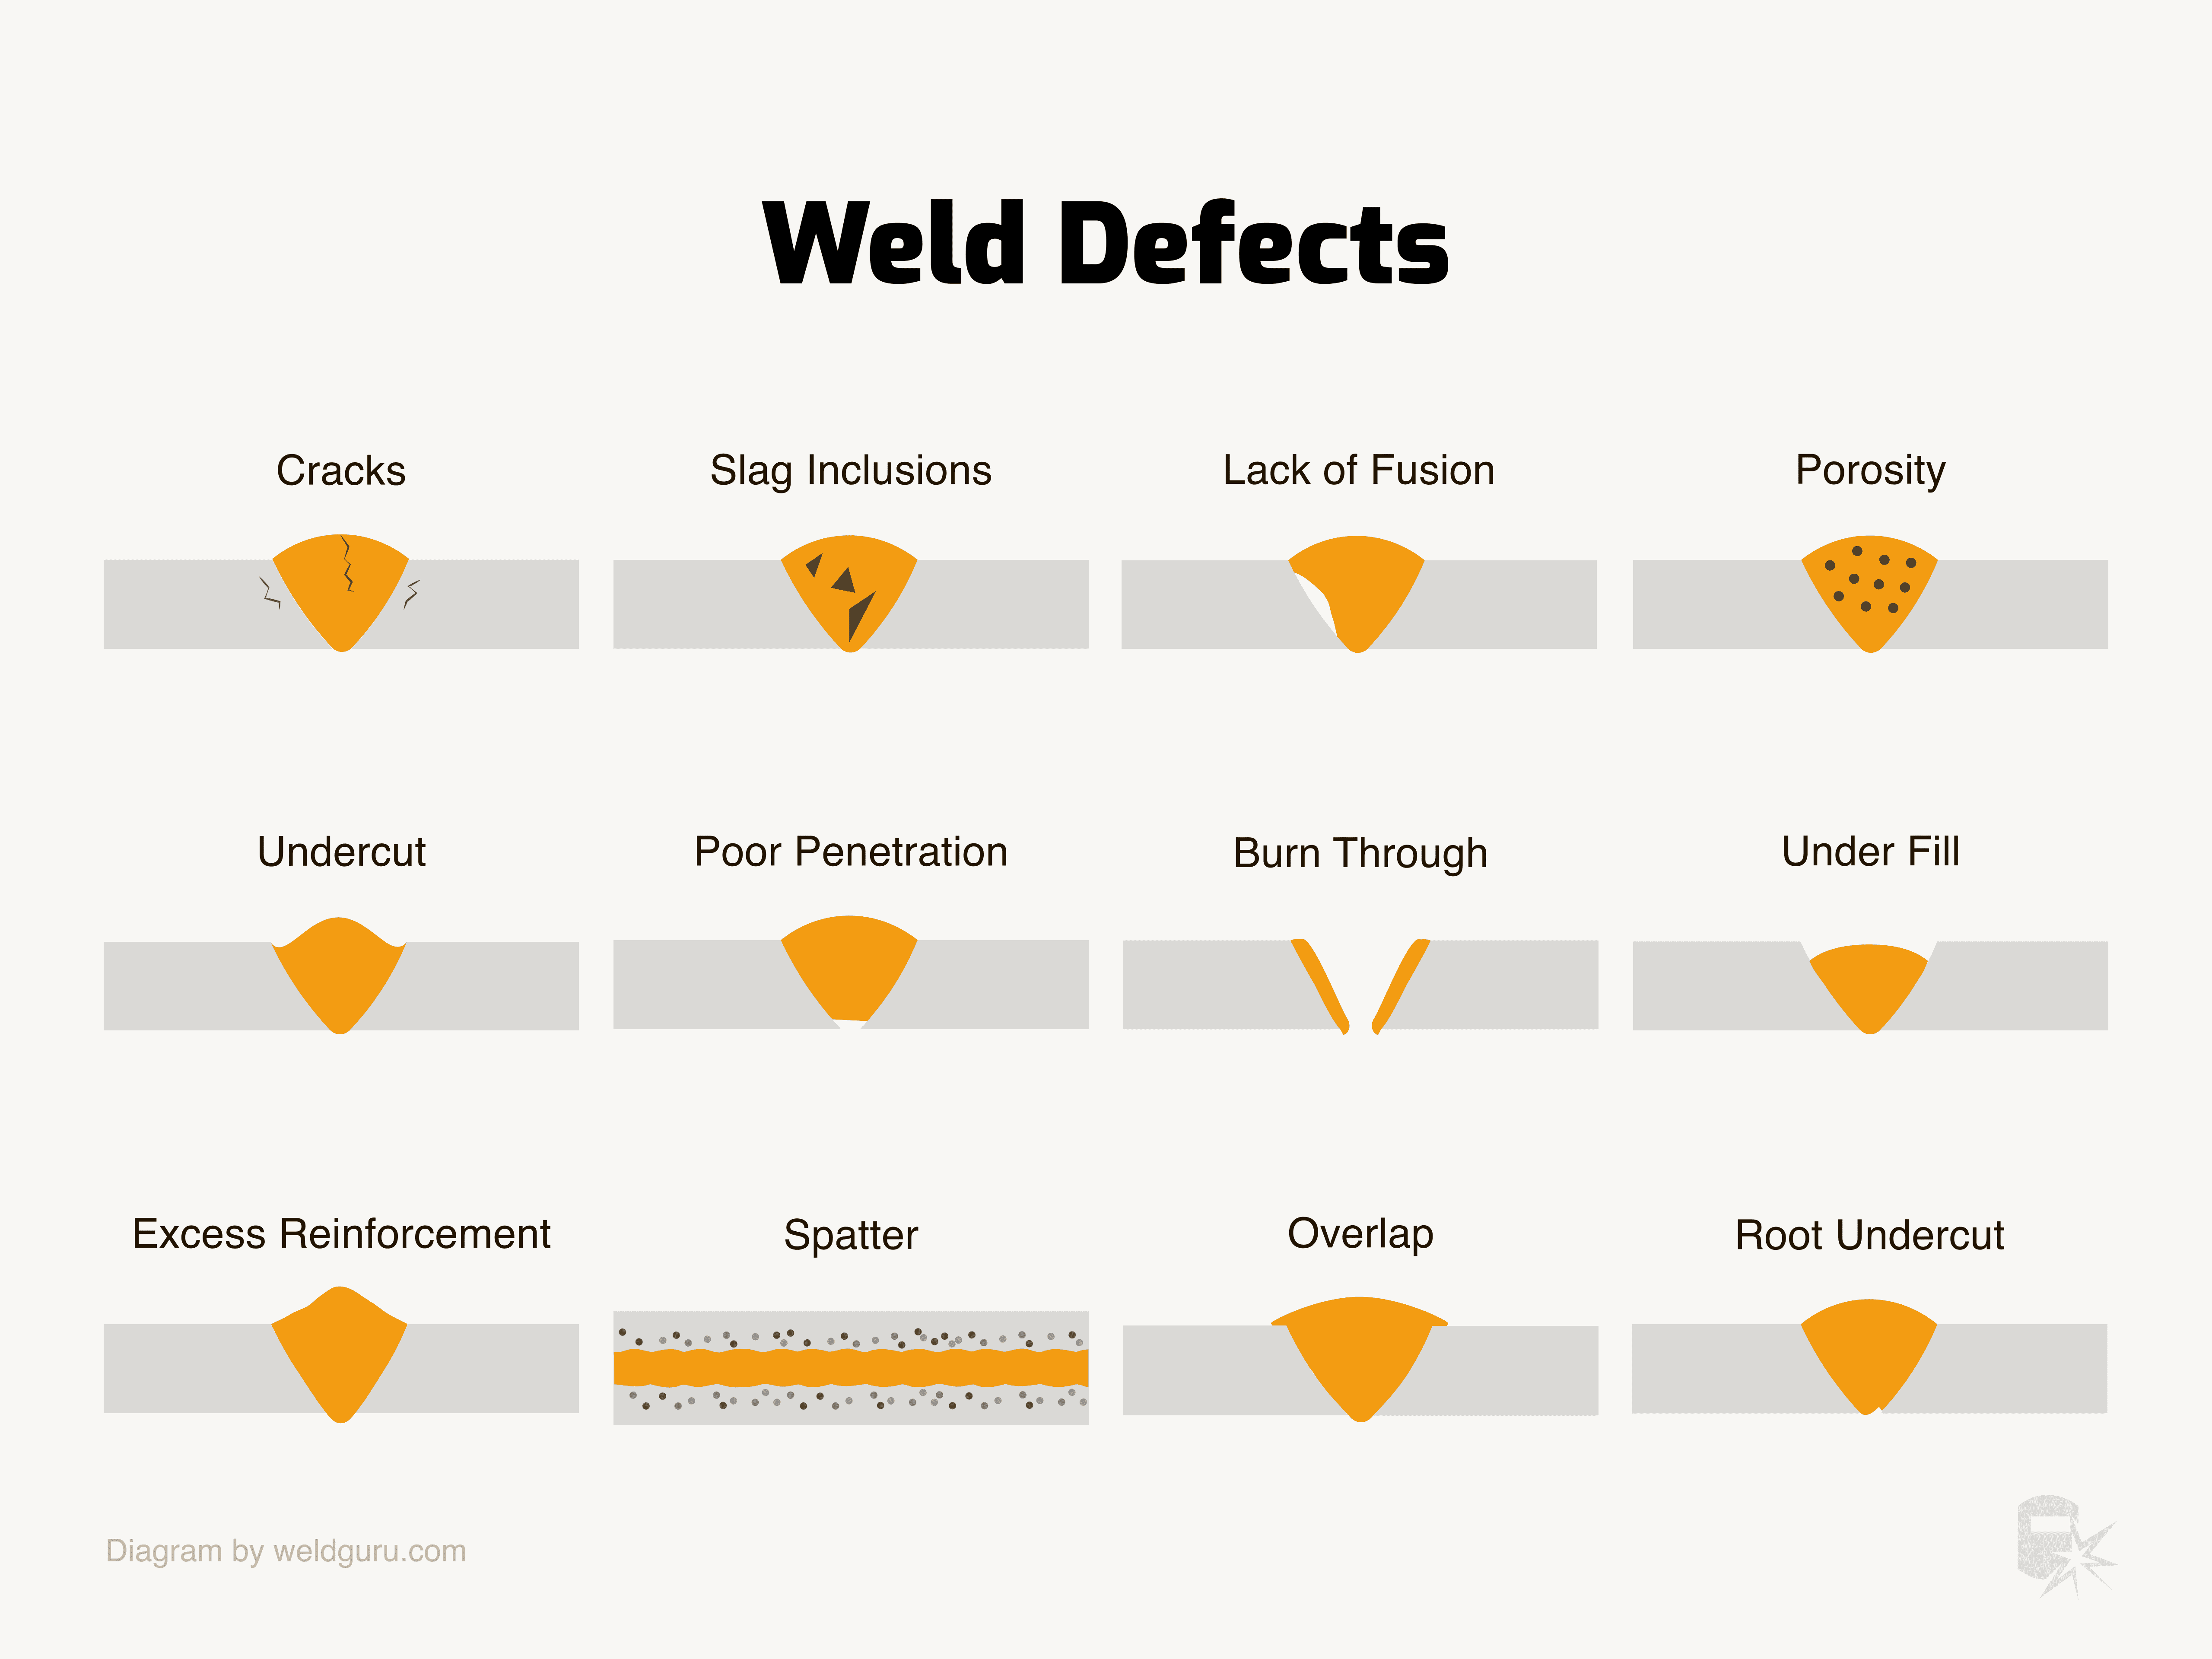
Porosity (small holes in weld) indicates gas entrapment. Fix by cleaning base metal thoroughly, verifying oil-free filler rod, and ensuring neutral flame adjustment. Rust and mill scale contain trapped moisture that releases gases when heated.
Lack of fusion appears as lines between weld/base metal—a critical defect requiring complete removal. Causes include insufficient heat, improper torch angle, or adding filler before base metal reaches fusion temperature. Slow travel speed and ensure both surfaces glow bright orange before adding rod.
Excessive spatter signals too much acetylene or high pressure. Convert to neutral flame and verify regulator settings. Drafty conditions also disrupt flame envelope—use wind barriers when working outdoors.
Maintain Equipment for Reliable Performance
Regular maintenance prevents dangerous failures and ensures consistent welding results.
Inspect hoses weekly for cracks or abrasions—replace damaged sections immediately. Gas under pressure can turn small leaks into dangerous ruptures. Check all connections with soapy water while pressurized—bubbles indicate leaks requiring attention.
Clean torch tips using proper tip cleaners—never drill bits that enlarge orifices. Soak stubborn deposits in solvent before gentle cleaning. Clogged tips cause irregular flames and poor weld quality. Store cylinders upright with valve caps secured when not in use—never allow them to fall or roll.
Practice Efficiently to Build Welding Skills
Develop muscle memory through structured practice on progressively challenging projects.
Start by laying beads on steel plate, focusing on consistent travel speed and rod addition. Practice side-by-side beads, then stack beads for multi-pass technique. Aim for uniform, ripple-free beads without undercuts until you achieve consistent results.
Progress to butt joints on increasing thicknesses, then tackle T-joints and fillet welds. Document successful settings (tip size, pressures, travel speed) for different materials—this reference speeds future setups and troubleshooting. Seek experienced welder feedback when possible—another perspective catches defects your welding hood obscures.
Mastering oxy acetylene welding opens fabrication possibilities that electric welders cannot match. By following proper setup procedures, maintaining precise flame control, and practicing regularly, you’ll develop skills that deliver strong, clean welds on diverse materials and projects. Start with these fundamentals, build good habits from day one, and this versatile technique will serve your metalworking needs for decades.
Leave a Reply