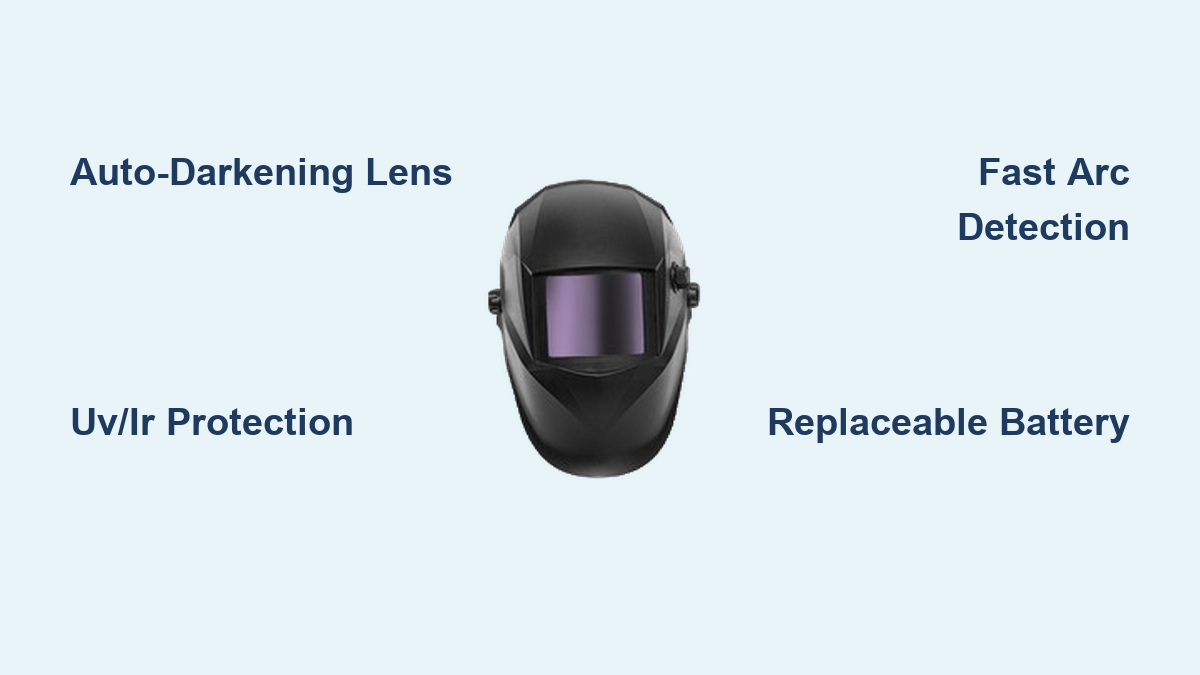
If you’ve ever watched a welder strike an arc, you’ve seen the blinding flash of light that erupts in an instant. That intense glow isn’t just bright—it’s packed with dangerous ultraviolet (UV) and infrared (IR) radiation capable of burning your eyes in seconds. A welding helmet is the critical shield that protects against this hazard, but modern helmets do far more than simply darken. Today’s auto-darkening welding helmets react faster than the human eye can blink, switching from clear to dark in less than a millisecond. This seamless protection allows welders to see their work clearly before starting, maintain focus during the weld, and inspect the result immediately—without lifting the helmet.
So, how does a welding helmet work to deliver this near-instant protection? At its core, it combines light-sensing technology, liquid crystal lens systems, and permanent UV/IR filters into a smart, responsive shield. Even in its clear state, the lens blocks nearly all harmful radiation. The moment an arc strikes, sensors detect the surge of light, trigger electronics, and reconfigure the lens in microseconds. This blend of speed and safety has made auto-darkening helmets the standard for professionals. In this guide, you’ll discover exactly how these helmets function, what sets high-end models apart, and why understanding their operation helps you choose, use, and maintain one effectively.
Auto-Darkening vs. Fixed-Shade Helmets
Fixed-Shade Helmets: Outdated but Still in Use
Fixed-shade helmets use a permanently tinted lens—typically shade 9 to 13—that blocks most visible light at all times. Before welding, the user must lift the helmet to see the workpiece clearly, position the torch, then flip the helmet down and strike the arc. This constant flipping disrupts workflow, increases neck strain, and creates a risk of accidental arc exposure if the helmet isn’t fully in place when the arc starts.
While durable and inexpensive, fixed-shade models are best suited for occasional or beginner welders. Their lack of flexibility and safety gaps make them inefficient for frequent or precision work.
Auto-Darkening Helmets: The Modern Standard
Auto-darkening helmets feature a smart lens that remains light—usually shade 3 to 5—until an arc is detected, then instantly darkens to the preset protection level. This means you can keep your head down, see your joint clearly, and start welding without interruption.
Because they eliminate the need to flip the helmet, auto-darkening models improve safety, precision, and productivity. They’re now the go-to choice for professional welders across industries.
How Auto-Darkening Lenses React in Milliseconds
Arc Detection with Light Sensors
Auto-darkening helmets use 2 to 4 high-sensitivity sensors placed around the lens perimeter. These sensors detect the sudden burst of UV and IR radiation when a welding arc ignites. The more sensors a helmet has, the more reliable its detection—especially in awkward positions like overhead or tight corners.
Budget models with only two sensors may fail to trigger if the arc is blocked from view. Premium helmets with four sensors ensure consistent activation no matter the angle.
Electronic Control Triggers Instant Darkening
When the sensors detect the arc, they send a signal to the electronic control unit (ECU). The ECU applies voltage to the liquid crystal (LC) cells inside the lens, changing their alignment and blocking light. This entire process takes just 0.05 to 0.1 milliseconds—over 1,000 times faster than the human blink reflex.
That speed is crucial: it means your eyes are protected before your pupils even begin to constrict.
Liquid Crystals Block Light on Demand
The heart of the helmet is the auto-darkening filter (ADF), a multi-layered lens stack that includes:
- Liquid crystal cells
- Polarizing filters
- UV/IR absorptive layers
- Transparent conductive coatings
In the clear state, the liquid crystals are aligned to allow light to pass through. When voltage is applied, they realign, disrupting light polarization and blocking it via the polarizing filters. The result is a rapid shift to shade 9–13, depending on your settings.
Lens Returns to Clear Instantly After Welding
Once the arc stops, the sensors detect the drop in light and signal the ECU to cut power. The liquid crystals return to their natural state, and the lens clears in under a second. This lets you inspect your weld immediately—no need to lift the helmet or wait for it to reset.
Permanent UV/IR Protection—Even When Powered Off
Even in the clear state, the lens blocks 99.999% of UV and IR radiation thanks to permanent filter layers built into the lens stack. This protection is passive, meaning it works even if the battery dies or the electronics fail.
This is especially important for TIG welding, where the arc can strike unexpectedly during high-frequency starts.
Key Components Inside the Helmet
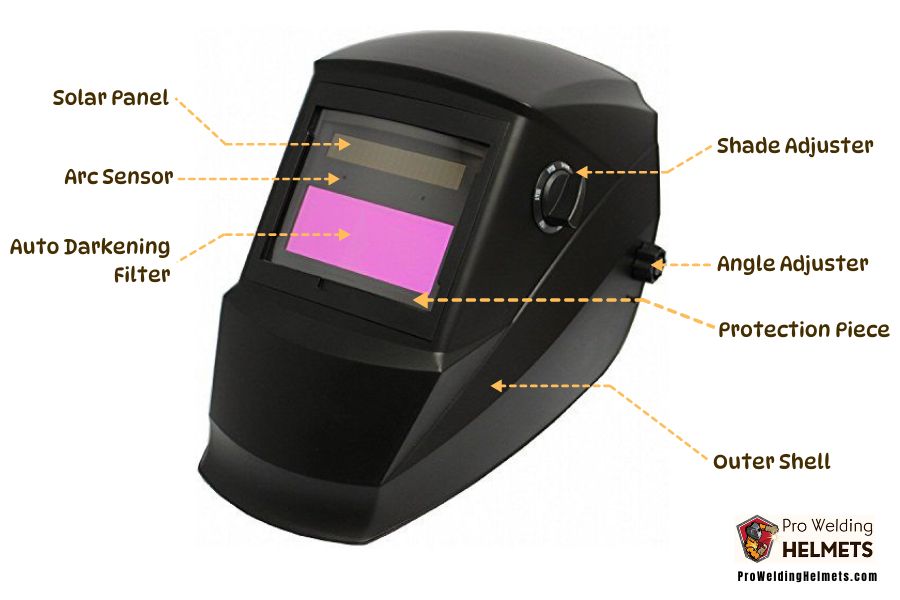
Sensors: The First Line of Detection
- Number: 2 (budget) to 4 (premium)
- Function: Detect arc light and trigger darkening
- Placement: Around lens edges for 360° coverage
More sensors mean fewer missed triggers—critical for overhead or out-of-position welding.
Auto-Darkening Filter (ADF): The Smart Lens Core
The ADF is a precision optical system combining liquid crystals, polarizers, and radiation-blocking layers. It enables fast, reliable switching between clear and dark states while maintaining optical clarity and contrast.
Power System: Battery + Solar Assist
Contrary to popular belief, solar cells do not recharge the battery. Instead:
- The battery (usually CR2032) powers the sensors and control circuits at all times.
- Solar cells on the helmet’s exterior generate power during welding to maintain the darkened state, reducing battery drain.
This hybrid design allows premium helmets to run for 5–7 years or more on a single battery under normal use.
Replaceable vs. Non-Replacable Batteries
- Replaceable (e.g., CR2032): Found in professional models; extend helmet lifespan
- Non-replaceable (soldered): Common in $30–$50 models; the helmet becomes unusable when the battery dies
Always check battery type before buying—replaceable batteries offer long-term value.
Adjustable Settings for Any Welding Job
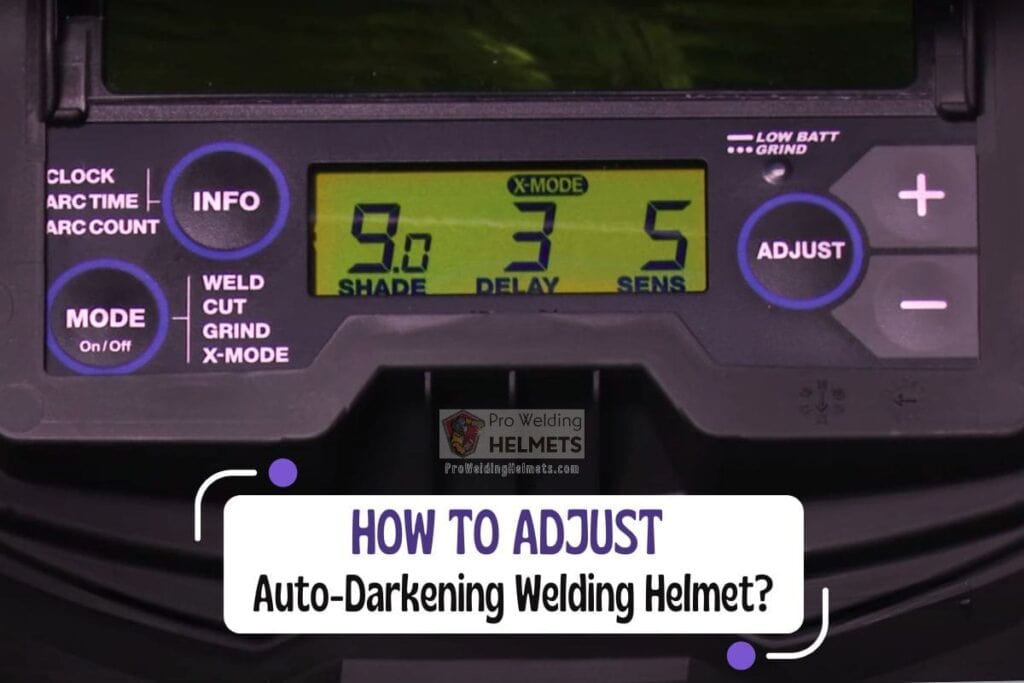
Shade Level: Match Protection to Your Process
Most helmets let you adjust shade from 5 to 13:
- Shade 5–8: TIG, light MIG
- Shade 9–12: MIG, stick (60–250A)
- Shade 13: High-amperage stick or plasma cutting
Some models offer dual-shade mode, letting you switch between two preset levels.
Sensitivity: Avoid False Triggers
Sensitivity controls how easily the sensors react. Too high, and the helmet may darken from grinding sparks or sunlight. Too low, and it might not trigger in dim conditions.
Best practice: Set sensitivity just high enough to detect your arc reliably.
Delay Control: Fine-Tune Lens Recovery
Delay (or fade time) sets how long the lens stays dark after welding stops (0.2–2.0 seconds). Use:
- Short delay (0.2–0.5s): For short welds or quick inspections
- Long delay (1.0–2.0s): For pulsing arcs or TIG with frequent stops
Grinding Mode: Stay Clear During Prep Work
Switch to grinding mode to disable arc detection. The lens stays permanently clear, so sparks or bright light won’t trigger darkening—perfect for grinding, chipping, or cleaning.
Lens Size and Visibility Matter
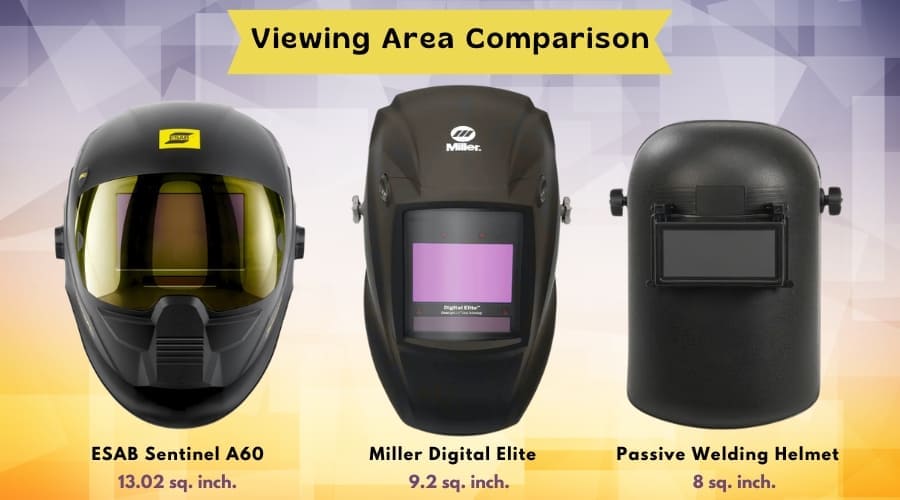
Small vs. Wide Viewing Areas
- Budget helmets: ~2.5″ x 4.5″ window—limited visibility
- Premium helmets: Up to 4.5″ x 4.5″—wider field of view
A larger window reduces head movement and eye strain, especially during overhead welding or long seam runs.
Lens Clarity and Resolution
Higher-end lenses offer:
– Higher pixel density
– Better contrast
– Less distortion
This results in a clearer, smoother view of the weld pool, improving control and consistency.
Safety Standards You Can Trust
ANSI Z87.1 and OSHA Compliance
Auto-darkening helmets must meet ANSI Z87.1+ standards, requiring:
– Full UV/IR protection in both clear and dark states
– Impact resistance
– Reliable performance under extreme conditions
OSHA 1910.133 mandates proper eye protection based on welding type and amperage.
Minimum Shade Levels by Process
| Welding Type | Amperage | Recommended Shade |
|---|---|---|
| MIG / TIG | < 60A | 8–10 |
| 60–160A | 10–11 | |
| 160–250A | 11–12 | |
| 250–500A | 12–13 | |
| Stick Welding | < 60A | 9–10 |
| 60–160A | 10–12 | |
| 250A+ | 13 |
Always match your helmet’s shade to your process and current.
Why Auto-Darkening Helmets Are Worth It
Improved Safety
- No arc flash exposure during helmet adjustment
- Constant UV/IR protection—even when powered off
- Faster than human reflexes
Better Precision
- See your joint clearly before striking the arc
- Start welds exactly where needed
- Watch pool formation in real time
Reduced Fatigue
- No neck strain from lifting the helmet
- Less workflow interruption
- More comfortable for long shifts
Greater Adaptability
- Works across MIG, TIG, stick, and plasma
- Adjustable settings for different materials
- Grinding mode adds versatility
Avoid These Budget Helmet Pitfalls
Limited or No Adjustments
Many low-cost helmets (under $50) have:
– Fixed sensitivity and delay
– No grinding mode
– Only 2 sensors
This reduces reliability and flexibility.
Non-Replacable Batteries
When the battery dies in a soldered-unit helmet, the whole helmet is trash. No repair, no reuse.
Poor Headgear and Fit
Cheap plastic headgear often:
– Slips during use
– Lacks padding
– Can’t be finely adjusted
This leads to discomfort and frequent readjustment.
Real-World Durability and Longevity
Professional Helmets Last Years
Top brands like Miller, 3M Speedglas, and ESAB regularly last 7–10 years with proper care. Users report reliable performance after:
- Drops and impacts
- Exposure to rain and heat
- Years of daily use
Battery Life Tips
- Remove batteries during long storage
- Avoid extreme heat (above 104°F reduces shelf life)
- Use quality CR2032 cells—cheap batteries leak or fail early
What You See When Welding
Through a high-quality auto-darkening helmet, you experience:
- Clear pre-weld view: Align joints and position torch with precision
- Instant darkening: Seamless transition at arc start
- High-contrast pool visibility: See filler metal, travel speed, and bead shape clearly
This real-time feedback is crucial for achieving strong, clean, consistent welds, especially in critical applications.
Auto-darkening welding helmets are a smart investment in safety, efficiency, and weld quality. By combining ultra-fast sensors, liquid crystal tech, and permanent UV/IR filters, they deliver instant protection while letting you see clearly before, during, and after each weld. When choosing a helmet, prioritize 4 sensors, adjustable settings, wide viewing area, and replaceable batteries—especially if you weld regularly. Understanding how your helmet works helps you use it better, maintain it longer, and stay safe on every job.